Wish List

Friday, December 30, 2022

More pretty sticker fun...


As some of you may remember, purple is my favorite color. I love any shade of it, from a pastel lilac to a very deep purple. When I saw these hydrangea stickers in the Dollar Tree, I had to buy them. I knew they would come in handy for making cards to donate to the thrift store. And I would LOVE making some purple cards!


Here's a look at the entire set. Aren't they pretty? I love that they include a few single blossoms, too.


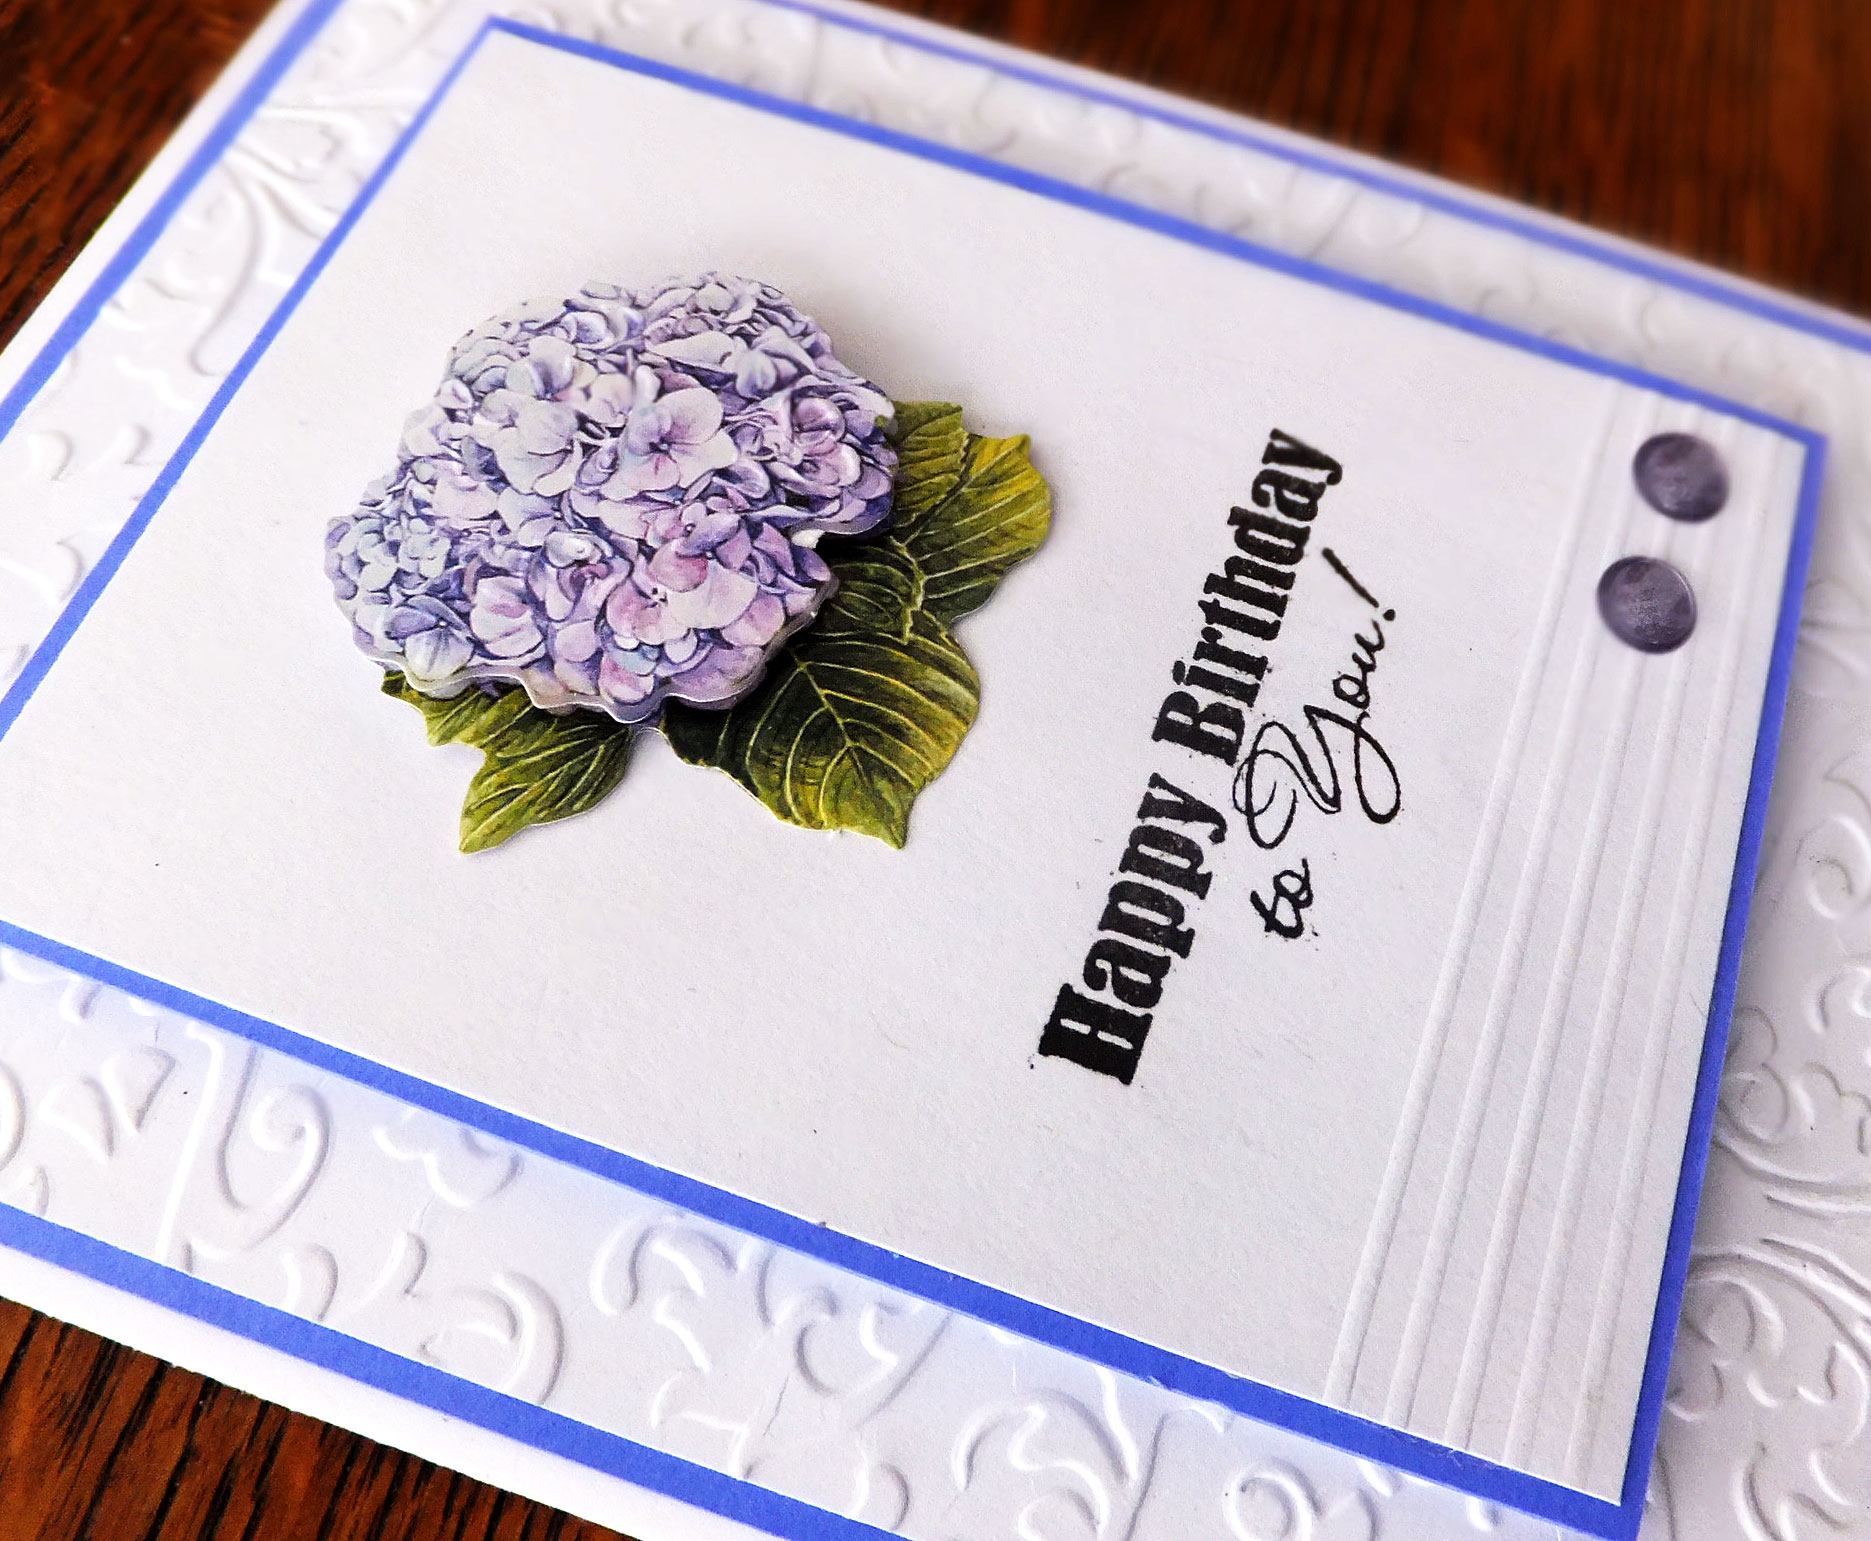
The detail on them is wonderful, and they definitely speed up the cardmaking process.

Here you can see that I've added a few scored lines at the bottom of my focal panel and added a couple of sparkly enamel dots for added interest.


A close-up of one of the stickers shows how they are multi-layered. Love that!

If you really wanted to spice it up, you could add a tiny bit of glitter to the center of each blossom. 


On the inside, I added a stamped sentiment and one of the smaller stickers from the set. It really finished off the card nicely.

Well, I mentioned in my last post (which was written in advance and scheduled to post on Dec. 27) that we would be returning from a Christmas trip to Oregon and Washington. Sadly, we never made it any further than Chicago O'Hare Airport.

As we landed in Chicago, eager to make our connecting flight, I got a text message that our flight to Portland had been canceled. We waited in line at the airport for 5 1/2 hours to speak to a United Airlines agent about rebooking. When we finally had a chance to talk to him, he said he could not get us to Portland until Dec. 28 (our return flight was, or course, scheduled for the 27th). Our only other option was to go home again. 

We spent a sleepless night at O'Hare and then arrived back in Minneapolis late the next afternoon. Our luggage had been lost, even though they assured us it would follow our rebooking, and we did not get it until 4 days later.

We were so sad about missing a very special Christmas with our Northwest kids and their families. Oh, well, maybe next year...

Thanks so much for stopping by, and remember to laugh--a little or a lot--every day. Even on those days when your airline reservations are canceled!

Cheryl

Tuesday, December 27, 2022

Masculine Get Well Soon card...


 This was a simple get well card that I made to donate to the thrift store. There isn't much to it, really. I die-cut the cattails and adhered them to a piece of script-patterned cardstock. After stamping the sentiment with brown ink, I added the brown ribbon to ground my cattails. The ribbon has a bit of gold edging on it, and I thought that made it a more interesting embellishment. This panel was then glued to an off-white card base.


If you look closely at the picture at left, you might be able to see that I've added some brown flower soft to the cattails to give them a more realistic look. I will soon be out of brown flower soft, so I'll have to start looking for more. You don't often see it on craft sites anymore.


I used the same brown ink pad to stamp a sesntiment on the inside. I really like this sentiment, and I think it can be used on several different kinds of cards.

Now, obviously, this card would work well for a female, too, but I think it works particularly well a man. 

As you read this, we are returning from a holiday visit to the Pacific Northwest. I've written this ahead of time, so I can't tell you anything about our trip just yet.

Thanks so much for stopping by, and remember to laugh--a little or a lot--every day.

Cheryl

Friday, December 23, 2022

A very merry Christmas to you...

 This will be just a short post to share a card and to wish all my readers a wonderful holiday season.

I had a 12" X 12" sheet of pretty designer cardstock that had some glittery elements worked into the pattern. This single sheet would make six A2 card fronts if I cut it carefully into 5 1/4" X 4" pieces. 


I cut the sentiment and holly berries from red cardstock and the holly leaves from green glitter cardstock.

With so much going on in the background, I thought this was all the card needed.


The inside was stamped with a Christmas sentiment. These cards were so simply designed that I was able to finish all six of them in short order.

I wish you peace and joy this holiday season. Please know how much I appreciate your visits to my blog throughout the year.

Thanks so much for stopping by, and remember to laugh--a little or a lot--every day.

Cheryl

Tuesday, December 20, 2022

Oh, those gnomes...


This gnome in a gift box was a new die set that I bought for some of my Christmas cards this year. He's a fun little guy to cut out and put together. Once again I cut the gnome and the ribbon (on the package) from white cardstock and colored them, where needed, with alcohol markers.

The sentiment was a stamp from a gnome stamp set I got a couple of years ago. I've popped it up on a couple of foam squares.


The gift box was cut from glitter cardstock, as you can see in this photo. I love the way the die adds some embossed stars to the packaging. In my opinion, those little details are what makes a die set special.


I added a stamped sentiment on the inside, and my card was done. Looking at it now, I wish I had die-cut a small gift out of the same glitter cardstock and added it here. I was in a hurry, though, to get my cards done and in the mail.

Speaking of cards in the mail, I had one card returned to me in pieces! The pieces had been placed in a plastic bag, and the only thing not torn apart or mangled was the return address. In fact a lot of the envelope and almost all of the Christmas letter were missing, so I have no idea to whom this card was sent! If you think you should have received a card from me, but you have not, this might be the reason. I sent out 90+ cards, and I had made more than 10 different card designs, so I'm clueless as to the recipient.

Thanks so much for stopping by, and remember to laugh--a little or a lot--every day.

Cheryl

Friday, December 16, 2022

Three little snowmen, all in a row...


This card shows another way I used some of those pre-made card bases I had featured in this post. I first added some clouds to my background with some pale blue ink and a cloud stencil. Then I adhered a snowy landscape with some glitter cardstock. Before adding my little snowmen, I stamped a sentiment at the top with red ink.

These little snowmen are mostly one-piece dies with very minimal piecing. I cut everything out of white cardstock and then used alcohol markers on the pieces or parts that required some color. All the eyes, along with the buttons and mouth on the first one, were filled in with Nuvo Drops.

Each snoman is popped up with foam squares.


On the inside I stamped another red sentiment and adhered three sparkly snowflakes that had been die-cut from the same glitter cardstock that was used for the snow on the front.


This week I've been working on baking some Christmas cookies. My husband's favorites are Date Pinwheels. They're a bit of a pain to make, but make them I must. He wouldn't think it was really Christmas if he didn't have his date cookies! I usually make 8 to 10 different kinds of cookies so that I have enough to share with family members and neighbors. We'll be taking some with us when we travel to the Pacific Northwest to my son's and daughter's homes for Christmas.

Thanks so much for stopping by, and remember to laugh--a little or a lot--every day.

Cheryl

Tuesday, December 13, 2022

Snowflake frame...

So this is another card design that I used to  make at least 10 cards. The simple design lent itself to cutting lots of snowflake frames and Merry Christmas sentiments and then assembling them in short order. I added a few gems for some sparkle.


The sentiment was cut from holographic cardstock, so it reflects all the colors around it.


The snowflake frame was cut from cardstock with a nice sheen to it. It was Reflections brand from Michael's. The picture definitely doesn't do it justice, but does highlight that each of the larger snowflakes in the frame also got the "gem treatment."


I grabbed some small snowflake stamps from a couple of different sets and stamped them, along with a sentiment, on the inside of each card.

We received delivery of two new recliners a few days ago. These chairs were my husband's and my Christmas gifts to each other. Ok, not really, but after we got them, I thought they should be! I mean, do we really need to spend more money on each other, when we have everything we need? They are so comfy to lay back in at the end of a long, hard day making cards, baking cookies and wrapping gifts. I'm not sure why we waited so long to get them.

Thanks so much for stopping by, and remember to laugh--a little or a lot--every day.

Cheryl

Friday, December 9, 2022

Wishing you joy...


I had some pre-made card bases that were white except for the short diagonal stripes around the outside front edge. I've had these card bases for a few years now. Every Christmas I use some of them, but I never seem to be able to use them up. I think they're multiplying behind my back!

The letters for "JOY" were made with a fun little die set that I got a short time ago. I cut the letters all out of white cardstock and then colored them with alcohol markers, except for the top of the ornament, which was colored with a silver gel pen.


Although you can't see it in either of the photos, I've also added a little sparkle with a glitter brush. The tiny silver bow was adhered with some Glossy Accents.

I popped all three letters up with some narrow foam tape.

On the inside I added a sentiment stamped in red ink.

These were so much fun to make (I made at least 10 of them), so I'm sure I'll make more of them for next Christmas and donate them to the thrift store.

All my cards have now been mailed--so glad that's done! I've been working on creating our family photo calendar and wrapping gifts. I haven't done a lick of baking yet, so that's next on the to-do list.

How about you? Are you ready for the holidays? I hope your preparations are all going smoothly and you're able to relax and enjoy the festivities.

Thanks so much for stopping by, and remember to laugh--a little or a lot--every day.

Cheryl

Monday, December 5, 2022

Let's Craft and Create Challenge #190: Anything Goes or Inspired by a Song...


For this final month of 2022, Let's Craft and Create is inviting all of you to join in on the fun of our last challenge of the year. You can choose "Anything Goes" or "Inspired by a Song" as guidance for your creation.

I decided to create a card that was inspired by a song. There are so many great Christmas songs, so I chose "Silver Bells." If you're not familiar with it, here's a link to a recording by Michael Bublé.

It is definitely "Christmas time in the city" here in Minneapolis. We received about 8" of snow during the last couple days of November.


I opted to make an A2 top-folding card, using white cardstock for my base. I cut a curved, scalloped edge across the card front using a large scalloped oval die. Then I used an embossing folder to add some "snow" to the front flap.

Once the embossing was done, I cut a piece of pretty silver and white striped cardstock to 4 1/4" X 5 1/2" and glued it to the underside of the scalloped flap. The backside of the patterned cardstock was white, so this worked perfectly to add some contrast to my card front.


I used my Silhouette Cameo to cut out some jingle bells, which I backed with plain gray cardstock. They were popped up on foam squares after added some pretty silver twine for them to "dangle" from.

The bells were cut from some silver mirror card that had a holographic shine. You can see how they reflect the colors around them. They're so pretty in real life!


My sentiments (front and inside) were printed with my computer. I used a gray font color to soften the look. I also used a silver stamp pad to ink around the edge of my sentiment oval. As a final touch, I added three tiny stars that had been cut from one of the jingle bells.


The inside of my card contained only the printed sentiment. Next time, I think I'll cut an extra jingle bell and add it here.

Now I hope you'll take some time to join our final challenge of the year. We love seeing your creations! The Design Team has lots of inspiration for you at Let's Craft and Create.

Thanks so much for stopping by, and remember to laugh--a little or a lot--every day.

Cheryl

Friday, December 2, 2022

Another snowman card...


I made this card with another one of those Christmas dies that I just had to have. I will admit that it made my cardmaking very quick, especially since I made at least 10 cards like this one in an afternoon.

I took a white A2 card base and cut the front only with the die. Then I used some spray adhesive to attach an aqua panel to the underside of the front. 


I think you can see in this photo how I've added a little glitter to the small circular die cuts to the left of the snowman that I thought were snow. The glitter adds a nice bit of sparkle--and Christmas cards can always use a little sparkle, right?

My sentiment was heat-embossed with the only aqua embossing powder that I had on hand. I thought it was an ok match, though.


I stamped my inside sentiment with an aqua ink that matched the panel I had glued to the front of the card.

I am so happy to announce that I have finished making my personal Christmas cards--89 of them! If I have time in the coming weeks, I will continue to make them. It would be so nice to get a head start on next year's cards. 

I don't think I'll need to make hardly any Christmas cards for the thrift store, as my friend Lynette (My Stamping Addiction) donated oodles of them. I took a big stack of them to the store today, and I know they will sell like hotcakes! Thank you, Lynette!

Thanks so much for stopping by, and remember to laugh--a little or a lot--every day.

Cheryl

Tuesday, November 29, 2022

A happy snowman...


I love this happy little snowman. He's so easy to die-cut and assemble. I used a snowy/starry sky die to create my background on some blue CS. I backed it with a wide piece of double-sided tape so that I could burnish some fine, white glitter into the holes created by the die. A piece of glitter CS was added to the bottom as snowy ground and my panel was matted with some green cardstock that matches the scarf.


I cut all the pieces for the snowman out of white cardstock and simply colored a few of them with alcohol markers.

I also used a fine tip black pen to go over the scored lines for his mouth and eyes.

His cheeks were given a bit of pink with some chalk.


On the inside, I stamped a Christmas sentiment that went well with the die-cut sentiment on the front of the card.

And speaking of snow, we are supposed to get a lot of snow today. I'll be out on the road taking my granddaughter to school this morning, so I hope the roads are still in good condition for that! I really hate driving on icy roads.

Thanks so much for stopping by, and remember to laugh--a little or a lot--every day.

Cheryl

Friday, November 25, 2022

Sharing a couple more Thanksgiving cards...


We had a wonderful Thanksgiving meal at my daughter's house. The food was delicious, and it was fun to spend the holiday with family. I hope your day was as lovely as ours!

I had a couple more Thanksgiving cards to share with you, so thought I would do so quickly before I move on to sharing more of those Christmas cards I've been making at breakneck speed.

This one was a simple design, made a little more special by using gold strips on either side of my center panel, some gold embossing for the sentiment and Nuvo Drops. The leaf was cut with a stitched die and inked with three different fall colors. It has been popped up on dimensionals.


I just love ink blending with brushes. It blends so smoothly, and I think the results are beautiful!

To age the edges of my leaf a bit, I added some brown ink with a finger dauber.


On the inside, I added a stamped sentiment and a leaf that was made with a small punch.


These two cards were made using a design with a center flap that opens and two 1 1/4" sides that are adhered to the back of the card base. 


The leaves were dimensional stickers from Dollar Tree. I shared a photo of the sticker sheets in this post.

It's not visible in the photos here, but each leaf has a bit of glitter on it.


Underneath the center flap, I adhered an ivory-colored panel that was stamped with a Thanksgiving sentiment.

I really like this card design, so I'm trying to think of a Christmas card I could make using it. It's a great way to use up those scraps of DSP.

Thanks so much for stopping by, and remember to laugh--a little or a lot--every day.

Cheryl


Tuesday, November 22, 2022

Finally, the Christmas card pile is growing...

I have been making 5-10 Christmas cards a day for the last few days. One day I even made 26 of them! My process is to choose a design, gather my materials, do any necessary prep work, and then make at least 10 cards using that design. 

The snowy tree scene was a freebie I got from thehungryjpeg.com. I planned the size I needed and where I wanted it to print on my cardstock. Then I printed out four scenes on one sheet of 8 1/2" X 11" white cardstock and cut them out to fit my cards. 


I made a template the same size as my card front to help me place my circle die in just the right spot.

I then cut a gold ring using two circle dies and used one of my reindeer dies to cut a small, gold reindeer.

"Season's Greetings" was also cut from the same metallic gold cardstock and glued to the front of each card.


The last thing I did was to stamp a sentiment on the inside below my snowy scene. It is completely hidden when the card is closed, but there is still plenty of room below it to write a brief note and sign the card.


Using this design, I made five blue cards and five white and silver cards (with a tiny bit of purple in the mat).

In my stash of Christmas embellishments, I found two sheets of  rhinestone snowflakes that needed to be used before the glue holding them together deteriorated. 

I started by using a "Merry and Bright" die to cut the letters out of the front panel of each card. Then I also cut the letters out of a piece of metallic silver CS and inlaid them into the front panel of each card. 

The only extra embellishment on each card was a big sparkly snowflake. I placed it over the "D" in AND, because it was still easy to read the sentiment even if that letter was obscured.


I love the way the snowflake gems reflect whatever color is near. In the bottom gem of this snowflake you can see the red of my sweater as I'm taking the photo.


On the inside of each card, I stamped a "Merry and Bright" sentiment. 

All the cards in this post were really fun to make. Who knows, I may make even more of them as I still need to make 25 or so before I have enough.

I made the cranberry relish today for Thursday's meal, and tomorrow I will start on the pies. My daughter is hosting Thanksgiving, but I have been charged with bringing the relish, pies and dinner rolls. I plan to make cherry, apple and pumpkin pies--all family favorites. 

If you celebrate it, I hope you have a wonderful Thanksgiving, surrounded by loved ones.

Thanks so much for stopping by, and remember to laugh--a little or a lot--every day.

Cheryl

Friday, November 18, 2022

Autumn Blessings...


These are some of the cards I made to send to family and friends for Thanksgiving. The fold is called an angled gatefold card, and I learned how to make it from a Stamp Your Art Out video by Rachel Tessman. She's a fellow Minnesotan and a fabulous cardmaker. 

I used slightly different measurements than she did by using 12" X 12" paper and cutting a card base that was 5 1/2" X 11 1/4", scored at 3 1/2" in from each end. My finished card was then the usual A2 size of 4 1/4" X 5 1/2". I used the same measurements for the angled cuts as she instructed on her video.

I used quite a few different old Stampin' Up papers. Since I made 16 cards like this , I was able to use up quite a few sheets. My circles were die-cut and then the edges were rubbed with a gold metallic ink pad. "Autumn Blessings" was heat-embossed with gold EP. A few flat-backed metallic gold pearls were added for a little shine.


My pretty leaves were double layered (with dimensionals between the layers) and had a smattering of glitter on them. 


I actually didn't make the leaves. They all came from two sticker sheets that I purchased at the Dollar Tree. The sheets each had such a nice selection of leaves and I used them on my personal cards as well as on cards for the thrift store.


This is what the cards look like when they're opened. I liked Rachel Tessman's description of this fold as being one that looks like a blanket wrapped around someone to keep them warm.


My inside sentiments were all computer-generated, then cut out with the same die that was used for the circle on the front. I also brushed the edges with my gold ink pad.


I am now knee-deep in Christmas card papers and embellishments. I hope to have them all done before December 1, but that means my card-making process has to continue steadily and without a hitch. Hopefully, I'll be able to share some of them in the near future.

Thanks so much for stopping by, and remember to laugh--a little or a lot--every day.

Cheryl