Wish List

Tuesday, June 29, 2021

Stream of butterflies...


To make this card, I first created a slimline cardbase. Then, I cut two narrow pieces of white cardstock to the same height. I cut one edge of each piece with a curved edge die. Once that was done I used an embossing folder to give them some dimension. With an A2 EF you have to emboss half of each piece, turn them around, match the pattern up inside the EF and then emboss the other end. It's necessary to have a repeating pattern on your EF to do this.

I adhered a floral scrap of DSP onto the center of my card front, then adhered the white embossed panels with foam tape.

The butterflies were die-cut, adhered with glue, and a pearl was added to the center of each. My "Happy Birthday" sentiment was computer generated using the Impact Label font. Love this font! It's great for creating strip sentiments. I found it free on Dafont.com.

I added one more butterfly to the inside of my card, along with a stamped sentiment.

I really like making slimline cards, and this card helped use up some scraps of white and floral cardstock. 

This week we are heading out to Portland, Oregon, to visit a couple of our kids who live there. It will be the first time we've been on a plane in over two years. 

I am hoping the heat wave in the Northwest will have eased and we will have more temperate weather while we are there. I've been watching their temps and they've been ranging between 100-113 degrees Fahrenheit (38-45 Celsius) the last few days.  Today was 113, and I hope they do not top that!

Thanks so much for stopping by, and remember to laugh--a little or a lot--every day.

Cheryl


Friday, June 25, 2021

Cat cards...


I have a few cat-themed stamps and dies, so I thought I'd make a couple of cat cards for the thrift store.


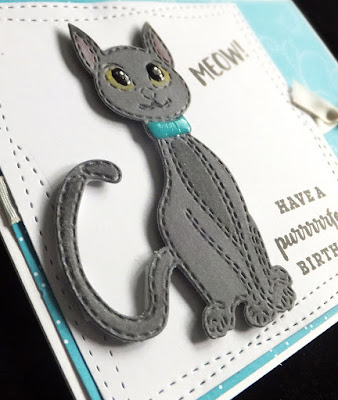
This little feline was actually in my card parts, just waiting to be used. I popped her up on dimensionals and then onto a die-cut square with wonky stitchlines.

Her eyes and collar had been covered with Glossy Accents and a little shading was added with colored pencils.


The inside has a simple stamped sentiment and party hat. I added an enamel dot to the top of the party hat.


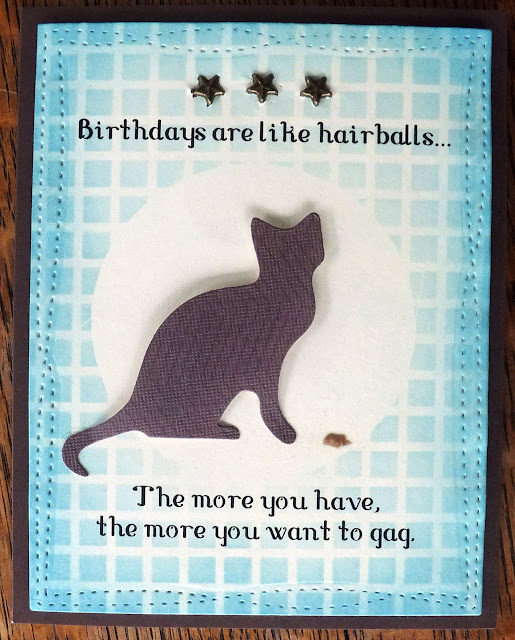
This card was made with another die-cut cat that was found in my card parts and a computer-generated sentiment. After printing my sentiment and die-cutting my panel, I placed a circle mask in the center and then used a stencil to blend some ink onto the background. The little stars are tiny metal brads.


This picture is a bit blurry, but you can see from the shadow that my cat is again popped up on dimensionals.

I created a hairball by putting a little glob of glue near my cat and then adding some brown flocking powder to it.


I added another computer sentiment on the inside and a little more inking with my stencil.

Both of these sold quickly at the thrift store, as people seem to really like cards that include a bit of humor in the design. I definitely need to make more.

I am looking forward to the weekend. We actually checked the listings at our favorite movie theater (we use to go at least twice-monthly). We planned to go this weekend if we were at all interested in the film. Sadly, it was the new F9 film that was showing, and neither my husband nor I have any desire to see that one. When we do go to a movie, it will be the first time in 16+ months!

Thanks so much for stopping by, and remember to laugh--a little or a lot--every day.

Cheryl

Tuesday, June 22, 2021

A few Father's Day stragglers...

 I have a few Father's Day cards that I haven't shared with you yet. I thought I'd post these stragglers on the blog today, even though the holiday has past. These masculine card designs could be used for other occasions, too.

First there are these shirt cards that I made for the thrift store. These were quick to make and I like how they turned out. They're the size of an A2 card, so it wasn't necessary to make a special envelope.

I started with an A2 card base, and at 3/4" down from the top, I cut 1" in on each side to create the collar. The 3/4" X 1" strip was cut completely off the back of the cardbase.

I added a small off-white piece to the inside of the collar. This could be skipped if you don't want the contrasting color there.

You may have noticed that this shirt has a bit wider collar than the other one. That's because it was my prototype. I cut this collar at 1" down from the top and 1" in at each side. I felt that made the collar a little too wide, however, so I switched to cutting it as described above.

The ends of the collar were then brought to the center of the card and secured in place with a little foam tape (for dimension) and glue.

The buttons were created with Nuvo Drops. A corner rounder was used to create "shoulders."

Here's what the card looks like on the inside. The sentiment was computer-generated

This is the Father's Day card I made for my husband. He says he may just take up fishing next year when he actually retires from his business. We live only five blocks from a lake, so he definitely could do that!

All the pieces for this little scene were cut with an unbranded die set. I just arranged them on my ink blended background and hand wrote on my little sign. Easy peasy.


The inside sentiment was stamped, using a couple different stamp sets.

I have been working hard on more cards for the store.  It's getting a little difficult to keep a good supply on hand. I was volunteering last week and had just added some cards to the display when I heard one lady say to another, "Oh look, she's added some new cards!"  They hustled over to see if there were any they wanted to buy. I've been told by store employees  that customers often buy more than one card, so they disappear pretty quickly.

Thanks so much for stopping by, and remember to laugh--a little or a lot--every day.

Cheryl


Thursday, June 17, 2021

A "Twofer" of sunshine cards...

 I am so happy to be taking part in this month's challenge--Sunshine!--over on the Twofer Challenge Blog.


I decided to take the prompt literally and create two cards that feature sunshine. To make it a little more interesting for me, I decided to use a single die-cut to create both backgrounds.

I happen to have a background sunshine die that worked perfectly for this. My sun was cut separately from yellow glitter cardstock with a reverse-scallop circle die.

I think it's pretty evident that I used the negative parts of my die-cut for the rays of sunshine on my first card. To keep them correctly spaced, I carefully flipped my die-cut over, with all the pieces in place, and added a little glue to just the negative pieces. Then I placed a piece of blue cardstock facedown on top of the die-cut. Voila! All the negative pieces stuck to the blue cardstock, and I could lift away the die-cut.


I didn't glue all the negative pieces down, just the top half. Then I added my sparkly sun.

I designed the cloud panel on my Silhouette. You can't see it, but it is popped up on foam tape. I used the Silhouette and a sketch pen to write the sentiment on it. 

When I finished adding it to my card, the bottom seemed a little blank, so I added a couple of die-cut clouds. 


I sponged a little gray ink on the edges of the clouds and popped them up on dimensionsls to make them stand out more.


The inside of my card has a couple strips of the yellow glitter crdstock and a stamped sentiment.


This card is my favorite. I love the face (Peachy Keen stamp) and the die-cut sunglasses.


I added some Glossy Accents to the lenses of my glasses to make them look like they were made of glass.

Once again, I used the Silhouette to write the sentiment and then cut it out. I glued some strips of cardstock to the back of it to give it some added dimension.


The Silhouette also printed the inside sentiment and cut out the panel to be glued inside my card.

I think this card will go to one of my grandsons. They are a handsome group of boys, but it's hard to come up with ideas for cards for them, now that they're in their tweens and teens.


You'll find lots more inspiration on the Twofer Challenge Blog site. It's such a fun challenge, so I hope you'll play along.

Thanks so much for stopping by, and remember to laugh--a little or a lot--every day.

Cheryl

Tuesday, June 15, 2021

A wonky happy birthday cake...

I received this "wonky birthday cake" die set a few weeks ago and finally got around to making up a card. I love this fun image with its star-flame candles.

This picture is a bit blurry, but it gives you a good sense of the proportions of the layers.

I cut each layer and then colored in every other stripe with an alcohol marker that was a bit darker than the cardstock I had used.

The set actually does cut out the individual stripes, but coloring them is definitely quicker, and I think it looks just as good.

The cake platter (as well as the "Happy Birthday" sentiment) was cut from a piece of silver metallic cardstock. A few white stars were added around my sentiment.

The little dots in between each layer were made with white Nuvo Drops.


On the inside of my card, I added three strips of cardstock in the same colors I had used for my cake. The sentiment here was created on my computer.

I plan to use this die set a lot. It's just so perfect for birthday cards. I can see adding a few flowers, though, and turning it into a wedding or anniversary card, as well. 

My granddaughter will have her graduation party on Saturday, and I plan to spend the day on Friday, helping my daughter get ready for it. I'm really looking forward to it. Graduations are such happy occasions!

Thanks so much for stopping by, and remember to laugh--a little or a lot--every day.

Cheryl
Friday, June 11, 2021

Silhouette graduation cards...

 Sometimes I like to try my skills at designing cards on my Silhouette. The card pictured below was one of those.

This is a shaped card where I downloaded a free image from Printable Cuttable Creatables that included the year, the mortarboard and the tassel. After sizing these elements to my liking, I created a shadow piece and then used the shadow to create a card base in my Silhouette software.

As you can see in the above photo, I also used the shadow image to create a panel for the inside of my card with the "interior offset" function. The Silhouette even wrote the sentiment, using sketch pens. All I had to do, once the Silhouette had done its part, was to adhere everything together.

I found another Free SVG file on Printable Cuttable Creatables for a Graduation Caps Insert Card. Here's what I made with that file:

These were super simple. I used the SVG file to cut out the card bases. Then I hand-cut two panels, one from red and one from blue glitter cardstock, to fit on the inside of the card front. The panels are held in place by the star notches in each corner.


Here you can see the sparkle these cards have. I printed a color-coordinated sentiment for each card and cut them out with a small banner die. I added several layers of cardstock behind each banner to give it some dimension before gluing it to the card front.


I also printed the inside sentiments with my computer before adhering them to my card base.

These were very quick cards since the only hand-cutting I did was for the glitter card panels. I could have cut those with my Silhouette, but chose not to because the glitter card can really dull a blade.

All of these cards were sold at the thrift store. Graduation cards were very hot items there this spring.


We've been experiencing an incredible heat wave here in Minneapolis. It has been 95-100 degrees Fahrenheit (35-38 degrees Celsius) every day for more than a week now.  My poor flowers and other plants are struggling. In fact, I'd better finish this post and get out there and water them...again!

Thanks so much for stopping by, and remember to laugh--a little or a lot--every day.

Cheryl

Tuesday, June 8, 2021

More graduation cards...

Where have the years gone? We're already celebrating grandchild high school graduations!


Here's a photo of my beautiful granddaughter posing with us after her high school graduation ceremony last night. She graduated with honors (3.5 or higher GPA), and we're so proud of her!

The ceremony was held at a large arena on the University of Minnesota campus and was over 2 hours long, due to the fact that there were 650 students in her graduating class. We were thrilled that we could be there with her to watch and celebrate.


Following are a couple of the graduation cards I made for the thrift store, as they have been in high demand there lately:

This card was so easy and fun. I found some free graduation subway art here. I sized it to my liking, printed it out and added a few gold touches with a gold glitter pen. This panel was then adhered to a metallic gold mat and a black card base. 

The mortarboard was cut with my Silhouette and popped up on dimensionals.


I added a computer-generated sentiment to the inside, which was a quote from Dr. Seuss.


This card features die-cuts for the year 2021 and the line of celebrant graduates. The numbers were cut out of white cardstock and adhered directly to the blue panel. The graduates were cut out of black and also adhered directly to the front. I liked that they overlapped the numbers a bit.

On the inside of the card I stamped "Congratulations" in blue and then added a strip sentiment (stamped and heat-embossed), which was popped up with several layers of cardstock underneath it.

These cards were quick and fun to make and sold quickly at the thrift store. I guess I'd better get to work and make a few more to take in this week!

Thanks so much for stopping by, and remember to laugh--a little or a lot--every day.

Cheryl
Saturday, June 5, 2021

Let's Craft and Create Challenge #172: Anything Goes or Add Buttons...

 What? It's June already? That means it's time for a new challenge at Let's Craft and Create, and this month we're featuring an oldie, but a goodie--Add Buttons. Of course, you can always participate, no matter what you create, because there is also the "Anything Goes" option.


I love die-cutting buttons (I have a few button dies in my stash), and this is what I have created for June:

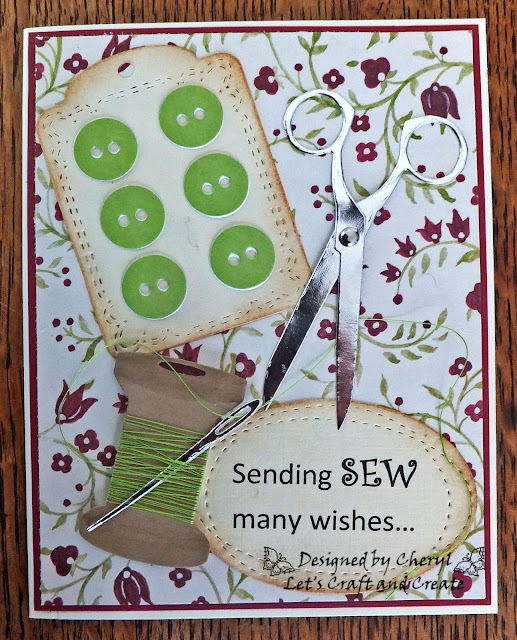
I made two sewing-themed cards for the challenge, using the same die set that included the buttons on a button card, spool of thread with needle and the scissors.

As you can see in this photo, I've used some real thread, winding it around my spool and lacing my needle through it. The thread even goes through the eye of the needle!


The sentiment on the inside of this card was stamped with an old wooden stamp that I purchased at a thrift store.


My second card has the same layout, but is a birthday card. Note that the scissor cuts in two separate pieces and they are held together with a tiny silver brad.


I used another old wooden stamp to add a sentiment to the inside of this card.

These cards were so much fun to make, and I think they will be fun for someone to receive, too.

Now it's your turn. Head over to Let's Craft and Create and check out all the projects the Design Team has made to inspire you. There will be a prize up for grabs, so why not give it a go?

Thanks so much for stopping by, and remember to laugh--a little or a lot--every day.

Cheryl


Thursday, June 3, 2021

In Love Art Shop Blooming Fireworks dies...

 Did you catch the name of the die set in the title of this post? It's "Blooming Fireworks." I think that is such a perfect name because they can be used to create flowers, too. 

See what I mean? I cut three different sized dies in three different shades of pink and layered them.


I was going for the look of a Spider Mum like the one in this photo.


The stem for my mum came from another flower die. I added a few gems for sparkle and a layered "hugs" die cut.

I love simple, layered sentiments like this.


I layered the inside of my card with the same pink striped DSP that was on the front of the card and added a stamped, heat-embossed sentiment.

We don't always think to put DSP on the inside of our cards, but I always think it's such a nice surprise when you open the card.

The Blooming Fireworks dies are available here, and you can get a nice discount by using code G-45217.


Here's a more traditional look for the dies. I created a navy blue slimline card, cut my Blooming Fireworks from glitter cardstock and layered them up. A few white, punched stars added to the look of a nighttime sky. I then die-cut the word "happy," a large 4, and a smaller "th." 

I haven't yet completed the inside of this card. I'm going to do some online research to find something a bit patriotic. There aren't many examples of 4th of July cards available, so I may have to get creative. My aunts get a kick out of receiving them. They say no one ever sent them 4th of July cards before.

Remember, these fun dies are available now at In Love Art Shop. You will find them here and can use discount code G-45217.

We will be attending a family wedding this coming weekend. It will be the first time we have attended a gathering like this since the pandemic lockdowns began. Everyone there may not be vaccinated, but we are, so we're confident we'll be able to stay healthy.

Thanks so much for stopping by, and remember to laugh--a little or a lot--every day.

Cheryl