Wish List

Thursday, April 30, 2020

Pop-up diorama cards...

I have some pop-up diorama Easter cards that I never shared, so I thought I'd share them now. They all use NBUS dies and one uses an NBUS stamp set, as well.


On these two cards, both the egg and the bow were NBUS dies. As you can see, I cut one egg out of purple glitter CS and one out of white. Then I just swapped the negatives and Voila! - two cards.

I did a little bit of inking on my bows to give them more definition, since they're just flat die-cuts.


The inside of my card has an egg-shaped opening (cut with an NBUS die from a set of graduated egg sizes. Peeking through my aperture is a stamped chick, still in the egg shell, but celebrating Easter with his bunny face and ears. This was stamped with an NBUS stamp set for the most part. I did stamp the face using a Peachy Keen stamp set that I've used before (and had for years and years).

I added a stitched rectangle at the bottom for a personal note and to sign our names.


This is how these cards look from the top. They're super easy to make, but fun to look at and receive. If you'd like to try making one, there's a great tutorial on Splitcoaststampers under Pop-up Diorama Card.


Here's another one using the same egg die, but a different die-cut bow.


I did the inside on this one a little differently, too, adding a die-cut bunny in some grass, rather than a stamped one.

I'm going to link these cards to the NBUS Challenge Blog. I usually forget to do this when I'm using all that NBUS I've got piled up!

Today was a lovely day. We even went and purchased some flower seedlings, an azalea bush and a tomato plant and got them all into various pots and places in the flower beds. I just love it when the pots and beds are filled with blooming flowers. We don't plant many vegetables as we don't have a sunny enough spot for them, but I stubbornly try planting a few (a VERY few) every year.

Thanks so much for stopping by, and remember to laugh--a little or a lot--every day.
Cheryl

Tuesday, April 28, 2020

Start each day with a grateful heart...


I used my Silhouette Cameo to cut this reminder, which I purchased from the Silhouette Design Store. It's really a good reminder these days when we feel like we have lots to complain about.

Today I am so grateful that I already planted the little seedlings that I started inside the house about 6 weeks ago. We have had a couple of nice rains in the days since I did that, so their chances of survival have been greatly increased! I planted quite a bit of kale, which I like to add to soups, salads and other dishes. I've even made kale chips by roasting it in the oven for a few minutes.


Besides sharing this cup with you, I thought I should also share a card I made recently.


I've had this stamp set for some time, and it was definitely time to ink it up. After stamping my birds and masking them off, I used some brushes, ink and a piece of torn paper as a mask to create the sky and grass. I then cut a cloud shape (with a die) from a piece of cardstock. Using this as a stencil, I applied several layers of white ink through my "stencil" to form my clouds.

I think you can really see those clouds in this sideways photo.


I had fun with my Promarkers, making the birds as colorful as I could. I think their whimsical design lends itself well to bright colors.

After stamping a few notes around their heads and some leafy fronds at their feet, I was ready to work on the inside.


The sentiment here was computer generated, but the notes were added with stamps. I tried to find a font that went well with the font used for the stamped sentiment on the front of my card.

To add just a bit of color to my panel, I drew several lines close together with the Promarkers I had used to color my birds. I know it's hard to see, but I actually used different colored markers at the top and bottom of my panel.

That's it for me today. Thanks so much for stopping by, and remember to laugh--a little or a lot--every day.
Cheryl

Friday, April 24, 2020

More fun with glitter paste and a stencil...


I am having such a good time playing with stencils and some Martha Stewart clear glitter paste. For this card, I first used three different colors of yellow ink and a stencil to add the design to my white panel.


Once that was done, I left the stencil in place and added a thin layer of the clear glitter paste. The only drawback in doing this is that the clear glitter paste that you are using absorbs some of the ink and takes on a yellow hue, so you really can't put any excess back into the jar. I just try to start with as little as possible and add a tiny bit more if need be.

When the glitter paste was dry, I mounted my panel onto a black mat and then onto my gold card base.


I love the dimension and sparkle it adds to my card.

My sentiment was cut with a die out of black foam board from Dollar Tree, so it is very dimensional, as well.

I left the inside of this card blank, as I will be using it to send a personal note to a family member.


It is a gorgeous day in Minneapolis today, so we will be going for a walk later on. In fact, our BIG plans are to walk a half-mile or so to a service station where a taco food truck parks. We're going to have "dinner out" from the food truck. How exciting is that? Bet you're all jealous. he he

Thanks so much for stopping by, and remember to laugh--a little or a lot--every day.
Cheryl

Tuesday, April 21, 2020

Killing two birds with one stone...

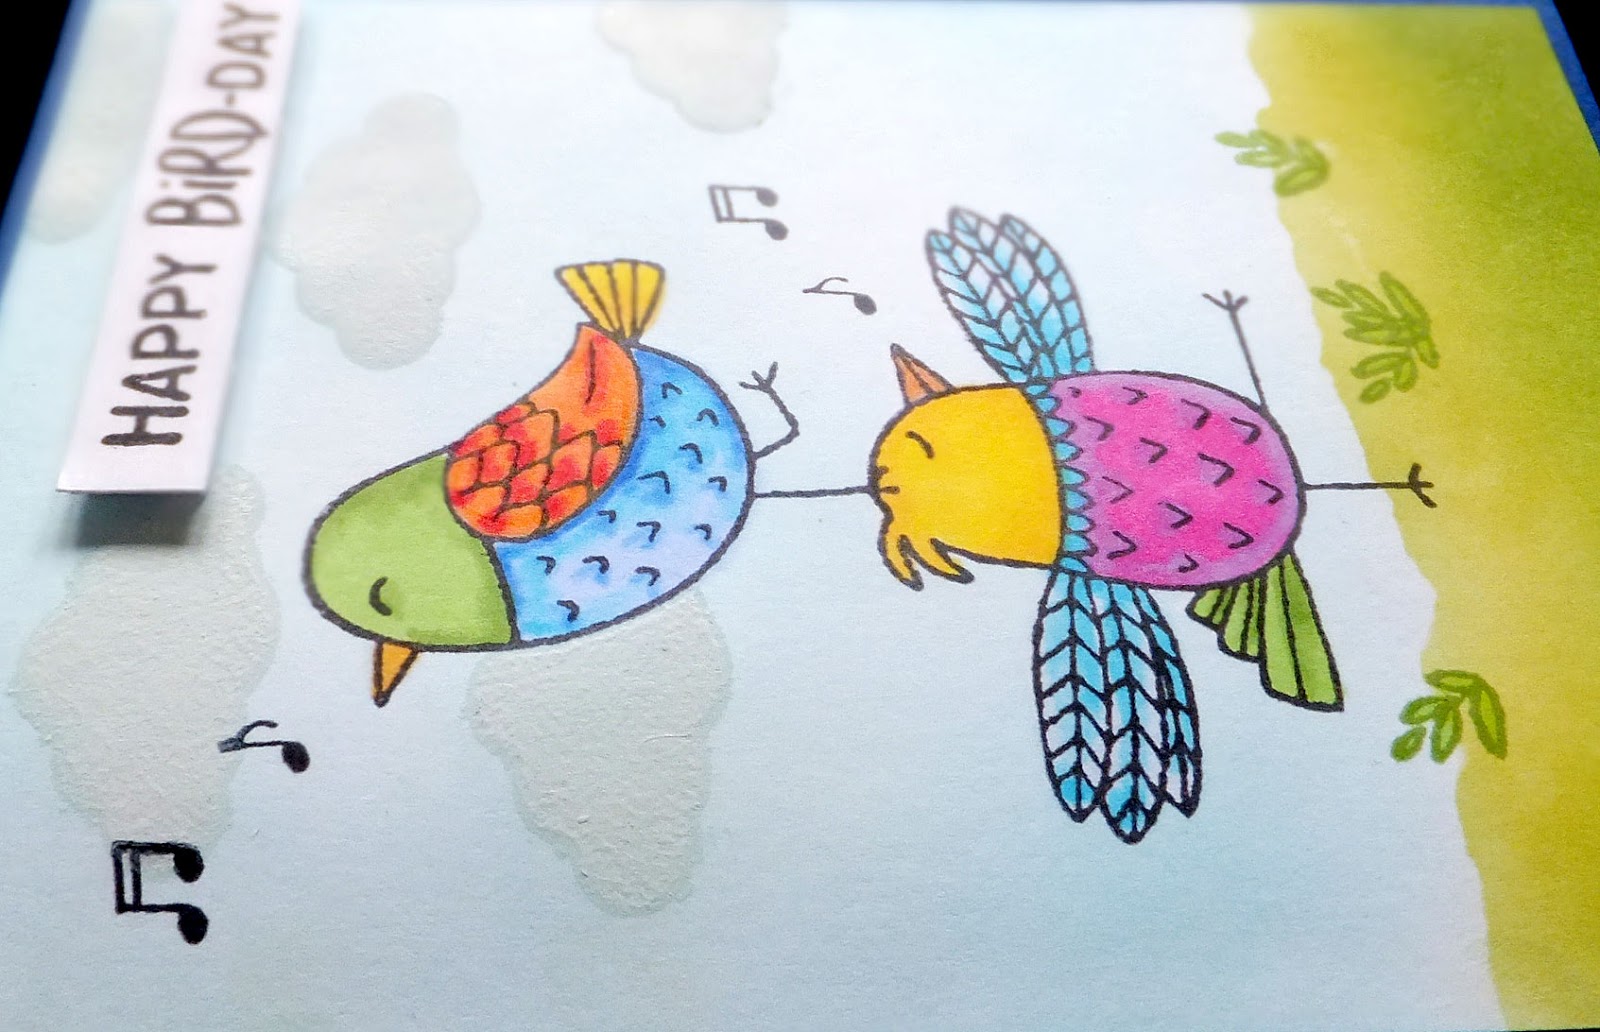
...not that I want to kill any birds. In fact, I definitely do not! Now squirrels are another matter.

But back to the issue at hand: The lovely Darnell of djkardkreations.com has two challenges this month for your cardmaking pleasure. One is the ever-popular NBUS (Never Before Used Schtuff) Challenge and the other is the TwoFer Card Challenge. I will be entering and linking to both of these fun challenges from this blog post--hence, the two dead birds.


First, I'll share the two cards I made for the Twofer Card Challenge. Since the April theme is rain/umbrella, I decided to incorporate both into my cards.


The first card is an encouragement card and the second, a get-well-soon card.

I began by using a rain stencil on a die-cut circle. After inking the raindrops, I kept the stencil in place and added a layer of Martha Stewart Glitter Paste. Can you see the sparkly dimension of the raindrops? A few weeks ago I had used a Michael's coupon for 50% off to purchase a jar of clear glitter paste just before the lock-down occurred. It has given me something new to play with while we self-quarantine.


On the inside of the card I added a few more raindrops and a computer-generated sentiment. I know we "ladies" are not supposed to go stomping about, but honestly, don't you just want to stomp out your frustrations sometimes?


I did not add any glitter paste to the raindrops on my second card, but I did add some nice dimensional grass, cut with a die and inked on the tips of the blades. The sentiment has been popped up on foam tape, as has the center of the umbrella.


I added a sun to the inside of my card, hoping it will cheer someone up. Once again, my sentiment was computer-generated.


Since I was playing for the first time with my umbrella die set, I also made a card for the current NBUS challenge. In fact, this was the first card I made of the three.

I designed it as an encouragement card--we need a lot of those nowadays, don't we? I love the idea of an umbrella filled with flowers, so that's what I made. The shaft of the umbrella is cut from gold foil CS to match the gold sparkle in the umbrella's canopy (I had to look up the names of those umbrella parts!).


The inside of this card features a matted panel with one of the flowers displayed in the corner--just a little something to brighten up the inside.

I hope you'll join in on one or both of these challenges. They're both so much fun and they definitely help me look through that pile of NBUS and select something to actually use!

Thanks so much for stopping by, and remember to laugh--a little or a lot--every day.
Cheryl

Friday, April 17, 2020

Sending a smile...

Sending smiles is so important these days, so I decided to make a card that would do just that.


I'm sure you recognize one of Tim Holtz's crazy birds, which I have colored with alcohol markers and then cut out with the matching die.


My bird was popped up on foam tape as was my computer-generated sentiment.

I had cut out my sentiment strips and backed them with black cardstock before popping them up on my card.

The border die across the bottom of my DSP (from Stampin' Up) is an unbranded one that is fun to use on cards like this.


I left my card blank so that I can write a personal note inside. In fact, this card has already been sent, and I'm pretty certain it resulted in some smiles!

Today the sun is shining brightly and the weather has warmed just a tad. We've been promised a very nice weekend, so it's time to get serious about that outdoor work. If I were a betting woman, I'd be putting nearly all my money on "NO MORE SNOW!"

Thanks so much for stopping by, and remember to laugh--a little or a lot--every day. Happy weekend, everyone!
Cheryl

Tuesday, April 14, 2020

Sympathy cards in silver and white...


I had some handmade, silver-dotted paper in my stash for at least 10 years, so it was time to use it on some cards. I know the paper looks rather fibrous in these photos, but that's the nature of it.


I started with a silver card base and added my panel of handmade paper.

I had an ornate oval in my die collection, so I used it as the focal point of my card.

This one has a few stems of holly hocks with silver centers made using a Viva Decor pen.


The sentiment on each card was heat embossed with Wow! embossing powder.


I added a silver heat-embossed sentiment on the inside of each card. If you look closely, you'll see that there's a tiny bit of dry-embossing on the bottom of the panel, as well.

These cards were difficult to photograph. The day was dark and dreary and the muted colors didn't help.


Sadly, I've already had to use one of these cards, so I'll be making more for my stash in the near future.

Our 5-6" of snow from Easter Sunday is nearly gone already--melted by the strength of the April sun. I'm hoping now that warm weather will move in for good.

Thanks so much for stopping by, and remember to laugh--a little or a lot--every day.
Cheryl

Sunday, April 12, 2020

Happy Easter and Blessed Passover to all those celebrating...


I'm thinking of all of you today who, like us, are celebrating alone. It is difficult not to have our families around when that has been the tradition all our lives. I am especially thinking of my Aunt today, as my Uncle passed away on March 25, and this will be her first holiday without him by her side. I made the card above with her in mind, using a hexagon die set.


The crocuses were stamped with a pale water-based ink onto water color paper. I then got out my water colors and painted them, using only one shade of purple, two shades of green and a golden orange for the stamens.

I used some matching dies to cut them out before adhering them to my card.

The white center hexagon has been popped up with foam tape.


Because I had a couple of leftover crocuses after finishing my card front, I decided to adhere one of them on the inside of my card.

I hope you all have a lovely celebration today. We are actually in the middle of a spring snowstorm! It is snowing like crazy outside as I type this.

Thanks so much for stopping by, and remember to laugh--a little or a lot--every day.
Cheryl


Edited to add: 


Here's what it looks like outside our front door. Not exactly the usual Easter scene!


Here's my hubby and I enjoying our Easter dinner.

We wish many blessings to all of you!

Friday, April 10, 2020

Pretty in pink Easter cards...

Sometimes simple is best, and these two cards were definitely simple.


All it took for this card was a pretty tulip die-cut, a heat-embossed sentiment and a few flat-backed pearls.


This photo shows the sentiment and the pearls a little better.

It was a dreary day when I took these photos, so they really don't show the card in its best light.


I heat-embossed the sentiment on the inside, as well, and rounded the upper right-hand corner of my card. I thought it needed a softer line to reflect the soft lines of the tulips.


This second card used a die that created a tulip border around the edge.  I simply inserted a pink piece of paper that would show through the die-cut design.


To finish off the card, I added some die-cut vellum butterflies (with pink pearl centers) a few pink sequins and some pink and white baker's twine tied in a bow.


I used the same sentiment on the interior of this card and stamped it in pink.


In my last post I mentioned that I thought I needed to trim my own hair. It was beginning to drive me a bit crazy every morning when I tried to blow-dry it.  Well I took a scissor to my bangs and to the back of my hair--particularly at the nape of my neck. I did this pretty much by "feel," as I did not have a mirror that I could hold and still cut my hair at the same time. It actually didn't turn out too badly. I took a photo of the back of my head in a mirror to show you the result.


The photo is a bit blurry, but at least you can see that there aren't any big gouges in my hair across the bottom. I even took a disposable razor and shaved the nape of my neck.

I guess this just shows we can do what we have to and not fail completely!

Thanks so much for stopping by and remember to laugh--a little or a lot--every day.
Cheryl

Tuesday, April 7, 2020

Quick Easter cards for the grands...

I have 10 grandchildren, so I needed some quick-to-make Easter cards for them, and here is what I came up with:


I started with some pre-made card blanks that I've had for years. These particular blanks had a circle aperture at the top.

I remember I had this swirly twig wreath die, and it was the perfect size! I cut it out of green cardstock and added some Nuvo Drops in Easter colors.

Finally, I die-cut three simple bunnies, inked their edges and added some enamel dots for tails.


I really didn't have to do anything additional on the inside since I had already stamped "Happy Easter" through the aperture.

Each of my five grandsons is receiving one of these cards with a little something tucked inside.


For my granddaughters, I once again chose some pre-made card blanks and then used glitter cardstock to die-cut some cute "bunnies peeking through windows." I used the same dies to cut the apertures in my DSP panels so that the bunny die-cuts fit perfectly.


The little tags were cut, inked, stamped and popped up on foam squares.

The final decoration was a few Nuvo Drops in coordinating colors.


On the inside of these cards I wrote a personal note and added a little something to let them know I was thinking of them.

This is the first time I've used these bunny dies, so I'm linking this card to the NBUS Challenge blog, deftly led by NBUS Queen Darnell from djkardkreations. Be sure to visit this new blog site to see what the NBUS excitement is all about and for lots of incredibly inspiring entries.

I made all of these cards in an afternoon--which tells you how easy they were. I think they turned out rather cute and festive, though.

The other day I read something online that made me laugh: If you think purchasing an adequate amount of toilet paper is difficult, wait until we're all trying to book haircut appointments!

I'm past due for a haircut and seriously thinking of getting out the scissors and giving it a go myself! If it turns out horribly, at least I won't have to go anywhere that people might see it. And it seems we'll be confined at home long enough for it to grow out.

Thanks so much for stopping by, and remember to laugh--a little or a lot--every day.
Cheryl

Sunday, April 5, 2020

Let's Craft and Create Challenge #158: Through a window...

www.letscreatechallenges.blogspot.com
It's time once again for our monthly challenge over at Let's Craft and Create. This month the challenge is to make a card based on our theme "through a window," but keep in mind, we always have a standing "anything goes" option.

I have just one window die, which I haven't used much at all, so it was time to get it out, dust it off and do a little die-cutting. This is what I came up with.


I wanted my card to have the look and feel of a seaside cottage with weathered wood and frilly curtains. And what would a seaside cottage be without its resident cat?

The first thing I did was to create my weathered wood by stamping a gray CS panel using a woodgrain stamp and gray ink. I thought it turned out rather realistic-looking.

I created my window scene with some distress inks and a brush applicator. The seagulls were die-cut, as was the cat. I pulled dies from five different sets for this card! I also used a Martha Stewart punch for my window valance.

I thought my stamped sentiment was appropriate for this particular time in history when we're all social-distancing and staying home as much as possible.


 There actually is a die-cut curtain rod that my valance has been folded over at the top of my window. Even though it's not really visible, I feel like it added the tiniest bit of detail to my scene.

I did a bit of inking on my window frame and sill with some gray ink. They wouldn't have been stark white in a weathered seaside cottage, would they?

Once when we drove around Cape Cod, I picked out my favorite seaside cottage. It had weathered wood shakes for siding on the outside and purple flowers in boxes under each window. I imagined that there was weathered wood paneling on the inside (which I never saw, of course) and a cat lounging in the sunshine that streamed in from one of the windows.


I hope you'll check out the rest of the Design Team's projects and join in on our latest challenge over on Let's Craft and Create. As always, there is a prize up for grabs.

Thank you so much for stopping by, and remember to laugh--a little or a lot--every day.
Cheryl

Thursday, April 2, 2020

Simple Easter bunny cards...

As I have mentioned before, I make a lot of cards that are sold at a local thrift store to help them raise money for their community outreach programs. Here are some of them that I made this year:


This little bunny is so cute. It's a really easy die set (unbranded) to put together. I added the little oval "rug" to ground him. The sentiment was cut from some foam board for dimension.


I used ProMarkers to color the pink on his ears and paws and the black on his buttons. I also added a little glitter pen to his buttons for a bit of sparkle.


For this card I used a felt bunny sticker that I had left over from last year. I see in this photo that the tail on this sticker isn't in quite the right place, but this one is already at the thrift store so I'm not able to fix that. I'm always amazed at what I see in photos that I don't notice IRL!


The scalloped border and sentiment were both cut from dies. The sentiment was cut out of both CS and foam board, which were glued together.


I have a bunny border die with a row of bunnies "hanging over the edge." I had used part of the border and had a couple of the bunnies left over, so I cut away one of them and put him on my sentiment panel. I think he looks so cute hanging there. The enamel dots are Nuvo Drops. They didn't turn out perfectly round (user error!), but I think that's ok. They're more in the shape of eggs, right?


Once again, I cut my sentiment from foam board. Since the foam board is stiff, it makes the sentiments so much easier to handle and glue down. They don't become misshapen the way they can if you cut them out of a regular foam sheet.

For the interiors of these cards, I either stamped an Easter sentiment or printed one from my computer.


I've already mailed the Easter cards that I regularly send to family in Europe, and today I will try to get the rest addressed and ready to mail to family here in the U.S. It will definitely be a strange Easter this year with no church service and no guests for Easter dinner. I haven't even bothered to get out my few Easter decorations that I usually display. How about you? Have you decorated your home for Easter?

Thanks so much for stopping by, and remember to laugh--a little or a lot--every day.
Cheryl