Wish List

Friday, January 29, 2021

A pretty stamp and die set from In Love Art Shop...

 I continue to work with In Love Art Shop to provide sample creations made with their products. They have a pretty stamp set with coordinating dies called Hydrangea Bouquet. If you click on the name, it will take you to this set in their online store. If you decide to purchase this or other products, be sure to use this discount code:

G-33664

For my first card, I used all of the stamps in the set and heat embossed the images randomly on a piece of pink cardstock. Then I sponged the edges of this panel with some Worn Lipstick Distress Oxide ink and wiped the excess off the white embossing.

Finally, I created a little window by using one of the dies to cut out my center image, cutting through both the pink cardstock and the white card base. I added a piece of acrylic packaging between my pink panel and the card base. I also added a heat-embossed strip sentiment to complete my window. 


I adhered the die-cut image to the inside of my card so that it lined up perfectly with the window. I also added another strip sentiment directly behind the one on the front of the card so that you can't see it when the card is closed.


This shaped card features a lacy layer on top of a green layer that is popped up on foam tape. I tried my best to capture the pinks and blues in my hydrangea image, but I sure could use some advice on how to get a smoother, more realistic look.


I first colored my flower with both a pink and a blue alcohol marker. Then I used some colored pencils to add more detail. I definitely need practice!


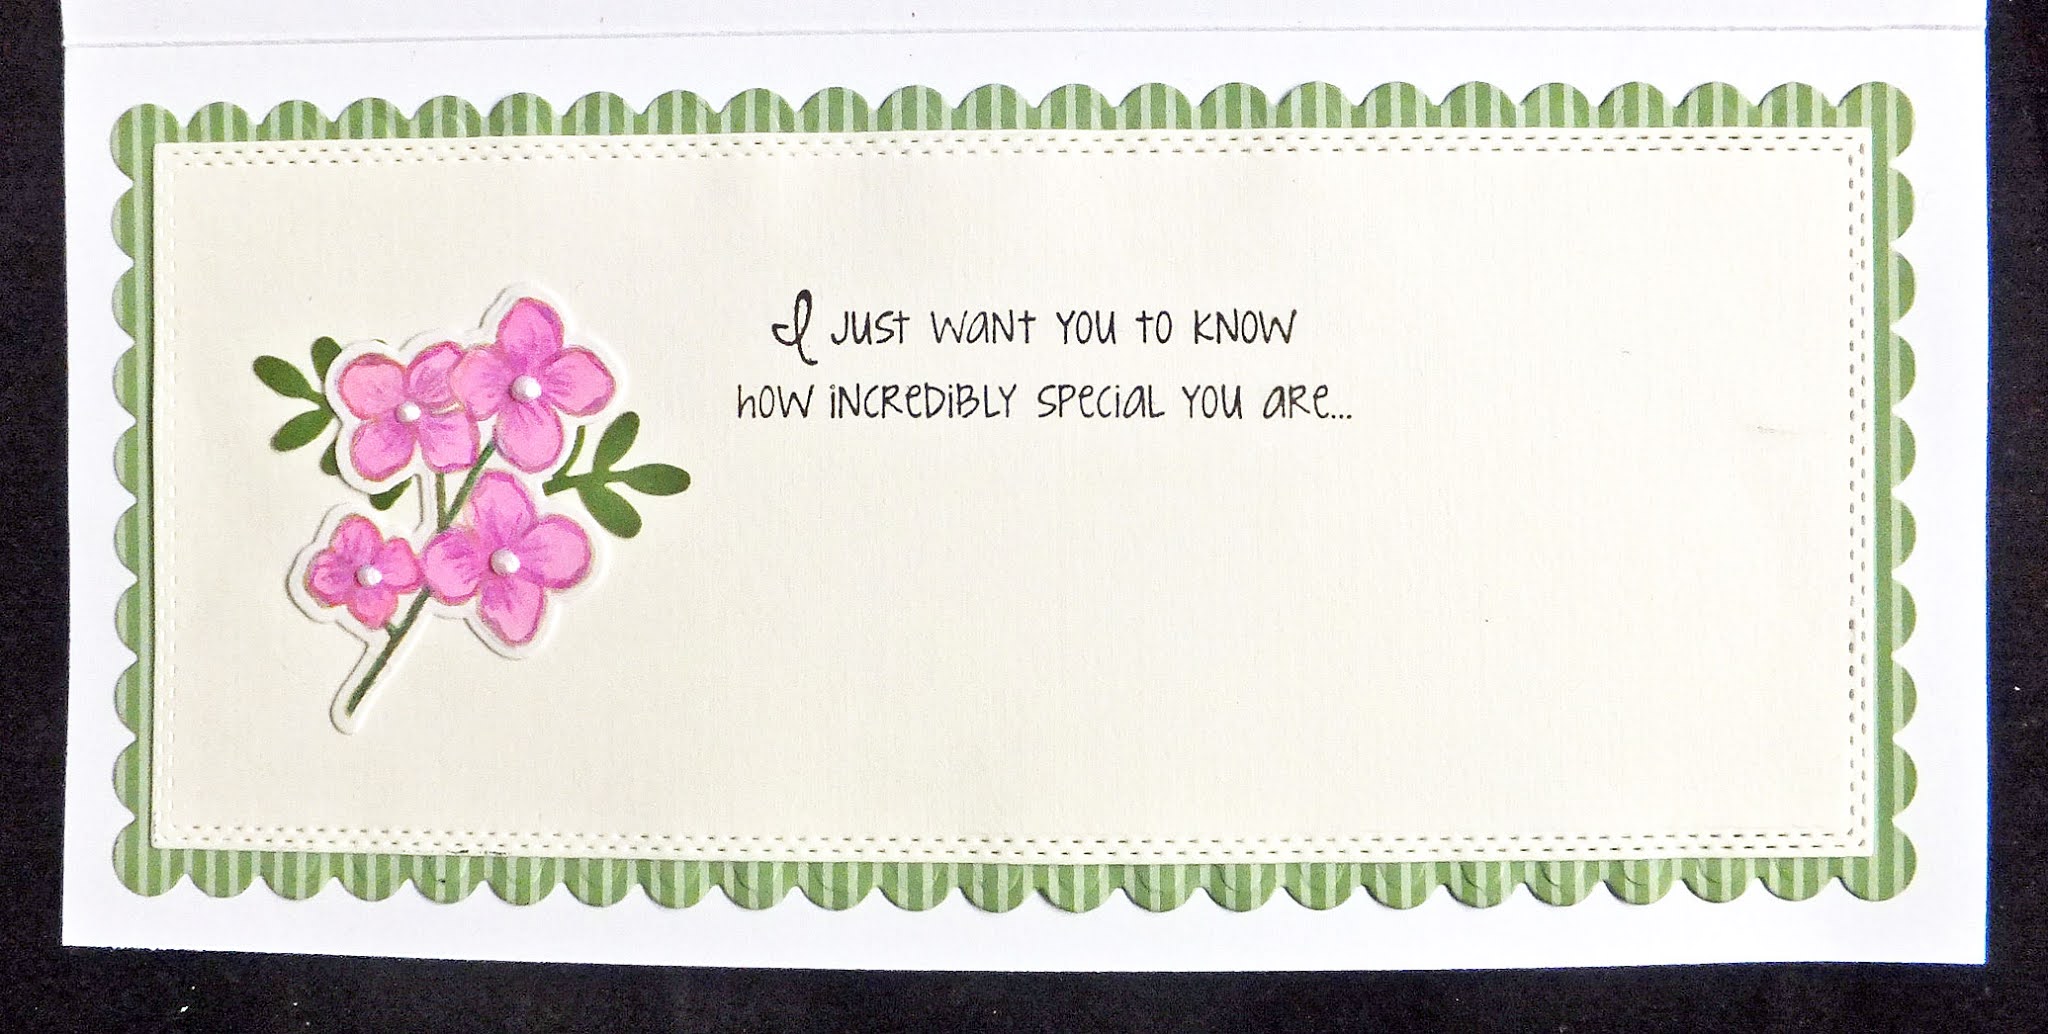
On the inside of my card, I added another green panel and a smaller white one for my sentiment.


I think the hydrangeas look a little better on this card--but they still need some work! I colored these the same way as I did on the previous card. For the leaves on both cards I also used a couple of alcohol markers to start, and then added some detail with colored pencils.

The flowers on both cards have been popped up on foam squares.


The inside of this card was handled very much like the previous card. 


One last card made with the Hydrangea Bouquet set was a Mother's Day card. I think I may send this to one of my aunts. I have three of them, and they're all very special ladies who deserve some extra Mother's Day cards.
`
This slimline card was a nice size for featuring all three of these images. The green panel is popped up on foam tape, as were the flower images.


I added some punched leaves since these flowers didn't feature any foliage. I also glued a tiny white pearl to the center of each flower.

My stamped and clear-embossed sentiment strip is also popped up on foam squares.


Another green panel was adhered underneath my sentiment panel. Because there is so much white space on the inside of a slimline card, I decided to color, die-cut and add one of the flower images here. Instead of pearls, I used Nuvo Drops on this one as they are a little flatter.


I hope you've enjoyed seeing the cards I've made from the Hydrangea Bouquet stamp and die set from In Love Art Shop. I definitely had a great time making them.

Please leave me a note with your best coloring advice, if you can. As I said before, I would truly like to learn a few tricks for creating more realistic images.

Thanks so much for stopping by, and remember to laugh--a little or a lot--every day.

Cheryl

Tuesday, January 26, 2021

Love this Valentine...


This is such a simple design, but I really love it.

I made a few of these and used some different background papers. In the photo above, you can see two of the papers I used.


The leafy heart die-cut is unbranded. I think it's such a great image for an adult Valentine. Once I had it glued down, I brushed each of the leaves with a Wink of Stella brush and added some sequins for a little sparkle.

My sentiment was heat embossed onto a strip of black cardstock, and I fishtailed the ends. Finally, I popped it up with foam tape and adhered it onto my die-cut.


I die-cut an extra leafy heart, which I cut apart so I could add a leafy branch on the inside of each of my cards, along with a stamped sentiment.

I worked on cards most of the day today. I tried my hand (again) at coloring some larger flower images. I'll be sharing those cards soon and hope you'll let me know what you think of them and how you think I might improve my coloring techniques. I'd love to get better at it and do more coloring for my cards.

Thanks so much for stopping by, and remember to laugh--a little or a lot--every day.

Cheryl

Friday, January 22, 2021

Heart frame die from In Love Art Shop...


I am once again making some sample cards for In Love Art Shop. This heart frame die is one they sent me recently. I thought it would make a nice frame for a wedding card. I even made a metallic gold flower that I can use on a gift box or even to decorate the envelope.

The bride and groom (old wooden stamp) were stamped with Versamark ink on off-white cardstock and then heat-embossed with gold embossing powder. They were fussy-cut and attached with pop dots.

This heart frame die is pretty versatile in that it can be cut apart to make borders. You could even cut it into individual hearts if you wanted to use them that way. I used one of the longer sides of the frame to make a Valentine. The sentiment was heat-embossed with white embossing powder, and I've added a few sequins for sparkle.


When I cut the heart frame into four pieces, I couldn't waste all the rest of them, so I've made this baby card, too. I thought the hearts worked well with my sentiment. I added some die-cut letters to spell out BABY. I also used some Nuvo Drops for the teddy bear's eyes and on the top and bottom of my sentiment panel.

This heart frame die comes with a smaller floral frame, as well, and I'll be using it for a card in the next few days.

I haven't yet finished the insides of these cards, but I'll do that soon, since I'll be donating them to the thrift store next Thursday when I volunteer. I take 12-18 cards to the store every week. My crafty friend Lynette has given me many cards that she has made, so the ones I take are a combination of cards made by the two of us.

If you're interested in purchasing this heart frame die, or any other products at In Love Art Shop, be sure to use this discount code:

G-33664

Thanks so much for stopping by, and remember to laugh--a little or a lot--every day.

Cheryl


Tuesday, January 19, 2021

Puppy Valentines...


I had fun making these simple puppy Valentines. Rather than using the same background paper for all of them, I mixed it up a bit and tried to use up some of my scraps.

I loved this background. This Valentine will definitely go to a girl. I think they'd like the pale pink background and deeper pink heart.


Here you can see how I've popped the puppy up and then popped up the little sentiment (Woof you), as well. I don't have a stamp for this, so I created them on the computer.

For the heart on this one, I used a die and cut out the center of a large flower on a piece of DSP. The pattern was so wild, I didn't think I'd ever use it on a card, but it worked just fine for cutting out a patterned heart. 

If you look closely, you'll see that the red background paper is embossed. I'm not sure where I got this paper--possibly from the thrift store--but I loved the embossing on it.


I used my white gel pen to add some reflection dots on the eyes and nose, and then added some clear Nuvo drops to give them dimension.


This background paper actually came from a Christmas pack, but I thought it worked just fine for a Valentine. I added some Wink of Stella to the heart and the X's and O's.


I added some gray marker to the pads on the bottom of the paws. I love the way he's sitting with his hind paws exposed.


Each Valentine had a simple stamped greeting on the inside. I will be adding my own personal note when I send them.


It was cold out today--the high was only 19 degrees. I don't like running errands on cold days, but I felt I had to get a few groceries and fill my car with gas. I also needed a couple of items from the Dollar Tree and had to pick up an online craft supply order at Joann's. 

Ok, I'll admit it. It was the Joann's order that was the impetus for me to go out. I had ordered some of their Distress Oxide inks that they had on sale recently for $2.99 and some medium weight white cardstock for card bases. I'm excited to try out my new Oxide inks.

Thanks so much for stopping by, and remember to laugh--a little or a lot--every day.

Cheryl

Friday, January 15, 2021

Two birthday cards...

 I have made a lot of birthday cards for the thrift store, and today's post features two of them.


For this first card I played with some Brushos color crystals to create a vibrantly colored background. Once my background was dry, I embossed it with an argyle type embossing folder to add some texture. 

My colorful banners came from a spool of them that I had gotten from the thrift store. I still have a LOT left, so I'll be making more cards like this. The Happy Birthday and a few stars were die-cut from white glitter cardstock.


The inside was very simple with just a stamped sentiment.


This card is a bit busy for my taste, but someone liked it, because it sold quickly. I chose this fun colorful DSP and then selected my embellishments to match the colors of the stars in the background. 


The sentiment was die-cut and backed with red CS. I also add three thin strips of red cardstock and "decorated" them with enamel dots and stars that I had in my stash.

The inside sentiment for this card was exactly the same as the previous card.

I thought either of these cards would work well for a boy. I always wonder about the people who buy my cards, what they think of them and to whom they give them.

Thanks so much for stopping by, and remember to laugh--a little or a lot--every day.
Cheryl

Tuesday, January 12, 2021

A trio of Valentines...


I have been busy making Valentines to sell at the thrift store and for my own use.  Here are three of them.

I added the heart frame to the front of my card and stamped the sentiment.


The flower on this card and on the pale pink card were cut from white cardstock, and a little ink was added with a blending brush to the center of each layer.


I really love this set of flower dies. I think it is the size of the petals and the markings on them that I like the most.


A pearl was added to the center of each flower. The top and middle layers of petals were popped up by placing tiny foam squares under each petal.


Three more pearls were added around the sentiment.


I used some pale pink cardstock to create my flower on this card and a darker green for the leaves.


Each card had a stamped sentiment on the inside. I also added one of the hearts that was an offcut when I die-cut the frame.

These were so easy to put together, but I loved how they turned out. I plan to send a couple of these to my elderly aunts and a couple more to some special friends who have been isolated during this pandemic.

We are having a lovely stretch of days, weather-wise, and I am so glad for that. Winters can get long in Minnesota, and when you can't even get out to go to a movie, they seem longer yet.

Thanks so much for stopping by, and remember to laugh--a little or a lot--every day.
Cheryl


Friday, January 8, 2021

Happy heart Day...


I've had the die that cuts this pretty design for a while now. When I looked at it closely, I realized that it incorporated hearts into the design, so it would be perfect for Valentine's Day. It's also nice that it cuts the design out of the panel, but leaves the panel itself intact. 


I think you can tell from this picture that I adhered my panel to the front of my card base with foam tape to give a little dimension to the die-cut.

I added a cardstock bow (with a silver heart in place of the knot) and a white banner with a heat-embossed sentiment.


On the inside of my card, I heat-embossed another sentiment and added a few more silver hearts.


In this photo, you can see that three hearts were glued to my sentiment panel and then three smaller hearts were popped up on top of each of them. More fun dimension!


Today I am still reeling from the breach of our nation's Capitol by a group of lawless people who did there best to destroy parts of it. It makes me incredibly sad that five people have now died because of this criminal act. As if we haven't had enough death in this country from the Coronavirus! The predictability of the destruction reminds me of one line from the lyrics of "Where have all the Flowers Gone?" That line is, "...when will we ever learn?"

Thanks so much for stopping by, and remember to laugh--a little or a lot--every day.

Cheryl

Tuesday, January 5, 2021

Let's Craft and Create Challenge #167: Cheers to you...

 Happy New Year, everyone! Can you believe it is officially 2021? Hopefully, this is a much happier, more productive and less isolated year--a year where we can once again gather with family and friends for all those special celebrations we missed out on in 2020.

It is also time for the first challenge of the year at Let's Craft and Create. This month our theme is "Cheers to You" with the option of Anything Goes. Here is the card I created for this challenge:


I first designed my wine glass shaker elements using the Silhouette software. Then I cut out one wine glass backing and eight layers of the shaker frame. I glued seven of the frames together to create some dimension.

My last steps in putting together the shaker was to glue the wineglass frame to the backing, add some micro beads to the inside of my glass, glue on a piece of acetate and then add the final frame on top of the acetate. 


 Here you can see the dimension all those layers added to my wine glass.

When I began putting this together, I thought I was going to use sequins in my glass, but then I remembered I had some micro beads. They were perfect! They even move like liquid.


To finish my card I found some alphabet stickers which I used for the word "Cheers" To give them a little dimension, I carefully squeezed some Glossy Accents on top of them. The strip sentiment, "to a new year," was computer-generated.

The stars were die-cut from some red, glittery, holographic paper.


For the inside of my card I wrote a rhyming sentiment which I printed with my computer. I added a few more red, glittery stars for embellishment.

Now I hope you'll join in the fun. We all want to celebrate the end of 2020 and the beginning of 2021, right? A card to a friend or family member is a great start. Just visit Let's Craft and Create to see all the fabulous creations of the Design Team. I know you'll be inspired.

Thanks so much for stopping by, and remember to laugh--a little or a lot--every day.

Cheryl

Friday, January 1, 2021

Commissioned birthday card...

 A friend asked me to make a birthday card that she could give to her soon-to-be 15-year-old granddaughter. Here's what I came up with:


 The sentiment on the front is a cut-away from one of my paper stacks. I have matted it with pale pink cardstock and popped it up on foam squares.


I love pop and twist cards, so that's what I created on the inside.

The small, blank panel at the bottom is where my friend can write a personal note and sign her name.


I heat embossed "Happy" and "Birthday." The numbers were cut with dies from glitter cardstock.


I added a stamped sentiment and image on each of the little pop-out panels.


It's actually kind of fun to look through all the small stamps I have and find ones that will work.


I was pleased with the way this card turned out, and I now have a die for the pop and twist mechanism, so they are much quicker to make. I don't have to look high and low for my instructions and dimensions. Of course, there's always the chance that I will mislay the die! LOL

We had a quiet first day of 2021. I started working on some Valentines, and my husband did a lot of reading (we received 7 or 8 books as Christmas gifts!).

I want to wish all of you a very happy and healthy 2021. May this year be your craftiest yet!

Thanks so much for stopping by, and remember to laugh--a little or a lot--every day.

Cheryl