Wish List

Monday, October 31, 2022

Mummy, dearest...


The mummy die set for this card was new for me this year, and I used it on only the one card above. It's a simple set with only three pieces--so easy to assemble! I'll definitely be making more of these cards next year.

I started this card by creating my clouds in the background. I added a little orange ink to them to coordinate with the orange in the die-cut sentiment. I also just like adding a little color to clouds other than blue or gray. I think the orange made them look more ominous, don't you?

The mummy's pieces were cut out, and I added a little ink with a Q-tip before putting him together and adding him to the scene.

In the picture above, you can see how the ghost is popped up, as is the left hand of the mummy.


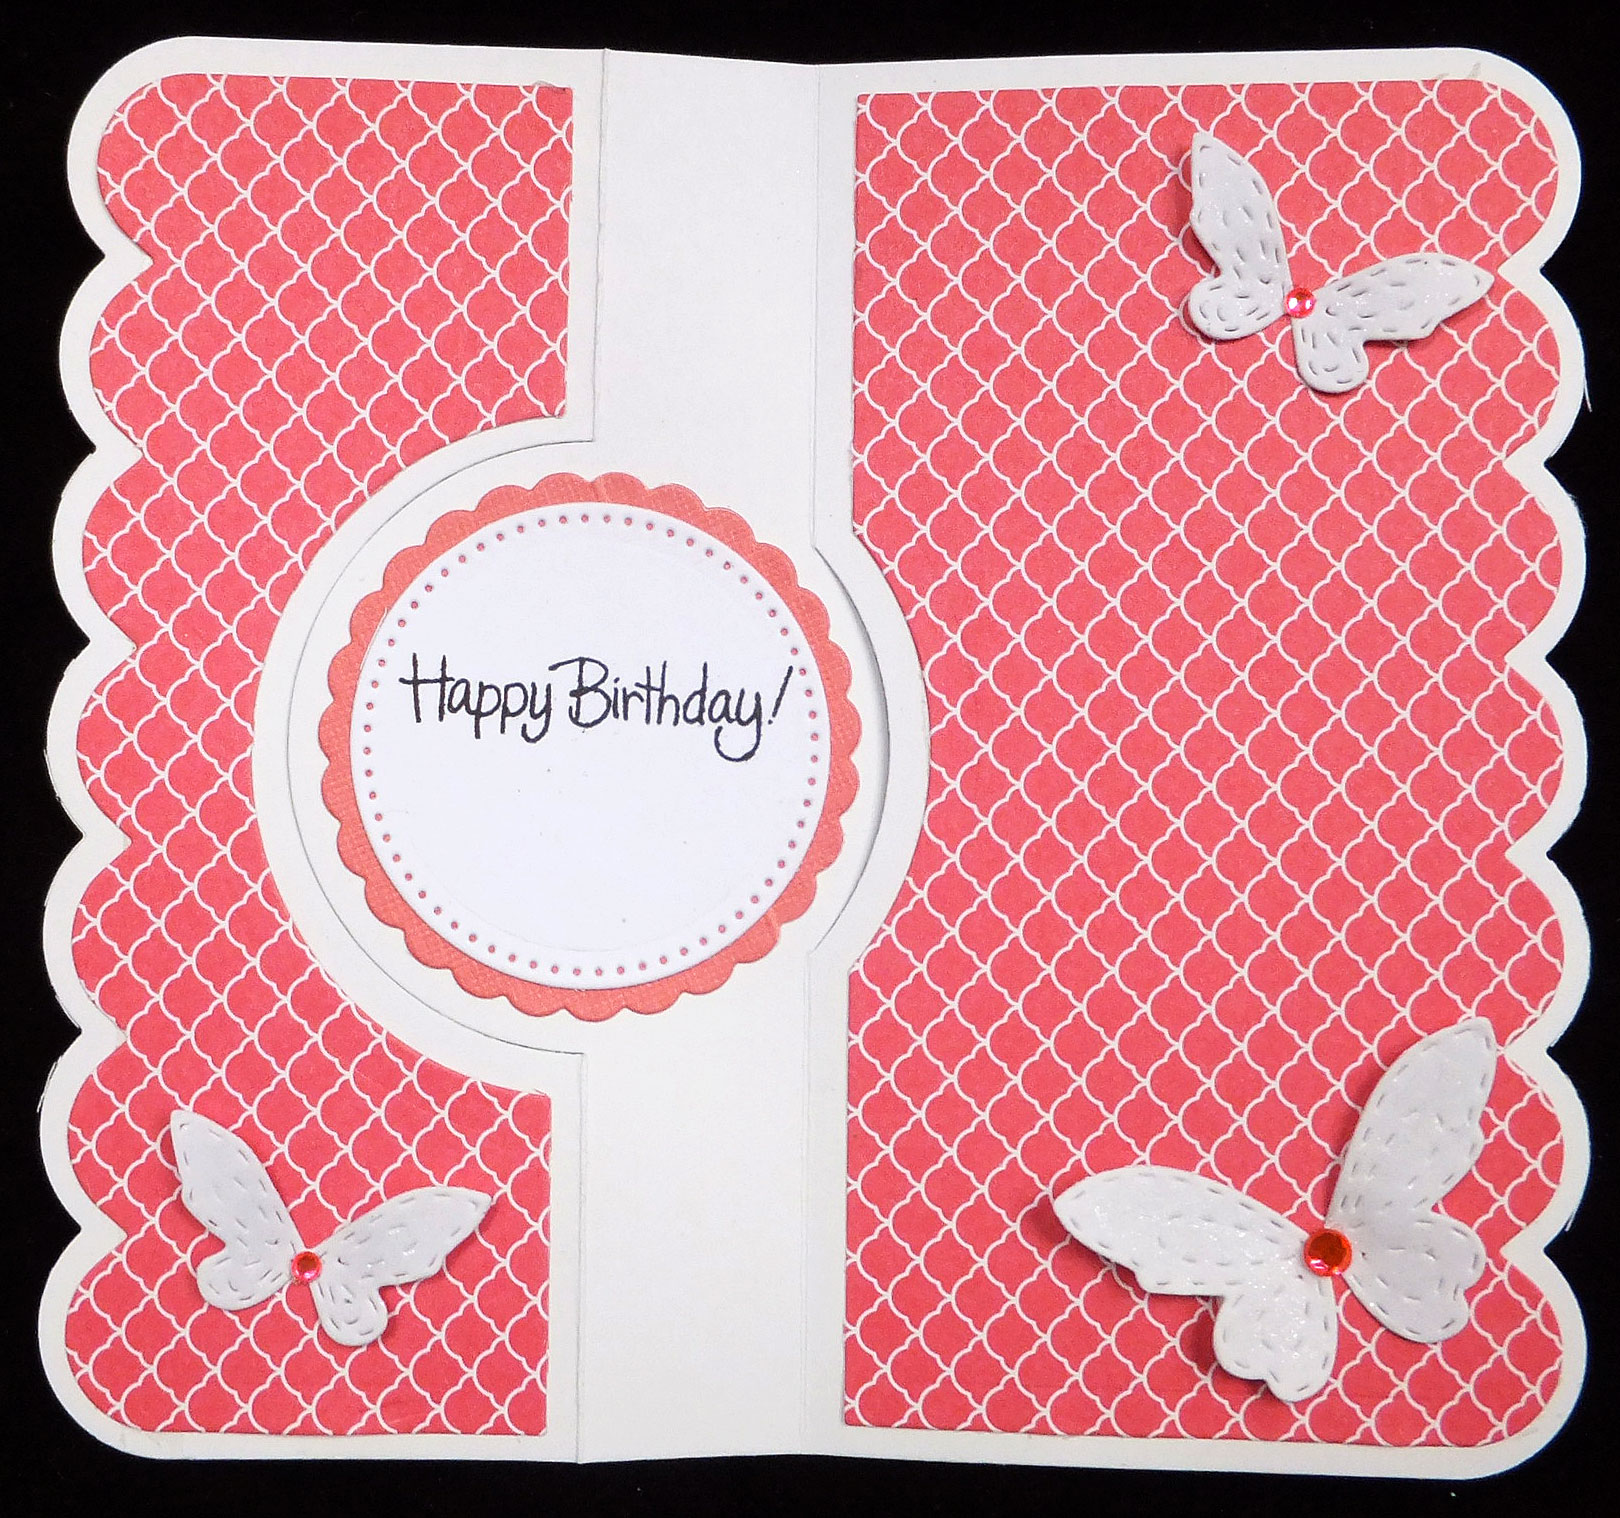
I used my computer to print this sentiment. I'm not sure where I found it. As I've said before, I tend to collect sentiments, writing them down on scraps of paper whenever I see them. I occasionally just make them up, too, as I enjoy writing simple poetry.


Today, in the afternoon, I will carve a big pumpkin, line it with foil (to protect the flesh), put a candle inside and set it out at about sunset. just before the kids begin coming to our door. As soon as they stop, which is usually around 9 p.m. or so, I bring the pumpkin in, cut it into chunks and bake it until it's soft. Tomorrow, I will puree all the pumpkin flesh and freeze it in 2-cup amounts. I use it year-round to make pumpkin bars, pies, bread, etc.

Happy Halloween to all of you! I hope you have lots of trick-or-treaters. It's always fun to see their costumes and their excitement at getting all that candy.

Thanks so much for stopping by, and remember to laugh--a little or a lot--every day.

Cheryl


Friday, October 28, 2022

Magic potions and flying bats...


This is another of the Halloween cards I made--in fact, I think I made 6 or 7 of these. I love this die set that includes all the potion bottles, a couple of books and a skull and candle. I also die cut a few bats from another die set, and the word "spooky."


Everything, but the bats and sentiment, was cut from white cardstock and colored with alcohol markers. It's just so much quicker for me to do it that way, rather than cutting each little piece out of a different color cardstock.


I think I saw this sentiment, or something similar, on a card in the drugstore. I printed it four times on a sheet of cardstock to create four inside panels for my cards.


I saw this card idea in a YouTube video. I wrote down all the dimensions--and then promptly misplaced them!! So, rather than trying to find the video again, I just made it up as I went along, 


When the inside card is pulled up, it pulls up the bats on the moon and reveals the sentiment on the inside.

There's just enough room at the bottom of the sentiment for a signature.


To create this card I used an A2 top-folding card and put the fold at the bottom. Before adhering the sides together with 1/8" red-line tape, I used a Stampin' Up Word Window punch to make the slot and a circle punch to create the half-circle divot at the top center of the card.

The interior card was cut to 3 3/4" X 5 1/2" (or slightly less to make sure it is flush with the top of the card when pushed all the way in).

A round pop dot was used to adhere the moon to the inside card and to act as a stopper so that the card doesn't pull all the way out.


On the back, I adhered a spider web border, gluing just the left and right ends to the card. This band can hold a monetary gift and/or a special note for the recipient.

I really do love making Halloween cards; I just wish I hadn't been so rushed this year. I think I made 20+ for my own use and another 8-10 for the thrift store.

I am writing this post on Thursday night, because Friday will be dedicated to a final meeting with the contractor who remodeled our kitchen and also painting the dining room. Once we get the dining room painted we can finally move the table and chairs back into place. Then it will begin to feel like "home" again.

Thanks so much for stopping by, and remember to laugh--a little or a lot--every day.

Cheryl

Tuesday, October 25, 2022

Happy Halloween...

 I have managed to get all of my Halloween cards made and in the mail. Phew! It was a race to get them made in time so they would arrive before the 31st. Here is one I had fun creating:

I had this spooky die-cut house in my stash, and I wanted to use it. I backed it with some silver cardstock because I don't like house images that have "empty" window areas where the background shows through. I also had a narrow strip of white cardstock with the above verse printed on it. I soon realized that it was just the right size to add the house at the bottom. I did exactly that, and I also added the little scalloped border, but there was still something missing.


The verse says the sky is "the color of soot," so I decided to add some decidedly gray clouds. That was just the touch it needed! 

Because my house was black and the windows and doorway were metallic silver, I was able to use my cloud stencil and not worry about getting any gray smudges on the house. 

I liked this card so much, that I made another one where I added the clouds before I adhered the house.


On the inside, I stamped a simple "Happy Halloween."

Since I planned to send this card to a family member, I decided I also needed to make a couple for the thrift store. I had a 6" X 6" distressed Halloween paper stack that I had gotten from the thrift store. There were a couple of pages with some cute Halloween images on them.


 The pumpkins and the little girl were already printed on the distressed background. I added some die-cut bats and a "Happy Halloween" sentiment. 


On the inside I added a computer-generated sentiment. I like this sentiment because it works well for an adult or a child.

I'll have a few more Hallween cards to share with you in the next couple of weeks. Now that I'm done with them, though, I can finally move on to Thanksgiving cards. Those should come together pretty quickly, as I don't make nearly as many of them.

Thanks so much for stopping by, and remember to laugh--a little or a lot--every day.

Cheryl


Friday, October 21, 2022

A Halloween hello...

 I have a new Halloween die set that features a cute cat wearing a witch's hat. It's one of those die sets that has only a few pieces to adhere together, so it's quick to make up.

I used another die set to cut a few bats to add to my little cat scene. The sentiment was stamped with Versafine black ink and then heat-embossed with clear embossing powder.


I cut the cat, bats and hat band from black cardstock and the hat from purple cardstock. The other, smaller pieces were cut from white cardstock and colored with alcohol markers. 

I also added some highlights (bats' eyes, hat band buckle, spider string and cat's whiskers and toes) with a silver gel pen.

My rickrack-style border came from a set of border stickers that I had in my stash.


I saw this sentiment on a card somewhere and wrote it down at the time. Luckily, I was able to find it recently and use it on some of my Halloween cards. I'm always writing down sentiment ideas on scraps of paper, but it's never a sure thing that I'll be able to find them when I need them!

We will be having fabulous--high 70s--weather this weekend. That means we'll have to use this opportunity to work in the yard and prepare it for the winter. Goodness knows we'll have snow soon enough. It will be great to get a little outdoor exercise for a change, though.

Thanks so much for stopping by, and remember to laugh--a little or a lot--every day.

Cheryl

Tuesday, October 18, 2022

A triple-scoop happy birthday...


I have tried and tried to remember where I got this stamp. I think I may have gotten it at the thrift store, but I just can't be sure. It's such a fun image, though, don't you think?


I used my alcohol markers to quickly color it before matting and adhering it to my card base.

The sentiment was die cut from both white and black cardstock and then stacked for dimension, with the black on top.

I've added a strip of black cardstock to the bottom with an enamel dot on the right side. I thought this black strip helped to balance out the black sentiment. 


The inside sentiment is from a clear stamp set that is geared toward kids. It's a fun set that has come in handy when I am making kids' cards to donate to the thrift store.

I am currently scrambling to get my Halloween cards made in time to get them in the mail. We've been so busy doing things around the house that I just haven't had time to work on them. Hopefully, I'll have some to share with you soon.

Thanks so much for stopping by, and remember to laugh--a little or a lot--every day.

Cheryl


Friday, October 14, 2022

A couple of flip cards...

 Every once in a while I dig out my flip card die set and make some cards for the thrift store. It's fun to use this die set because it cuts out a DSP layer and the different circles for the focal point. I think customers at the thrift store find these cards fun and different from the usual.

This card features my favorite stitched butterflies. I've used a gem in the center of each one for a little sparkle.


This photo shows how the card looks when opened. I make sure to leave a little space on this side of the circle for a signature.


Here's a close-up of the largest butterfly. They can be layered, too, if you choose to do so.


Since I had some of this "little sweet pea" paper left in my stash, I thought I would also make a baby card. I wish you could see the green of the cardstock behind each scalloped layer of DSP in the photo above. I should have taken it on a lighter background.


A while ago, I bought several different kinds of tiny heart embellishments, like the one you see here. I just love them for cards like this.


Again, here is the card when it is fully opened. 

Aren't these cards a nice change from the usual side-fold or top-fold A2 cards? They actually are A2 size when folded, so no special envelope is needed.


Kitchen Remodel Update:

Tonight I was able to cook on my own stove for the first time since August 7. They moved it back into the kitchen today and hooked it up (it's a gas stove). My refrigerator is still in the dining room, but that will hopefully be moved into the kitchen in a day or two. Then we'll need to concentrate on painting the living room and dining room so we can get back to normal living!

Thanks so much for stopping by, and remember to laugh--a little or a lot--every day.

Cheryl

Tuesday, October 11, 2022

I promised a pink monster, and here she is...


This time I gave my little monster a couple of balloons to hold onto. Isn't she cute?, I inked around the edges of the pink areas, added some Glossy Accents to the embossed areas on her face, and used real thread for the balloon strings.

The monster's head and the balloons are popped up on foam tape for a little dimension.


I've made up a couple different monster-themed sentiments for the insides of these cards and this is one of them. 

Customers really seem to like them at the thrift store, so I'm very glad I bought this die set. 

I can see making some Valentines with these dies, too, and adding some heart-shaped balloons, or maybe adding the arms in such a way that the monster is holding a little bouquet of flowers.


Our kitchen should be done by the end of this week. I actually went out today and bought a new plant to put in it. Kind of silly, because the last thing I actually need is a plant. But it's a pretty succulent and makes me happy to look at it. So there's that...

Thanks so much for stopping by, and remember to laugh--a little or a lot--every day.

Cheryl

Friday, October 7, 2022

Inking an embossing folder...

 I decided that I wanted to have another go at inking up an embossing folder. I selected one of the few 3D folders that I have and used some blue Distress Oxide ink on it.

I was really pleased with the coverage I got. I used a brayer to ink up the background side of the EF and kept my panel of cardstock in place so that I could brayer on more ink several times. Once that was done and the ink had dried, I glued the panel to the front of a white card base.


I think the Distress Oxide ink works better for this technique than any other ink I've tried. Also, using a brayer helps to get nice, even coverage.

I used a glitter pen to add just a tiny bit of sparkle in the creases of the flowers where some ink occasionally settled. I also glued on a few pearls.

The stamped sentiment oval was one I had in my stash, and I simply popped it up on foam tape.


I stamped another sentiment on the inside and my card was done.

This was so easy that I think I'll make a few more in different colors for the thrift store to sell.


Now a little about out latest "adventure." We went on a RoadScholar trip to a guest ranch called Rancho de la Osa, which is about an hour south of Tucson, AZ, very near to Sasabe, Mexico.

This is one building with guest rooms on the ranch grounds. We had a large room with a fireplace in the middle of this building. It was built in the 1800s, so was quite rustic, but with everything we needed for comfort. It was also air-conditioned, so even in 95+ temps, we were comfortable.

Other buildings on the ranch included the hacienda, where we had three fabulous meals a day, a cantina where we gathered for some of our classes and to socialize with others in our group , additional buildings with guest rooms, and, of course, the horse barn and other outbuildings.

We rode horses most days. The horse assigned to me was named Boone. He was a gentle, patient soul, and we got along well. The trail rides lasted about 1 1/2 hours and took us into the Sonoran Desert countryside.

When we weren't riding horses or doing other outside activities, we had informative classes we could attend. One of them was a watercolor class, taught by an artist from Tucson. In the picture above, my creation is on the left and my husband's is on the right (guess who is the wine drinker in the family? LOL). We also had classes from experts on Navaho jewelry and weavings, desert plants and their uses, horsemanship, varieties of tequila and how they're made, etc. We enjoyed the classes as much as the trail rides and we're looking forward to another RoadScholar trip - maybe in 2023.

One early evening, after a sudden rainstorm, we had this beautiful sunset. It's a great reminder of the fun we had "getting our cowboy on" at Rancho de la Osa.

Thanks so much for stopping by, and remember to laugh--a little or a lot--every day.
Cheryl

Wednesday, October 5, 2022

Let's Craft and Create Challenge #188: Anything Goes or Colors of Fall (Use any or all of these colors - red, yellow, orange, brown)...


The beautiful month of October has arrived and it's time for another challenge at Let's Craft and Create. You can choose to enter any sort of card under the "Anything Goes" option, or you can create something using the fall colors of red, yellow, orange and/or brown.

I have chosen to use shades of brown to make a sympathy card. I believe that muted colors are perfect for sympathy cards, and I really liked how the browns and beiges looked on this one.

I started with some heavy, patterned cardstock to make my card base. I added the "With Deepest Sumpathy" die-cut that had been backed with one of the lighter shades found on the card base.


I die-cut a flower, but kept all the interior cutouts in place by adding some tape to the back of it.

I also added a little shading to the petals and backed the center with a very dark brown piece of CS.

The sprig of die-cut leaves in off-white added some nice contrast.


The inside was stamped with an appropriate sentiment.

I prefer making sympathy cards before I need them. It's so much easier to choose such a card from my stash, rather than making it at the last minute.

Now it's your turn. For some special inspiration, visit Let's Craft and Create to see what the Design Team has come up with. Even I am excited to see what my talented teammates come up with each month.

And don't forget--there is a prize you could win!

Thanks so much for stopping by, and remember to laugh--a little or a lot--every day.

Cheryl


Monday, October 3, 2022

I always knew we would get old...


This is a card I made and sent to my oldest brother. I wanted to make it fun and interactive, so I adhered some stars to some clear strips of plastic that I salvaged from some packaging material. I glued the other end of the clear strips between the layers of my sentiment panel.

The stars bob and wiggle when the card is moved, so they add a bit of fun. The sentiment was printed with my computer and it was popped up on foam tape.

This is the inside of my card. I did trim that rough edge on the bottom of the card base. It's funny how you sometimes don't see stuff like that until you take a picture.

This sentiment was also printed with my computer. I have set up a form in Word where I can pull it up, add four sentiments, then print and cut them out. It's very quick, so I often use this method for sentiments, rather than searching through my stamps.

This is just a quick post today, as I have scheduled another post for October 5, when we start another month-long challenge at Let's Craft and Create.

Thanks so much for stopping by, and remember to laugh--a little or a lot--every day.

Cheryl