Wish List

Friday, July 29, 2022

Wedding card in basic black and white...


I made two of these simple wedding cards to donate to the thrift store. The A2 card base was made with some sparkly black/grey/white patterned cardstock. The pattern was very glittery, and if you look closely at the photos, you'll see the sparkle. I also used my corner-rounder on the upper right corner.


I added clear flat-backed gems to the sentiment, the bride's hair and to her bouquet.

The bride/groom die-cut was popped up on foam squares, as was the sentiment.


On the inside I added a stamped sentiment.

This was a super simple card to make. The glittery cardstock did most of the work for me!


Last night we went to an outdoor musical performance in our neighbor's back yard. It was a beautiful summer evening to sit and listen to great music with friends and neighbors.

Thanks so much for stopping by, and remember to laugh--a little or a lot--every day.

Cheryl

Tuesday, July 26, 2022

Get well soon...


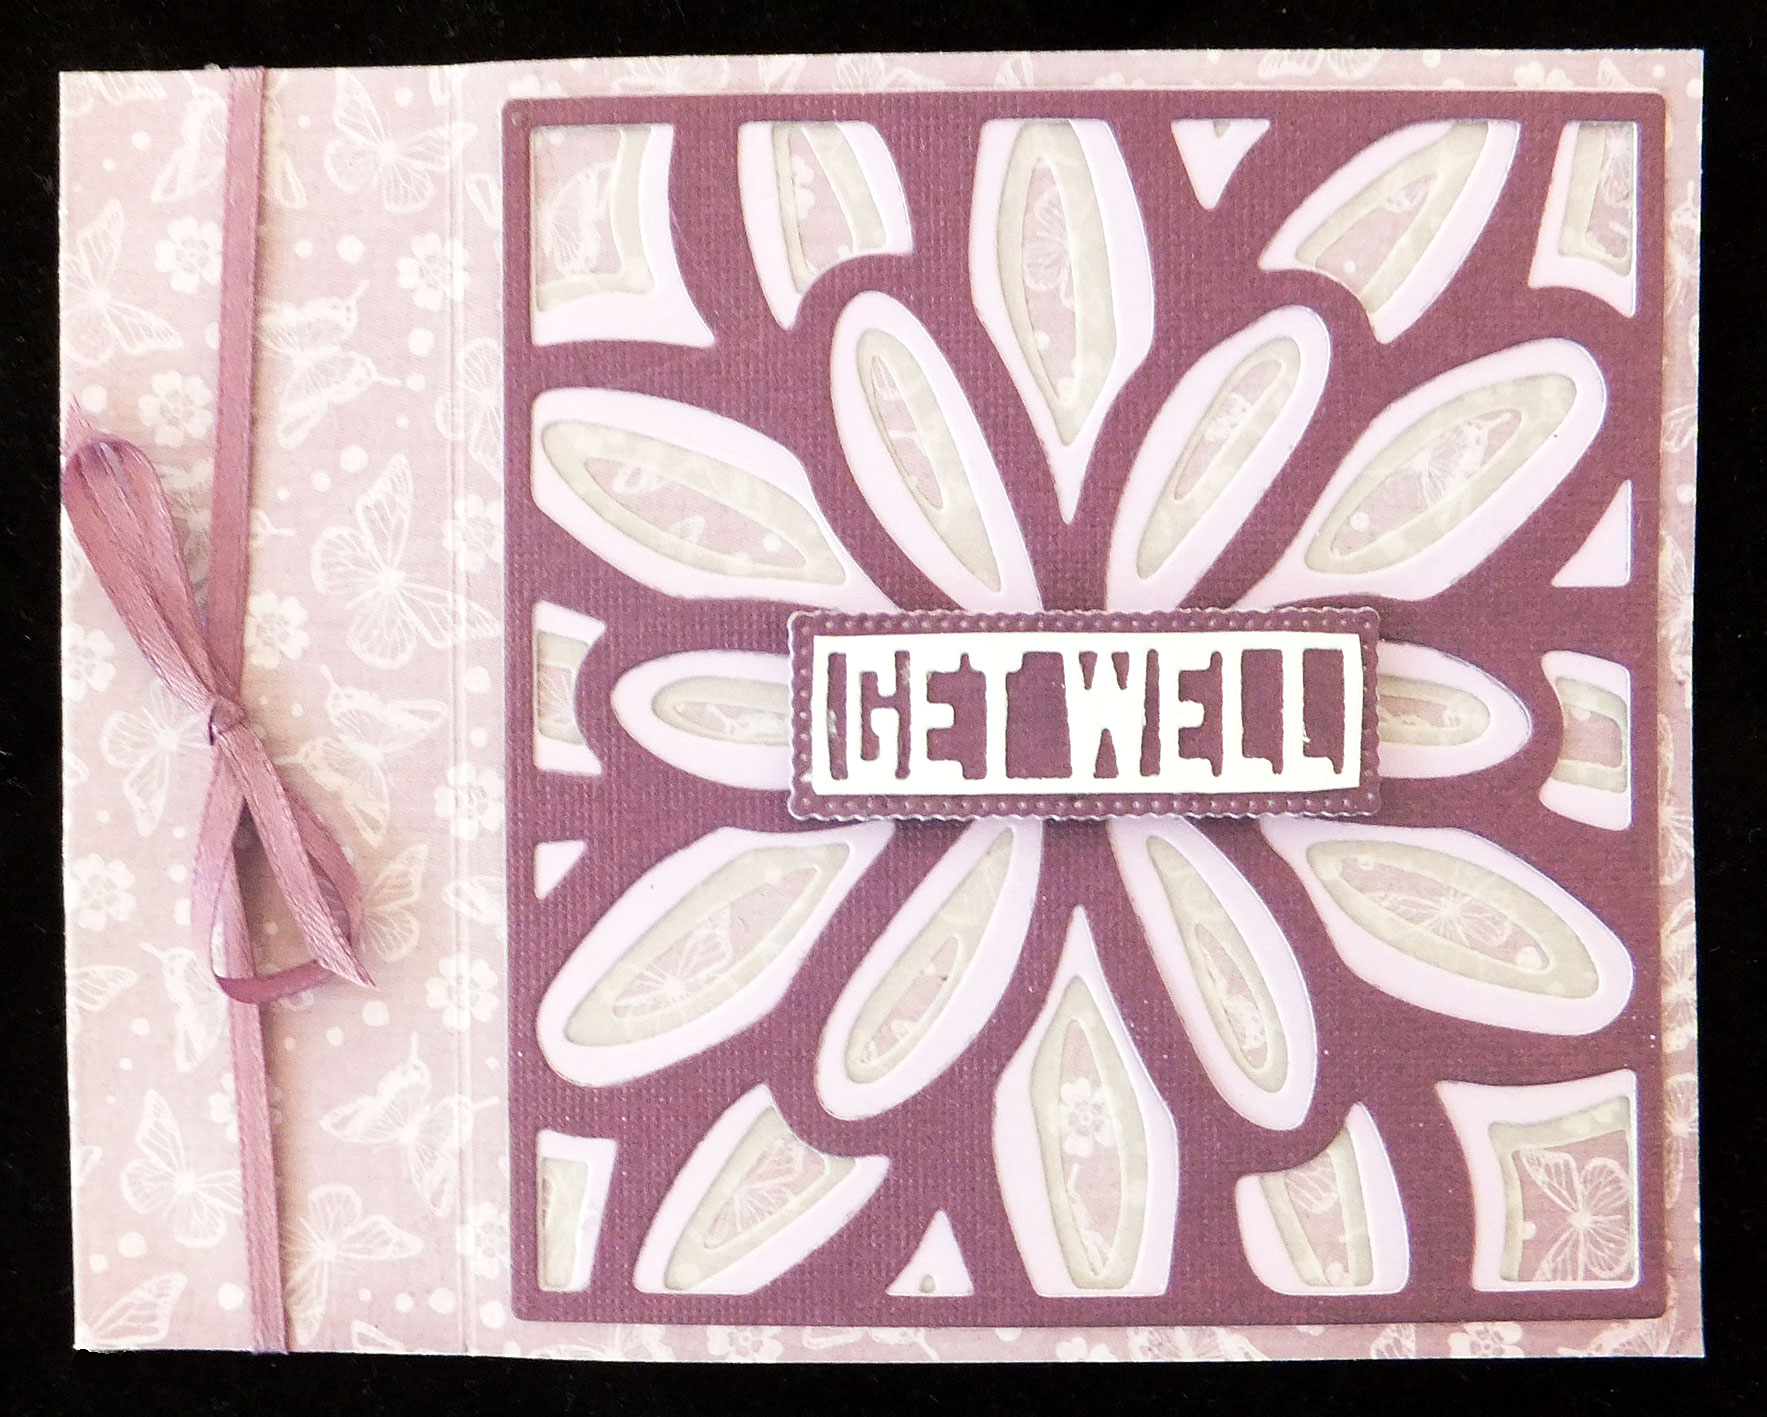
 This is not a good photo, but I thought I'd share it anyway. I started this card by creating a "book binding" card base. The left 1 1/4" of the A2 card base is adhered together (after tying my ribbon around the front portion). That leaves a 4 1/4" X 4 1/4" portion of the card that opens normally on the right. My layering die fit nicely into this area.


What I did on this card that was a little unusual is that I cut one of my layers from vellum. If you look closely at the photo on the left, you'll see there is the deep purple on top, then a pale lilac layer and finally a vellum layer that allows a bit of my DSP to show through.


On the inside was a simple, stamped sentiment.

This card was donated and sold quickly, so I think I need to make some more of them.

I am finally ready to share just a few photos of our trip to the Northwest to visit two of our kids and their families there. 

We had such a nice time and the weather was perfect. In fact, I was sunburned a couple times and am now sporting a nice tan.


This is my daughter-in-law's "wall of flowers" on their deck, which is where we spent part of every day. Their home looks out over a preserve, so there are no homes or commercial buildings to obstruct the view.

This is the view from the deck. You can see Mt. St. Helens peeking out from behind the trees in the center of the photograph. Most days we could see this mountain and on a few days with saw two other mountains, as well. It all just depends on how hazy the day is.


The granddogs were happy to see us, although they look pretty disninterested in this photo! They loved being out on the deck with us or playing in the back yard. Charlie is the dark brown and white dog and CJ is the light brown dog. They are super friendly and affectionate. CJ will kiss you on the lips on command! You just have to know how to give the command.


Each morning my daughter-in-law Jenn offered to make me a special latte with their incredible Italian espresso machine . I usually took her up on it. They were so good!


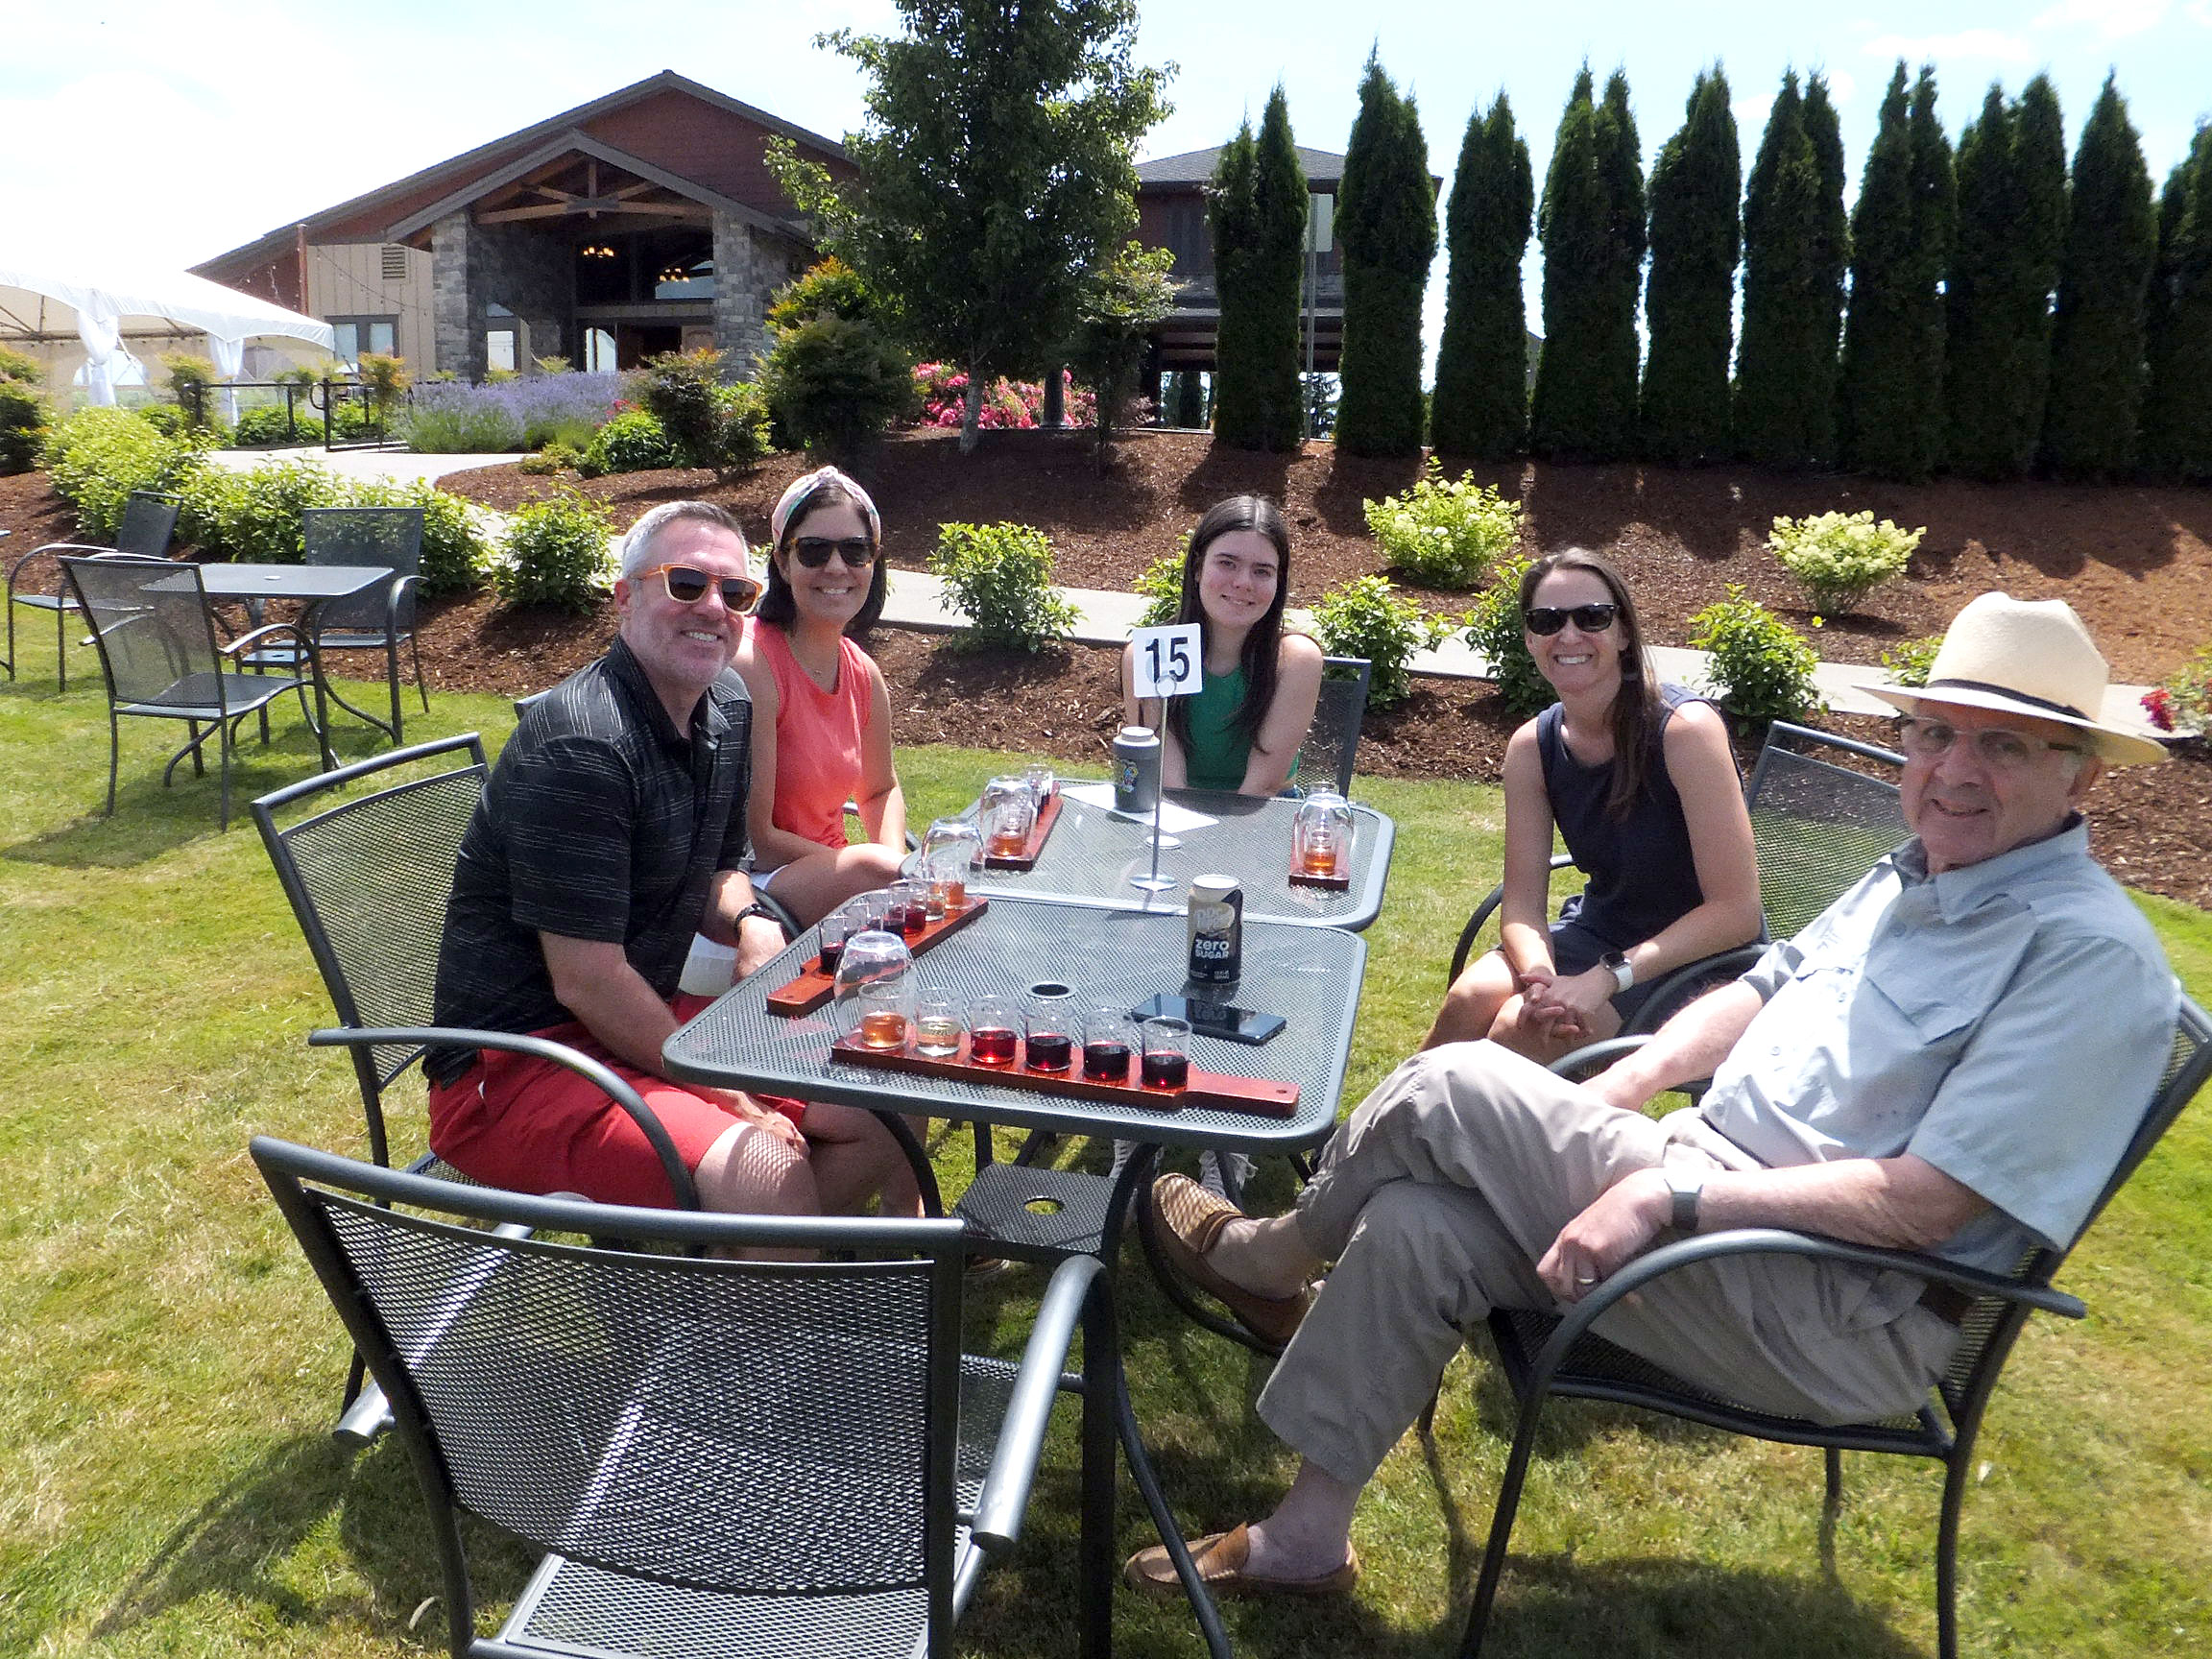
One day we visited a local winery where we were able to sit outside and taste several of their wines. My son was not with us on this day--he was in New Orleans receiving an award.


Another day we went crabbing in the waters of the Pacific at Tillamook, Oregon. Gary and I did our crabbing from the dock, whereas the rest of our crew went out on a boat to crab in deeper waters.

We didn't catch much. I'm sure that's not because we're such inexperienced crabbers! ha ha

Later in the day we toured Tillamook Creamery. It's a fascinating place that produces wonderful cheeses, ice cream and other milk-based products. Of course, we had to end our tour with an ice cream treat!


This is daughter Heather with another granddog named Joey. He's a timid dog but very sweet and well-behaved. We loved having him around, even when we went crabbing.


Gary celebrated his birthday on my son and daughter-in-law's deck. He received mostly gifts related to dogs--a leash, a dog toy and some dog waste disposal bags with their own dispenser. We will be adopting a fur-baby this fall, so the gifts were in preparation for that!


Part of the time we were in Oregon and Washington, my son was in New Orleans to receive an award from the National Federation of the Blind. Scott was named the "2022 Distinguished Educator of Blind Students." You can read about it here.

We're so proud of him and his strong commitment to education of blind students.

Well, that's it for me today. Thanks so much for stopping by, and remember to laugh--a little or a lot--every day.

Cheryl


Friday, July 22, 2022

Masculine birthday card...

 Some of you may remember that I always struggle with masculine cards. Occasionally, I "bite the bullet" and get some made. Here's one that I created recently:

Men like gears, right? I have some gear dies and used them for this card. The background paper is from a wood-patterned sheet that I've had for a long time..


The word "birthday" was cut, along with it's shadow, and popped up with foam squares. The chunky font makes it easy to attach the squares to the back.

I happened to have the word "happy" already heat-embossed with white EP on black cardstock, so I popped that up, too, with some foam squares.


The sentiment on the inside was printed with my computer.

I think I need to make a few more of these--some to donate and some to have on hand.

I am home now from our trip to Oregon and Washington. I hope to share some photos with you in my next vote. We had a lovely time and especially enjoyed spending time with our granddaughter, Hadley.

Thanks so much for stopping by, and remember to laugh--a little or a lot--every day.

Cheryl

Tuesday, July 19, 2022

Thanks a melon...


I had an 8" x 8" sheet of watermelon patterned paper in my stash for a very long time. I also purchased a small set of watermelon dies. The warm weather of late has me craving a nice, cold piece of watermelon.  I haven't gotten that watermelon yet, so I decided to make a watermelon card instead.

I'm not sure what the name of this card fold is, but it's easy to make and I really like it. I'd share a link to the site where I saw it, but I can't find one anywhere!

I believe I started with a piece of cardstock cut at 7" x 5 1/2", scored at 2 3/4" to create an A2 card base. I also cut a piece that was 4" x 4", scored at 1" to create the smaller flap on the right side. Once the base was put together, it was simply a matter of cutting the pieces of DSP or white cardstock to fit each area.


The little watermelon dies cut three different layers, plus they have the holes through which you can use a black marker to color the seeds.


I used a stamped sentiment on the inside. I plan to make a couple more of these. They would be a fun addition to the selection of cards at the thrift store.

We are arriving home from our trip to the Northwest today. I'm hoping to share some photos with you very soon.

Thanks so much for stopping by, and remember to laugh--a little or a lot--every day.

Cheryl


Friday, July 15, 2022

Art Impressions Golden Oldies images...

 The thrift store where I volunteer received a donation of craft items that included some Art Impressions Golden Oldies card kits. The kits were not complete--parts of them had been used--but I was able to make a few cards out of what was left and donate them back to the store.

I created some backgrounds and then began layering the images on them.

I like these three grumpy guys. You can see the shadows in the above photo, caused by the popped up layers. 


These cards were so quick to make because all the images could be punched out - no cutting necessary!

Even the sentiment was punched out. I did layer it up, though, on some black cardstock to give it a more finished look.


The sentiment in the square came with the kit. I stamped "Happy Birthday" beneath it.


Can you imagine three "older" ladies doing this? The only outcome I can imagine is broken hips and fractured knees!


The layers are clearly visible in the photo at left.


I added some blue paper to the inside of this card before adhering the matted sentiment.

Sometimes it's fun to take a break and use a kit like this. It was very satisfying to make these cards in such a short amount of time. They sold really well at the thrift store, too.

Thanks so much for stopping by, and remember to laugh--a little or a lot--every day.

Cheryl

Tuesday, July 12, 2022

One die + two papers = two cards...


 I pulled out my Big Paper Hugs die along with some patterned and pale pink papers. I already had two card bases (medium pink and black) in my stash, so I pulled those out, too.


I cut a piece of pale pink CS to 4" X 5 1/4". Centering the die on this piece, I ran it through my Big Shot. When I rmoved the letters, I made sure I also kept the interior pieces for the letters B, P, A and R.


I followed the same process with the floral CS. Before assembling the cards, I also cut a few small flowers out of a leftover piece of the medium pink CS.

Then the fun part began with first putting sheet adhesive on the backs of the two 4" x 5 1/4" pieces and adhering those to the card fronts. That left adhesive exposed in the letter cutouts. It was easy to add the floral letters to the pink CS and the pale pink letters to the floral CS.

The fronts were finished off with a few flowers glued here and there.


The inside of each card was given a stamped sentiment.

I love paper-piecing, and these cards were a form of that. 

Thanks so much for stopping by, and remember to laugh--a little or a lot--every day.

Cheryl

Friday, July 8, 2022

Easy monster birthday cards...

 I always try to make a few children's birthday cards for the thrift store. My only requirement is that they be quick and easy. Here are a couple of fun makes that meet that requirement:


Aren't they goofy looking monsters? Looking at them in the photo, I feel like I should have put a couple tufts of hair (using a grass die or punch) on the center top. I thought my crafty friend Donna of Design by Donna might like to make a couple of these to include in the cards she donates to Cards 4 Kids.

I started with two A2 portrait-style (fold at the top) card bases. Before working on the front, I adhered a sentiment panel to the inside that had a computer-generated sentiment.

Then I decided on what I wanted the front "skin" of each monster to be. For the first one I used a kraft cardstock that had silver dots all over it. I cut it to 4 1/4" X 5 1/2". Then I used a curved border die (one that's meant for making landscapes) to cut it into two pieces, making the cut closer to the bottom. The smaller piece was adhered to the inside of the card base, right over the top of my sentiment panel, lining it up at the bottom. The larger piece was temporarily adhered to the top of the card base so that I could fussy-cut the front of the card base to match the curve of my "skin." 

Before I glued down the larger piece of "skin," I cut a few triangles of white CS in somewhat different sizes and glued them to the front of the card base so that they extended over the bottom piece of "skin" when the card was closed. Once the teeth were in place, I permanently adhered the top piece of "skin" and added different sizes of circles of black and white for the eyes.


The "skin" on the second monster was some DSP that I dry-embossed with a dots embossing folder. Note that it had been cut with the curved die before I embossed it.


Here's a peek at the inside with the smaller piece of "skin" adhered to the bottom.

These cards were so fun to make. I think next time I will add those tufts of hair, and I'm going to round the two top corners so that it looks more like the monster's head.

As you read this, we are traveling to Portland, Oregon, to visit our kids who live there. We only get to see them once or twice a year, so this is a really special time for us. I hope to have some photos to share when we get back.

Thanks so much for stopping by, and remember to laugh--a little or a lot--every day.

Cheryl

Tuesday, July 5, 2022

Let's Craft and Create Challenge #185: Anything Goes or Fun in the Sun...


It's time once again for our monthly challenge at Let's Craft and Create. You can always join in the fun via the category "Anything Goes," but I find it's even more fun to create a card according to the alternate suggestion. This time it's "Fun in the Sun."

I opted for a clean and simple design, and I really enjoyed how quickly this card came together.

I started with my scalloped and stitched rectangle and did a little light inking in the center--blue on the top, green on the bottom. When that was done, I used my stamp positioner to stamp my sentiment on the lower right. There were two line-art hearts that were part of the stamp, so I die-cut a couple of tiny red hearts and glued them on top of the line-art ones.


I die-cut my whimsical sun and adhered it to the panel. Then  I die-cut some clouds, inking them lightly on the bottom with blue ink. I popped a couple of them up with foam pads.


The sentiment on the inside came from a completely different stamp set than the one on the front. I thought it was perfect, though.

This would be a great card to send to a child or grandchild who's gone off to college. I think it would brighten their day and let them know how much they mattered.

I hope you'll consider making a card that will add some sunshine to someone's life and join our challenge. Check out the creations of the design team here. They are all so talented, and I think you'll be inspired.

Thanks so much for stopping by, and remember to laugh--a little or a lot--every day.

Cheryl


Friday, July 1, 2022

Happy Independence Day...


This is an example of the cards I made this year to celebrate the 4th of July. The others looked just like this one.

I had a 12" X 12" piece of red and blue striped paper with stars along each of the stripes. I cut and adhered a piece of it to each blue card base. I decided to add even more stars with a special die and some holographic metallic cardstock. 

I love this "swirl of stars" die. It cuts not only the swirl with its stars connected, but also three other free-standing stars of different sizes. I adhered a large one in the lower left corner and the two smaller ones in the upper right corner.

The sentiment was printed with my computer, cut out with a sentiment strip die and then matted and popped up on foam tape.


The sentiment on the inside was also computer-generated. I added a few tiny holographic stars that I had in my stash.

Do you make 4th of July cards? They always seem like "low-pressure" cards to me, because nobody really expects to get a card for that holiday. I only send them to my elderly aunts, and they really appreciate them.

Thanks so much for stopping by, and remember to laugh--a little or a lot--every day.

Cheryl