Wish List

Wednesday, July 9, 2025

Using vellum stickers...

A short time ago, I saw a card on Heartwarmers by Vicki that inspired me to make a couple of cards. I simply guessed at the measurements to use, and I think they turned out to be quite nice cards.

This design enabled me to use up a scrap of the striped DSP. I think it was 3" wide, and the navy blue mat under it was 3 1/4" wide. I made each matted piece just long enough to fit under the diagonal strip.


The flower is a vellum-like sticker that has some metallic gold highlights. The colors in it went perfectly with the DSP and navy card base.

The sticker is rather delicate, so I applied it to some white cardstock first and then die-cut the circle. This worked really well because it helped to embed the image into the white paper.

Each circle was then popped up on foam squares.


I made the diagonal strip of navy blue CS 1" wide, and the white mat under it is 1 1/4" wide.


I used Night of Navy ink to stamp the sentiments on the front and inside.

I have a lot of the floral stickers in different colors, so I think I'll be making more cards like this to donate to the thrift store and to have in my own stash of cards.

Our new sofa and one of our new end tables has been delivered. The second end table should arrive today. New furniture is so much fun!

Thanks so much for stopping by, and remember to laugh--a little or a lot--every day.

Cheryl

Monday, July 7, 2025

Birthday card for a young man...

 One of my handsome grandsons turned 20 recently and this is the card I made for him:

It's a pop-out fun fold that is a simplified version of the one that is made in this tutorial


I think most young men dream of owning a pickup--unless they already have one, of coursse--so I used a pickup die-set to create this one. I even put some vellum in the back window, although you can't see it.

The balloons were all popped up with foam squares and a black piece of thread was attached to each one. 

The letters were stickers, and the word "Birthday" was stamped onto the tailgate.

I used metallic silver cardstock for the bumper, lights and sideview mirrors. The brake lights have a red dot glued to the little metallic circle.


I used some gray, nubby vinyl for the eight small sections you see here. I thought it might resemble some vinyl upholstery in a pickup.

Both sentiments on the inside were stamped. I just had to make sure that the second one was in the center so that it would be covered up when the card was closed.

This was a fun card to make, and it really isn't difficult--just a little time-consuming.

Thanks so much for stopping by, and remember to laugh--a little or a lot--every day.

Cheryl

Saturday, July 5, 2025

Let's Craft and Create Challenge #221: Anything Goes or Punch It! (Use a hand punch and/or die)...


It's time for another fun challenge at Let's Craft and Create. This month you can choose the usual Anything Goes option, or you can opt to create with a punch or die (or both!).

I chose to start with a scalloped circle punch. I hadn't used it in a very long time, and it was definitely due for a little action.

I wanted to make a couple of children's birthday cards and decided to create some Sesame Street characters with my punch.


I chose a slimline card base that measured 3" X 7 1/2". I pulled out a stencil from my stencil drawer, some inks to match the the colors of the characters I would make, and began inking up my card front.

For each character, I first punched a scalloped circle from the appropriate color of cardstock.

I used a small circle punch to punch two white circles for each character.  I also used a 1/8" single-hole punch to create small black circles for the eyes.

The sentiment was stamped, matted with black and popped up on foam tape.


A small circle die was used to create Cookie Monster's mouth. I simply cut the circle in half. Then I punched another small circle for the cookie and used a small, scallop-edge die to make the bitten end.

Elmo's mouth is the other half of the circle used to make Cookie Monster's mouth, and his nose was made with the same punch used for the eyes.


I fussy-cut Oscar the Grouch's eyebrows and added them to his eyes after cutting off a bit of the white.

The mouth was cut from a circle die-cut and the tongue was 1/2 of a circle that came from the middle of an "O" die. 

Big Bird's top feathers were fussy-cut from some yellow scraps.

His beak was made with a die for a narrow leaf. I just cut it twice out of two different colors of cardstock and layered them.


To decorate the inside, I added a strip of cardstock the color of each character to the top and bottom before stamping a sentiment.

Since this card has some fun stenciling on it, I am adding it to Darnell's (DJKardKreations) weekly inspiration post.

Now it's your turn. I hope you'll join us with your punched and/or die-cut creations. Of course you can always choose the "Anything Goes" option, too.

Be sure to check out the Design Team's wonderful creations at Let's Craft and Create. The other team members always inspire me, and I know they'll inspire you, too!

Thanks so much for stopping by, and remember to laugh--a little or a lot--every day.

Cheryl

Friday, July 4, 2025

Happy 4th of July 2025...

Each year I send only two cards for the 4th of July--to my two elderly aunts. One is 89 and lives in North Dakota and the other is 98 and lives in Montana. Luckily, on our recent RV trip, I was able to visit with each of them in person.

I made two of these cards to send to them:

I started with a blue card base and added some patriotic DSP to the bottom of it. The "happy" was cut with a "happy birthday" die. The number 4 and the little "th" were cut with a number die set that I have.


Each of the die-cut balloons is popped up with foam squares.

I added some marks with a white gel pen to indicate the shine on the balloons. Since it wouldn't show on the white balloon, I used a glitter pen on that one.


In one of my birthday stamp sets, I have some fireworks stamps, so I used them on the inside, along with a "celebrate" stamp.

I hope you have a happy and safe holiday. Ours will be filled with a lot of catch-up yard work. Every plant in our yard (including the weeds) seemed to grow an extraordinary amount while we were gone.

Thanks so much for stopping by, and remember to laugh--a little or a lot--every day.

Cheryl
Wednesday, July 2, 2025

Dragonflies on a Z-fold card...

To make this card, I started with a piece of cardstock that was 5 1/2" X 8 1/2". With the long side across the top of my score board, I scored it at 2 1/8" and 4 1/4". The first score became a mountain fold and the second score, a valley fold.

I added a piece of DSP to the front that measured 1 7/8" X 5 1/4". 

I heat embossed the sentiment using some purple EP, then die-cut it and adhered the left half to the front folded section of the card.

A couple of metallic silver, die-cut dragonflies were added as embellishments.

The DSP for the inside measure 4" X 5 1/4".

I stamped the inside sentiment with purple ink onto white cardstock and then die-cut it, using the same die that I had used for the front. 

To get the right placement, I added adhesive to the back of the sentiment piece, and held it behind the die-cut on the front, making sure it matched exactly. Then I carefully  laid it down onto the DSP on the inside, so that when the card is closed, you cannot see it.

One more little dragonfly embellishment finished the card.

This is an easy card to make and looks much more complicated than it is. You can use almost any shape for the white piece. I've used plain and fancy ovals, circles and rectangles. You can even use two smaller shapes on both the front and the inside, if you wish.

We've just returned from a 14-day RV trip to Vancouver, Washington, and back. It was wonderful to spend some time with our granddaughter and our kids and their spouses who live in that area. We also stopped several times enroute to visit other relatives and friends.

While we were gone, our floors were refinished and some other carpentry and finishing work was done. Everything looks great and we're working now to get all the furniture and decor back in place. My plants need some attention, too!

Thanks so much for stopping by, and remember to laugh--a little or a lot--every day.

Cheryl

Monday, June 30, 2025

Using another sketch...

 I wanted to use up a few more scraps, so I turned to a card sketch to help me do that.

First, I cut a green mat that was 3 3/4" X 5". The flowery piece measures 2 3/8" X 3 7/8", the yellow piece measures 1" X 3 7/8" and the striped piece is 3/4" X 3 1/2".

I also had some little pre-made flowers sitting on my desk in just the right colors, so I used them on this card, too.


I stamped a sentiment, used a circle punch to cut it out, glued it to the green circle, and then decided I didn't want to use that one. Ever do that?

So I stamped a new one, punched it out, and glued it right over the top.

The sentiment is popped up with foam dots, which enabled me to tuck three little flowers around the left side. I added a gem to the center of each one.


I had this computer-printed sentiment panel on my desk, so I used it on the inside of this card. 

And since those flowers were still sitting there, I added three more to the inside.

I enjoy going through my pile of DSP scraps to find some that coordinate well enough to use them on a card. I think sketches like this one are a great way to do that.

Did you know that there are TONS of card sketches on Pinterest? Just search for "card sketches" and you'll get more than you could ever use in a lifetime!

Thanks so much for stopping by, and remember to laugh--a little or a lot--every day.

Cheryl


Friday, June 27, 2025

Colorful get well cards...


I had a partial sheet of this colorful DSP left and I wanted to use it up. 

This is almost an A2 size card . I started with a 4" X 11" piece of yellow patterned CS (it was what I had and I was ok with my card being 1/4" shorter than a standard A2). I scored it on the long side at 4" and 6 3/4". That left 1 1/2" of the inside (third) panel exposed on the right when the card was closed.


I added my layers to the top, along with a punched scalloped circle and a die-cut stamped circle with a navy blue mat.

The sentiment circle and mat are popped up with foam tape.


This is how the card looks when opened. The navy blue piece on the right is just over 1 1/2" wide. That left about a 2 1/2" wide area for my sentiment panel.

Then I decided to make an arrow caard with a remaining piece of the DSP. You can find instructions for how to make this card in this post. Once again I used a circle sentiment, but added a couple of simple foliage die-cuts before I added the navy blue mat. Then I popped the circle up with foam squares.


This is how the card looks when opened.

I stamped the sentiment and added a couple die-cut leaves.

With this card, you have to be mindful of how much the pointed front covers of the sentiment panel. You wouldn't want your sentiment to be too large or placed too low so that it could be seen when the card is closed.

I really do love making arrow cards. I think they have such an interesting look. They are a nice change from the standard A2. Also, they can be made in any size. You'd just have to measure where the half points are on the three sides.

Thanks so much for stopping by, and remember to laugh--a little or a lot--every day.

Cheryl


Wednesday, June 25, 2025

"Quilt-y" thank you cards...

I came across a couple of AI images online that depicted lots of different scraps of fabric and reminded me of quilting. I thought the images seemed cozy and "down home."

After printing the images, I cut them to size and glued each of them to a coordinating card base. 

The only elements I added to this image were the die-cut "Thank You" and the three red dots at the edge of the circle. I think the creator of this image expected users to add some sort of sentiment to the blank circle.

There would have been room to stamp a small "thank you" in the white square on this image, but I decided to add a die-cut sentiment, instead. I also added a couple of purple dots in the lower right-hand corner. I know that many cardmakers recommend adding embellishments in odd numbers, but I only had two purple dots, so I went with them.


This is the sentiment, printed with my computer, that I put on the inside of each card.

Every once in a while I love putting together quick and easy cards like these two. I am amazed at the beautiful AI images that other crafters create and their generosity in letting others use them.

Thanks so much for stopping by, and remember to laugh--a little or a lot--every day.

Cheryl

Monday, June 23, 2025

Using vinyl on cards...

I was given some textured vinyl sheets a while back, and I finally decided to cut into them for a few cards.

I know Father's Day has come and gone, but I wanted to share these with you anyway. The design could work for any occasion.

I thought the colors and texture of the vinyl sheets were perfect for Father's Day cards, so I pulled out a card sketch and followed it to make this one.

I used a very strong double-sided tape to adhere the vinyl. I didn't think liquid glue or tape runner would hold it well enough.


After the vinyl was adhered, I cut a leafy sprig out of black cardstock. 

The sentiment was printed with my computer and popped up on foam squares over the top of the leafy sprig.


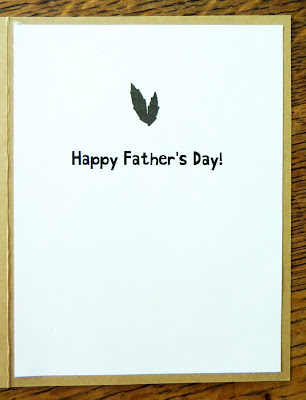
I used another computer-generated sentiment on the inside and stamped a couple of small leaves.


I made a second card that used the same elements, except for the focal point. "You're the Best" is a very old sticker that was adhered to a decorative metal circle (from the same sticker set). 

To finish the inside of the card, I stamped a simple "Happy Father's Day."


Here's a closer look at that sticker. It has a slightly domed surface. I've had it for years--thank goodness I finally used it!

Do you save stickers when there are just a couple left from a set or do you chuck them? I tend to save them, but I've been working hard to use up some of the older ones I have in my stash. I almost always add glue to them, because I'm pretty sure they wouldn't stick otherwise.

Thanks so much for stopping by, and remember to laugh--a little or a lot--every day.

Cheryl


Friday, June 20, 2025

A Gingko get well...


If you've followed my blog for a while, you may recall how much I love this Gingko leaf diecut. It's so delicate and versatile. I've used it on a number of different kinds of cards.

I decided to make this card with bright, happy colors, hoping it would cheer up the receiver who is trying to get well.

I had the "Get Well Soon" sentiment in my stash. It had been stamped and die-cut, so I simple added it to a strip of cardstock and angle-cut each end.

Did you notice that I had added a strip of the same cardstock to the right side of the DSP?


I stamped a sentiment on the inside to finish the card.

I don't know if I have ever received a get well card, but then I am rarely sick, so that is no surprise. I'm keeping my fingers and toes cross that I'm never sick long enough for anyone to think they should send me one.

Thanks so much for stopping by, and remember to laugh--a little or a lot--every day.

Cheryl

Wednesday, June 18, 2025

Out of this world...


I used a Dollar Tree stamp set for this card. I started by adding some cloudy sky DSP that I had in my stash to the card front. Then I used the stamps to create the Earth, Saturn and the Space Alien. I colored them with markers and colored pencils and fussy-cut them. The stamp set also included the sentiment, which was cut out and popped up with foam tape.


I added quite a few holographic stars to the dark sky and some Glossy Accents to the Space Alien's helmet visor. Too bad you can't actually see it!


The inside sentiment was another stamp from the set. And, of course, I had to add a few more holographic stars.

I made two cards like this and donated both of them. I think there must be some children out there who would enjoy receiving them.

Thanks so much for stopping by, and remember to laugh--a little or a lot--every day.

Cheryl


Monday, June 16, 2025

One embossed panel, two cards...

I have a new 3D embossing folder and decided to use it to make a couple of cards. I started by embossing a single white panel. I was so taken with the embossed design--it really is lovely--that I thought it should decorate more than one card. So why not cut it into two pieces and use it for two cards, instead of one?

For this first card, I just left the embossed panel as it came from the folder. I thought it would be perfect for a sympathy card.


I added the narrow blue strip to finish the edge of the embossed panel and then popped up a blue, scalloped oval with a stamped and die-cut sentiment.

I decided to keep this card very simple and not even add any pearls or gems.


On the inside, I added a stamped sentiment and a stamped image of a leafy branch.


My second card--made with the remaining piece of my embossed panel, was made in much the same way. This time, however, I used a small blending brush and my chalks to add a tiny bit of color to the embossing. I sprayed the panel with a finishing spray so that the chalk didn't rub off.


I added a strip of pink CS to each side of the embossed panel.

I found the die-cut sentiment in my stash, so I simply glued it to a pretty scalloped oval and popped it up on my card.

This time I added three pink gems for embellishment.


On the inside, I stamped a sentiment in black and a couple of hearts in pink.

I think I am going to try embossing a panel of white core, colored cardstock and sanding it to see how it looks. I've sanded 2D embossed panels before, but never 3D. Have you? Did you like the results?

I will share my results here on Paper Panacea.

Thanks so much for stopping by, and remember to laugh--a little or a lot--every day.

Cheryl

Friday, June 13, 2025

Elegant Father's Day card...


This card was inspired by Rachel Tessman of Stamp Your Art Out in this post.  It's a fun card to make and came together very quickly.

I first pulled out some kraft card bases that I had in my stash. Then I cut a strip of DSP (about 2" wide, I think) and added a narrow edge of white on each side. I then added a tiny strip of gold metallic cardstock to the right side.


I stamped "Happy Father's Day" and die-cut it with a stitched hexagon die. 

I stamped the leafy branch, angling it downward from the top and edged the right side with a bit of the gold CS.

The "ribbons" were made with a small banner die and attached on the left.

Finally, I die-cut a leafy sprig and attached it to the top of the hexagon before adhering it directly to the card.

I used a gold Viva Decor pen to add three dots below the sentiment.


On the inside, the first sentiment was stamped with gold metallic ink and the second one with black ink.

I made several of these cards to donate, but I think I'll be using this design again for other cards. This card can easily change from masculine to feminine by using different cardstock and DSP.

I hope all the dads and dad-like figures have a wonderful Father's Day. Parenting, mentoring and nurturing children can be an all-consuming job, but the rewards are endless.

Thanks so much for stopping by, and remember to laugh--a little or a lot--every day.

Cheryl

Wednesday, June 11, 2025

You've got the "write" stuff...


Here are a couple more Father's Day cards I made to donate. I used a typewriter die set that I've had for a long time. I really don't use it very often, but I thought it would work well for an older dad who remembers using one.


I really like this die set because it actually does remind me of my days in my high school typing class. I think I was able to type 60 words per minute by the end of the year. And I remember buying an old, second-hand manual typewriter to take with me to college.

Those were the days, weren't they?

The sentiment at the bottom of the card was printed with my computer, matted with brown CS, and popped up with foam tape.


I did a little research to see if there ever were any turquoise typewriters. I found that there actually was one made by the "Royal" company in the 1950s. I would have loved to have one of those!


This is the sentiment I stamped on the inside of each card.


So, did you learn to type on a typewriter? Or did you learn on a word processor or computer?

I feel like we learned more about the "rules and techniques" of typing when I was in high school. Now it seems that the outcome is more important. If you can type really fast with just two fingers, then go for it!

Thanks so much for stopping by, and remember to laugh--a little or a lot--every day.

Cheryl