Wish List

Tuesday, August 30, 2022

Special delivery...


This card was made with a combination of items the thrift store had given me to use and items I had in my stash.

The green scalloped square with the lamb image and buttons, as well as the card base, were pre-made items I received from the store.

I added the lacy-edged rectangle, the strip of pink CS with bow, and the sentiment, popped up on foam tape.


I thought the pink and green were such a nice color combination for a baby card. The "little lamb" image is super cute, too, don't you think?


The inside was stamped with a simple sentiment, and my card was done!

This is another card that was donated to the thrift store. Baby cards seem to sell quickly there.


Now a few pictures of the progress on our kitchen. The walls have been sheetrocked, but they still have to mud and sand the seams and screw holes.

This is the new arched opening to the kitchen area and the stairs.


These two walls will hold the bulk of the cabinets. The sink will be under the window, as you can see from the rough-in plumbing there.


This will be the "cooking alcove" where the stove and a few more cabinets will be located.  This arch was already there, and they made the new archway in the first picture to match this one.

Lots more work ahead to finish it up. It's actually going pretty smoothly, given that this is a house that was built in 1927 and most of the structure is still intact as originally built. That means lots of plaster and lath (think LOTS of dust and dirt when deconstructing). I will be so glad when this is over, I think I'll throw myself a party! LOL

Thanks so much for stopping by, and remember to laugh--a little or a lot--every day.

Cheryl

Friday, August 26, 2022

It's o-fish-ally your day...


I nearly forgot to write a post for today, so here I am doing it during lunchtime.

I made these cards for the thrift store using some fun, dimensional fish stickers. I also used the last of my water-like background paper (and I REALLY wish I had more of it!).


These cards were super simple to make. I cut some "coral" with one of my foliage dies. I also added some clear Nuvo Drops for bubbles. You can see in the photo at left that they're not dry yet, as they dry clear.


I printed the sentiment with my computer, cut it out with a dotted-edge die and popped it up with foam tape.

I think I should have made my bubbles different sizes, but hopefully, I'll remember to do that next time. The fish stickers, by the way, came from Dollar Tree. It's always fun to go through their stickers and see if there are any that will speed up my cardmaking for the thrift store.


The inside of each card was stamped with a fun sentiment. 

We have lots of customers at the thrift store that are grandma/grandpa age, so I try to make a few cards that they would enjoy sending to their grandchildren.

And now for a little "remodeling news." The sheetrockers have arrived and are setting up in the kitchen area as I type this. I'll take a photo when they get the kitchen sheetrocked and share it in my next post.

Thanks so much for stopping by, and remember to laugh--a little or a lot--every day.

Cheryl

Tuesday, August 23, 2022

A fuschsia happy birthday...

I bought this fuschsia die set recently, and I am still figuring out how to color it properly. I cut everything from heavy white cardstock and used inks, markers and watercolor pencils (with a water brush) to color them. I wasn't completely satisfied with the outcome, but I think it will get better with practice.

I love using a pierced-design die to add some dimension to the background. I think it adds so much to the look of the card.


I'm sure you can see in both of these photos that I have added some clear dewdrops and I've popped up my stamped and die-cut sentiment.


I used two different stamps on the inside for the sentiment.

I'm looking forward to making more of these fuschsia cards. There are a few other varieties of fuschsias that are different colors, but I think I like the pink and purple best.

We have finished our 5-day stint of babysitting my daughter's two dogs and three cats. Now we have to focus on getting the rest of the supplies we need for our part in the kitchen remodel--like paint for kitchen, dining room, living room, and entryways. We also have to prepare for company. I can't believe they really want to stay with us in the middle of the remodeling! I'll let you know how it goes.

Thanks so much for stopping by, and remember to laugh--a little or a lot--every day.

Cheryl

Friday, August 19, 2022

Pretty fairy...

Sometimes, the thrift store where I volunteer gives me random card punch-outs to use when making the cards I donate to them. I once got several fairy scene punch-outs. I thought they were so pretty and would make great birthday cards for young girls.

It really didn't take much to make this card. I added a panel of pale pink DSP around which I had tied some crinkled hem tape. I cut the image with a large ticket-shaped die and then backed it with gold foil.

The fairy panel was popped up on foam tape. The sentiment was cut from the same gold metallic cardstock as the mat and adhered to the fairy panel.


On the inside of the card, I adhered one of the punch-out sentiments (also backed with a gold metallic mat).

Since there were some smaller fairy images included with the larger ones, I decided to make a gift tag as an extra to include with the card. I made three cards like this, and I think that little extra helped sell these cards very quickly.

Our kitchen remodel is moving right along. I am writing this post on Tuesday evening (8/16), and today, the electrician was here to do the rough-in electrical work. Tomorrow (8/17) the plumber will be stopping by to begin his rough-in work. When you read this on Friday, hopefully most, if not all, of their work will be completed.

Thanks so much for stopping by, and remember to laugh--a little or a lot--every day.
Cheryl

Tuesday, August 16, 2022

Sometimes all you need is a pretty border die...


This card was nearly impossible to get a good photo of because of the shiny, embossed cardstock I used for the base.

I cut my A2 cardbase from the butterfly DSP, used a pretty border die on the front's bottom edge and added a blue strip of CS with a die-cut bow. Easy peasy!


I didn't want to detract from the pretty DSP, so I added a small "Happy Birthday" strip sentiment.


On the inside of the card, I added a stamped sentiment and a wide strip of blue CS that helped to highlight the pretty border on the front.

I also rounded the corners, as I thought they looked much better than square corners under the scalloped front.

It's so much fun to use some pretty CS for a card base. This was pretty heavy stuff, so it made a very substantial card. I love that sentiment on the inside, too, don't you?

Thanks so much for stopping by, and remember to laugh--a little or a lot--every day.

Cheryl

Friday, August 12, 2022

Cascading display fun fold...


I made several of these cascading display fun fold cards for my daughters and daughters-in-law. They were really fun to make.


I think they pack a real punch when it comes to fun folds! I love how they look on display.


This is how they look when they're completely open. 

If you'd like to know how to make them, just google "Cascading display fun fold card" on YouTube and you'll find several instruction videos. They're really not hard at all and so much fun to decoreate and embellish.

I am writing this post on Aug. 1, and setting it to post on Aug. 12, because I have to take my computer in to the shop tomorrow morning to fix the fan. I'm hoping I get it back before I have to write another post.

I also want to give a big shout out to my crafty friend Lynette Neus of My Stamping Addiction. She has once again donated dozens and dozens of her handmade cards to the thrift store where I volunteer. It is such a wonderful donation, and I know they will sell quickly to support the store's food shelf and other community support efforts. THANK YOU, LYNETTE!

Thanks so much for stopping by, and remember to laugh--a little or a lot--every day.
Cheryl

Tuesday, August 9, 2022

Out of this world...


Because cards are so hard to create for teenage boys, I bought this "...out of this World" die. It makes quick work of cards that are suitable for them.

This is a simple, one-layer card. I didn't use glitter cardstock for the die-cut, but I think it would look great. I may try that next time I use it.

I left the real surprise for the inside. I used a pop-out die to which I attached the stars that had been cut out when using the die. They pop out as seen in the photo whenever the card is opened.

I also used a star stencil from Dollar Tree to add some yellow stars to the background. My sentiment was printed with my computer. I like how this one turned out, and plan to use this pop-out die for lots more cards.

By the time you read this, our kitchen will be torn apart by the remodelers. I'll try to remember to take a few pictures along the way and share them with you.

Thanks so much for stopping by, and remember to laugh--a little or a lot--every day.

Cheryl

Friday, August 5, 2022

Let's Craft and Create Challenge #186: Anything Goes or Feeling Distressed (distressed paper)...


When I saw this month's challenge theme at Let's Craft and Create, I must admit, I was a little...well...distressed. I don't usually make cards that have a distressed look. In fact, in years and years of cardmaking, I could count them all on one hand! 

I didn't want to back away from using distressed paper, so I dug through my stash until I found some in a 4 1/2" X 6" paper pad of pastel distressed designs. Here's what I created:

I found this pale orange striped paper that was distressed in random areas. Once I had cut my panel, I used a distressing tool to rough up the edges a bit, as well.

The letters were cut using my largest alphabet dies. I cut them each four times and stacked them up for more dimension.

The small embellishments were cut with a very, very old Provocraft die. Even the little hearts were a part of the design of this die.


In this photo, you can see some of the distressed pattern of the DSP and also the ragged edges created with a distressing tool.

I've added some glossy accents to the hearts and rattle and a tiny ribbon bow to the "Y".


I added some more of the images cut by the Provocraft die to the inside, along with a stamped sentiment.

When this card was finished, I decided that I quite liked it. I also thought I should try using more distressed DSP and use that distressing tool a bit more in my cardmaking.

Do you like the distressed look? If you do, I hope you'll join us at Let's Craft and Create and enter your project in our challenge. If you're not a fan, you can always choose the "Anything Goes" option. For inspiration, check out the Design Team's creations here.

Thanks so much for stopping by, and remember to laugh--a little or a lot--every day.

Cheryl

Tuesday, August 2, 2022

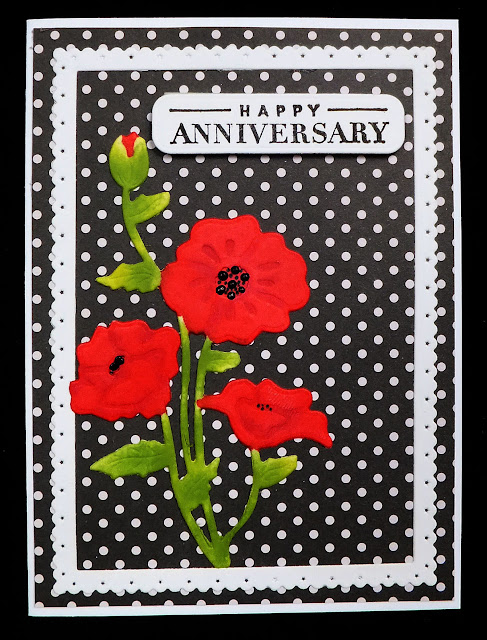
Happy Anniversary in red, white and black...


I had a scrap of this polka-dotted paper laying on my desk, so I decided to use it for an anniversary card. I cut the scalloped frame and the flowers from white cardstock, and I cut the flower heads from red.  Before gluing the flower heads to the white die-cut, I used a blending brush and some green ink to add some color to the stems and leaves.


I used some Nuvo Drops to add some dots to the flower centers.

I really love how the blending brush gave dimension to the stems and leaves by not solidly coloring them in. I should have cut the flower heads from white and done the same thing with them. Next time...


I used an old wood-mounted stamp on the inside. I think it was meant for a wedding card, but I believe it works equally well for an anniversary card.

I love the dramatic colors of this card. I think it has already been sold at the thrift shop, so I need to make some more. Next time I'll remember to use ONLY blending brushes and ink pads to color the entirety of the flowers!


I think the fan on my computer is going out. Every once in a while I can actually hear it and can occasionally feel it vibrating. I contacted the computer store where I bought the computer, and they said I could go ahead and bring it in. Have you ever had a fan go out in your computer? Was it an expensive repair?

Thanks so much for stopping by, and remember to laugh--a little or a lot--every day.

Cheryl