Wish List

Friday, February 26, 2021

I love word dies...

 In Love Art Shop sent me a set of word dies (Greeting Wish Words with Border) that are really going to be handy in my cardmaking. The word dies come with a shadow for each of them, which is also very handy. If you're interested in purchasing them, you will find them here

Don't forget to use this discount code if you do place an order:  G-37356

So far, I've only used three of the five dies included in the set, but trust me, I'll be sharing cards with the other words eventually.

This was a very simple thank you card using the Round Leaf Branches Wreath die from In Love Art Shop and one of the word dies. As you can see, the size of the word die is perfect for cardmaking.


Here's a peek from another angle. I've used a Martha Stewart punch for my flowers and a pearlized white Viva Decor pen to make my faux pearls. I have a few Viva Decor pens, but I actually prefer using Nuvo Drops, as I find they hold their shape better.

This card was left blank on the inside to leave space for a lengthier personal note.

This card features one of the word dies with its shadow cut from white CS. My balloons were cut from glitter cardstock, shaded around the edges and popped up on foam squares.

The black sentiment strip was created on my computer using the "Impact Label" font. This is a free font, and I have created an entire sheet of  greetings and partial greetings on a piece of white cardstock. All I have to do is fussy-cut them out, ink the edges with a black marker and pop them up on foam strips.

The inside of this card says "Unwrap a special day" and features three smaller glittery balloons.

For this card, I tried a technique that I've been meaning to try for a long time--creating a flower out of eight small circles. It's called a dahlia fold. If you're interested in how I did this, you can watch a tutorial here.


I used another of the word dies from the set on this card. To make it just a bit different, I cut the shadow from glitter cardstock, and the word from a piece of pink packaging material. I like the way it looks.

This card has a stamped birthday sentiment on the inside.


I've been creating a few St. Patrick's Day cards for the thrift store and have made a good start on my Easter cards. Because I make cards for myself and for the store, it seems I am never caught up!

Thanks so much for stopping by, and remember to laugh--a little or a lot--every day.

Cheryl


Tuesday, February 23, 2021

Best Valentine ever!

The mailperson delivered a belated Valentine from my dear husband yesterday, and it is the best Valentine I have ever received!

Here's the backstory: He saw online that people working in the tourism industry in Mali, a country on the west side of Africa, were hurting. The tourism industry was once particularly strong in Timbuktu, a major city there, and it is now in dire straights. My husband saw that some tourism workers were trying to maintain their incomes by offering to send postcards with a personal message from Timbuktu for $10 each. My husband saw that as an opportunity to send me a unique Valentine and to help someone out (he has a very big heart!), so he ordered one online.

It was mailed on January 8, and yesterday I received my "Valentine" postcard from Timbuktu.

This is the picture on the front of the postcard. The structure in the background is a mosque. My husband had them write this message: "I love you from here to Timbuktu!" 

Isn't that an awesome Valentine? I told him it was the best one I had ever received. If you'd like to order one, you can do so here.

Here's a photo of the stamps on the postcard. Notice how they stack the stamps on top of each other, making sure the value of the stamp is visible. I wonder if the USPS would allow us to do that?

I hope you enjoyed my little Valentine story.


Here are my makes for today. I created the colorful backgrounds by using 1/2" strips that I have cut off of 8 1/2" wide patterned paper to make envelopes. Every single one of those strips represents an envelope that I have made, and I have a LOT more strips than this. I love being able to make envelopes that coordinate with  the colors in my cards. I almost always turn the color to the inside, with the white on the outside, so that it's easy to address them. 


I wish this picture didn't go out of focus on the far side so that you could see my little dryer image more clearly. It's just a fun card to send to someone you know well.


Here's the interior of my card. I colored the letters here and on the front of my card with alcohol markers.


My "Happy Birthday" frame included the cupcake image attached to the bottom of the frame. I actually cut it off, then die-cut another cupcake and glued one on top of the other for a little extra dimension. I also glued on my little flower sequin and added a center to it with Nuvo Drops. I also added some Wink of Stella to the frosting, but it's just not visible in the photo.


I used a really old stamp for my inside sentiment. Both of these cards will go to the thrift store to be sold there.

I have more stripey backgrounds to use, so you'll be seeing more cards like these in future posts.

Thanks so much for stopping by, and remember to laugh--a little or a lot--every day.

Cheryl

Friday, February 19, 2021

There's a new challenge on the Twofer Card Challenge blog...


I love a challenge that gets me to think about using my supplies in new ways, and that's just what the Twofer Card Challenge does.

This month's theme reminded me of an old balloon punch that I bought at a thrift store. I've used it many, many times, but always as it was intended--for punching out balloons. I tried to think of a new way I could use the punched image, and here is what I came up with.

The card on the right uses the balloons in the usual way--as balloons. But see those eggs on the left-hand card? Those are balloons, too!


Here you can see how I've tied three balloons to my pick-up truck's bumper, which has been popped up with foam squares. The balloon strings are lengths of black thread that have been wrapped around the neck of each balloon and secured on the back with a little double-sided adhesive. 

The green balloon has been popped up on foam squares for a little dimension. I also added some vellum to my truck's back window and some Glossy Accents to the tail and brake lights.

My letters were die-cut using a small alpha die set. They're a little fussy to glue down, but I think I've managed it without making a mess.


The inside of this card features some smaller balloons that were cut out with a little die that I happen to have. These strings were simple drawn on with a black pen, and the sentiment was stamped.


Now let's take a look at those eggs. I punched out three  balloons and then carefully used a scissors to cut off the neck and lip of each balloon. Voila! They became eggs.

I nestled them onto this wreath from In Love Art Shop and added a little die-cut greenery. I also dotted my wreath with some Nuvo Drops in pastel colors.

Side note: you can use discount code  G-37356 if you wish to purchase the wreath die, which is available here.

I stamped my sentiment onto a banner and popped it up on foam squares.


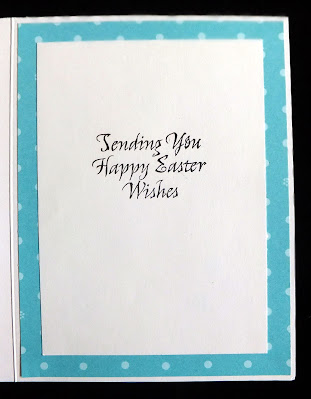
On the inside of my Easter card, I have used an old stamp and matted my panel with the same DSP as was used on the front.

I had fun thinking about some different ways to use my balloon punch. When making your Easter cards, if you don't have the right size egg die or punch, look at your balloon dies and punches. You may find you can use one of them.

Thanks so much for stopping by, and remember to laugh--a little or a lot--every day.

Cheryl

Tuesday, February 16, 2021

In Love Art Shop and the perfect little Mother's Day die...


This little die is one that was sent to me by In Love Art Shop. It is one of two dies in the set called "Heart Chained and Flower Frame." I have been authorized to offer you a discount code to use if you wish to purchase this or other dies:  

G-33664

I thought it would be pretty to cut it from watercolor paper and then...well...water color it. I used a combination of distress inks and watercolor pencils. It turns out this little frame is just the right size to add to a tag. Wouldn't it look sweet hanging on a gift bag?


When I saw how pretty it looked with some color added to it, I decided to cut three frames and use them on a slimline card. I will be taking this card to the thrift store, so hopefully a customer will find it just right for his or her mom.


My letters are a couple of layers thick (I cut two of each and glued them together) and were popped up on foam squares to give them some added dimension..


For my inside sentiment, I stamped "Wishing" in pink and then added the rest of it with black ink. I also cut one more frame, watercolored the flowers and then cut a couple of them away from the frame to add next to my sentiment.

I think these little frames could be used for Easter cards, too, with a bunny, chick or egg inside each one. I may give that a try.

I hope you'll pop over to In Love Art Shop and do a little browsing. I have found their service to be very good, and I'm really enjoying using their products.

We are managing to stay warm in this cold blast by having lots of fires in our fireplace and extra blankets on our bed. My craft area--which is in our basement--is only 64 degrees at best right now. I generally wear a jacket when I'm down there working on cards. 

Thanks so much for stopping by, and remember to laugh--a little or a lot--every day.

Cheryl

Saturday, February 13, 2021

A few more Valentines...

Valentine's Day is tomorrow, and I think I'm ready. All my Valentines to family and friends have been mailed or delivered. My DH's Valentine is sitting in the mess called my crafting space, waiting for me to give it to him tomorrow. He never ventures in there alone (I think he's scared of all those crafting tools and supplies! he he)

The following are some of the Valentines I have made this year that I haven't shared with you, yet. 

This one was made for the thrift store. It's a smaller card--mini slimline style--and very simple. I had some bright pink cardstock with a metallic gold polka dot pattern on it. I cut a couple of hearts and the sentiment from metallic cardstock.


The gold is so hard to photograph, but here's a picture without so much glare on it. The lower heart is popped up on a foam square.

My pink panel was adhered to a black card base.


Inside, I added a stamped sentiment and a couple more gold metallic hearts. They look really dark in the photo, but they're actually cut from the same CS as the hearts on the front of the card.


This Valentine was made for one of my grandsons. I just love this little sloth! I've had the cloud-patterned paper for years. In fact, I bought it long before I ever had any other products that helped make a cloudy background, like dies, embossing folders, ink blenders, stencils, etc. 


The sentiments on the front and on the inside of this card were computer-generated.


These cards were made for two of my older grandsons. The brown wood-grained panel actually started out as a white panel with a gold, wood-grained pattern on it. I simply added some brown Distress Ink. The metallic woodgrain resisted the ink. The blue panel also started out as white with a navy blue woodgrain pattern on it. Once again, I added some blue ink that would allow the woodgrain to show through.

The gears (silver for the brown card, gold for the blue card) are adhered directly to the panel, the letters are adhered and then coated with Glossy Accents, and the heart is popped up on a foam dot.

Both of these cards have a simple, stamped sentiment on the inside, leaving lots of room for a personal note.

Have you finished making and sending/delivering your Valentines? 

The deep freeze continues in Minnesota. We even made national news with a -50 degree air temperature in a small town named Ely. We don't expect to get that cold here in the Minneapolis area, but we are still dipping to the minus teens and twenties at night.

Thanks so much for stopping by, and remember to laugh--a little or a lot--every day.
Cheryl


Wednesday, February 10, 2021

Birthday card for my son...

Today is my son's birthday, and I struggled a bit to figure out what to make for his birthday card. Masculine cards are hard! 

I had a die that featured a man and his dog walking near water. My son has two big dogs, so I decided to use that die and just add an extra dog.


I started by inking up the water on the bottom of a my panel and the sunset at the top. I used several inks for each section and applied them with my blending brushes. Then I stamped some trees with Versafine ink on the right. 

The die-cut includes the black hill and its reflection, the man and one dog (and their reflections) and the narrow strip of land that continues across the width of the card.  I cut two more dogs and glued them in place--one on land and one reflected in the water. Then I added a few squiggly white lines on the water with a white gel pen. I think next time I'll try using a white colored pencil for a subtler look.

When I had my scene completed, I glued the entire panel to a navy blue card base that was white on the inside.

My sentiment was computer generated, cut out with a die and inked around its edges before adding it to my card with foam squares.


The inside sentiment was also one of my "originals" which was computer-generated. 

I talked with my son today to personally wish him a happy birthday, and he told me he loved his card. I'm so glad!

We're in a deep freeze here in Minnesota, but my Christmas cactus in blooming, so I thought I'd share a photo of one of the blossoms.


I am always in awe of the delicate coloring of these blossoms. Nature is amazing!

Thanks so much for stopping by, and remember to laugh--a little or a lot--every day.

Cheryl

Monday, February 8, 2021

In Love Art Shop's Bubble Wind Nesting dies...

 Today my post is featuring the Bubble Wind Heart die set from In Love Art Shop. I love these dies and they cut so beautifully.

The largest die in the set is quite large. This is a 5 1/2" x 5 1/2" card, and the Bubble Heart nearly fills it up! The sentiment was printed on the center heart with my computer.

This is such a simple card, but it sold very quickly at the thrift store. I think the pretty, lacy look of the heart is what attracted people. It's a shape they would not be able to easily reproduce unless they had this die set.

If you'd like to add these dies to your own collection, you can use this special discount code:

G-33664


In this photo  you can see how I've added some dimension by adhering the center heart with some foam squares to lift it off the card a bit.

I also added the three gems for a little sparkle.


The inside sentiment was added using a very old wood block stamp. I colored in the little heart to add a wee bit of color.


For this second card, I've added my heart die-cuts at an angle. I happened to have a few leafy sprigs on my desk, so I added them, along with a few gems, to the center heart. I know you can't see it, but I also gave a little sparkle to the sprigs with a Wink of Stella brush pen.

The sentiment was cut out of some silver cardstock and adhered to the bottom front.


The simple sentiment on the inside was heat-embossed with silver embossing powder.

Luckily, this card also sold very quickly.

I had fun making these cards. As I said at the beginning of my post, the dies cut beautifully. Sometimes lacy dies are really frustrating to use, but not these. The negative pieces literally fell out of the die.

So check out In Love Art Shop for this die set and lots of others (don't forget that discount code!).

Thanks so much for stopping by, and remember to laugh--a little or a lot--every day.

Cheryl

Friday, February 5, 2021

Let's Craft and Create Challenge #168: Red, Pink and/or White...

 It's the first week of February and time for a new challenge at Let's Craft and Create. This month we're suggesting you use red, pink and white (or some combination of those three colors) when creating your project. You can always choose to go the "anything goes" route, too, if that suits you better.

I've created a Valentine for my DH using all three suggested colors:

I couldn't resist using this cute gnome die set for my card. I cut all the pieces out of white cardstock and then used my alcohol markers to color him up. 

My sentiment was computer-generated and the design on the pink panel was created with a background die.


You can see in this photo how he's been popped up on foam squares. If you look closely, you can see his red and white striped leggings. Gnomes wear leggings, don't they?


The inside of my card is very simple with a stamped sentiment and a couple more hearts. Since this Valentine is for a man, I thought that CAS was the way to go.

Now it's your turn to create something for our challenge. If you need more inspiration, just click here to see all the projects the Design Team has created.

There will be a prize up for grabs, too, which makes the challenge even more fun.

Thanks so much for stopping by, and remember to laugh--a little or a lot--every day.

Cheryl

Tuesday, February 2, 2021

Lacy bows from In Love Art Shop...

 Not long ago I ordered a set of two dies called Hollow Lace Bows from In Love Art Shop.  The two dies are exactly the same except for their size.  If you're interested in purchasing them, don't forget to use the following discount code:

G-33664

Once I started using these pretty bows, I didn't want to stop! They can be used on all different kinds of cards and projects, and here are a few samples:

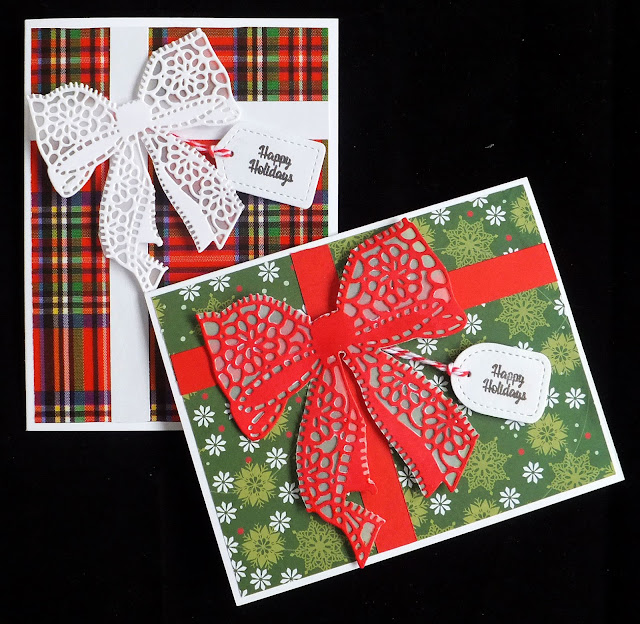
I started out by making a couple of Christmas cards that look like wrapped gifts. In fact, the plaid paper really is from a roll of wrapping paper! For these bows, I actually backed them with some vellum, fussy-cutting it around the edge of the bow. I'm not really sure that was a good thing to do, but the two layers are well and truly stuck together, so I'll go with it.

If you look closely at these two cards, you can see the difference in the size of the bows. The smaller one worked best on the portrait card, while the larger bow looks great on the landscape card. In fact, I plan to use the larger bow as a decoration on actual wrapped gifts in the future.


On the inside of the card I added a stamped sentiment and a tiny die-cut bow (from a different die set) to mimic the one on the front of the card.


From Christmas cards, I jumped to making a baby girl card. I had one sheet of sweet baby girl paper with darling little shoes all over it. I picked three colors from the shoes and cut three small bows. I used a single glue dot to adhere each bow to my card, added a stamped sentiment on a stitched oval and a few enamel dots. 
.

The bows look so girly and lacy IRL--perfect for this card. 


On the inside, I added some more of the sweet baby shoe paper. I have some baby sentiments pre-printed on vellum, and added one of them after matting it with some pink cardstock.


Finally, I decided to make a birthday gift bag. I saw something similar online and came up with my own version. I mainly used scraps of cardstock to make the entire bag. Love using up those scraps!

The scallops at the top edge of the bag were made with a really old border punch. I'm not even sure what brand it is anymore. It's pink and white, if that tells you anything.

The bow was attached with a single large glue dot.


The handle was attached with brads (one of them is under the bow) so that it can be moved out of the way when placing items in the bag.  The dimensions of the bag are approximately 5"H x 3.75"W x 1.75"D.

I hope you've enjoyed seeing my lacy bow creations. Once again, the dies are available here in the online store, In Love Art Shop. Don't forget the discount code!

Thanks so much for stopping by, and remember to laugh--a little or a lot--every day.

Cheryl