Wish List

Friday, September 29, 2017

A couple of quick birthday cards for my stash...


I wanted to add a couple of quick birthday cards to my stash, just to keep the number of cards on hand at a comfortable level. You never know when you're going to need a card on a moment's notice!


I grabbed a couple of kraft card bases and a couple different colors of cardstock.

Then I picked out a Recollections flower punch, along with an unbranded flower die, leaf die and "wavy lines" die.

Oh, yes, I also picked out a CTMH Happy Birthday stamp.


With all my tools at the ready, I first stamped my white panels, adhered the wavy lines, and then ran them through my Cuttlebug with two different embossing folders (just to see what I would like best).

I inked the punched and die-cut flowers, layered them and glued them on with the leaves. As a final touch, I added a sparkly enamel dot to each flower center.


The inside of each card looked like this, but the other one had a pink mat and stamp, of course. The stamped sentiment is from Fiskars.

Two cards, done and dusted, in no time flat!

I will soon be sharing some photos with you from our trip to Europe. It's so much fun to go, but it's also fun to get home again.

Thanks so much for stopping by, and remember to laugh-- a little or a lot--every day.
Cheryl

Tuesday, September 26, 2017

Pretty in pinks and blues....


I had so much fun making this card for a fabulous artist and crafter, who is also the owner of the Desert Diva blog. Hannelie has such an incredible eye for graphic detail and eye-catching color combinations. I've learned so much from her, but I'll never equal her crafty ability. She also offers such wonderful encouragement to other crafters and shares many digital sentiments that she creates. I hope you had a happy birthday, Hannelie!


To make this card, I first taped off a rectangle using Post-It notes. Then I got out some of my pink and blue ink pads (various ones, whatever I could find), and started inking and blending inside my rectangle.

Once that was done, I added my die-cuts with some spray adhesive. This die set is an unbranded set that I really like.

Once the die-cuts were attached, I used my stamp positioner to stamp "Birthday wishes," and then drew a line with a fine-tipped black pen around the perimeter. Because my line wasn't perfect, I went over it with a glitter pen. I really liked the affect, as it added just the tiniest bit of sparkle to my card.


On the inside of my card, I stamped a Woodware sentiment and then added just a portion of another die-cut for a little embellishment.

This is such a simple card, but I like how it turned out. I hope Hannelie liked it, too!

Thanks so much for stopping by, and remember to laugh--a little or a lot--every day.
Cheryl

Tuesday, September 19, 2017

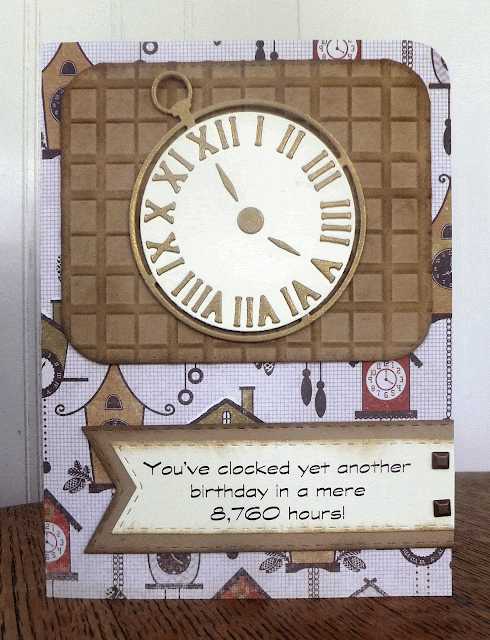
Another birthday in 8,760 hours...


Today's card is one I made for my brother-in-law, whose big day was the 29th of August.

I cut out a pocket watch using an unbranded die set. It's actually cut out of shimmery gold cardstock, but it looks like kraft CS in the photos. In retrospect, I wish I had used some black or dark gray CS, because it would have stood out more.

I embossed my rounded rectangle with a Darice EF and then lightly inked the raised areas to give it some definition.

Finally, I used a couple of stitched banner dies for my sentiment, which was printed with my computer.


The two little square faux-brads are really self-adhesive embellishments, which I'm quickly running out of. Guess I'll need to keep my eyes open for some more of these. They're great for masculine cards.


The inside of my computer is pretty plain, with just a computer-generated sentiment. Men like "plain," right?

This post was written and scheduled a couple weeks ago, because right now I am gallivanting in Europe. Wherever I am, I will raise my glass to all of you, because I am so grateful that you continue to read my blog and encourage my crafty efforts!

Thanks so much for stopping by, and remember to laugh--a little or a lot--every day.
Cheryl

Tuesday, September 12, 2017

My grandson's birthday card...

I have a couple of grandsons who are veteran Minecraft players (both with birthdays in August), so I decided to use that theme for their birthday cards.

I searched online for a Minecraft paper pattern that I could print out. There are lots of different free printables available. I wish I could point you toward the exact one that I used, but I'm afraid I can't find it anymore.

I also looked at Pinterest posts for ideas to create the front of my card. I found the look I wanted, but had to guess a bit at the size of the black facial features. I used 1" squares for the eyes, which I've scored both ways in 1/4" increments (doesn't show up in the photo). For the nose and mouth, I cut a piece of black cardstock that was 2" X 2", scored it both ways at 1/4" increments, and then used my score lines as guides to cut away parts until I had the shape you see here.

On the inside, I used a pop-out idea that I found on Splitcoast Stampers, modifying it to fit the size of card I like to make (4 1/2" X 6").  It takes some patience, but I did eventually get it all to work properly. I happened to have a die that cut out little squares to form a lattice shape, so I used those little squares to decorate my Creeper pop-out.

As you can see, I first lined the inside of my card with a black layer, then the pop-out was on a green layer, and finally, I carefully measured and cut two printed layers to cover any of the green that was NOT part of the actual Creeper.

My sentiments were computer-generated and cut out with some pierced rectangle dies.

While these cards took a little longer than usual to make, I think my grandsons liked them. At least it was a theme they totally "got."

Thanks so much for stopping by, and remember to laugh--a little or a lot--every day.
Cheryl

Tuesday, September 5, 2017

Let's Craft and Create challenge #129: Child's Play...

Today we start a new challenge at Let's Craft and Create, and it's one we can all have fun with, I think. After all, who doesn't like to make a card for a child?

I decided to use some fun word play with my card.


My cute little fish, plants and water lines are all unbranded dies.


I inked up my little fish and even added some lines and dots on a couple of them. I wasn't the least bit worried about making them look realistic--I just wanted to have fun.

My sentiment was computer-generated.


I also added some clear half-rounds that I had in my stash, thinking they looked a lot like bubbles.


Because this card is for a child, I decided to have a little more fun on the inside.

 I die-cut a whale using another unbranded die, and then inked it up and added some spots to his belly.

Isn't he cute?

My inside sentiment was also computer-generated.

Now it's your turn to have some fun making a card for a child. I know some of you regularly make them for non-profit organizations, so here's your chance to join in our challenge fun with your creations.

Check out the Design Team's fabulous projects here, today AND midmonth. Then be sure to post yours on the Let's Craft and Create blogsite. I'm so excited to see what you make. I know you will inspire me, and I'll use that inspiration to make lots of cards for my 10 (yup, ten!) grandkids.

Thanks so much for stopping by, and remember to laugh--a little or a lot--every day.
Cheryl