Wish List

Friday, July 31, 2020

Doily time...

In Love Arts sent me a pretty little die called a Clover Wreath Die. You can find it in their shop here, AND you can get a 15% discount on your order by using this code:

G-20849

I decided to make three distinctly different cards with it, and here they are:


For this card I used the doily as a backdrop for my flower. I thought it turned out quite pretty with my curved and scalloped edge on the top flap.

To make my flower, I cut out three layers of petals, inked the centers a bit and then scrunched them all up into little balls. Then I carefully unfolded them and glued them together. I like the dimension that this gives to the flowers. An enamel dot finished off the center.


The little banner die is also from In Love Arts and you can find it here.

The card is blank inside so I can write a personal note.


My next card was a Christmas card. Once again, I used the doily as a backdrop to my flower--a ponsettia that has inked edges on the petals and Nuvo Drops in the center.

The music DSP is from an old Heidi Swapp ( I think) stack. I cut out a piece big enough for my card and inked the edges with distress ink.

My sentiment has been die-cut twice--once from black CS and once from gold metallic CS. I glued them together with the black offset just a bit to give a little better definition.


The inside of my card has a simple stamped sentiment. I might go back and add a little something else to dress it up a bit.


Finally, I die-cut several doilies and then cut a couple of them apart into the heart shapes that make up each one. I glued them randomly to a card front by sponging some liquid glue onto the back side each one. I added some sequins and a heat-embossed sentiment that is popped up on foam tape.

I have left the inside of this card blank, but I may add a stamped or computer-generated Valentine's sentiment to it later on.

I had a lot of fun coming up with three different cards using the Clover Wreath doily die.

Have a great weekend, and thanks so much for stopping by. Remember to laugh--a little or a lot--every day.
Cheryl


Tuesday, July 28, 2020

In Love Arts...

I was contacted by a new (to me) online craft shop called In Love Arts. They asked if I would be willing to try some of their products and post about them on my blog. Of course, I was happy to!

In Love Arts is generously offering a 15% discount to any of my readers. Just use this code:
G-20849

One of the items they sent me was the "Motto Words" stamp set which has some great sentiments.


These sentiments are a very nice size and stamp well. I decided to make a card for every single sentiment in the set.


For this card, I chose a pre-made card base from my stash that had a fun pattern. Then I cut some 1/2" strips of patterned CS that coordinated with the colors of my card base. I fussy-cut the tops of the candles to look like they might have melted just a bit. My flames are actually leaves cut with a foliage die that I had in my stash. I colored them just a bit with Promarkers and added some Wink of Stella. My big sentiment and a few self-adhesive stars finished off my card.


This card came together very quickly! Once again, I used a pre-made card base that had the soft green shading on it. I stamped my sentiment with green ink. I left my card base in my stamping platform, and when the ink was dry, I stamped the sentiment again with Versamark. I sprinkled on some clear embossing powder and used my heat gun to give it a nice glossy finish. It looks a little blurred in this photo because of the texture of the card base.

The strawberry and flower were cut with my Silhouette and had been sitting on my desk for months and months. Time to finally use them on a card!


When I saw the sentiment "Small Wonder," I thought of a baby card, but I definitely think it could be used in other ways, too. I dug out a teddy bear die, tag die and a corner die. I cut and dry embossed my bear and corner die-cuts. Then I added a little color to parts of my bear and popped him up in front of my tag.


Another pre-made card base was used for this card. I cut the "thanks" with a die, backed it with a strip of black cardstock and stamped my sentiment. It just doesn't get any quicker or easier, and I think it's a rather elegant thank you card.


This card is a 3 1/2" X 5" notecard. The glittery panel was adhered to the front, then the die-cut heart with its heat-embossed sentiment was popped up with foam squares. The sequins were added for a little sparkle. My pinks actually match much better IRL.


My final card is a wedding card. The background die is also from In Love Arts, and the sentiment is from the set above and was heat-embossed onto a heavy vellum oval.

This die, called Curl Pattern, cuts a beautiful pattern but takes some extra care in getting a good cut. I used a couple of shims to make sure it cut through and then I took great care in getting my cut design out of the die. Some of those swirls are really narrow, but aren't they beautiful?

After cutting my panel I adhered it to my card base with some double-sided sheet adhesive. I burnished some clear glitter into all the openings of my die-cut where the adhesive was exposed. It has such great sparkle!

To finish my card front, I added two narrow strips of silver glitter cardstock and a few flat-backed gems.

I hope these cards have piqued your interest in In Love Arts and the crafting supplies they offer on their site. I'll be sharing more products with you in the near future.


Thanks so much for stopping by, and remember to laugh--a little or a lot--every day.
Cheryl

Friday, July 24, 2020

Back in one of my May posts I talked about making a "slew of multi-layer stamped flowers." Today's card uses one of those flowers and an embossing folder to make a simple card.


First of all, I love the sentiment on this one. I am often in awe of the kindness of others and their beautiful hearts.

After stamping, dry-embossing and adhering my white panel, I added my flower with a foam square, tucked the leaf image in beside it and adhered a few blue and clear sequins. I also dotted the flower center with a few tiny gold Nuvo Drops.

On the inside of my card I added a  plain white panel on which to write a personal note. Voila! Card done!


I also wanted to share with you this new solar bird bath fountain I just installed this morning. I sure hope the birds love it as much as I do. It's really a hot one out there today, and I think a few sprinkles of water will be very refreshing for our bird friends.

Thanks so much for stopping by, and remember to laugh--a little or a lot--every day.
Cheryl

Tuesday, July 21, 2020

Reverse stencil technique...

A while ago I watched a Gina K video about the reverse stencil technique here, and I really wanted to give it a try. My crafty friend Lynette had watched the same video and created a couple of cards using this technique, as well. She inspired me to wait no longer and to give it a go. Here's what I came up with:


First, I laid down some ink colors onto a white piece of cardstock using my blending brushes. Then I laid my stencil on top of this piece and applied some black ink over the stencil.

I matted my inked piece with some yellow CS and adhered it to a white card base. My sentiment was stamped and popped up on foam squares.

The sequins are actually clear, but seem to reflect the colors around them, especially the blues.

On the inside I adhered a blank rectangle of white CS matted in the same yellow as the front.


I love how this turned out and plan on trying some more using different colors of inks. I want to try replacing the black with another strong color such as navy blue or even dark red. We'll see how that goes.

Here are a few photos from our recent RV trip that I thought I'd share with you:


We saw this sign at one of the highway rest areas in Montana. We definitely stayed on the sidewalks!


We spent three days camping in Grand Teton National Park in Idaho. It's so beautiful there. This is a photo of the majestic mountains and Jackson Lake.


Here's a little closer view of those peaks--still dotted with snow in July. Grand Teton Mountain, the highest peak, is 13,776 ft.


We also visited Craters of the Moon National Monument and Preserve. The picture at left is what the landscape looks like there--11,117 square miles of it!

It is a crazy area formed by about 25 volcanoes thousands of years ago. What you see in the photo is hardened lava.


Sometimes the lava was piled up in heaps forming hills like this one at right. Other times it looked relatively smooth, but all of it was almost black and barren.

I really was astounded by this landscape. It is also located in Idaho, about 170 miles from Grand Teton National Park.


Finally, we visited Devils Tower in northeastern Wyoming. It has been a sacred site for Native Americans for centuries. It is believed that this tower was formed by magma from an erupting volcano. The magma hardened and the mountain sides were eroded away leaving the "neck" exposed.

Thanks so much for sticking with me while I reminisced about our little trip. It will definitely be the last one for a while. We kept to ourselves as we traveled, wore our masks whenever we entered a business or were in an area with other people and incessantly washed our hands and used hand sanitizer. We have self-isolated since arriving home and are now confident we managed to stay healthy.

Thanks so much for stopping by, and remember to laugh--a little or a lot--every day.
Cheryl

Sunday, July 19, 2020

Twofer Card Challenge #29: Butterflies....

I am sneaking in just under the wire for this month's Twofer Card Challenge.


I love butterflies and have quite a number of butterfly stamps and dies. I chose one die from a set of nine Ellentina butterfly dies for this challenge.


As I started this project, I thought maybe I ought to try to use some of the mountains of floral cardstock that I have on hand. Butterflies and flowers go together, after all, don't they?


This card was a new design for me. I can't recall now where I saw it, but I'm pretty sure it was somewhere online.  It's a pocket card, with the top flap overlapping the pocket on the bottom. I'll show you what I mean in the photos below.


'I layered up a wonky scalloped and stitched circle with a white sentiment circle. My little butterfly was attached to the top with three brown "pearls" made with Nuvo Drops.

I felt like it needed a little sparkle so I added three pink gems, too.

The layered circles are popped up with foam tape onto the top flap.


Can you see the little pocket I've created on the inside? I simply adhered the left and right edges of the flap with 1/8" double-sided tape. Then I created a card to put inside my pocket. You could also put money or a gift card in the pocket.


I searched through my flower stamps to find one that matched, as closely as possible, the flowers on the front DSP. I made a mask so that I could stamp one over the top of the other. I also added a couple of stamped leaves and some dots made with a marker.

All of the sentiment and image stamps I used on this card came from various sets. I have my stamps sorted by occasion, so I just search through them to find what I need.


My second card was quick and easy. I had this pretty gold-flecked floral DSP and wanted to use it. I found a background die to cut the front panel with the three square apertures. Then I cut the same piece out of foam board. I glued the two together and then glued them to my pale pink card base.

Once again, I used my Ellentina butterfly die to cut three butterflies from some metallic gold packaging material. It was nice, heavy stuff and made some sturdy little butterflies. I used a black Viva Decor pen to add the three black "pearls" to their bodies.

Finally, I stamped a sentiment and cut it out with a fancy oval die.

Because my background die was NBUS, I'm also going to enter this card into Darnell's NBUS Challenge #16.


Both of these cards were super fun to make, and it makes me happy to be able to enter them into a couple of online challenges. I hope you'll consider doing the same.

Thanks so much for stopping by, and remember to laugh--a little or a lot--every day.
Cheryl


Friday, July 17, 2020

Happy birthday to a special daughter...


I made four cards--three for my daughters and one for my stepdaughter. They all have summer birthdays, so I thought I would get them all done at one time.


This was a project that took me a few days, as these cards were a little more complicated to make than the usual side-fold or top-fold ones. They are called double concertina cards.

I began by picking out some pretty papers for each card. I needed some plain CS for my base and three coordinating patterned papers per card. Sometimes it takes me forever to pick out papers, and this was one of those times. Finding three patterns that coordinated was the hard part. My considerable stash of Stampin' Up paper came to the rescue!


This is what the cards look like when opened. I varied the type of flower I used, and the papers, of course, but they were otherwise the same.


I found several links to tutorials on Pinterest and Youtube, but I changed the dimensions to make a 4 1/2" X 6" card to fit the 1,000 envelopes I still have in that size.

Click here for a good tutorial on how to make a "5 X 7" version.


The centers of my flowers on this card are some glittery enamel dots from Dollar Tree. I love when I can find some nice embellishments for just a dollar!


Now I'll give you a little closer look at the other three cards.


I hope you enjoyed my double concertina cards and didn't get too bored with so many photos. It was fun to think about each daughter as I made her specific card. They all have so many talents and wonderful attributes that I pale in comparison.

Thanks so much for stopping by, and remember to laugh--a little or a lot--every day.
Cheryl

Tuesday, July 14, 2020

Didn't we just celebrate Easter a few weeks ago?...

Yes, we definitely did, and I posted quite a number of the Easter cards I had made for my own use and to be sold in the thrift store where I volunteer. In fact, when I started this card I had no intention of making an Easter card. But the colors seemed so very Easter-y to me.


I wanted to use one of the flowers I had made when creating the cards in this post. I found some dotted paper that had just the right shade of yellow in it, so I went with that for my background.

As you can see, the flower is popped up on a foam square. My little butterfly was made with a Martha Stewart punch.

The embossed turquoise panel was one from a pack by David Tutera, I believe. It was given to me, so I'm not 100% sure.


On the inside of the card, I added a double-stitched rectangle on which I had stamped my sentiment. I also stamped a little pink butterfly to mimic the dimensional one on the front of the card.

When you read this, we will be on our way home from our little RV trip. I hope to share a few photos with you in an upcoming blogpost.

Thanks so much for stopping by, and remember to laugh--a little or a lot--every day.
Cheryl

Thursday, July 9, 2020

Working on those holiday cards..


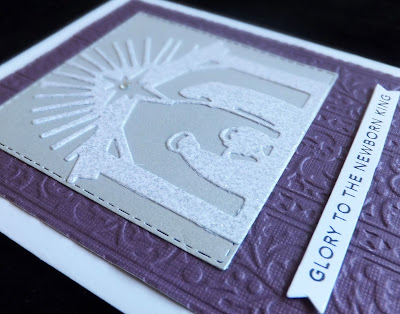
These cards were quick and fun to make. I picked out a few jewel-toned papers and dry-embossed them with one of my Christmas embossing folders. Then I stamped and cut a few banner sentiments, stitched squares from silver CS and my focal images from silvery glitter CS.


I added one flat-backed gem in the center (okay, SORT of in the center) of my star and three on the bottom right of my embossed panel.

My sentiment banner was popped up on foam tape.


On the inside of my cards I adhered a mat from the same CS that was used on the front. I stamped my sentiment and then added the negative star cut from my focal image. It worked so perfectly to dress up the inside of my card.

This card came together so well with only a few supplies, and I think it looks quite elegant. I hope you like them, too. If, for some unforeseen reason, I don't get enough cards made by the time I need to mail them, I will come back to this design and make some more of these.

I've been picking kale every few days from my tiny garden. We've been eating it regularly, as my eye doctor says I need to eat more dark, leafy greens for my eye health. I started the kale from seed in March and it's really doing well. The seeds came from Dollar Tree and cost $.25, so I wasn't sure if they'd produce anything. Turns out, they're doing great!

Thanks so much for stopping by, and remember to laugh--a little or a lot--every day.
Cheryl

Sunday, July 5, 2020

Let's Craft and Create Challenge #161: STARS & STRIPES - Anything USA/red, white & blue...


It's time once again for another fun challenge on Let's Craft and Create. This month we're focusing on red, white and blue. It's a great time to make a card that honors a service member. I know some of you even make cards that are offered to the troops to send home to friends and family members. If you're one of those kind people, thank you for doing that! My dad, both of my brothers, my grandfather and almost all of my uncles served in the Military, and I know they would have appreciated some handmade cards to send home.

I decided to make two 4th of July cards to send to my aunts. They get such a kick out of receiving them. They told me they had "never heard of sending 4th of July cards," so I enjoy adding a little fun to their holiday.


Here are my two cards. I started with one white card base, one blue one and two white panel fronts, which I dry-embossed with a stripes embossing folder.


For my first card, I dug out my star dies and some red, white and blue glitter cardstock.

It was a simple matter to organize my stars into a "flourish," laid out diagonally across my front panel.


I love the sparkle on this card. In fact, you can see that I even added some colored flat-backed gems. The flurry of stars and gems reminds me of the fire works displays we watch each year.

My sentiment was stamped with Versamark ink onto red cardstock, heat-embossed with white EP, fussy cut and popped up on foam tape.


On the inside of my card I used a red mat and three glittery blue stars to embellish my stamped sentiment.


For my second card, I used a star-shaped shaker element as my focal point. My entire front panel is popped up to provide room for the sequins in my shaker.

The sentiment was heat-embossed and I added a few blue gems on either side to tie in a little more of the blue.

In this photo you can clearly see the blue card base which also serves as the background of my star shaker.

I love making shaker cards, and I think they are such a nice surprise for the recipient. I hope my aunt likes this one!


I used the same stamped sentiment on this card and randomly adhered a few tiny holographic stars. In person, these little stars reflect the blue of the interior left side of my card base.

That's it for my red, white and blue cards. I hope you'll join in the fun and post your cards on Let's Craft and Create. You can also check out the inspiration from the other amazing Design Team members.

Thanks so much for stopping by, and remember to laugh--a little or a lot--every day.
Cheryl