Wish List

Friday, September 29, 2023

A fun card for a 70th birthday...

 Not long ago, my brother-in-law turned 70, and this is the card I made for him:

I had this bird in my card parts, and I thought he'd be the perfect embellishment for this interactive card.  I think this is called a peek-a-boo shutter card, but I'm not 100% sure.  At any rate, I started with a gate-fold card and then used a die set to cut out the  mechanism on the inside.


The party hat was a Dollar Tree sticker that I cut down a bit to better fit my bird.

I stamped the speckles behind the bird and the sentiment below him. I popped up the bird's body on foam squares, but I glued his skinny little feet directly to the white rectangle so that they wouldn't catch on something and tear off.


Here's a look at the inside of the card. The wide strips on either side of the center panel are the "shutters." They cover up the message in the circle when the card closes and show the message when it's opened, as you see here.

This was a fun card to make--I really need to make more of them.

Have a great weekend with, hopefully, some fun outdoor activities.

Thanks so much for stopping by, and remember to laugh--a little or a lot--every day.

Cheryl


Tuesday, September 26, 2023

More wooden embellishments...

In my last post, I shared some cards made with little wooden bird button embellishments that my sister had given me.  She also gave me some other wooden embellishments, and I used some them on this card:

I used some leftover scraps of DSP from one of my card kits and put them together to create this background. I used a gray marker to color the watering can, glued a tiny flower on it and added a little wing to the bird. Then I simply glued each embellishment onto a different section of my card front.

The sentiment strip was popped up on foam tape.


This card was donated to the thrift store, and I wondered if someone would like it enough to buy it. I was pleasantly surprised when it sold almost right away.


 On the inside was a simple stamped sentiment.


TWOFER:

This card doesn't feature any wooden embellishments, but rather a little die-cut teapot that was in my card parts. 


I added three tiny pink flowers with blue Nuvo Drops in their centers. After adhering it to a die-cut oval and stamping a sentiment, I popped the whole thing up on foam tape.

I added two lacy corners to dress up my card front a bit. I thought they added an additional feminine touch to the card.


I made this into a get well card with the stamped sentiment on the inside.

I also added a scalloped border on the inside, made from the same DSP as the background paper on the card front.

I like to add some coordinating element to the inside when I can (and when I have time!).

I hope this finds you doing well and enjoying some beautiful Autumn weather (or Spring weather if you're in another hemisphere). I am already dreading the first snowfall here in Minnesota with it's requisite shoveling! I will most likely be chief shoveler this winter because of my husband's broken elbow. The doctor says it will take many months for it to heal and then he still may not be able to use it as he did before. 

Thanks so much for stopping by, and remember to laugh--a little or a lot--every day.

Cheryl

Friday, September 22, 2023

Little birdie cards...

 My sister gave me some small wooden bird embellishments for my cardmaking stash. They were actually made like buttons with a couple of holes for thread. I decided to cover those holes with some tiny wings that I simply fussy-cut and glued on.

This card features just one of the little birds. I cut the wing out of pink cardstock and inked around the edges of it to help it stand out a little.


Here's a closer look at that little wooden bird.


On the inside of the card I added a die-cut flourish and a stamped sentiment. I thought the sentiment was perfect for this card!


My sister gave me quite a few of these little birds (Thanks, Michelle!), so I used six more of them on these cards.


I had three birds that were all the same pattern, so I used them here. Birds of a feather stick together, you know. LOL


I used some pre-made card bases that I had gotten quite a while ago, and these little birds fit perfectly inside the the round apertures. If they hadn't, I could have easily made them a little bigger with a circle die.

Note that I have glued the bird to the inside of the card so that it is clearly visible through the aperture when the card is closed.


For this card I used three different birds (they were all pre-colored).


Once again I added a wing to each one and glued them inside the apertures on the inside of the card.


Here's what each card looks like on the inside. I used the same sentiment for both of them.

I am going to try to remember to get a couple of posts ready for next week so that I don't have to worry about writing them while I'm caring for my grandkids and granddogs (and cats). It's going to be a busy week, and I'm certain I'll be running back and forth from their house to our house, to swim practice, etc. 

Thanks so much for stopping by, and remember to laugh--a little or a lot--every day.

Cheryl

Tuesday, September 19, 2023

Ink blending an image...


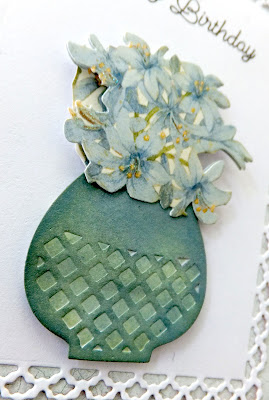
I had a flower sticker and a scrap of DSP and that I wanted to use on this card. I also had a die-cut vase that had been cut from white cardstock, so I decided to try and color it to match the gray-blue in the flowers and background.


I used a green ink pad and a dusty blue ink pad, along with a finger dauber to get the result you see in the photo.

The pictures really don't do it justice, as it looks much better IRL. It has the multi-colored look you see in many clay vases.

Both the flower sticker and the vase are popped up on dimensionals.


I added just a simple stamped sentiment on the inside.


Since I still had a few flower stickers on my desk (and I wanted them used!), I made a few more cards:

This card is a bookbinder fold. I really love this fold and make it often. The green die-cut frame was adhered to a piece of cardstock which was stamped with the sentiment.

This one has a similar layout to the first one, but I used another die-cut frame which has been glued to a piece of white cardstock. A scatter stamp was used to make the dots that ground the flower sticker and the sentiment was stamped, die-cut and popped up on dimensionals.

This card features a piece of leafy vellum with a die-cut frame. The sentiment was, again, stamped, die-cut and popped up on dimensionals.

This final card uses another die-cut frame, glued to some white cardstock. The center panel has been popped up on dimensionals.

FINALLY, those stickers have been used up! All of these cards were donated to the thrift store, so at least two more people will get to enjoy those stickers--the sender and the recipient.

In another week, I will be spending a dozen days with two of my grandchildren and their four dogs (and three cats). My daughter and her husband are going on a trip to Europe, so I will be in charge while they are gone. The grands are both in high school, but the younger one doesn't have his driver's license yet, so that means I need to get him to swim practice a half-hour away by 5:30 a.m. This will be pretty hard duty for me as I am definitely NOT a morning person. In fact, I'm a night owl who likes to stay up past midnight. Wish me luck!

Thanks so much for stopping by, and remember to laugh--a little or a lot--every day.

Cheryl


Friday, September 15, 2023

Sympathy cards in black and cream...


I had some very old black and cream patterned cardstock in my stash, and when I was rummaging through my papers not long ago, I ran across it. Because it has a rather elegant design on it, I decided to turn it into a couple of sympathy cards.

This card features a die-cut that I've backed with plain cream-colored cardstock and popped up on dimensionals. I also added some sheer black ribbon tied in a simple knot. Please excuse the out-of-focus photo!


The inside is plain, with just a stamped sentiment.


I didn't want to make the cards exactly the same, so for this one, I cut a somewhat smaller piece of the patterned cardstock, matted it with black and adhered it to the front of the cardbase. 


The sentiment oval was popped up again and the ribbon was applied in the same manner as on the first card, just in a different direction.


I used the same stamped sentiment inside this card and also added a bit of decoration to the bottom.

On the homefront, my DH met with the orthopedic surgeon again yesterday. The doctor said my DH may never have full use of his right arm again and it may always cause him pain. He is not very hopeful that it will heal properly, and he said there is really nothing he can do to fix it. He said an elbow replacement might be possible, but I don't think my DH will really want to do that. We'll just have to wait and see how the healing goes, I guess. 

A word to the wise: Be very carefull to avoid falls as you get older! 

Thanks so much for stopping by, and remember to laugh--a little or a lot--every day.

Cheryl

Tuesday, September 12, 2023

Stadium wave pop-up cards...

After watching Sam Calcott's video tutorial here on how to make stadium wave cards, I made a few for family birthdays.

This card was made for my daughter who fosters dogs for a local rescue agency. I have a die that is a row of little pups, all hooked together. I simply cut them apart to use on my card.


These cards are a nightmare to photograph, so please excuse the bad images I'm sharing with you. I hope you get the idea.

I used pink vellum and some strong double-sided tape for the wave mechanism in this card. It worked well and wasn't as thick as cardstock.


Here's the sentiment panel on the inside, which I created with my computer. My daughter is always cuddling on the couch with two or three dogs, so this was perfect for her.


This is a stadium wave card I made for my aunt. All of these cards were A2 in size. I cut the cardstock at 4 1/4" X 11" and scored them at 5 1/2", so they were top-fold cards.

The butterfly was very glittery, so I also added glitter to the small white circles that had been die-cut, signifying the butterfly's trail.


On the inside there was a rainbow of butterflies. I added a die-cut oval with a stamped sentiment on it and a blank oval (on the lower left side) as a space to write a personal note and sign the card.

As you can see in the photo, I used the same paper for the wave mechanism as I had used to decorate the inside and front of my card. This paper was not cardstock, but more like a good quality printer paper. It seemed sturdy enough for the wave mechanism and didn't make the card so thick that I had to add a belly band to keep it closed.

I was with my aunt when she opened this card, and she really loved it!


I made this card twice - for two of my grandsons. They were not the same age, so the statistics used on the inside were a bit different on each of them.

The sentiment on the front of the card was created with my computer. The balloons were die-cut and the middle one was popped up on foam squares.

In this photo you can see that I've added die-cut ovals to each section of the "wave." Each oval has a statistic on it that is equal to 14 years. The stats included were seconds, minutes, hours, days, weeks, months and, finally, years.  I used a good quality printer paper to make each piece of the wave mechanism and because I had only seven ovals/statistics, I scored and folded my paper strips a little differently to give them a wider spread.

Both of the grandsons who received these cards really seemed to like them. The stadium wave mechanism is such a fun surprise when the card is opened.

I hope you'll give these cards a try. Once you get the hang of it, they're not hard at all. I think a Christmas card with all different kinds of die-cut snowflakes on the wave mechanism would be great. I may have to give that a try.

Thanks so much for stopping by, and remember to laugh--a little or a lot--every day.

Cheryl

Friday, September 8, 2023

Birthday cards for kids...


 I don't often make cards for younger kids, as my grands are all teenagers or young adults now. I like to make them, though, and they always sell quickly at the thrift store. I purchased this dinosaur die set just so I could make some for both boys and girls.


The card bases and large tags were from a card kit that a friend gave me.


The party hats were some stickers that I got a very long time ago at the Dollar Tree. I also had a few pastel-colored mini-brads in my stash and used one on each tag.


On the inside of each card I added a computer-generated sentiment.

The colored triangle in the corner was put there to mirror one on the far opposite (upper left) corner on the inside of the card. There was a little damage to that upper left corner, so to cover it up and look like an embellishment, I added the triangles.


This card was intended for a young girl. I used the "Stack, cut and shuffle" technique that I had used (and explained) in this post.

The little girl was a chipboard sticker that I had in my stash.


On the inside of this card I added a stamped sentiment.


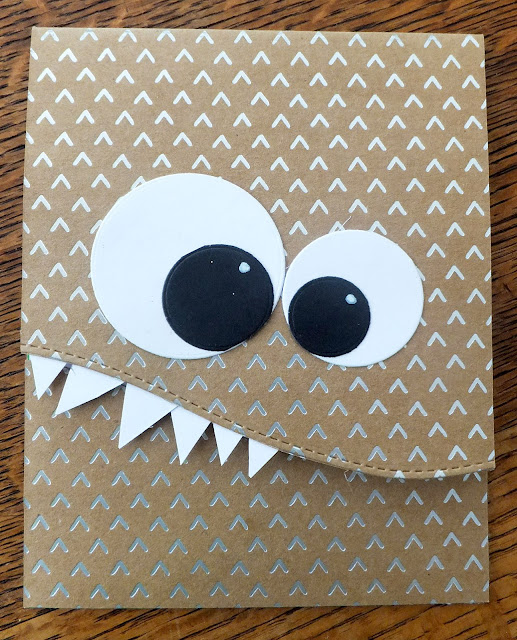
Finally, I made a couple of these silly cards. They're so easy and quick to make, and I can imagine that little kids would love them. After all, they get to open the monster's mouth to see what's inside the card!

I used a curved edge die to cut the bottom off my A2 portrait-style card base. The teeth were hand-cut triangles glued to the backside of the front.

The eyes are a few different sizes of circles, cut and adhered together.


The bottom of the card front is adhered to the inside. I also added a white panel to the inside of the top of the card front to cover up where I added the teeth.


If you have some ideas or links to fun and easy-to-make kids' cards, I'd love it if you'd share them with me. I really should make more cards like this for the thrift store, since they are in such demand there.

Thanks so much for stopping by, and remember to laugh--a little or a lot--every day.

Cheryl

Tuesday, September 5, 2023

Let's Craft and Create Challenge #199: Paper Strips instead of Ribbon or Anything Goes...


A new month brings another challenge from Let's Craft and Create. This month's challenge will help you use up some of those paper scraps. I'm certain you have piles of them, just like I do! 

Cut some of them into strips and use them on your cards in place of ribbon. You can even use some of them to cut a faux bow, like I have done for the card below.

I had a pale lavendar card base on hand, so I decided to "fancy it up" a bit for this card. I use a border die to cut a fancy scalloped border on the bottom of my card front.

I also cut a panel from white cardstock and die-cut it with a background die that allowed a little bit of my lavendar card base to show through.


To finish off the edge where my white panel ends, I added a strip of die-cut cardstock and a tiny die-cut bow out of deep purple cardstock. The sentiment was cut from the same CS a couple of times and layered for dimension.


On the inside I added a stamped sentiment and another strip of purple cardstock with a die-cut bow in the center.

Now it's your turn to get creative with some strips of paper. Head on over to Let's Craft and Create for more inspiration from the other members of the Design Team. I can't wait to see what come up with.

Thanks so much for stopping by, and remember to laugh--a little or a lot--every day.

Cheryl