Wish List

Friday, March 30, 2018

My last Easter cards...for a while, anyway...

I'm glad it's Friday today, although I'd be a bit happier if my DH's car hadn't broken down last night. Actually, his "check engine" light came on when we were returning home from an event and the engine started running very roughly. We managed to make it to our house, but it would not start this morning. He has taken my car to work and I am waiting for the tow truck to come and tow his car to the repair shop.

Vehicles are great when they work properly and a real pain when they don't!

But enough of that, and on to my cards for today. I actually have two Easter cards to share with you.


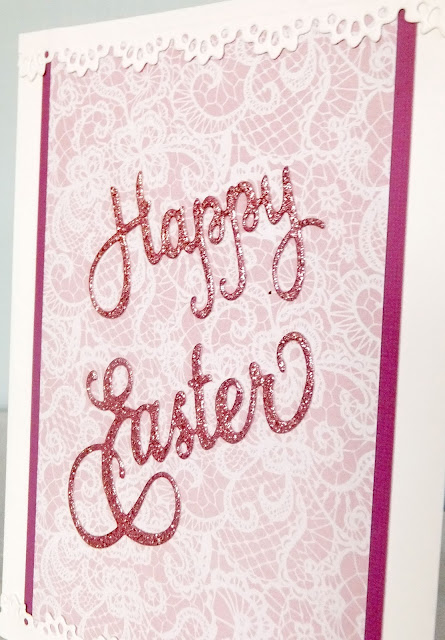
 This was actually a very simple card to make. I had this pretty scrap of lace-patterned paper (it actually came from a selection of Christmas papers that I got with a magazine), and I wanted to use it because I liked it so much. I thought the delicate pattern really worked for a springtime card.

 
I used a couple of unbranded dies to cut the lacy borders from white CS and the sentiment from some glitter cardstock.


On the inside of my card I cut some more lacy borders and backed them with the deep pink CS that I had used on the front.


For this card, I used a Cheery Lynn die for the sentiment and unbranded dies for the basket and the lacy strip with ribbons woven into it. I used my Silhouette to cut the eggs out of white CS (which I colored with ProMarkers) and a Martha Stewart punch to create the "grass" in the basket. I inked up the edges of my front panel and the basket and applied some Wink of Stella to "Happy Easter."


On the inside of my card I adhered another blue panel and cut the sentiment panel with a Spellbinders Labels 8 die.

I think we're all ready to move on to cards for other occasions now. I know I am! I still have a few Easter cards that I haven't shared on the blog, but to keep from boring everyone to death, I think I'll skip those. At least for a while.

I hope you all have a wonderful Easter. It is going to be cold in Minneapolis--reaching around the freezing point for a high. The best we can hope for is a dry, sunny day with no snow!!

Thanks so much for stopping by, and remember to laugh--a little or a lot--every day.
Cheryl

Sunday, March 25, 2018

Homemade wreath builder stencil...

I've seen so many pretty cards created by using something called a wreath builder stencil. It didn't look very complicated, so I decided to use my Silhouette Cameo to create my own.


This is what my wreath builder stencil looked like after I cut it out and laminated it. I actually used it before I laminated it, just to make sure it would actually work. You can see in this photo that I haven't trimmed away the excess laminate yet, but I'll do that before I use it again.

To create it, I used my Cameo to draw two 4-inch squares. I overlapped them with one of them turned at a 45 degree angle and welded them together to create a single image. Then I drew a 6-inch box around them. Once I had everything centered, I cut out both the 6-inch box and the 8-point image, which left me with the stencil you see above.

To use my stencil, I cut a 4-inch square of cardstock, grabbed some stamps and my stamp positioner, and went to town stamping as I turned the 4-inch square, fitting it into the points of the stencil.

Here's the result:


It was fun to watch the wreath come together. What took the longest was searching through my stamps to find enough tiny ones that would work. I added the dots with a Promarker to fill in any spaces that seemed to need a little something more.


Here's a little closer look at my wreath. Not all my stamps were quality stamps. Some were on the soft side and didn't stamp a clear image, but I was ok with a little "fuzziness" here and there.


On the inside of my card, I used a few of the stamps to create a little bouquet in the corner.

This was so much fun to make. If you search for "wreath builder stamping" on YouTube, you'll find several videos that show just how it's done. I think there are even some videos that show how to make your own stencil.

We were supposed to have a snowstorm the other night, but the cold front stopped just short of the Minneapolis/St. Paul area. We didn't get so much as a flake! Yay! I am so OVER the snow and cold.

Thanks so much for stopping by, and remember to laugh--a little or a lot--every day.
Cheryl
Thursday, March 22, 2018

Fun with Twofer Card Challenge #3...


I am just under the wire in joining this month's Twofer Card Challenge. I really like this challenge. I usually make just one card at a time, and this challenge gets me to think about making two cards using the same stamp or die.

Here are my cards for the challenge:


I chose to use an unbranded flower die on both cards.


For my first card, I colored the die-cut with a shade darker Promarker and then backed it with the same cardstock (but I didn't color this piece). I cut out a few leaves that were as close as I could come to the leaves in my DSP. I also colored the stamens white to echo the colors of the larger flower in the DSP.

I had trouble coming up with a sentiment for the front of my card. I wanted this to be a Mother's Day card, but none of my "Happy Mother's Day" stamps seemed right. Since the only person I would send this to is one of my aunts, I decided that a "Thinking of You" stamp was appropriate. Then I put a Mother's Day greeting on the inside.


I dressed up the inside with a strip of my DSP and a scalloped piece of my deep pink cardstock.


For my second card, I cut the same flower out of three colorful scraps of cardstock. I also cut a tiny scalloped edge to finish off my white strip. 

Do you think I should add some enamel dots or flat-backed gems? I couldn't make up my mind about that, so I left it plain.

I left the inside of this card plain, too, except for the stamped sentiment.

If you'd like to join in the fun over at the Twofer Card Challenge Blog, you've got just a couple of days. But we all work better under a little pressure, don't we?

For the next 10 days, I am taking care of my daughter's dog and three cats while she and her family are on vacation in Costa Rica. As I type this, Willie (the dog) is sitting on the arm of the sofa (he's a Chihuahua) and watching me. I think he wants me to finish up soon so I can pay more attention to him!

Thanks so much for stopping by, and remember to laugh--a little or a lot--every day.
Cheryl

Monday, March 19, 2018

Easy, quick Easter cards...

When I'm making cards to be sold at the thrift store where I volunteer, I need the designs to be easy and quick. I usually end up making them the day before I have to take them to the store, so I'm always crunched for time. I only make 6-10 of them each week, but they still take some time. Especially when I'm also trying to get Easter cards made for my own personal use.

Here are a few of the latest ones:

For this card, I pulled a flower from my stash, cut a couple of leaves and added an enamel dot to its center. The sentiment was heat embossed using an old wood block stamp (from Stampin' Up, I think).


This card features another flower from my stash, embellished the same way as the one above. The butterflies were cut using a couple of my Ellentina butterfly dies, and I added some Nuvo drops. As you can see, I'm still perfecting the application of those!


All of the papers I have been using for these cards were given to me by the thrift store for this purpose, so that is why you keep seeing them over and over.

The cards have been selling well. Only once so far was there a single card left unsold at the end of the week.


For this card, I used my little chick die (unbranded). They kind of look like they're marching in their own Easter parade, don't they? The sentiment was stamped and then cut out with a La La Land folding banner die.

I've truly had a lot of fun making these cards--made even more fun by the fact that people are actually purchasing them!

Thanks so much for stopping by, and remember to laugh--a little or a lot--every day.
Cheryl

Friday, March 16, 2018

Happy St. Patrick's Day!

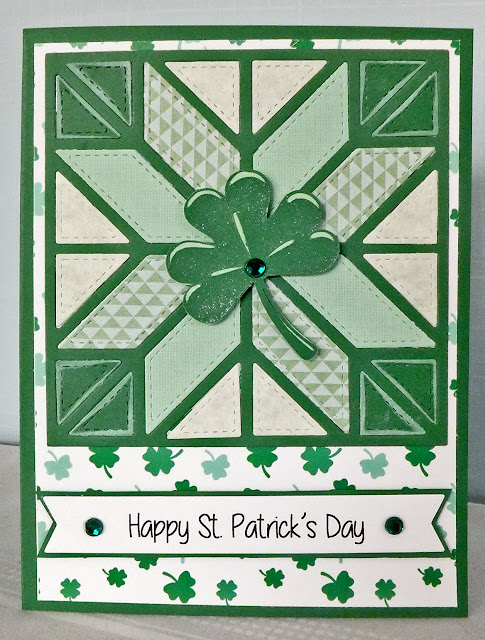
I made just one St. Paddy's Day card--for my sister.


Once again I used my quilt die (unbranded) to create a focal point.  Because I used dark green cardstock for the "frame" and for all four corners, I decided to ink the edges of the corner pieces with white ink to help delineate them from the frame. I wanted to maintain that quilted look, even in the corners.

My background paper and my shamrock are freebie images from Printable Cuttables. The shamrock is nice because it is two-layered, which makes it sturdy. It was cut out with my Silhouette. Can you see in the picture above that I gave it a good dose of Wink of Stella?


I popped the shamrock up on a piece of double-sided foam tape, and added a green gem for even more sparkle.

My sentiment was computer-generated and cut out with a double-fishtail banner die (unbranded). I popped it up on foam tape, too, and added a couple more gems.


I cut three different sizes of shamrocks, since I wasn't quite sure what size I wanted to use. I added the smallest one to the inside of my card. I've saved the third and largest one for another project (maybe next year's card?). My sentiment here was also computer-generated.

Will you be doing something special for St. Patrick's Day? I'll be going to the grocery store to pick up a corned beef brisket so we can have it along with cabbage, carrots and potatoes for our dinner. That's about as celebratory as we will get. Both Minneapolis and St. Paul will hold St. Patrick's Day parades. We haven't usually attended either one, but who knows? Maybe tomorrow we'll do just that, since the weather is supposed to be very nice.

Thanks so much for stopping by, and remember to laugh--a little or a lot--every day.
Cheryl

Tuesday, March 13, 2018

A quilted happy Easter...

I got this quilt die quite a while ago and used it on some Christmas cards in this post.

It was fun to cut several out of coordinating papers and then mix and match them to create quilt patterns. The great part about it is when you cut out several, you get several completed quilt squares to go on an equal number of cards. And that's probably the closest I'll ever come to making an actual quilt!!

My fancy sentiment label is by Spellbinders. I haven't used these dies in ages, and decided it was time to pull them out again.

The pink-patterned cardstock is some I'm trying to use up. I've got so much patterned paper, and I really need to "thin" it out. I'm not sure it works well for this card, but I do think it looks better in person.


For my flower I cut three layers of petals, inked the tips and then added three flat-backed pearls for the center. My leaves came from the same die set, which is one of those unbranded ones you can get on eBay or Amazon.


I added a stamped sentiment on the inside along with a simple pink scalloped trim piece to dress it up a little. The scalloped strip actually looks much better in real life. Not sure why the camera shows it as a different shade of pink.

I've been having fun lately cooking in an Instant Pot (a combination pressure cooker, sauté pan and slow cooker). My daughter gave it to me for my birthday, and I'm quite smitten with it. Last night I made country-style ribs with sauerkraut. The cooking time (under pressure) was 12 minutes! It did need to sit another 20 minutes while the pressure released naturally before I could open it, but it didn't require any watching. And the ribs were tender and delicious! I have a chicken recipe that I want to try next.

Thank you so much for stopping by, and remember to laugh--a little or a lot--every day.

Cheryl

Saturday, March 10, 2018

Simple Easter cards...

I've made about a dozen simple Easter cards to sell at the thrift store where I volunteer. It's actually quite fun to put these together to help produce income for the store. Here are the first six that I completed.

All of the DSP came from the thrift store, and I added die-cuts, flowers and gems, as well as the card bases, from my stash.  All the cards were stamped inside with an Easter sentiment.

Here's a closer look at each of them:


I have another batch of cards like this to share with you--but that's for another day.

We went to a swim meet today in which two of our grandkids competed. They both swam really well, achieving personal bests and some first place awards. It was fun to watch them swim, but it was like a sauna in the pool area. So HOT and HUMID!! We've been to quite a few swim meets, and this was the most tropical one yet!! I felt like they should have had a few fake palm trees and some fancy drinks with umbrellas to complete the experience.

I hope you're having a splendid weekend, wherever you are. Thanks so much for stopping by, and remember to laugh--a little or a lot--every day.
Cheryl

Wednesday, March 7, 2018

Li'l chick Easter card...

I made this "li'l chick" Easter card recently, using an assortment of dies. The curvy scalloped edge die is by Spellbinders, the tiny butterfly is a Fiskars punch and the grass and chick (with eggshell) are unbranded dies. My sentiment is a clear stamp from My Sentiments Exactly.


I just love this goofy little chick with the eggshell on his head.

As you can see, I've inked him and the eggshell around the edges to give them a bit more definition.

I probably should have used a beige/light brown ink on the egg shell for a more realistic look. Next time...


I only stamped a sentiment on the inside. In looking at this picture, it seems kind of plain, so I think I'll go back and add a couple of those little butterflies.

When I photograph my cards, it seems I almost always find something I should change or correct.

This card definitely says "SPRING!", and I am so looking forward to warm, balmy breezes and bright sunshine.

It's always exciting to see the first spring flowers poke their tender leaves through the ground. I especially love when my peonies bloom. They're such big, bold, luxurious blooms. I always try to bring a bouquet or two into the house, being careful to remove all the ants first! Peonies have some green scale-like structures that protect the blossoms as they begin to form. These scales have a gland called a nectary along the edges which produce nectar. Ants LOVE this nectar and swarm all over the buds before they open. The ants do some good though, while they are feasting on the nectar--they also devour insects that are attacking the plant.

I've been making some simple Easter cards to sell at the thrift shop. I've made a dozen so far and will share some of them with you soon.

Thanks so much for stopping by, and remember to laugh--a little or a lot--every day.
Cheryl

Monday, March 5, 2018

Let's Craft and Create Challenge #135: Anything Goes or Easter...

Once again it's time for the monthly challenge over on Let's Craft and Create. This is such a great challenge because you are given an entire month to enter your Easter or Anything goes project.

This month the design team has created some wonderful cards to inspire you, so be sure to head over to the LCC site for  little look-see.

My card for this challenge is my first Easter card of the season. I decided to try a double gatefold card. I followed the tutorial on Splitcoast Stampers with a few little changes. I made my finished card to measure 4" X 6". I also cut my diagonal from the top of the card to 2" from the bottom of each side.


I used the diagonal pieces I cut off each side to make the leaves for my flower.  My double-sided paper added a nice contrast, but I thought the green looked a bit too plain so I decided to add a little dry embossing on each side with a Cuttlebug EF. If you look closely, you'll see that the right side slipped a little when putting it into the Cuttlebug, so it didn't emboss all the way to the bottom. I may try to fix that....or I may not. But I will be more careful and tape my paper to the EF if I make more of these!


I used a pretty border die to "fancify" my sentiment panel. I think it's a nice surprise when the card is opened up.

My belly band was made with a strip of paper, punched with a Fiskars border punch, and the circles are all Sizzix dies. The rest of the dies I used are unbranded.

Now I hope you'll head over to Let's Craft and Create and check out the creations by the rest of the design team. I do hope you'll create something of your own and enter it into this month's challenge. We love seeing your projects and visiting your blogs.

Thanks so much for stopping by, and remember to laugh--a little or a lot--every day.
Cheryl

Friday, March 2, 2018

Minimalist masculine get well card...

My daughter's father-in-law recently had knee replacement surgery, so I decided to make him a get well card. With a little inspiration from Pinterest, this is what I came up with:


The design is really simple--this is for a guy, after all!

I decided that the sentiment (printed with my computer using the Yellow Daisy font) was going to be the star of the show.

I found this sentiment on Pinterest and it made me laugh, so I decided to use it.

Just a few enamel dots for some minimalist embellishment.


The inside was "minimalist," as well. Just a couple strips of the orange cardstock to frame my sentiment and lots of room for a personal note.

We will be heading to the northern part of the state this weekend to watch our granddaughter play in a basketball tournament.  I'm looking forward to it, as I've not had a chance to see her play yet. It will also be fun to spend a little time with my daughter.

I hope you have a wonderful weekend, wherever you are. Thank you so much for stopping by, and remember to laugh--a little or a lot--every day.
Cheryl