Wish List

Thursday, May 31, 2012

Thank you, Teacher...

I was a teacher for a few years, so I know just how important a little thanks and encouragement can be.  Just out of college, I taught Algebra in a Grand Forks, ND, high school.  I had the students who were struggling and needed extra help.  Even though math was difficult for most of them, we had a great year. It has been decades since I taught there, but I still have some of the notes of thanks and encouragement that I received. 

When my twin daughters asked if I would make some teacher thank you cards for their children to give to their teachers, I jumped at the chance.
 
 This is the first card I made, using some alphabet paper that I printed from a CD onto cream colored cardstock, inked along the edges and then matted on black CS.  The stems for the Petaloo flowers were cut from the "Walk in My Garden" cartridge. I inked and bent the leaves a little for more dimension, and the two largest blossoms are popped up on dimensionals.  The sentiment has been cut out with a Lifestyle Crafts label die, matted on black cardstock and adhered with dimensionals.  Can you see that the design of this label looks like an open book?


 This card uses some paper and cardstock from my stash that I've had for eons.  I was so glad to find a card to use it on.  The strawberries were cut from the "Preserves" cartridge, embossed with the Swiss Dots folder and popped up on dimensionals.  I hand-embossed some lines in the leaves and inked them for extra dimension.  A little twine around the sentiment and it's done!  By the way, all the sentiments on these cards were computer-generated. 


My third card also used the "Preserves" cart for the apple and "Nate's ABCs" for the lettering.  I'm not sure why 'teacher' cut a little funkily, but I thought it still looked okay.  The inside sentiment for this card uses the same label die and matting as the flower card, but says, "Thank you for a great year!"

A final look at the cards as a group.  They were fun to make, and one of each will be in the mail to my daughters today.

Remember to laugh--a little or a lot--every day!
Cheryl


Monday, May 28, 2012

Card for a soldier...

Happy Memorial Day, everyone!

I thought today I would share a card that I made to send to a soldier serving our country in Afghanistan.  I can only imagine how difficult it is to be separated from family and friends and live in a dangerous place.  I think it is the least we can do to send them some encouragement and gratitude from time to time.  My own father was in the Army, Navy and Air Force (I know--it's hard to believe) and both of my brothers also served-- one of them for 23 years!

There are organizations that use this sentiment, but it just was so perfect that I had to use it, too.  Sure hope it's not trademarked!!

For the mat, I scored a piece of medium blue cardstock every 1/4" and then ran an ink pad directly over the side with the raised scores to give a weathered appearance.  I really love how that turned out and I'll be using that technique again.  I cut the "because" on my Cricut after I had welded it with the Gypsy.  The letters are from Nate's ABCs cart.  The stars are from a Sizzix die with nested starsall on one die.  The center star comes out solid and the rest come out as star-shaped frames.  I like the combination of the two on this card.OnOn the inside of the card I added a couple of the stars on the top panel and left the bottom blank to write a note.

Maybe there's someone you know, or know of, that is serving our country here or abroad and could use a little encouragement.

Thanks for stopping by.  Remember to laugh--a little or a lot--every day.
Cheryl

Saturday, May 26, 2012

Yet another card by my sister...

Look at this lovely card my younger sister made for my older sister's birthday, which was May 3rd.  There are four girls and two boys in my family, and I am the second oldest of the girls. 

Our oldest sister who received this card is a tremendous seamstress, even making her only daughter's wedding dress - which was flat out gorgeous, I might add.  Anyway, this card was perfect for her with all the sewing details.

Don't you love the buttons with the gems in the center?  The dressform panel is popped up on dimensionals.  I'm not sure where the papers are from--my sister lives 500 miles from me and emailed me this pic.  Now that we both have fun making cards, I wish there weren't any zeroes on that number of miles!

 Thanks for stopping by.  Remember to laugh--a little or a lot--every day.
Cheryl

Thursday, May 24, 2012

Feathers are so much fun...

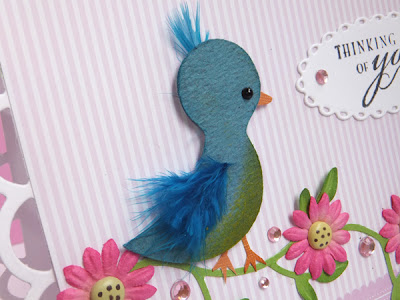
Here is a fun card that came together very quickly, once I figured out what I wanted to do.  The little bird is cut at 3" from the Nate's ABCs cart.  I opted not to use the layers and instead inked his breast with some orange-gold chalk ink and used a feather from Petaloo for his wing and little top feathers.  For the placement of the wing, I looked to see where the wing was supposed to start in the handbook, poked a little hole and inserted the quill of the feather through the hole, securing it to the back with a little tape.

The flowers are also from Petaloo and the leafy branches were punched out with a Sizzix die.  For the centers of the flowers, I took some pale green/beige brads from my stash and dotted them with a paint marker.  I really liked how they looked with a few polka dots on them.  The pink gems were some I had in my stash and added just the right touch of "bling."  The butterfly is one from a K&Co. set that my grandson gave me for my birthday.  He's only 6 and picked out some crafting supplies for me all by himself. You have great taste, Max!


To make the base card, I folded some heavy cardstock and then used a Lifestyle Crafts scalloped square die to cut the shape.  I had to run just half of the card through my Cuttlebug, reposition the die, and then run the other half through to get just the size I needed. The mat on the front of the card is from a DCWV matstack called "The Sweet Matstack."  I also used a Lifestyle Crafts scalloped  oval die for the sentiment.

I hope you liked my little bird/butterfly card.  I am sending this to a young woman who is married to a soldier serving in Afghanistan.  I hope it lets her know she is not alone as she waits and worries.

I am also entering this card in  the following challenges:
Going Buggy - Things with wings
Truly Scrumptious Challenge - Pretty in Pink
The Paper Shelter - Bling it on
Cute Card Thursday- Pink & Green
Cardz TV - #108 May Day

Thanks for visiting.  Remember to laugh--a little or a lot--every day!
Cheryl


Wednesday, May 23, 2012

Ever hear of a Princess Train? Well...

Quite a while ago I picked up a Sizzix train die for a really good price.  At the time I thought it would be perfect for making cards for little boys.  However - little girls like trains, too.  Especially if they're glittery and filled with "jewels and fairy dust!"

Here's a card that I made for my granddaughter's third birthday.  With this great die, it was fun and came together very quickly:


I cut each car from a different color of glitter cardstock.  One of the little coal cars is filled with "jewels" (flatbacked gems) and the other is filled with "fairy dust" (a nice little pile of sparkly glitter).   I added gems in various places for more dimension.  I also cut just the wheels again from gray cardstock and did some extra embellishing on them with metallic gel pens (and gems, too!). I used a lacy ribbon for the track, cut some puffs of smoke from white felt and used another die to cut the letters for "choo choo."  Each "choo" was actually part of a phrase that I cut apart until I had what I wanted.  I used a decorative corner punch and a small flatbacked gem to finish off each of the corners

For the inside, I ran a decorative strip on the left.  I actually composed the verse inside and printed it onto the cardstock with my computer.  Please use it for your own cards, if you wish.  Just substitute the appropriate age and name.  In case it's hard to read, here is what it says:

A pretty little Princess Train
is heading straight your way.
It's filled with jewels and fairy dust
for a girl who's three today!

Happy Birthday, Hadley!

I hope you enjoyed this girly train card.  Remember to laugh--a little or a lot--every day.

Cheryl


Monday, May 21, 2012

Embellishment for a gift...

I love to decorate gifts with something I have made that is different from a ribbon tied in a bow or curled with a scissor blade.  My granddaughter recently celebrated her 9th birthday and I gave her the gift that I talked about in this post.  When I wrapped it, I wanted to use some very flowery paper and decorate it with something a little unique.  I remembered the beautiful butterfly that can be cut from the CTMH Art Philosophy cartridge.  I cut it out at 5" (I think).  Then I applied some spray adhesive and covered it with fine yellow glitter, burnishing by rubbing the glitter gently in circles with my fingers.  It's always a good day when I can play with some glitter!

I have some very fine gold wire that I used to fashion the antennae, which I adhered under one of the gold flat-backed gems that formed the head and body.  This butterfly was so quick to make and looked pretty impressive as it rested on the garden of flowers in the paper's design.  I also used a Spellbinder's Fancy Tags die on which I wrote my granddaughter's name. 


Just a word about the Art Philosophy cartridge - it is one of my very favorites! I love the images and the stamps that coordinate with them.  If you read my blog from time to time you will see me using it again and again.  If you'd like to purchase this cartridge, I recommend you talk to Lisa Stenz at Lisa's Creative Corner.  She's a wonderful CTMH consultant and I know you'll just love her!

Remember to laugh--a little or a lot--every day!

Cheryl

Saturday, May 19, 2012

Hydrangea Happy Birthday...

In my city we have a wonderful little store called "ArtScraps."  It is basically a second-hand craft store and sells all kinds of products for crafting.  I believe they get everything donated from individuals, organizations or businesses and resell it at much reduced prices.  I have purchased envelopes, cardstock and other papers, colored wires (great for butterfly antennae), ribbon, and quite a few wood-mounted rubber stamps.  Some of the stamps they sell have never been used and I have purchased them for as low as $.25!

The hydrangea stamp on this card is one of those stamps.  It isn't large but works perfectly for this quick-to-make birthday card.

I stamped the image on some heavy off-white card stock and colored it with ProMarkers.  I also stamped a couple of borders onto a subtley striped vellum, heat embossed with white embossing powder and cut them out, following the scalloped outlines.  I love that look and am now hoping to find some more lacy border stamps that I can stamp and cut out.  The doily and label dies were all from Lifestyle Crafts.  The little blue strip of CS was embossed with a Cuttlebug border folder. It added the perfect extra touch.  Three green flatbacked pearls finished it off!

Thanks for visiting.  Remember to laugh--a little or a lot--every day.
Cheryl

Thursday, May 17, 2012

One "Sweet" card...

This card will fit into a business-size envelope, although it's certainly not very businesslike!  I'm not sure how I'll use this card, yet, and I haven't added an inside sentiment.  I am thinking that it could be for a birthday - "Have a very sweet day!" - or it could be a thank you card - "Thank you for being so sweet!"  Any other ideas out there?

It is done in blindingly bright colors so would work well for a child.  I stamped the dotted background at the bottom and heat-embossed with white embossing powder.

The border was punched with a Martha Stewart punch.  I stamped the cupcakes, colored with ProMarkers and added some clear glaze to the frosting on each of them for added interest and dimension. I cut them out with a Lifestyle Craft circle die and used dimensional adhesive to stick them to a slightly larger colored circle.

The letters were cut out of self-adhesive paper with Cuttlebug alphabet dies.  A little ribbon and a little faux stitching with a white gel pen and it was done!

Remember to laugh--a little or a lot--every day!

Cheryl

Tuesday, May 15, 2012

More of my sister's cards...

When I was 9 years old, the eye doctor said I needed glasses - badly!  I remember having to sit in the front row at school because I couldn't clearly see what the teacher was writing on the board. Well, I was excited to go to the eye doctor and get this very first "personal embellishment."  My mother helped me pick out a pair of red and white striped glasses - what was she thinking?  I certainly had no fashion sense at that age and thought they were fantastic.  Looking back at photos of myself at that age, I realize they really were not that attractive on me.

When my sister started making cards, she decided to send me a card to remind me of those glasses.  I don't recall exactly which cartridge she cut the glasses with (was it Nifty Fifties?) but this card really made me smile when I received it.  What are sisters for if they can't tease each other about their fashion failures?!


The next card I'm sharing with you today is an Easter card I received from her.  Isn't it cute?  She told me that she had gotten a great deal on some Easter-themed brads and was using them for her cards this year.  I loved the patterned paper she chose and the little felt bird embellishement.
This was one of those photos that I took on a dark and gloomy day, so it's not great, but I think you can see all the elements of the card.

The decorative pink strip was made with a border punch and nicely showcased the Easter brad.

Great work, sis!

Hope you enjoyed these two cards from my sister.

Remember to laugh--a little or a lot--every day.

Cheryl

Saturday, May 12, 2012

Welcome to the neighborhood...

My nephew recently bought a home in my neighborhood, and I wanted to take him a little "welcome to the neighborhood" gift.  I decided I needed to decorate a bag to hold the items I had purchased for him.  Since he is still a bachelor, I didn't want it to be too girly, so I selected a kraft paper bag.

I had inherited some wide lace from my mother (a prolific seamstress) years ago and had never used it because of its hideous green color.  I'm sure that's why she hadn't used it, as well!  I wanted to do something different with this bag, so to start, I sprayed the back side of the lace with some adhesive and gently patted it in place across the bottom front of the bag.  After masking off the rest of the bag, I sprayed over the lace with some bronze metallic Maya Mist. After giving the mist a few seconds to set, I then pulled the lace off the bag.  It came off easily and did not tear or mar the bag in any way.  This is something I will definitely try again!
Can you see the lace laying just in front of the bag?

I cut the "Welcome" letters with some Cuttlebug dies, the butterflies were a Spellbinders die, the birdhouse image was a digital image (colored with ProMarkers) that I got long ago - can't even remember where - flowers were the MS 3-in-1 hydrangea punch and the leafy branches were a Sizzix die.

"To the Neighborhood" was spelled out below the birdhouses with some small white alpha stickers that I received from my daughter.

This bag was fun and quick to put together, once I decided what I wanted to do.


Try looking at other lacy items, such as doilies, that could be sprayed over to capture their design.  They would need to be something you weren't planning on using because the spray may not wash out.

Thanks for visiting and remember to laugh--a little or a lot--every day.
Cheryl


Wednesday, May 9, 2012

Happy Birthday in Red and Black...

It isn't often that I make such a dramatic looking card, but sometimes it feels good to dive into some intense colors.  I used a set of Stampendous stamps called Poppies in Bottles for this card.  I cut the red panels, stamped 3 of them with the poppy images (leaving off the bottles) using Versamark ink. I then heat embossed with black embossing powder.  On the 4th panel, I stamped Happy Birthday, also heat embossing it, and added some flat backed pearls and a narrow black ribbon tied in a bow.  I also rounded the corners of each red panel with a 1/4" corner rounder to soften the look a little.
 

 I actually didn't have any narrow black ribbon when I began making this card so I simply took a piece of light blue ribbon and colored it with my black ProMarker. Love that!

I wanted to add a poppy to the inside,too.  I decided to stamp it in red ink to add a little color to the sentiment.

Monday, May 7, 2012

Oh, to be 16 again....

This is a "Sweet 16" birthday card that I made for my step granddaughter. Sixteen is such a wonderful and scary age all at the same time.  I hope this card conveys to her that we think she is a sweet young woman with a wonderful future ahead of her.

It's a simple card to make but I wanted to share that I used Card Candi to spell out s-w-e-e-t.  I purchased a packet of the white Card Candi at my local Archiver's store. I then colored it with Pro Markers to match the card and stamped the letters on with a tiny alphabet clear stamp set.  The inverted scallop circle is a Spellbinders die and the 16 was die cut from an old Cuttlebug alpha/number die set that I got when I first bought my Cuttlebug a few years ago.


Teens can be hard to make cards for, but this actually came together very quickly.  The inverted scallop circle is popped up on dimensionals and the Card Candi is adhered with my homemade glue dots.  More on those in another post.

Remember to laugh--a little or a lot--every day!

Cheryl

Sunday, May 6, 2012

My sister's cards...

As I mentioned in an earlier post, I wanted to share some of my sister's cards on this blog. It is so much fun to have another family member share my love of papercrafting.  In fact, I believe I was the one who inspired my sister to buy her Cricut and she definitely inspired me to purchase a Gypsy - which I love.  Here's the first handmade card she sent me.


I loved the sheer ribbon that she placed over the matted sentiment panel on the front.  It softened the look of the sentiment and reminded me of  the shimmery wings on the bees.

Here's another fun card she sent me for my last birthday.  Isn't that little metal hanger cute?  She used a square piece of pink vellum for the "wall" behind the hanging towel and outlined it with narrow satin ribbon.  A little brad kept the hanger in place.  I don't know how she was able to adhere that ribbon so straight and neat, with no excess glue showing anywhere!


She even put my initials on the towel. So cute!  I have to say, she must think I'm a lot more stylish than I am.  There's no way I'd be walking around in those high heels!  Not anymore, that is.

Please excuse the poor quality of these photos.  I took them on a cloudy day and much too late in the afternoon. I'm also still learning to use a new camera and I hope to get better as I work with it.

Let me know if you have a family member who shares your love of papercrafting and what that means to you.

And remember to laugh--a little or a lot--every day.

Cheryl

Thursday, May 3, 2012

Making a gift extra special...

A couple of weeks ago I purchased  this "Paper Fashions" book by Klutz at my local Jo-Ann's store, using one of their awesome 50% off coupons.  It contains stencils for many different articles of clothing, pretty papers and other embellishments to design all kinds of clothing and accessories.  I thought my granddaughter, who's birthday is this week and who loves to draw, do paper crafts, and is very fashion conscience, would love it.  I decided, however, that something was missing...


...a notebook where she can keep her designs and have fun looking back at them.  So on my next trip back to Jo-Ann's, I purchased a narrow sketch book and went to work dolling it up just a bit to be more in line with the main part of the gift. 

Here's the result:


The patterned paper used on the front of the pad and for the dress is from a Heidi Grace pad of double-sided papers.  The chocolate brown CS that was used for the girl's body (cut at 4 1/2" from the Forever Young cart ), the lettering (from the CTMH Art Philosophy cart) and the flower centers was scrap from my stash.  The flowers were also cut from some pale pink scraps using the Flower Shoppe cart.

I added some liquid pearls to the sash on the dress and it actually looks rather silky IRL.  I also ran a bead of Stickles along the hemline of the dress to coordinate with the sparkly border along the top of the pad.  I found a cute little bag in the Dollar Store with some pockets on the front.  The Klutz book and the "My Designs" pad fit nicely inside.  In the pockets of the bag, I put a small pair of scissors, a glue stick, a mechanical pencil, a cute container of candies (who doesn't want to snack while they're crafting?) and a couple of girly items (nail polish and lip gloss) to go along with the fashion theme.

Hope you enjoyed this project.  I've entered it in the "Flowers for Mom" challenge at The Cuttlebug Spot.  Why don't you come play along?

Remember to laugh--a little or a lot--every day.

Cheryl

Wednesday, May 2, 2012

For a sweet baby girl...

This was a project I made some months ago for my niece's new baby girl.  The frame was an unfinished wood frame I bought at Michaels. I painted it with a white basecoat to seal it and then Mod Podged the pretty plaid paper to the surface.  A matching pink ribbon is adhered around the edge of the frame.  I made each of the flowers and Mod Podged them on all sides, as well, to give them strength and stability.  The little leafy branches under the flowers were cut with a Sizzix die on my Cuttlebug. 

I hand cut the little shaped card that looks like a baby's dress.  I used two different patterned papers -  one adhered on the inside layer that peeks through at the sleeves and the hem and another adhered to the outside front layer.  I also embossed a vellum "apron" on my Cuttlebug and adhered it to the front of the dress over the patterned paper.  A lacy white ribbon hides where the vellum is attached to the front of the card, and the dress simply flips up to reveal the sentiment inside.  I found the pattern for this card on the internet a couple of years ago, and I'm sorry I can't remember where.  I did find the same pattern here, however.

I also made the little fresh-water pearl bracelet as part of the gift and created a little pink gift box to put it in. I make basic jewelry, nothing fancy, but these pearls were in very soft shades of pink, blue, gray and white and I thought they were perfect as the first jewelry for a sweet baby girl.


Hope you enjoyed my project.

Remember to laugh--a little or a lot--every day.

Cheryl

First blog post ever...

While no one in the stratosphere may ever read these posts, it is fun--and challenging--to have a spot where I can record some thoughts, ideas, photos and projects.  It will be a place where my sister and I can connect as we both play with paper and ooh and aah over each other's creations.  I plan to post some of her cards from time to time as I think she does a wonderful job.  It will also be a wonderful recording of a few bits and pieces of my life for however long I remain a blogger.

This introductory post contains no pictures but I will have some posted for you soon. 

Don't forget to laugh--a little or a lot--every day.