Wish List

Friday, December 29, 2023

A flip card from a kit...


One of the card kits that were given to me contained some black, rectangular "flip" cardbases, fun punch-out shapes and some coordinating DSP. 


I pulled out one of the cardbases and a red punch-out shape that resembled a flower. I stamped a die-cut circle and popped it up on the flower shape before adding it to the flip mechanism. I also added a tiny black gem to each petal of the flower.

I chose two of the coordinating DSP patterns and added one to each side of my card base. Then I cut a white rectangle and matted it in red before stamping "What's new?" on it and adding it to the backside of the flip mechanism. This photo shows the card when it has been "flipped" open.

This card was fun to make, so I think I'll make a few more.

I thought I would also share a Christmas card (or three!) on this and some upcoming posts. I like to have them documented so that next year, when I'm trying to come up with Christmas card ideas, I can easily look back at my previous December and January posts and see what I made that year.

These cards were made with some very old cardbases that had a red and green striped border. 

For this card, I matted a piece of DSP that had holiday greetings written in rows across it. After adding that to my card base, I also added a holly sprig, some red gems for berries and a ribbon bow.

This card features a red panel cut from an old store-bought Christmas card. I love when I can upcycle parts of old cards. I added a snowflake (the larger one) and the word "merry." Both had been enclosed as a little extra in a Christmas card from fellow cardmaker Darnell of D J Kard KreationsBeneath "merry" I popped up the word "Christmas." 

Finally, I added a die-cut gingerbread boy and a ouple more punched snowflakes.

Darnell had also enclosed a red "merry" in her Christmas card, so I added that die-cut to this card. This time I heat embossed "Christmas" onto a strip of red CS and popped it up.

The Christmas tree was made with a die set I had on hand. The set has some tiny ornament dies, but I opted to just do a little inking on the lower branches and add a simple red garland made with Nuvo Drops. The die-cut star on top was also from the set.

I am still working at cleaning up the Christmas mess in my craft room. I have more dies and stamps for Christmas than I have for any other holiday, so it's a lot to clean up and reorganize.

Thanks so much for stopping by, and remember to laugh--a little or a lot--every day.

Cheryl


Tuesday, December 26, 2023

Good tidings of comfort and joy...


I have a 4" X 6" stack of Christmas papers, and I try to use a few of them every year on my holiday cards. The patterned paper you see on this card was cut from a sheet in that stack.


After matting and adhering my patterned paper, I cut a large banner, stamped it with my "Good Tidings" sentiment and added a little die-cut ornament, popped up on a foam square. 

Finally, I also popped my banner up on foam tape and then stamped a sentiment panel for the inside.


I thought I would also share with you a photo of the cookie platters and containers we gave away to a few neighbors and family members. The snowman tin you see in the back is also full of cookies and was given to my brother.

Here is a picture of one of the Christmas crackers I made to have at each place setting on our Christmas table.


I only had to make nine of them, as we had two store-bought crackers left over from a previous Christmas. I put those two at my husband's and my place settings. 

My crackers were gender specific. The females all received a pair of earrings, a nail file and a lip gloss. 

The male crackers contained a Chap Stick, a small comb, and a mechanical pencil with extra lead.

All the crackers contained a tissue paper crown, a Christmas joke and some candy.


I watched May May's video on how to make them, using my envelope punch board, but made mine longer to fit what I had purchased for them. I also put a stopper at each end so that the items inside wouldn't fall out. The stopper is simply a punched circle glued in place.

I may now have to make these every Christmas, as my family members MUCH preferred them over the store-bought ones. Oh-oh. That's all I need is another craft item I am expected to make at Christmas time. It sure is a great way to use up some of that Christmas paper, though!

I hope your Christmas was as full of family, fun and love as ours was. I wish you all good things in 2024.

Thanks so much for stopping by, and remember to laugh--a little or a lot--every day.

Cheryl

Friday, December 22, 2023

Silent Night...

I really enjoyed making 10 cards like this one for Christmas. The embossing folder is 3D and adds so much detail to the image.


When I was done embossing, I swiped my Versamark ink pad over the raised image and added some sparkling "snow" embossing powder. I really couldn't capture the sparkle in these photos, but it was so pretty!


I printed these sentiments with my computer for the inside of each card.

I enjoyed making all my Christmas cards (and I have a few more to share with you), but I'm ready to move on to Valentine's Day now. How about you?

I have just a few more items on my Christmas "to do" list: I have a couple more gifts to wrap and I need to fill some trays with cookies for the neighbors and family members. I also need to make about a dozen crackers (the English kind of crackers that are filled with party favors). I like to put one at each place for our Christmas Eve dinner. I've always purchased them in the past, but the price has gone up so much that I decided to make them this year. I'll take a picture or two so I can show you how they turned out.

Thanks so much for stopping by, and remember to laugh--a little or a lot--every day.

Cheryl


Wednesday, December 20, 2023

Using up those Christmas DSP scraps...

I don't usually post anything mid-week, but I thought some of you might still be frantically wrapping gifts and in need of some gift tags. I always make gift tags out of my Christmas paper scraps.

I simiply cut a scrap (left-over strips work perfectly!) and add some embellishment to the top. Leftover Christmas stickers work great for the embellishments, but I also use die-cuts, stars, gems, snowflakes, etc.

This photo shows a die-cut snowman on one and a dimensional tree sticker on another. Instead of a die-cut snowman, you could just punch or die-cut a couple of circles to make a snowman. The eyes and mouth are easy enough to draw on and a narrow triangle of orange cardstock can be glued on for the nose. A piece of ribbon could be used as the scarf. 

If I'm not in too much of a hurry, I will add a few extra touches like rounding the bottom corners, as you see I did with the tree tag.

If needed, I add a piece of white CS to the inside and stamp "To:" and "From:". You wouldn't have to stamp this. It could certainly be hand-written.

If the DSP is one-sided, I don't add an extra white piece, I stamp directly onto the inside of the tag.

On the back of each tag I add some double-sided tape so that when I want to add it to a gift, I simple pull off the tape backing and stick it down.

Gift tags like this are so much easier to use than a tag that is on a string or ribbon.

I hope this little suggestion is helpful.

Thanks so much for stopping by, and remember to laugh--a little or a lot--every day.

Cheryl

Tuesday, December 19, 2023

A simple card, but I like it...


This card was very quick to make. I used a spatter stamp to stamp some white snowflakes onto a navy blue card base. Then I added the bottom snowflake DSP and the wavy die-cut that says "Merry Christmas."


I actually traced the curve of the die-cut unto my DSP and then used my scissors to cut along that line so that my die-cut fit perfectly on top of it.

You can also see in this photo how I've added a small blue gem to the center of each of the stars that are part of the die-cut.


I used some blue ink to stamp the sentiment on the inside.


Twofer:


This was another super simple card. I had some DSP that featured this funny little snowman with a tiny tree next to him. I first used some Versamark ink to stamp and heat emboss some snowflakes with white EP on the rest of the panel. . I used some wonky snowflake stamps to better coordinate with the fun style of the snowman.


Then I added some holiday banners, anchored with an enamel dot at each end. These banners were made with a stamp and die set that I used to heat emboss each banner on red cardstock and then cut out with the coordinating dies.

I also cut a triangle shape out of some green cardstock and popped it up over the tree that was printed on the DSP. I added some red Nuvo Drops as decorations.


Here's the sentiment that I stamped on the inside.

Both of these cards were fun to make and came together really quickly.

I had a really busy day yesterday. I did the laundry, went to the post office to mail some letters, went to the store to pick up some Christmas odds and ends, made 6 cards, made a batch of cookies and some candied almonds, printed and bound five of our family calendars to be sent to those family members we won't see in person over the holidays, and made ravioli for dinner for my hubs.

I think the rest of the days this week will be equally busy, getting ready for the big holiday.

I hope your preparations are going smoothly and you are able to enjoy this lead-up to Christmas.

Thanks so much for stopping by, and remember to laugh--a little or a lot--every day.

Cheryl

Friday, December 15, 2023

A bow on the top or the bottom...


I enjoyed making these cards, but I couldn't decide if I liked the bow better on the top of my wreath or the bottom. What do you think?

To make the first card, I die-cut the wreath twice out of two different shades of green cardstock. The sentiment was heat embossed, die-cut and then popped up on dimentionals. 

I had purchased a bag of little red bows, with this specific card in mind, so I grabbed one of them and quickly adhered it to the top of the wreath. But then I wasn't sure I liked it there.

I made another card the same way, but this time I put the bow on the bottom.


I added red Nuvo Drops to the berry sprigs for a little extra color and dimension.


On the inside of each card, I stamped a sentiment in green and red. It's actually two sentiments, I guess, from two different stamps, so it was easy enough to do.

So how would you vote? Bow on the top, or the bottom?

I will be making a few more of these for the thrift store, as the Christmas cards are selling like crazy there, and I'll place the bows according to the most votes. Thanks for your input!

Today I am baking my husband's favorite cookie--Date Pinwheels. I only make them once a year because it takes me three days: Day 1 - make the dough and filling and chill overnight, Day 2 - roll out the dough, spread the filling, roll the dough with filling into a long tube shape and chill overnight, Day 3 - bake them. Sheesh! What I do for that man!

Thanks so much for stopping by, and remember to laugh--a little or a lot--every day.

Cheryl

Tuesday, December 12, 2023

Christmas cards from a kit...

 As I mentioned in a previous post, a friend from church gifted me a box filled with card kits. There were three or four Christmas card kits in the box, and I used just one of them this year. There was also a partial Christmas kit that I tried to use up. 

I enjoyed making cards like this one from a penguin-themed kit. The penguin stamp was included. I stamped and fussy-cut him out, leaving a narrow, white border. The scarf was a punch-out. He was popped up on dimensionals, as was the little blue banner. The two larger snowflakes were created with a punch that I have on hand.


On the inside I added a stamped sentiment and a couople of blue, punched snowflakes.


This card used a cardbase, ribbon and some of the rather wild, striped paper that was in the kit. I created the stamped sentiment panel and popped it up on foam squares.


I stamped a sentiment on the inside of this one and added a stamped sprig of holly. 


The banner flags for this card were punch-outs. I popped each one up on a dimensional and added the strip sentiment above them. The kit instructions had suggested that a lot more be added to the card, including some of the wild, striped paper and some ribbon. I opted to simply add the polka-dotted strip of green (also a punch-out) and enhance the dots with some Nuvo Drops.


Finally, I added a stamped sentiment on the inside.


On this card, I used some of the patterned paper in the kit, as well as a scalloped border (punch-out). I added a gold foil mat and a gold strip on the left side of the border. There were 1/8" holes in the center of each scallop, so I filled them with Nuvo Drops.

For the focal image, I used a tree die I had in my stash and cut it out of a white, stitched oval. I backed the die-cut with some gold foil and curved a strip sentiment stamp to fit around the inside of the oval.


On the inside I added a stamped sentiment and a strip of the gold foil CS.


The trees, striped border and striped DSP on this card were all from the kit. The "Merry" stamp was also in the kit. I added only the white rectangle and the three blue snowflakes (made with a punch). The trees were popped up on dimensionals and some Nuvo Drops and glitter were added to the three largish holes that were in the punched out border.


I added three more punched snowflakes around my stamped sentiment on the inside.


If you made it all the way through this post, I thank you for sticking with me! These cards and 90+ others have been mailed to family and friends. 

Tonight I finished creating our annual family calendar that contains everyone's birthday, wedding anniversary, special holidays and lots of photos. I still need to print, bind and mail it, but I'll get it done. It only has to arrive at each home by January 1.

I'm also in the throes of cookie baking. I've made five different kinds so far, but I have at least another five kinds to make. I'm trying to make at least two different recipes each day for the next few days. I like to share cookies with neighbors and family members who live nearby, so that's why I need so many!

Thanks so much for stopping by, and remember to laugh--a little or a lot--every day.

Cheryl

Friday, December 8, 2023

Playing with Lunar Paste...


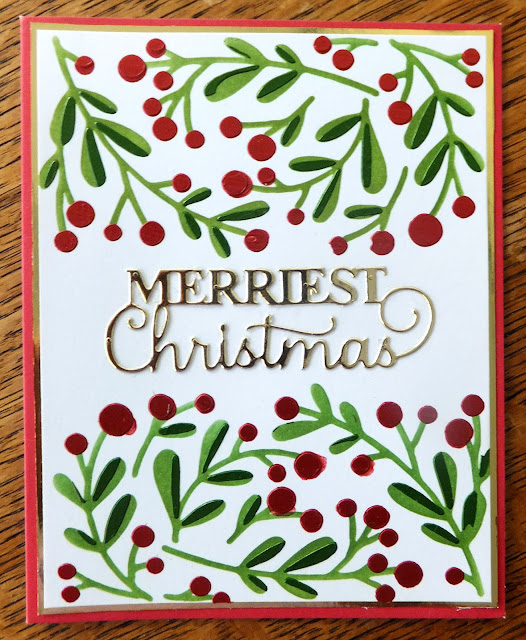
I have some holly layering stencils, so I wanted to use them along with inks and some Lunar Paste to make Christmas cards.

I selected the colors "Bee Sting" (a deep, bright red) and "Fake Plant" (a bright foresst green) for my holly. The names they gave those colors just made me laugh!

In preparation for making 20 cards, I first cut all my A2 card bases out of red and my layering panels out of metallic gold and white. I die-cut each sentiment from the center of a gold panel, since no one would see those areas anyway. 

To start creating the card fronts, I first inked the green sprigs onto the white panels, using the first of my layering stencils.

Then I added the green Lunar Paste through the second "sprig" stencil.

After the green was dry, I added the red Lunar Paste with the first berry stencil. There is a second berry layering stencil, but I didn't use it on top of the red Lunar Paste. The paste had enough sheen and dimension to make one layer of it sufficient.


I used only inks with the four layering stencils on the inside to create the sprig of holly above my stamped sentiment. If you enlarge the photo you can see the second layer of darker red ink on the berries.

I ended up making 19 cards with this design.


I used a second design on my stencil set to create just this one card, and I did it in exactly the same way as I did the others..

The Lunar Paste was so much fun to work with. Here's a link to a very short video that better shows the sheen and smoothness of it. I hope to get a few more colors of it in the future.

I am dog-sitting this week at my daughter's house. Along with trying to tie up some holiday "loose ends," I've been super busy.

Thanks so much for stopping by, and remember to laugh--a little or a lot--every day.

Cheryl

Tuesday, December 5, 2023

Let's Craft and Create Challenge #202: Anything Goes or Vintage Feel...


December's arrival brings another fun challenge at Let's Craft and Create. This month you can choose our regular "Anything Goes" option, or you can create something with a "Vintage Feel."

I have chosen to go the "Vintage Feel" route. Some people say for an item to be vintage, it must be at least 50 years old. I have tried to give my card a look that might have been popular 80+ years ago. 

I began with an off-white card base. I added a layer of DSP that looked like a piece of quilted fabric. I distressed the edges of this panel with a scissor blade and then inked them before adding it to my card.

The second layer was a vintage panel that my friend Donna (Design by Donna) had given me. Thank you, Donna! I cut it with a deckle-edged rectangle die, inked its edges and then popped it up on foam tape.

"Happy holidays" was stamped, die-cut and popped up on foam tape.


The mittens were die-cut twice--once from red and once from white. Then I combined the two die-cuts to get the mittens you see in the picture. 

Each piece (even the snowflakes) was lightly inked before it was glued in place. Each mitton was popped up on foam squares, but the "string" that connects them was glued directly to the holly leaves (also die-cut) which had been glued onto the deckle-edge panel..

The ribbon bow (attached with a glue dot) is one from a package of little bows that I had on hand. Can you tell that I even inked the outer edges of the ribbon?


On the inside I stamped a Christmas sentiment and added a small die-cut of holly with berries.

Even though I usually struggle with vintage cards, I had a great time making this one. It all seemed to come together pretty effortlessly.

Be sure to check out the creations from the other Design Team members for some awesome inspiration. You'll find them all on Let's Craft and Create. 

Thanks so much for stopping by, and remember to laugh--a little or a lot--every day.

Cheryl

Friday, December 1, 2023

Birthday card for my granddaughter...

 I have a beautiful granddaughter whose birthday was late last month.


She turned 17 and is an amazing student and athlete. And she's gorgeous, to boot!

It's hard to make a card that really reflects how wonderful she is. Anyway, here is the card I created for her:

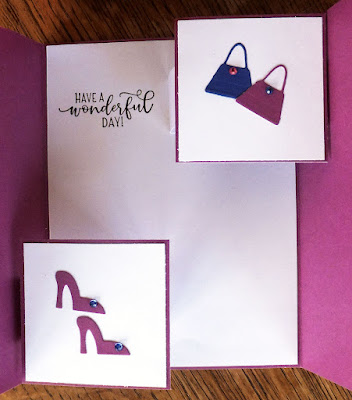
I decided to make a gatefold card with a couple of pop-ups inside. I used a fancy oval die-cut as a backdrop for my fun dress (also die-cut).


The dress top is popped up on foam squares, and I added a few gems around it for some sparkle.


On the inside (sorry for the dark picture), I created two pop-outs, one for a couple of purse die-cuts and one for a fun pair of high heels with a gem added to each of them for sparkle.

As you can see, there is plenty of room to write a personal note and sign the card.

My granddaughter sent me a text after receiving this card and told me how much she liked it.

It's so satisfying to be able to make a personalized card for each family member. Even though it's just a card, it's still packed with love and good wishes.

Thanks so much for stopping by, and remember to laugh--a little or a lot--every day.

Cheryl