Wish List

Wednesday, July 30, 2014

Melting pony beads...

I decided to try melting some pony beads after seeing several posts by people who had tried it.
These are the larger size (9 mm) beads on the parchment paper before I put them in the oven. I tried melting them at 350°, but found that it worked better at 400°. I honestly don't know how long I baked them - I just kept checking until they looked right.

Here's what resulted after a short while (15-20 minutes, maybe). After they cool, they easily lift right off the parchment paper.

So what did I do with these?  Here's an example using them as a flower center:
You can see that these make a fairly large embellishment. The beads do come in smaller sizes (5 mm and 7 mm), and my sister purchased some of the smaller ones. Since they come in bags of hundreds--sometimes thousands--of beads, we're going to share so that we each have some of the different sizes to melt and use.

In this photo you can see the dimension they add to a card.  I adhered them with an adhesive called "Gem-Tac" which worked well and held them securely. They really do look like the enamel dots that are so popular right now.

Be aware that baking these beads does elicit some unpleasant fumes--not a lot, but some. You'll want to have your windows open and kitchen fan on when starting this process. If you have a portable toaster oven, you might want to use it to do this outside.

Thanks so much for stopping by, and remember to laugh--a little or a lot--every day.
Cheryl

Monday, July 28, 2014

Washi tape banner...

Here's an idea for you when you need a quick thank you card that looks like a lot more work than it really is.

I tied a couple of bows in a length of baker's twine so that they could be placed at either side of a mat with a little bit of a downswing toward the center. This took a little bit of trial and error.  Once I had the placement of the bows figured out, I then began to take 4-inch (or so) lengths of 5/8" Washi tape and, centering them on the twine, folded them over so that the sticky sides met. This left me with about 2-inch "flags" across my twine.

To keep the flags evenly spaced, I first applied the two end ones, then the center one and finally the last two. I notched the end of each flag and adhered it to my mat with some clear foam tape. I then took the tail ends of my twine and tucked them behind the mat on either side,securing them with a little double-sided tape. Once that was done, all I had to do was adhere the mat to the card base, apply the letter stickers (they're actually a glittery black) and I was done! Easy peasy.

I love the ease of working with Washi tape. My daughter gave me a dispenser filled with the stuff last Christmas, and I love it! You can see my post about it here.

That's it for me today. Hope you have a marvelous week! Just remember to laugh--a little or a lot--every day.
Cheryl

Thursday, July 24, 2014

It's a "Blue Christmas" in July...

I managed to make seven Christmas cards this month with the help of my sister. She sent me seven ice skate die-cuts made from white card stock. She also sent me a cute Darice embossing folder. Thank You, Michelle!!!  I decided to glitter up the ice skates and use them, along with the embossing folder, right away.

I selected three different shades of blue for my background mats, which I embossed. To apply glitter to the skates, I first sprayed them with an adhesive and then added the glitter, making sure to burnish it into the adhesive. The skates are popped up on foam tape, but the bow has been glued directly to the mat, and has a tiny, clear, flat-backed gem added to its center.


Here's the deep teal blue mat, and I think you can just see that I have added a bit of sparkle to the embossed images with a glitter pen.


I used some Core'dinations card stock for the navy blue mat, which I embossed and sanded first before adding some glitter highlights.


For the paler blue mat, I embossed and then lightly inked the embossed design with a white ink pad. I used the direct method of gently swiping the ink pad over the raised design. I also added a tiny bit of sparkle with my glitter pen.


The inside sentiment was heat-embossed, using Versamark ink and some sparkly silver embossing powder. I've tried to take an angled photo to show you some of that sparkle (I have the WORST photography skills - no aptitude at all!)

I am entering these cards into the Winter Wonderland Challenge Blog's "Blue Christmas" challenge.

Thanks so much for stopping by, and remember to laugh--a little or a lot--every day.
Cheryl

Tuesday, July 22, 2014

Ooh, la la...

This spring, my 11-year-old granddaughter spent 10 days in France seeing a number of sites in Paris and also spending a few days in the home of a French family in Normandy. She even attended a school there with one of her host family's children.

Since Kindergarten, she has attended a French Immersion School here in the Minneapolis area, and this trip was the culmination of that part of her elementary education. Next fall she moves on to Middle School (6th grade) where she will still take French courses, but her days will not be "immersed" in the language.

When she returned home from her trip to France, I knew she would  have a few thank you notes to write, so I decided to make some for her. I happened to find some Eiffel Towers made out of flat-backed gems, and thought they'd be just the right embellishment. I also found some black and white pre-made card blanks that would work well and save me lots of time.

I used a label die to frame the Eiffel Tower and added a tiny frame for a splash of color on each card. I think the gold frame was my favorite.


These notecards came together in just minutes. I thought they were so cute, that I went back to Michael's to see if I could find some more of the Eiffel Towers (they had been in one of the $1.50 bins), but they were gone!

Isn't that how it always is? You find a bargain that works well, but when you go back to get more, they're gone!


Here's a photo of all four cards. If ever I find some more fun bling in a bargain basket, I'm not going to be shy about buying several packs!!

Thanks so much for stopping by, and remember to laugh--a little or a lot--every day.
Cheryl


Friday, July 18, 2014

Art Impressions "Big Birthday" challenge...


My husband just celebrated another birthday, and I decided to make him a birthday card with an Art Impressions image and enter it into one of their challenges.

I used my "Norm" stamp from Ai, but I just had to dress him up a bit:
See that balloon on a string tied to his finger? Yup. I added that. I also added the birthday hat. You can't really see it in the photo, but the tassels at the top of the hat are even glittery. I couldn't help myself, I had to add a touch of glitter even if it is a masculine card!


I colored Norm with my ProMarkers and free-handed some ground for him to sit on and some sprigs of grass around his chair.

He has a bit of a pout going on, but I think he's just putting on a show. He really is a lovable guy who doesn't mind some special attention on his birthday. He just doesn't want you to know that he's actually enjoying himself!

You can tell he's fun-loving by the clothes he chose to wear on his birthday. He picked out his wildest shirt and his brightest shorts. He would have worn purple socks, too, if only he had some. Maybe someone will give him a pair as a birthday gift.


My DH really is young at heart, but he has the usual aches and pains for someone who just turned 73. That doesn't keep him from riding his bike 12 miles to work and playing outside with the grandkids. He's a wonderful life partner, and I'm a lucky woman to have him in my life!


I like to tease my DH about being older than me and "robbing the cradle" when we married. ha ha

I am entering this card into the Art Impressions Challenge #140 "Big Birthdays" All Birthday Cards. I hope they enjoy seeing my card as much as I enjoyed making it.

Thanks so much for stopping by, and remember to laugh--a little or a lot--every day (even if it's at your DH!).
Cheryl

Thursday, July 17, 2014

Fluttering by to say thank you...

I really love this Marianne Creatables butterfly die. It makes a great focal point! This card was made for another co-worker to let her know how much I had appreciated working with her.

The turquoise edge down each side is actually Washi tape. When you're looking for a matching mat color, be sure to check out your Washi tape. It's such a quick and easy addition to a card. The "Thank You" was cut out with an Elizabeth Craft die and adhered to the CS.


The fancy square behind the butterfly was cut with a Spellbinders die (Marvelous Squares). I inked it a little around the edges to soften the transition from DSP to white CS and to better focus the attention on the butterfly.


This card was actually much prettier IRL than it is in the photos. Even my husband was impressed with it. It was fun to make and I plan on using this layout more often - especially when I can use my Washi tape!

Thanks so much for stopping by, and remember to laugh--a little or a lot--every day.
Cheryl


Monday, July 14, 2014

Life is sweet...

Cherries are one of my very favorite fruits. You just can't beat a sweet, juicy, dark red cherry! So when I think of the "sweet life," cherries naturally come to mind.

When I retired, I made this card for a former co-worker who had helped make my working life "sweet." I wanted to let her know how much I had loved working with her.


The cherries were cut from the Preserves cartridge. The pretty doily behind them was cut with the Prima Doily Die #1.

I backed only the center part of the doily to give the cherries a little simpler background. This plain aqua paper is actually the back side of the cherry-patterned paper, so it matches perfectly, even though it doesn't appear to in the photo.


The sentiment was heat embossed onto the banner, and the button is one that I had made using one of my favorite button dies. I like to cut out several layers and then glue them together for extra dimension and stability.

I really like how this card turned out. I am so glad I have an extra sheet of the cherry-patterned DSP, so I can make another card similar to this one.

That's it for me today. Thanks so much for stopping by, and remember to laugh--a little or a lot--every day.
Cheryl

Friday, July 11, 2014

Happy birthday to my twin daughters...

Thirty-seven years ago today I gave birth to my beautiful twin daughters. They came three weeks early, but at 7 lbs. 8 oz. and 7 lbs. 13 oz., there were no worries about prematurity. If you've had children, I'm sure you can imagine the relief I felt to no longer be carrying these two babies. It was an absolute delight to put them in their crib (they shared a crib for the first few weeks) for a nap. I also had a two-year-old and a three-year-old at the time, whom I tried to get to nap at the same time - that seldom happened! It was a busy few years before they were all potty-trained, able to sit at the table and feed themselves and weren't hanging on my legs and begging to be held. What wonderful years they were!

Before I share the cards I made for them, I just want to say:

Happy birthday, Heather and Shanna!

I decided to make them each a flower pot card. For the flowers I used a Sizzix Hero Arts stamps and framelits set called "Floral." I really like this stamp and die set and have used it quite a bit since I got it.

The flower pots were embossed with the "Argyle" embossing folder by Cuttlebug. Some border punches finished off the edge of the rim and a little distress ink gave some dimension to the edges.


I shaped the sentiment mat to fit the shape of the flower pot, making it tall enough to provide a base so I could adhere the flowers and greenery (which is an EK Success punch).


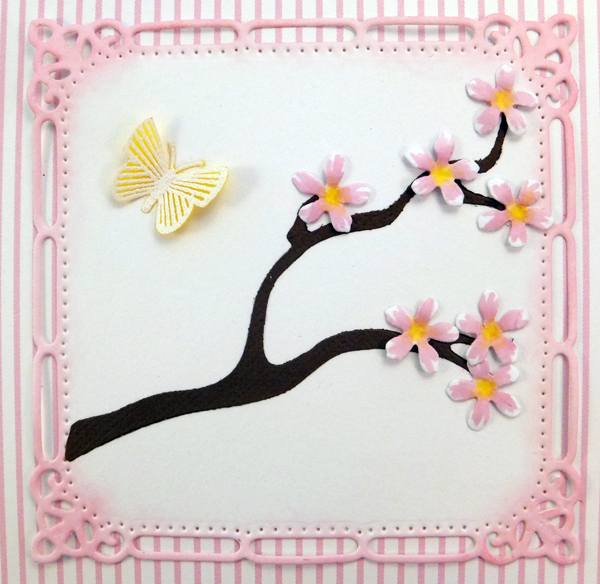
The butterflies were made using a Martha Stewart punch and some sparkly glitter cardstock.

I used liquid pearls for the centers of the flowers and for the body of each butterfly.


I had a lot of fun making these cards and reminiscing about my twins when they were little. They are identical twins and managed to get themselves into a little trouble trying to switch places in school. 

Not long ago, they both called me via a 3-way conference call. They are grown women now, but they still like to play tricks on me. They didn't tell me they were both on the phone, and they took turns commenting and answering my questions to see if I would notice. Well their voices sound E.X.A.C.T.L.Y. the same on the phone. OF COURSE I DIDN'T REALIZE IT! They just laughed and laughed at how they had fooled their old mom once again. 

Here's one of my favorite photos of these two imps when they were 3 years old. I remember sewing their little sunsuits. I thought they looked so cute in them!
Thanks so much for stopping by and putting up with my ramblings about my lovely children. Remember to laugh--a little or a lot--every day, even when your kids play tricks on you!
Cheryl

Thursday, July 10, 2014

You're the best...

I made this card for my former supervisor at the organization from which I just retired. I wanted her to know how much I have appreciated working with her over the past few years. The branch was cut with a Quickutz die (Rev 0152) and the flowers were cut with a Memory Box die ( 98312). I colored them with some of my Promarkers and used an embossing tool to give them a little dimension.


The butterfly was stamped with Versamark onto some yellow vellum and then heat embossed with some white embossing powder. I simply fussy-cut it and adhered it to my little scene.

The mat was cut with a Spellbinders Majestic Elements/Marvelous Squares die. I inked the edges just a bit, and I love how that looks.


The sentiment was stamped with dark brown ink onto a label cut with an old Cuttlebug die. It was one in a 4-pack of dies that I got years ago when I first bought my Cuttlebug. I actually still use these simple dies quite often.


Well, that's it for me today. I hope your summer is going well. Ours has been busy and fun so far, and we're looking forward to lots of company in the coming weeks.

Thanks so much for stopping by, and remember to laugh--a little or a lot--every day.
Cheryl


Saturday, July 5, 2014

I "wood" be so thankful...

This card was super easy to put together. I used a card base made from watercolor paper because of its rougher texture and off-white color. I needed this thank you card for a guy, and I thought the watercolor paper fit the masculine theme better than my usual white cardstock.

The wood-patterned cardstock is some that my daughter gave me a long time ago. She had used it for some invitations to a party for her boss, and that had to be at least 10 years ago! I LOVE it and have used it on lots of projects. It's so realistic looking and cuts beautifully.

For this card I die cut the "thanks" from the corner of the wood-patterned CS using an old Cuttlebug die. I then cut the same "thanks" out of black cardstock and laid it back in along with all the little inside pieces of the wood-patterned CS. I had backed the opening with a piece of double-sided sheet of adhesive, cut to fit.


In this close-up photo, you can see how cleanly the wood-patterned CS cuts and how nicely the pieces all fit back together.

To finish the card, I wrapped some black hemp twine around the mat a couple of times and tied a simple bow. I made sure to keep it above the "knot" in the wood pattern, because I really wanted that to show. I thought it added an extra ounce of "manliness" to the whole card.

Such a simple, simple card, but I honestly think that a man would appreciate it.


ETA: I'm entering this card in Moxie Fab World's "Wonderful Words Challenge."

Thanks so much for stopping by, and remember to laugh--a little or a lot--every day.
Cheryl


Thursday, July 3, 2014

I thank my lucky stars...

I have needed SO many thank you notes lately, so you're going to be seeing a lot of them on my blog. I've had fun making them because I've had a specific person in mind for most of them. Here's one that I made, though, for no one in particular. I wanted to try the whole "inlaid words" technique, plus I wanted to play off the theme, "I thank my lucky stars..."


If I remember right, the clouds were cut with an Impression Obsession die. Can you tell from the photo  that the words are inlaid in the clouds?


Here's a close-up photo so you can see it even better. It was a bit fussy to put back those tiny pieces of white CS into the h, a, k, Y and o, but I think the result was worth the effort.

To provide a sticky background for the die-cut words, I just put a light-colored piece of Washi tape on the back of the cloud. Worked like a charm!


Both the clouds and the stars are popped up on dimensionals to add a little character to this card. All in all, it's a very simple card and came together quickly--replacing the die-cut words took the most time. I could see using this card as a "Welcome Baby" card, too. I'd have to print or stamp those words on the clouds, though, since I don't have dies for them. Yet.

My next blog post will feature a thank you card using this inlay technique, as well. It's a masculine thank you card, so stay tuned for that one!

ETA: I'm entering this card in Moxie Fab World's "Wonderful Words Challenge."

Thanks so much for stopping by, and remember to laugh--a little or a lot--every day.
Cheryl

Tuesday, July 1, 2014

Another dog and hydrant card...

Just a quick post today to show you another dog and hydrant card that I made for my stepson's birthday. I liked this dog (also from the Four-legged Friends cartridge) better than the one I used in this post.


Isn't that puppy cute? I inked each piece to give him a little character. The grass border was made with a Fiskars punch.


The hydrant was again cut from the Everyday Paperdolls cartridge. It's a one-layer image, so I simply cut two of them, using the second one for the top layers. I colored those layers different shades of red to add some additional depth.


The front and inside sentiments were computer-generated.

I used my Perfect Layers tools to cut the mats on the front and the inside. I've really come to depend on these tools for getting straight and accurate mats.

Thanks so much for stopping by, and remember to laugh--a little or  a lot--every day.
Cheryl