Wish List

Tuesday, November 30, 2021

Simple sympathy card...


I really like using a silhouette-style stamp on a sympathy card. For this one, I used a mask to create my circle with a blending brush and some Distress Oxide ink. 


Then I stamped my image with Versafine ink and added a little bit of sparkle to the "open" spaces in the image with a glitter pen .

The sentiment on the front of my card is a My Sentiments Exactly stamp.


On the inside, I stamped the image again, after stamping off, using the same Distress Oxide ink that I used on the front. Then I stamped my sentiment right on top of it.

As a final touch, I added the ribbon. It actually matches much better IRL.

As you read this, we are visiting friends in sunny Arizona. It's so nice to get away for a few days before the Christmas rush sets in. I have most of my holiday shopping done, so when we return, I just need to work hard to finish up my cards.

Thanks so much for stopping by, and remember to laugh--a little or a lot--every day.

Cheryl


Friday, November 26, 2021

A funtastic 15th birthday card...


This is a card I made for my granddaughter who recently turned 15. I decided it was time to try a new (to me) fun fold. I saw a video tutorial for this card , but when it came time to make it, I couldn't find the video anywhere! I couldn't remember the name of the fold, either, so I simply had to "wing it."


I started by creating my two z-folds, one larger than the other, with DSP glued to the larger one and a medium blue CS to the smaller one. I adhered them together as you can see in the photo below. Then I focused on the front sentiment panel. I used a die to cut the word frame from glitter paper. I added a couple lengths of paper rick rack on each side of it to fill out my panel.


When the card is opened, the other two smaller panels appear. Fun, right?


One of my pocket dies came in handy as a money holder on the middle panel. "Funtastic" and "15" were cut from the same glitter cardstock as the word frame on the front. The dotted yellow paper is the backside of the light blue DSP.


The sentiment on this panel was computer-generated. A few more enamel dots finished it off.


The card stands nicely on its own. It was definitely a fun card to make.

I hope you all had a lovely Thanksgiving yesterday. We ate at my daughter's home. The food was all so delicious. I was charged with bringing the pies (apple, pumpkin, cherry) and the cranberry relish. It's so nice when the next generation takes charge of the main part of the meal, isn't it? I know I certainly appreciate it!

Thanks so much for stopping by, and remember to laugh--a little or a lot--every day.

Cheryl

Tuesday, November 23, 2021

Thanksgiving wreath...


The thrift store where I volunteer often gives me crafting supplies, particularly opened or partly used packages of stickers, ephemera, etc. This wreath sticker (and the little leaves) was in one such package. 

The background paper is from Stampin' Up, and the grosgrain ribbon is from my stash.


I did add the gold dots (Viva Decor pen), just for a little something extra. 

I don't use a lot of stickers on my cards, but I thought this one was particularly nice.


The sentiment was heat embossed on dark brown cardstock and cut out with a sentiment die. I've popped it up on a strip of foam tape.


On the inside I stamped a sentiment and added another of the little leaves.

My poor DH now has to have a basal cell carcinoma removed from his outer ear. He has had spots on his face removed in the past; this is the first time one has appeared on his ear. We're not sure when they'll want to do it yet, but it'll probably be quite soon. I can't help but think about those who, a few generations ago, didn't have the possibility of detecting these skin cancers early so that they could be removed. We're so lucky to have the level of health care we have today.

Thanks so much for stopping by, and remember to laugh--a little or a lot--every day.

Cheryl


Friday, November 19, 2021

A couple more metallic leaf cards...


 This card features more of those leaves cut from gold metallic cardstock and then colored with alcohol markers. Once again the photographs are not good because of the shine, but I think you get the idea. I have popped my sentiment up on foam tape.


You can see in this photo how the color varies across the leaf. I quite like that.

My only other embellishment was a few gold pearls.


My inside sentiment is a stamp that I really like. It's hard to find good Thanksgiving Day stamps, and I like to use new sentiments every year.


This card features a metallic cardstock leaf and a regular cardstock leaf (the smaller one) that has been painted with a metallic water paint. It doesn't show in the photo, but it has a nice sheen.


Here's a close-up for you. My background paper was so busy that I didn't add any other embellishments--just a couple of strips of the gold cardstock in the upper right corner.


For this card, I've used a computer-generated sentiment.

I feel like my Thanksgiving Day cards were a bit blah this year. I just couldn't get into making them, so this is the best I could do. I hope my mojo returns and helps me finish my Christmas cards.

Thanks so much for stopping by and remember to laugh--a little or a lot--every day.

Cheryl

Tuesday, November 16, 2021

Thankful...


This is a pretty awful photo, but it was just impossible for me to get a good one. The leaves were cut from gold metallic cardstock, and they are very reflective. I know we've all tried photographing reflective crafting materials and been completely frustrated by the results!

I used some alcohol markers on the metallic CS to give my leaves some fall color. They kept their shine, and the colors gave them more of a fall look. For comparison, the "thankful" was cut from the same gold cardstock and no color was added.


I was actually pretty amazed at how the metallic cardstock took the color, and I think it looks pretty cool.

The center leaf has been popped up on dimensionals.


The inside sentiment was computer-generated.  It actually came from a Thanksgiving card we received from our auto insurance agent. I liked it, so I decided to use it on a few cards myself.

I'm writing this post on Monday night, and my hubby had to go to urgent care today for his new knee, as it swelled up again and caused him a lot of pain. He had to use his crutches to walk. They didn't really do anything for him (again), and I will be taking him in for an appointment with a P.A. tomorrow (Tuesday) morning. I sure hope this doesn't keep happening!

Thanks so much for stopping by and remember to laugh--a little or a lot--every day.

Cheryl

Friday, November 12, 2021

Pocket full of posies...

Remember the words to "Ring around the rosie?" It popped into my head when I made this card because of it's second line, "Pocket full of posies."

I purchased a set of pocket-shaped dies because I thought they'd make cute cards, especially when they're filled with flowers...or even frogs!

For this card, I first adhered some checked DSP to the front of a white card base. I cut my pocket out of some blue denim-like DSP and added some stitch lines with a white gel pen.


I used a flower die set to cut some flowers in various sizes. I gave them a little shading in their centers and added some gems and leaves.

I had a strip sentiment on hand that said "It's your happy day!" I thought that was perfect for creating a birthday card.


I stamped a birthday sentiment on a white panel and adhered it to the inside. Card done!

This was so much fun to make and sold quickly at the thrift store. Now I need to find some frog dies so that I can make a card with frogs in a pocket. I think that would be a fun birthday card for a boy.

We went to our granddaughter's band concert last night. She plays trombone in the 10th grade band at a local high school. The concert was wonderful! I am amazed at how well they played some pretty difficult music. She loves being a part of the band, and it's fun to see her enthusiasm for learning and playing music.

Thanks so much for stopping by, and remember to laugh--a little or a lot--every day.

Cheryl


Tuesday, November 9, 2021

Believe in the magic of the season...

 I found some pretty Christmas wreath downloads--free ones--from the Hungry Jpeg, and so I decided to use them to make some holiday cards. Here's what I came up with:

I made a red card base and then used a pinpoint snowflake background die on a red panel that I adhered to the front of my card. I then cut my wreath out with a circle die and a slightly larger circle out of gold metallic cardstock.

I added some Nuvo drops in gold and red wherever there were dots or berries in the design. I also outlined some of the holly leaves with a gold sparkle pen.

The sentiment was heat-embossed with gold embossing powder, cut out with a pinpoint circle die, matted with a gold circle and popped up on dimensionals.

As a final embellishment, I added a narrow strip of the gold cardstock and added a die-cut bow.


I stamped my inside sentiment with red ink and added some stamped holly. I colored the holly leaves with a gold pen and filled in the berries with a red pen.

I like the way these cards turned out, and I may make a few more of them to fill out my stash of Christmas cards.

I spent Sunday afternoon this week in the emergency room with my hubby. His "new" knee swelled up and was so painful he really couldn't walk on it. They checked him out, determined it wasn't anything serious, and sent him home again with some pain pills. Of course that all took about 5 hours! He's doing much better today and is able to once again walk with that leg, putting weight on it without pain. 

Thanks so much for stopping by, and remember to laugh--a little or a lot--every day.

Cheryl

Friday, November 5, 2021

Let's Craft and Create Challenge #177: Anything Goes or EnTWINEd (use twine)...


It's November and we here in Minnesota are hoping to get through the month without icy roads and piles of snow to shovel. At least that's what I'M hoping! I'll also be doing lots of crafting this month, making Thanksgiving and Christmas cards.

For this month's challenge at Let's Craft and Create, I've chosen to make a Christmas card--mostly because I'm a bit behind in getting my usual 90 cards made plus 20-30 of them to donate, 

I love how my snowman turned out. He was created with a multi-layer stamp set. I used a combination of blue, gray and white inks on the various layers of snow, and I used black and gray inks on the hat.

To get my twine perfectly placed, and to keep it in place, I notched three tiny half circles with a 1/16" hole punch on each end. The half-circle notches are so tiny that you can't even see them once the twine is there. The tails of the twine were secured on the inside and a separate piece was used to tie a bow.

This is a "book binding" card, so the 1" section under the twine is adhered to the card back with some strong tape. That way my twine is not visible except on the front of the card.


The bright red scarf is actually die-cut from a snowman die set and glued in place. I thought it was just the right pop of red and coordinated nicely with my twine.

I masked off my snowman to blend some light blue ink to create a landscape behind my snowman. I used a torn piece of paper to mask off the "snow."


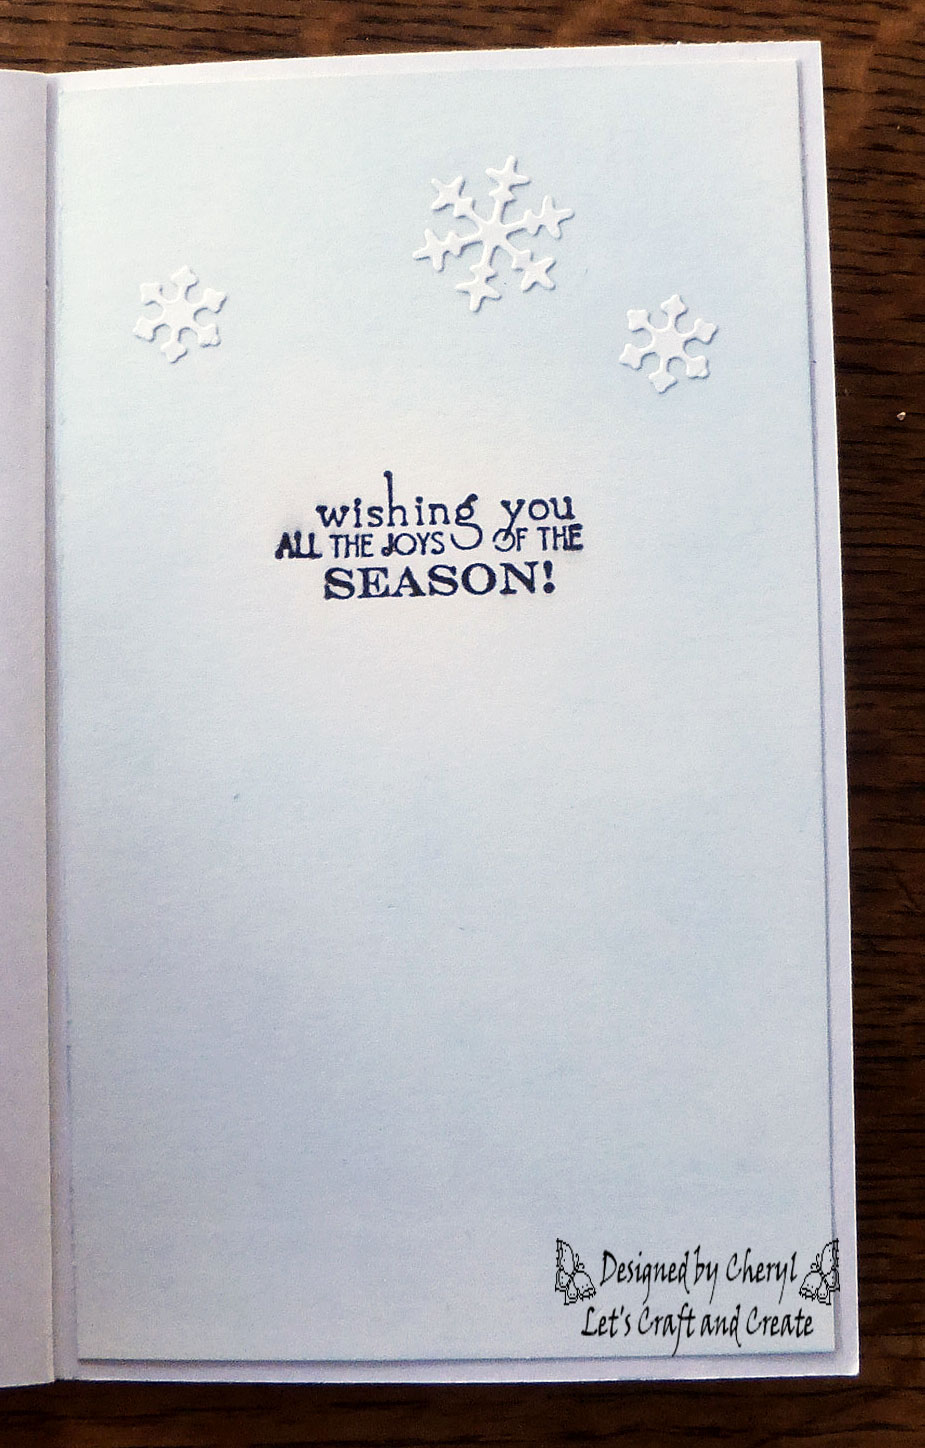
My inside space is a little narrower than usual because of the "bound" section on the left.  That's okay for my Christmas cards because I usually just sign them and include a separate family letter.

If you look closely you'll see that I have also blended a little light blue ink on this panel except where the stamped sentiment is . I've also adhered three of the same die-cut snowflakes that were used on the front.

Now it's your turn. We LOVE seeing all the creativity that crafters use in making projects for our challenges, so we hope you'll join in. The Design Team has provided some incredible inspiration for you over on Let's Craft and Create. I hope you'll take a peek. I know it will crank up your mojo.

Thanks so much for stopping by, and remember to laugh--a little or a lot--every day.

Cheryl

Tuesday, November 2, 2021

Like a fine wine...


Recently, I purchased a die set that included a wine bottle, wine glass and a cluster of grapes. I've used that set to create this card.

I started with a piece of  ink-resist DSP from Stampin' Up. I used a blending brush to add some purple ink to the paper. When I was done, a quick wipe with a soft cloth removed the ink still sitting on top of the resist pattern. I love how quick it is to create just the right color of DSP with this paper.

I cut my wine bottle from green vellum and my wine glass from an uncolored piece of vellum. I colored the back sides of these pieces to create the illusion of wine. They were adhered by covering the entire back of the die-cut piece with double-sided adhesive. That way, you can't see the adhesive through the translucent vellum.

The label was a separate die piece cut from white cardstock and sponged along the edges with a little tea-dye Distress Ink. I hand wrote "Fine Wine" on the label with a fine point black pen.

The grape cluster was cut from white CS and colored with an assortment of markers, colored pencils and pens.

My curlique stamp in the right had corner of my focal panel and the sentiment came from a wine-focused stamp set. I've had this set for a long time and haven't used it nearly enough! 

The inside of my card features a border stamp from the same wine-themed stamp set and a birthday sentiment from a different set.

It was fun making a wine-themed card. I happen to like a nice glass of red wine from time to time, although I wasn't drinking any when I made this card! lol

Having just recovered from a knee injury from mowing my lawn (I have a frayed meniscus and the mowing really irritated it), I am now struggling with bursitis in my left shoulder. It got so bad I was really having trouble sleeping. I think it's on the downhill trend right now, though, as the discomfort seems to be lessening. It really interrupts my crafting when I have an aching shoulder!

Thanks so much for stopping by, and remember to laugh--a little or a lot--every day.

Cheryl