Wish List

Wednesday, April 29, 2015

Happy Mother's Day...

While my own mother passed away more than 20 years ago, I do have some important women in my life that I like to acknowledge on Mother's Day. Three of those women are my elderly aunts who are dear people and who have collectively given birth to 18 children!! And I have even more first cousins than that. We were a BIG family.

Even my own immediate family was super-sized - we were a family of eight (six kids, all born within nine years).

Anyway, here are a couple of the Mother's Day cards I have made:


Once again my sister let me play with one of her dies - a Spellbinders Die D-Lites flower die.


Isn't it great? So easy to cut out and layer up. I did ink the ends of the petals a bit, to add a little dimension and help them look more life-like.

I added a black gem flourish above and below the flower and used some Liquid Pearls to create the flower center.


On the inside of my card, I added another gem flourish and the same small punched heart that was on the fishtail banner on the card front.


Here's my second card using the same flower die The only thing different on this one is the black leafy die-cut instead of the gem flourish. This leafy flourish is a Die-namics die. I love it and use it quite a bit.


Once again I added some Liquid Pearls to the flower center. This time, though, before it dried, I sprinkled on some black glitter. It's sparkly and pretty IRL.


On the inside of this card, I simply added a matted strip of the DSP across the top. Do you think I should add a portion of that leafy flourish, too?

I've got a couple more Mother's Day cards to share with you, but I'll put those in another post

Thanks so much for stopping by, and remember to laugh--a little or a lot--every day.
Cheryl

Sunday, April 26, 2015

Sparkly, shiny Christmas ornament...

When my sister came to visit a few weeks ago, she brought along a few of her dies for me to play with. One of them was this ornament die from Marianne Creatables.  Since purple is my favorite color, I just had to make some cuts with it from purple glitter paper.


This is the card I made with it. I backed the die with some shiny silver embossed cardstock and then used the "Precious Hearts" die by Memory Box to cut a bow and the "string." I added a sparkly silver enamel dot to the center of the bow.

My sentiment is a wooden stamp from the $1.50 bin at Michael's, and I used a Martha Stewart Pine Needles Edge Punch on my sentiment mat which helped create the illusion that the ornament is hanging on a tree.


I also used the MS Pine Needles punch on the inside mat. This inside sentiment stamp is by Penny Black.

I am entering this card into this week's Winter Wonderland blog challenge: Twinkle, twinkle (all things sparkly and bright).


I made some cards like this in more traditional colors, too, and here are a few pics of those:


Finally, I ran out of the red and purple sparkly die-cuts, so I used one of my own ornament dies (Lifestyle Crafts, I believe) to cut another ornament for a couple more cards like this:

Even though I made 10 of these ornament cards, I am still a bit behind on my self-imposed Christmas card schedule. I really need to get busy and make some more!

Thanks so much for stopping by, and remember to laugh--a little or a lot--every day.
Cheryl

Friday, April 24, 2015

Thanks a melon...

Recently, I was lucky enough to be selected as one of the winners of Taunya Butler's (Daisies Girl) many birthday giveaways during the 12 days leading up to her birthday on April 12. The little package that I received was chockfull of delicious Doodlebug products. I decided to use some of them to make a quick thank you card for Taunya.

One of the products Taunya included was the fruity Washi tape that you see at the top of my card. It was my inspiration!


I cut the word "melon" and my watermelon image from the Preserves cartridge. I added the "bite" out of my watermelon by using a small scalloped circle die. Some Diamond Glaze on the seeds made them look like real seeds!


Here's a picture of the roll of Doodlebug Washi tape and some pretty buttons that were also part of my prize package.

The buttons are in shades of orange - not quite the color I wanted for my card. But - no problem! I just colored one of them with a red alcohol marker and it became the perfect shade!


See what I mean?  The perfect color! A little green thread tied in a tiny bow was the finishing touch.


To decorate the inside of my card, I simply added a strip of that cute Washi tape. It was just the right touch of color and fun.

I'm entering this card into the Double-Click Skittles Challenge #20: Thank You or Teacher.  Taunya is a big inspiration over on the Double-Click Skittles blog, too. Check it out!

Thanks so much for stopping by, and remember to laugh--a little or a lot--every day.
Cheryl

Thursday, April 23, 2015

Masculine thank you card...

Just a quick post from me today. I needed a masculine thank you card and just happened to have some of this map paper in my stash. I thought it would be perfect for a guy.  My daughter had also given me some sheets of burlap - what's more masculine than that? I cut a banner shape and used my sewing machine to stitch it across the top to help keep it in place.

The encircled letters were some stickers from my stash. I added some Diamond Glaze to each one to make them a bit more substantial.

I created a couple of corners out of kraft cardstock and inked them with Frayed Burlap Distress Ink before adhering them to my two right-hand corners. If you look closely, you'll see that I also inked the edges of my burlap banner.

I left the inside blank so that I could write a personal note.

That's it for me today. See? Short and sweet!

Thanks so much for stopping by, and remember to laugh--a little or a lot--every day.
Cheryl

Monday, April 20, 2015

How've you bean?


I just got the Latte Love stamp set by Fiskars and set about making a card.

In fact, it was so much fun and so easy that I made two!

The coffee cup was stamped on a separate piece of cardstock and fussy cut before I added some paper-piecing for the colored sections, The whole thing was then popped up on some foam tape.

The beans were also stamped on a scrap of cardstock, colored and then fussy-cut. One of them is popped up with foam tape.

After stamping the steam with some brown ink (I stamped off first), I added some sheen to it with a glitter pen. I know this doesn't show well in the picture, but it looks great IRL.


The background paper that I used is from Jillibean Soup. Love this pattern with its warm colors and homespun look. The rectangle for my image was cut with a Spellbinders Romantic Rectangles die.

I thought the lime green twine fit nicely with the warm, homespun look and feel of the card.


The inside of my card was decorated with a piece of the yellow cardstock that is also on the cup and one of the hearts from the background paper. Easy Peasy!


Here's a peek at both cards. There are some more cute stamps in the Latte Love set, and I can't wait to try making a few more cards with them.

Thanks so much for stopping by, and remember to laugh--a little or a lot--every day.
Cheryl

Thursday, April 16, 2015

Tone on tone butterfly thankyou...

I know I've shared a card with you before using the Butterfly Heart die by Memory Box, but it's just so darn pretty that I've decided to share another.

 
For this card, I used the die with some lavender paper. Once the butterfly shape had been cut (all the butterflies remain attached at the top and bottom points of their bodies), I slipped a piece of scratch paper under each wing and inked it lightly with some purple ink. I also stamped the thank you beneath the heart. Once that was done I matted the lavender piece with some white cardstock and attached the whole thing to my dark purple card base.
 
I used a Viva Décor pen to add a little pearl to the center of each butterfly.
 
For the inside of my card, I used a butterfly border embossing folder which still left plenty of room for me to write a personal note.
 
I want to thank those of you who sent me get well wishes when I mentioned that I had experienced an awful bout of food poisoning. I want you to know that I am back to feeling 100% again. It is so nice to no longer have sore stomach muscles and to also have my appetite back (although it would be good for me to have kept THAT at bay for a while!).
 
Thanks so much for stopping by, and remember to laugh--a little or a lot--every day.
Cheryl

Tuesday, April 14, 2015

Happy Birthday in pink tulips...

On April 12, Taunya Butler of Daisies Girl, celebrated her birthday after 12 days of posts featuring Doodlebug projects and giveaways. It was a fun 12 days, and my name was actually selected to receive one of the giveaways. Thank you again to Taunya and Doodlebug!!

Taunya and I exchanged birthday cards this year, and this is the one I sent to her.

I used an old (1997) Stampin' Up tulip stamp that I think is so pretty. The white mat was cut with a Lifestyle Crafts scalloped rectangle die and the sheer ribbon was from my stash.


I stamped the center tulip first, then masked it off to stamp the other two.

The stems and leaves were hand drawn/colored in with my ProMarkers

The little folded banner die is from La La Land. I have a computer file with some basic arched sentiments so that I can just print them out (a sheetful at a time) and then cut them with the die when I need them.


For the inside of my card, I used another scalloped mat and a birthday sentiment stamp from Woodware.

I hope Taunya enjoyed receiving her card and had a fabulous birthday on Saturday.

My weekend was not so hot. I suffered a bout of food poisoning and even spent a couple of hours on Saturday morning at the clinic trying to get something to relieve the stomach pains and nausea. It took a good 24 hours for it to begin to subside. I am MUCH better now - nearly back to normal - but I was really surprised at how AWFUL food poisoning can be. My sympathies to anyone who has (or will) experience it!

Thanks so much for stopping by, and remember to laugh--a little or a lot--every day.
Cheryl


Friday, April 10, 2015

Moo-chas gracias...


I recently won these three Stampendous stamps from Jamie Martin over at Stamp This. Thank you so much, Jamie! I was excited to receive them, as I knew they would come in handy for some cute and fun cards.

My first idea was to make a thank you card for Jamie. Here's what I came up with:
I stamped one of the images a couple of times on white cardstock. I colored up one of the images and cut it out with a circle die. On the other image, I colored only the butterfly, the nose/mouth/eyes area, the top hair and the cowbell/neckband. Then I cut these pieces out, shaped them with a ball stylus and adhered them to my first image with dimensional foam tape or glue dots.


I think you can see a little of the dimension these pieces add in the picture on the left.


Here's looking at it from another angle, and you can see how the "hair" locks flip up a little and the rounded dimension of the nose area and the cowbell.


I also added some Diamond Glaze (similar to Glossy Accents) to the eyeballs.

I used my ProMarkers to color this sweet little cow and some chalk for the sky and grassy areas.

There is so little coloring, so it was VERY quick and didn't require much skill. Thank goodness, because I don't have much!!

The dotted green mat (some leftover packaging material) behind my image was cut with a Spellinders Peony Nestabilities die. The other papers are from a Jillibean Soup 6X6 pad that I've had for quite a while.


My sentiment was computer-generated. I thought the little twine bow and a couple of green enamel dots added just the right amount of embellishment.


I kept the inside of my card pretty plain so that I had lots of room to write a personal note to Jamie.

I'm entering this card in Challenge #19 at DoubleClick - AKA Abusybee: Use a punny or funny sentiment. I think this card qualifies, don't you?

Thank you so much for stopping by today, and remember to laugh--a little or a lot--every day.
Cheryl

Tuesday, April 7, 2015

A simple Christmas card...

I am continuing my struggle to make approximately 10 Christmas cards each month. This is one I actually made back in February, but hadn't yet shared here on my blog.

I had some deep blue (looks black in the photo) starry paper left from a few Christmases ago. I decided to use it with my Marianne Creatables Pine Trees Horizon die to make a simple Christmas card.

I used the Marianne die to cut some plain white cardstock, on which I applied some spray adhesive and then some white glitter.

I heat embossed a Penny Black "Season's Greetings," and that's about all there was to the front of my card. So simple, but really sparkly and effective in person.


I stamped another Penny Black sentiment on the inside and added a sparkly white stripe at the bottom. It was made with some double-sided tape and white glitter. Super easy!

I have some more Christmas cards to share with you, but they will wait for another post.

I hope that the weather has turned to Spring wherever you are and your tulips are poking their pretty heads through the ground.

Thanks so much for stopping by, and remember to laugh--a little or a lot--every day.
Cheryl

Sunday, April 5, 2015

Let's Craft and Create, first challenge of 2015!

I am excited to announce that I am now a member of the Design Team for Let's Craft and Create, a challenge blog led by the wonderful and creative Eileen Dobson. I am so looking forward to the monthly challenges and to seeing all the fabulous creations from friends, followers and visitors of LCC.

This month's Challenge #100 - Seasonal Flowers was right up my alley. I LOVE adding flowers to my cards. I especially love making my own flowers, and that's just what I have done for this challenge. I was so excited about it that I actually made two cards!

My first card was inspired by the ornamental crab apple trees that will soon be blooming in my home state of Minnesota. The blossoms range from white to red, with all shades of pink in between.

I cut a piece of white cardstock for my little scene with a Spellbinder's Romantic Rectangle die. Then, I created a branch using a Lifestyle Crafts die and punched numerous little flowers out of vellum with my Martha Stewart Hydrangea punch. I used a ProMarker to color the back of each one, concentrating the color at the center.


I used an embossing tool to shape them and also added some pearly centers with a Viva Décor pen.

Do you see those pretty clouds behind my branch? That was done with a torn piece of  paper and some light blue chalk.

My butterfly was punched with a small Fiskars punch and then outlined and colored on the back with a ProMarker.


On the inside of my card, I used the same deep pink mat as the front and a strip of the DSP across the bottom.


Once again, I added a vellum flower--this time a larger one--as a little added decoration.


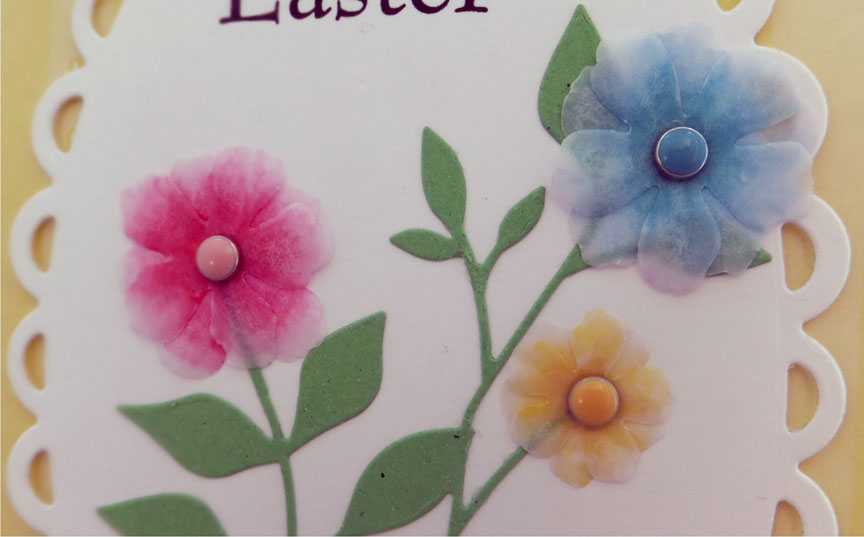
My second card was actually an Easter card that has already been sent to its intended receiver.
More of the larger vellum flowers, but instead of using a Viva Décor pen for the centers, I added some coordinating mini-brads. The foliage is a Memory Box die and the lacy oval was cut with a Lifestyle Crafts die.


I love the soft look of vellum flowers when they are colored on the back. They maintain their transparency and look oh, so delicate.


The inside of this card was another lacy oval on top of a DSP mat. My sentiment was computer generated.

Here is a list of links to the team so that you can visit and be inspired by their awesome creations:

             Karen

             Maryvonne

             Eileen

             Deborah

             Cheryl (that's me!)

             Ursula

             Hazel

             Mary

             Catherine

I hope you've been inspired and will join us by submitting your creation at Let's Craft and Create. There is a wonderful PRIZE up for grabs and you can read all about it here.

I think we all make floral cards from time to time, and I can't wait to see yours!

Thanks so much for stopping by, and remember to laugh--a little or a lot--every day.
Cheryl

Wednesday, April 1, 2015

Easter butterflies...

My lovely friend Nadine in Germany sent me a little box filled with these pretty butterflies. I just HAD to use some of them on an Easter card.

 I first used a Darice embossing folder to add some texture and interest to my white mat. I scored four lines to separate the embossed designed from the bottom section of the mat where I stamped my sentiment. Then I tied a piece of pink and white baker's twine in the center of the scored lines.


These little butterflies are so cute. They are not only punched out, but embossed, too. I think you can easily see the embossing on the aqua one.

I added a tiny to pearl to accent each one and to add a little bling to my card.


My inside was pretty simple: a white mat with four scored lines and baker's twine at the top.  My sentiment was computer generated.

Thank you, Nadine, for these fun butterflies. I am really enjoying using them!

And thank you for stopping by my blog today. Don't forget to laugh--a little or a lot--every. single. day.
Cheryl