Wish List

Friday, December 31, 2021

Flowers for a wintry day...


I have a set of stencils and a coordinating die that make this pretty floral wreath. I recently made a couple of cards with them that I donated to the thrift store. And since it's looking pretty cold outside--we'll have temps well below zero tonight--I thought they'd be perfect to feature on my blog today. 

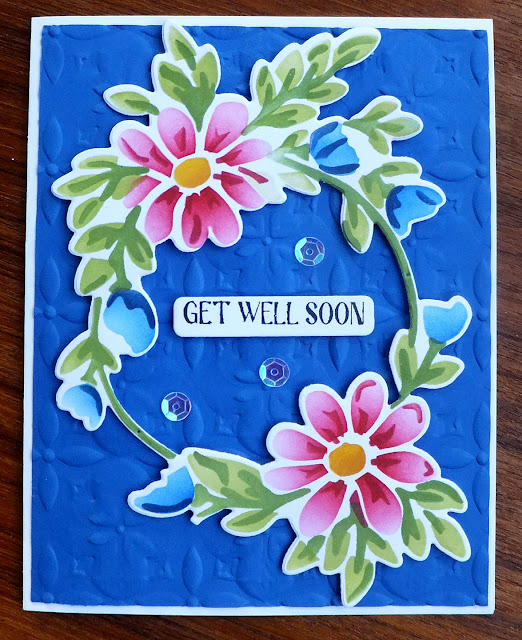
The first card has a dry-embossed background, made from a scrap of blue CS I found in my stash.


I have popped my wreath up on dimensionals, as well as my sentiment.

My only other embellishment was three iridescent sequins that reflect whatever color surrounds them.


This card was made the same as the first one, but with a piece of DSP in the background--another scrap from my stash. Once again, I added the iridescent sequins. See how pink they look on this card? 


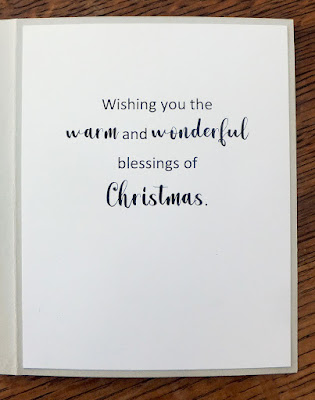
Each card had a simple, stamped sentiment on the inside. The photo on the right shows the one inside the first (blue) card.

We are having a very low-key New Year's Eve celebration today. My brother is coming to help my DH fix a bathroom faucet and staying for dinner. My brother-in-law will also be here, as he has been staying with us since before Christmas. We'll probably have a glass of wine to toast the New Year, and that will be it!

Thanks so much for stopping by, and remember to laugh--a little or a lot--every day.

Cheryl

Tuesday, December 28, 2021

Simple sympathy card...


I needed some sympathy cards and came up with this very simple design.

I had a pretty border die of a row of flowers--they look like water lilies to me. I decided to use it as the focal point of my card, keeping the layout really simple.

I found some silver cardstock with a "brushed" design on it. I cut a strip to back the die-cut and also used it to cut out my sentiment.

The silver cardstock was pretty heavy, so even though I didn't layer my sentiment, it still had some dimension.


On the inside of my card, I stamped a sentiment with no other embellishment.

I'm going to make a few more of these cards so that I have some on hand and also have some to donate to the thrift store. 

I think the rich purple and elegant silver are what make this card special. I have a 12" X 12" stack of cardstock in jewel tones, and I think those papers will be perfect to make more of these.

We had a lovely Christmas with some of our family members able to celebrate with us. So much food. So many gifts. So much fun. 


Here we are with three of the grands and one of their dogs. This was taken Christmas morning after they had finished opening their gifts.

I hope your celebrations were as merry as ours. I am looking forward to a New Year filled with blessings. After all, there's no sense in looking forward to doom and gloom!

Thanks so much for stopping by, and remember to laugh--a little or a lot--every day.
Cheryl


Friday, December 24, 2021

Glitter perfect...

 Sometimes you find a piece of glittery cardstock that is just too beautiful not to use. That's what happened when I came across a gold, holly-patterned piece in my stash. Here's what I made with it:

This picture absolutely does not do justice to this gorgeous paper. I wanted as much of it as possible to show, so I added only a small sentiment panel. My focal panel was matted with black and my sentiment panel had an inside reverse scallop frame. Does that make sense?


As a bit of embellishment, I added a couple of holly leaves cut from gold glitter cardstock and three gold, flat-backed dots for the berries.

My sentiment had been heat-embossed using gold embossing powder.


I stamped my inside sentiment with Versafine black ink and also matted it with black CS.

I have a little of this paper left and will be making a couple more of these cards for next year. I'm actually excited to get started on next year's cards, as I really, really want to get most of them made far ahead of time--perhaps by the end of October 2022.

After making the last batch yesterday (Dec. 23), I am finally DONE making Christmas  cookies and other treats. All the gifts are wrapped and under the tree (or mailed to their recipients), so I am now focusing on meals. We will have our traditional "Soup Supper" on Christmas Eve. My family LOVES homemade soup, so we always have at least three of them on that special night. This year I am making Turkey Wild Rice (done yesterday) and Cheesy Corn Chowder (will probably be done by the time you read this post).  My daughter is bringing Vegetarian Chili. We will have some nice hot baguettes and a crudite platter, as well. There will be wine, water and sparkling juice to drink. The dessert, of course, is an assortment of Christmas cookies. As soon as we are done eating, the grands will want to open gifts, which is always the highlight of the evening.

On Christmas morning I bake caramel rolls (which I prepare on Christmas Eve and allow to raise in the frig overnight) and bring them to my daughter's house as soon as they are done baking. She only lives nine blocks away, so we can get them there while they are still warm. We then have coffee, juice and rolls and watch the grands open their gifts at home. So. Much. Fun!

I hope your Christmas is joyous and filled with visits (by phone, computer or in person) from family and friends. 

Thanks so much for stopping by, and remember to laugh--a little or a lot--every day.

Cheryl


Tuesday, December 21, 2021

Cards for the kids...

 ...and by "kids" I mean those six grown-up kids who have given us 10 beautiful grandchildren!

I've had this sweet "cup of cocoa" die set since before Christmas 2020 and had never used it. I decided it was time and thought these cards would be perfect to send to our grown children and their families to wish them Merry Christmas.

I started by cutting all the pieces for my focal image from white cardstock. Then I sat in front of the TV one night and colored them with my Promarkers before gluing them all together.


I added some shadows around the little snowman (or is it a snowgirl?), whipped cream and marshmallows. I also added some rosy cheeks and some white dots to the eyes.

When it was all glued together, I popped the whole image up on foam squares. In fact, you can see one of them peeking out from under the cup's handle.

I cut an oval from my DSP to allow my kraft card base to show through. I felt this helped to draw the eye to the image.

The sentiment was computer-generated, cut out with a sentiment die and inked around its edges. I also popped it up on foam tape.


I really liked the red DSP for the background. The whitish triangles were actually a beige color which worked well with my kraft card base.

The green background added some nice contrast. All of the DSP came from a distressed Christmas 6" X 6" paper pad that I've had for years. I think I must have been saving it just for these cards!

On the inside of each card I printed another sentiment with my computer. I also added a strip of the same DSP that had been used on the front of the card.

These cards were a bit fiddly, but still so much fun to make. The coloring was simple enough that it didn't take much time at all. In fact, I made all six of them (two of each shown here) in an evening.

We are back from a quick trip to see our daughter and her family in North Dakota. While it was cold, the roads were in good shape, and there wasn't too much traffic. We are now ready to settle down and celebrate Christmas at home with family members who are able to join us.

I wish all of you a fabulous holiday celebration, and I hope to read all about it in your blogs after Christmas.

Thanks so much for stopping by, and remember to laugh--a little or a lot--every day.
Cheryl


Friday, December 17, 2021

A penguin Christmas...


I found this free image of a penguin online. It was so cute that I printed out several to be the focal image on some Christmas cards. You can find it here (#21). It is actually printable as a complete card, but I used only the card front. 

The sentiment was cut from a sheet of DSP that was filled with lines of Christmas greetings like this one. Some of the others were"Merry Christmas," "Ho Ho Ho," and "Season's Greetings," with holly and berries in between each of them. This DSP was WAY more useful to me as cut-apart sentiments than as a background paper. I popped the sentiment up on foam tape.


To add some extra touches to my card, I first matted the image. Then I added Glossy Accents to all the berries, a snowflake to his belly and went over the candle flame with a glitter pen to give it some sparkle.

I also added a squiggly line of glue across the snow and sprinkled it with clear glitter.


For the inside, I used my computer to print an additional sentiment.

Talk about quick and easy! This card helped me reach the finish line for the 95 cards I needed to send to family and friends.

I am now in baking mode, trying to get the cookies, pies and other treats ready for the big day. I need to keep my nose to the grindstone as we are taking a couple of days this weekend to make a quick 200-mile trip to see my daughter and her family. We will spend just one night with them and then return home to get ready for our Christmas celebration here.

Are you all done with your Christmas preparations? I tend to keep "preparing" until December 24th. Then I stop and just enjoy the holiday, ready or not!

Thanks so much for stopping by, and remember to laugh--a little or a lot--every day.

Cheryl

Tuesday, December 14, 2021

Peace on Earth...


I purchased a circle die that had some trees that were die-cut into the circle.  I thought it would make some great Christmas cards. As I looked at the die, trying to figure out exactly how I would use it, I noticed a stitched and irregularly scalloped circle on my desk that had been cut out of holographic paper. I layed my circle die with trees on top of it and realized it was just the right size to create a beautiful frame for my trees.

So, I began by cutting out more stitched/scalloped circles from holographic cardstock. Then I centered my new circle/tree die on the scalloped circle and ran it through my Big Shot again. Once that was done, I used my circle/tree die to cut an aperture in the front of my card. Finally, I adhered the holographic die-cut to the front of my card, matching the edges of the circles and the trees.


In this pic you can see how the aperture shows the inside of my card where I have adhered some starry sky DSP. You may have noticed that I adhered a tiny clear gem to one of the stars that is above the right hand tree.


I also adhered a gem to the star beneath my stamped sentiment. I have also outlined the star's rays with a clear glitter pen, but it doesn't show in the photo.


Because my DSP was so dark--and I didn't want to be signing cards with a white pen--I added a white stitched rectangle. I stamped my sentiment and left some room to sign our names. I just had to be sure that I adhered it beneath the bottom of the circle, so when the card was closed you were not able to see it.

I liked these cards, and I had enough of the starry DSP to make six of them.  I'm going to hunt through my papers and see if I can't find something similar so that I can make a few for the thrift store.

I am happy to announce that I mailed my Christmas packages and all my cards today. Whew! I hope they all arrive at their destinations in time. I'm sure some of the international addresses will probably be late, but that's just how it goes..

I finally got all of my Christmas decorations up, too. I know, I know, I'm slow. My excuse is that we were in Arizona the first week in December, so we had to play catch up when we got home. That's my story anyway, and I'm sticking to it!

Thanks so much for stopping by, and remember to laugh--a little or a lot--every day.

Cheryl

Friday, December 10, 2021

New flower border dies...


Not long ago I purchased a couple of new flower border dies. I love this type of die for making quick cards that look pretty impressive to the non-cardmaker. 

For this card, I started with an aqua card base and rounded the two right-hand corners. Then I added a strip of DSP, my die cut and a thin strip of silver glitter paper to finish off the seam between the two.


I added the vertical "Happy Birthday" die-cut and a bit of glitter to the flower centers. No other special embellishments.


The inside featured a stamped sentiment.

This was such a quick and easy card!


This is the second floral border die that I purchased. It features lilies of the valley, which I think are really nice for a sympathy card.


I kept this card very "quiet." No embellishments or sparkle.


Once again, just a stamped sentiment on the inside.

I donated both of these cards to the thrift store. They sold very quickly, so I guess that's a sign I should make some more.

My big plan today is to finish making the last few Christmas cards for my DH and me to send out this year. We'll be sending 95 cards plus I've made more for the thrift store. 

I want to add a special thanks here to my crafty friend Lynette (My Stamping Addiction) for her donation of cards to the thrift store. She included some Christmas cards in the assortment she gave to me. I've taken them to the thrift store and they are rapidly selling. In fact, nearly all of hers have sold, and I will have to keep making holiday cards to sell right up until Christmas.

Thanks so much for stopping by and remember to laugh--a little or a lot--every day.

Cheryl

Sunday, December 5, 2021

Let's Craft and Create Challenge #178: Anything Goes or Vintage Feel...


What? December already? I sit here shaking my head as I type. How can we be in the last month of 2021? 

Well, there's no avoiding the fact that we are almost ready to close the books on this year and ring in 2022. But before we do, let's all participate in the latest challenge at Let's Craft and Create.

This was a BIG challenge for me. I just don't do vintage cards, so I had to dig deep to come up with something that kinda', sorta' reflected a vintage feel.

I happened to have a perfectly sized sheet of the words and melody for O Little Town of Bethlehem. I tore off a border on all sides and then "aged" it with some Tea Dye Distress Ink.

My card base ws made from kraft cardstock, so I used a die to cut a manger scene from a leftover piece Then I painted it with some gold metallic water color paint. It has a nice shimmer IRL.

The star above the manger was cut from glitter cardstock, as were all my pine branches.

In this picture you can see a bit of the sheen from the metallic paint. I also added a few sparkly gold enamel dots (the smallest ones) to the pine branches at the top of my card.

I probably should have frayed the edges of my black DSP panel, but by the time I thought of doing that, it was already adhered to my card base!

On the inside I added a strip of the same DSP that is on the front and a narrow gold strip. I stamped my sentiment, and called it done!

Now it's your turn! You are probably WAY better than I am at making vintage cards, so I can't wait to see your creations. For some additional inspiration, check out what the Design Team has posted on Let's Craft and Create.

Thanks so much for stopping by, and remember to laugh--a little or a lot--every day.

Cheryl


Friday, December 3, 2021

Would anyone want a card with an orange truck?...

 That is the question I asked myself before I made this card. I had some glossy orange packaging material that I thought would be fun to use for a die-cut truck. I would donate the card to the thrift store, but would anyone actually buy it?

I had been given a roll of the banner you see at the top of my card. It's made from different sized triangles sewn in a continuous line. The triangles are a good number of different colors, so I just found a section of it that would go well on my card, cut it from the roll and applied it to my card. 

The orange packaging material was thicker than cardstock, so the embossed details of the truck showed up nicely.

Although it's hard to see I added some vellum to the windows so that it looked like there actually might be panes of glass there.

I also cut the wheel centers from silver metallic cardstock and gave my truck a door handle that was fussy-cut from the same silver CS.


The birthday strip sentiment is one I had in my stash and is popped up on foam tape.

On the inside, I added a piece of the same blue DSP I had used on the front and a stamped sentiment.

So, did it sell? It sure did--almost immediately. I think I don't donate enough masculine cards to meet the customers needs, so they are in big demand. Even simple cards like this will sell pretty quickly.

Thanks so much for stopping by, and remember to laugh--a little or a lot--every day.

Cheryl