Wish List

Saturday, December 29, 2012

Time to say thanks...

I got so many wonderful gifts for Christmas that it's time to let everyone know just how much I appreciated them. I was a little short on thank you cards, however.

My neighbor came over right after Christmas and asked if she could have a selection of thank you and sympathy cards (I had told her some time ago, "whenever you need some cards, please ask"). Well, after sharing some cards with her, I needed to get busy and replenish my stock.

I decided to use some of the discarded ribbons, tags and gift embellishments for my Christmas thank yous. Here's what I came up with:
This tree and snowman was an embellishment on a gift for one of my grandchildren. The little tag tied to the snowman's "hand" had orginally had his name printed on it. I simply cut a new tag and handwrote "thank you."

The tree was cut with the Art Philosophy cartridge and the snowman was cut with the Create a Critter 2 cartridge.

For the snow at the bottom of my little scene, I simply ripped a piece of white cardstock.


This next thank you card used the snowflake from a gift tag and the ribbon from the same gift. I carefully pried the snowflake from the tag (see this post if you'd like to know what the tag looked like when it was made), and secured it on top of the ribbon. The "Thank You" sentiment was heat embossed with white detail embossing powder.


For this next thank you card, I used the entire gift tag from one of the gifts. I didn't change the tag at all except to cut the ribbon a little shorter.


The striped paper on the bottom of the card base is the backside of some of the holly patterned paper you see on the tag. The red border was one my sister punched and gave to me. We occasionally share some borders in assorted colors with each other. They're so easy to mail back and forth and I always try to check my "border box" before I punch a new one.

The "thanks" is cut from a Cuttlebug die and inked around the edges.


I did make some thank you cards from all new materials, but I'll share those in another post.

Thanks so much for stopping by, and remember to laugh--a little or a lot--every day.
Cheryl


Tuesday, December 25, 2012

Merry Christmas...

It's hard to believe that today is Christmas Day. We have had a lovely holiday so far and we are looking forward to another family gathering tonight.

Yesterday was filled with lots of "kid fun." The afternoon was bright and sunny and perfect for sledding! It is our family tradition to go sledding, if Old Man Winter cooperates with enough snow, on Christmas Eve. Here are a few photos of yesterday's fun:
 
 
Granddaughter Sophie enjoys a turbulent ride down the hill.
 
Five-year-old Patrick is helped to get started by his older sister Francesca.


Polly is clearly having a good time in the snow!


Even Grandpa wrangles the orange sled and digs in his spurs for a wild ride down the hill.  
Looks like he couldn't stay on his "steed,"though! 
 
I was relegated to photographer (from the car) this year, as I am still trying to recover from the flu which seems to have morphed into a deep cough that continues to hang on.

Christmas Eve is, of course, the last day to receive mail until after Christmas. The postman delivered a lovely handmade Christmas card all the way from Germany on Christmas Eve. It will definitely be going into my "special cards" box to save and look at from time to time. We're so grateful to Nadine and Ulrich and their family for thinking of us, with a special thanks to Nadine, because I'm pretty sure she made this card.


The card base was made from some beautiful rich brown cardstock with a decorative edge cut along the top of the card. The wreath was embossed onto a small piece of ivory card stock and then inked with a beautiful bronze-colored ink. My picture at left doesn't to it any justice at all! So sorry I'm not a better photo taker.


The greeting is stamped with gold ink. I think the font of the greeting is particularly lovely. The photo below shows it in much better detail. It translates "Happy Christmas."


The bronze satin ribbon across the bottom of the card adds a lovely rich detail that finishes it nicely.

Even though it is very cold outside here in Minnesota, we are having a warm and wonderful Christmas. We hope you are, too.

Thanks for stopping by, and remember to laugh--a little or a lot--every day.
Cheryl

Saturday, December 22, 2012

Rosettes for Christmas...

When my children were all young, I almost always made Rosettes as a special Christmas cookie. I didn't make this cookie any other time of year, because they're a little putsy to make and my chldren loved them so much that they would disappear in a nano-second if I didn't dole them out.

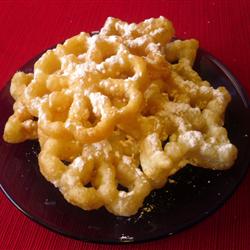
In case you've not heard of them, here's what they look like.
Rosettes are made from a thin batter that is deep-fried on a special "iron." This year at Thanksgiving, one of my daughters and her family came to stay for the holiday, and she asked about my old Rosette iron. Luckily, I was able to find it and hand it down to her so that a next generation of children can enjoy these delicate, sugared treats.


The recipe for Rosettes is very simple - eggs, milk, flour, a little sugar, dash of salt and some flavoring such as vanilla or almond.  You need to heat up the iron by setting it in your hot oil for awhile. Once hot, it is dipped in the batter and then back into the hot oil. They fry up very quickly. In the pictures you see my daughter making her first batch of Rosettes.
 
After frying, the Rosettes are drained on paper toweling and then sugared. I always used granulated sugar, but I know some folks like to use powdered sugar.
 

 My daughter always has several little Christmas elves helping her in the kitchen--especially when she's cooking such a tasty treat.

Because I enjoyed having Rosettes as a child, I made them for my children, and now my grandchildren are enjoying them, too. What a fun Christmas tradition!

Thanks for stopping by, and remember to laugh--a little or a lot--every day.
Cheryl

Tuesday, December 18, 2012

Some of my favorite Santas...

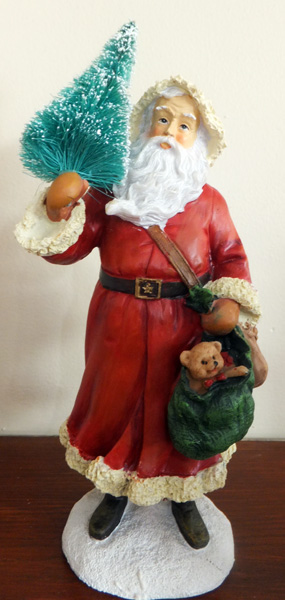
Since I've had a nasty flu the last couple of days I haven't done much crafting. So instead of a paper creation, I thought I'd share some of my favorite Santas with you. I have a small collection of them, and I like to pick them up, when I can, from wherever we travel.

Here's one of my most treasured Santas:
This Santa is from Russia. He is handpainted and was given to me by a friend who imports these types of gift items to this country. This Santa is very regal, and I really love him!


This Santa on the "rocking reindeer" is also from Russia and was given to me by the same friend. The little bells that hang from the saddle blanket actually jingle when he rocks.


This is another much-treasured Santa that I purchased in Prague, Czech Republic. My husband and I visited there a couple of years ago during the Christmas season, and I vowed not to leave until I had a Czech Santa. My grandmother was Czech so it was important to add this one to my collection. He is also hand-painted and very regal looking.


The Santa at right is quite rustic.  He was hand-carved and painted by a gentleman from northern Minnesota. I liked him because of his green shirt and his stance--with his hands in his pockets. These peculiarities make him different from most Santas you see.


The Santa at left was purchased in Heidelberg, Germany. He is wearing the traditional dress of the European-style Santa.  I chose him especially for that reason.

Don't you love his mittens, too? They look like they must be leather mittens.


This is a look at my entire small collection. Some I have painted myself, others have been purchased here in the U.S. and a few have been given to me as gifts. It's always fun to pull them out of the box and set them on the mantel in December.

Thanks for visiting today, and remember to laugh--a little or a lot--every day!
Cheryl


Friday, December 14, 2012

A few more of Connie's pretty Christmas cards...

As promised, here are some more cards that my sister's friend Connie made. For these she cut some images from the Sweater Weather cartridge.
Isn't this a lovely card? I love the red gingham check. It goes so perfectly with the pixelated stocking image.


Here are two similar cards using the mitten image. I love how she added the button in the middle of the design on the mitten.


I really love this card. The combination of the red gingham and the dark green polka dot is just so perfect. I love all the dimension from the red ornaments on the Chritmas tree, too.

This is one last card that should have been included in the previous post. Isn't that little mouse sitting at the bottom just the cutest little creature? He looks so full of sweets and satisfied.

Thank you, Connie, for letting me share some of your beautiful cards! I am certain you have inspired whoever has stopped by this blog today.

I appreciate that you have taken the time to visit.  Just remember to laugh--a little or a lot--every day!
Cheryl

Tuesday, December 11, 2012

Connie's pretty Christmas cards...

If you've read my previous blog posts, you know that I have a sister who loves to make cards, too. My sister has a friend named Connie who is also an amazing papercrafter. I love to see the cards that Connie creates because they are so beautifully and precisely made with lots of fun details. Recently, my sister sent me some photos of some of Connie's Christmas cards so that I could share them here on my blog.

Here are the first few cards that feature some stickers that Connie has had for a long time, but decided to use this holiday season.
Aren't these images just so sweet. I honestly don't like mice...except for these sweet little creatures.

I love the pink diagonal stripe paper on this card. I think the peppermint candies are a great touch, too--especially on either side of the "Christmas morning" sentiment.

Hee's another card with a super sweet image. I have to admit, though, that the thought of mice around my Christmas cookies makes me cringe a bit. :)


This last card is my favorite. I love, love, love that pink polka dot paper. And the ribbon behind the scalloped oval is just perfect!


Here's one last look at all four cards.  Beautiful job on these, Connie! I wish both you and Michelle lived closer to me so I get some papercrafting lessons from you!


If you liked Connie's cards, please leave a quick comment letting her know.  I'll share some more of her cards, made with the help of her Cricut and the Sweater Weather cartridge, in my next post.

Thanks for stopping by and remember to laugh--a little or a lot--every day!
Cheryl

Saturday, December 8, 2012

Gift bag toppers...

My sister and her friend Connie get together on a regular basis and make cards and have lots of papercrafting fun. Connie is a very talented papercrafter. Of course, my sister is no slouch, either! One of their projects a while ago was to make some decorative gift bag toppers.

Aren't these wonderful? And they're such a good idea, especially at Christmas time when gift bags often sit under the tree for many days. It's such a temptation to peek inside...unless there's a bag topper preventing you from doing so!  And these toppers add so much to the look of the bag.


The topper is a piece of cardstock folded in half and decorated along the edges.  A slit has been cut through which you can slip the handles. Doesn't this deep edge punched border look terrific?


This yellow and peach colored bag is one of my favorites. The topper is the perfect space to add flowers, gems, cutouts, all sorts of things, yet you don't have to decorate the entire bag front. The topper really makes the bag look special. I don't know if they've adhered the topper to the front and back of the bag, but I think that's something I would do in order to hold it securely. Maybe my sister will leave a comment regarding that issue.


This blue bag shows how pretty it can be to layer borders. The complementary color of the flower border really draws attention and makes it a focal point.

Thanks, Connie and Michelle, for letting me share your  beautiful bag toppers. In my next post I'll share some of Connie's Christmas cards with you.  You won't want to miss those!!

Thanks for stopping by, and remember to laugh--a little or a lot--every day!
Cheryl

Thursday, December 6, 2012

Merry Christmas tags...

Well, it's been a loooooong time since I've posted anything - not because I've been ill or away from home, but because I've been so busy. Last week I managed to make 80 Christmas cards! I felt I just HAD to get them done so that I could move on to other Christmas projects. It's the first time I've managed to make 80 cards in 6 days, so I was pretty pleased with my progress.

Next, my book club decided we should have a little gift exchange at our December meeting. I love gift exchanges, and I had a cute little Christmas platter in my gift box that I could give, but I also wanted to add something handmade. I decided that a little collection of Christmas gift tags would be just the thing.  Here's what I made:
 
These four tags were the "tie on" type and were cut using the Art Philosophy cartridge.


 As you can see at left, the back has room to write the name of the recipient and the giver.
 
 
I like the simplicity of the tag at right. It's similar to one in the group of four in the photo above and is cut out of craft cardstock. I added some velvet holly leaves, a flourish cut with a Spellbinders die and some glittered red Card Candi for the berries.
 Here's a very simple gift tag that is still glittery and festive.  The snowflake was cut out with a Spellbinders die and consists of three layers. It was actually cut out of plain white cardstock, covered with spray adhesive and then dipped into a container of glitter. A vintage gem is adhered to the center with Glossy Accents.


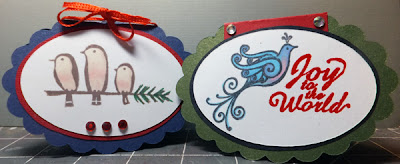
These two tags are more like small cards. They were also cut with the Art Philosophy cartridge. The images were stamped and colored with ProMarkers.  The fancy blue bird was dressed up with a glitter pen, but unfortunately, that doesn't show up in the photograph.

These two Christmas stocking tags are also small cards, as well. For all of these tags, I put a couple strips of double-sided tape on the backs so that they are ready to adhere to a package. The inside is stamped so that the names of the giver and receiver can be added.


 The last two tags that I made were simply stamped, cut out,  colored and glittered with a pompom glued to each hat.

I was really pleased when the person who received these gift tags was very excited about them. She had not started wrapping her Christmas gifts yet, so the timing was perfect!

I hope to have another post for you soon with another great Christmas idea that was passed on to me from my sister.

Thanks for stopping by, and remember to laugh--a little or a lot--every day.
Cheryl