Wish List

Friday, April 28, 2023

Double-pocket Anniversary card...


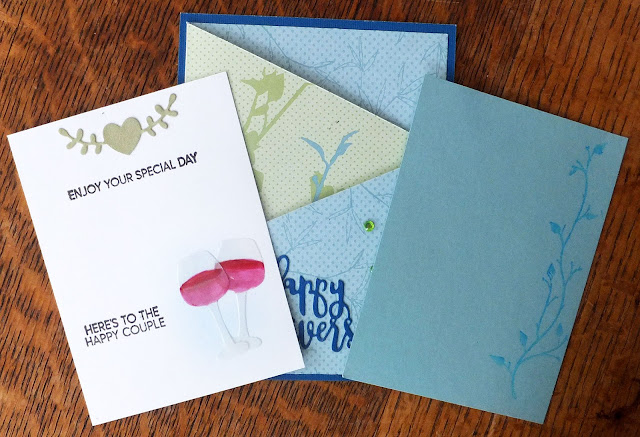
I was inspired to make this card after seeing this post at Heartwarmers from Vicki I used an older piece of double-sided DSP from Stampin' Up to form my pockets

This picture shows the two cards that get inserted into the pockets. The wine glasses were cut from vellum and colored with alcohol markers on the back side. To make sure the bottom elements don't show when the card is in place, I drew a very light pencil line before stamping and adhering the wine glasses. When that was done, I simply erased the line.

The blue card with the tone-on-tone stamping on the right side is where a personal note can be written.

The only drawback to this card is that it can't stand by itself. I do have some easels cut out of cardstock (given to me by my sister) that I could glue to the backside if I wanted that feature.

My card is pretty plain, but I think there's a lot you could do to dress this type of card up and make it really special. For instance, some sort of edging could be put along the diagonal cuts, you could put another sentiment or die-cut image on the second insert card, or you could add little ribbon pulls to the tops of the insert cards. You could even cut the insert cards with a shaped die. Maybe next time, I'll try a few of these ideas.

We have been super busy lately, helping my brother-in-law get all of his stuff into his new apartment and put in the appropriate spot. He isn't able to do much, so my DH and I are doing our best to make it into a home for him. We still have a few things to accomplish, like getting his desk set up (it needed some repair before it could be used), hanging pictures wherever he'd like them and setting out his mementos and other items that make the space uniquely his. I haven't moved for 25 years, so I had forgotten just how much work it is!

Thanks so much for stopping by, and remember to laugh--a little or a lot--every day.

Cheryl

Tuesday, April 25, 2023

New Home Congrats and three "Mom" cards...

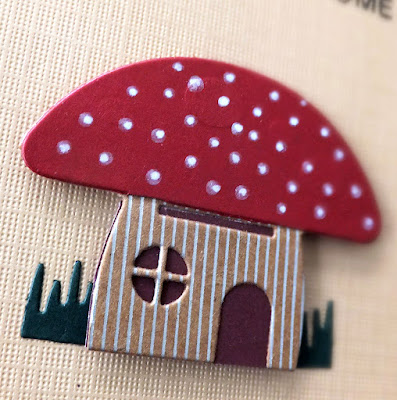
 I had some mushroom-patterned cardstock from a 12" X 12" pad, and I loved the earthtone colors so much, I knew I needed to use it on a card. As I sorted through my dies, I found this little mushroom house die set. 

First, I stamped my sentiment in two different colors. I actually used red and then some brown ink to stamp "Congrats." This made it the darker red that you see in the mushroom caps.


The grass on either side of the house was actually just one bit of grass that was connected to the house. I simply cut it off the house, and then cut it out of green CS twice. After popping my house up, I adhered the grass on each side, tucking it slightly behind the house.

I also added some white spots to the mushroom cap to mimic the ones on the patterned CS.


The mushroom die set also came with a teeny, tiny mushroom die. I cut it out of the same papers I used for the house and glued it above my inside sentiment. It looks so cute and just makes me smile.


I've been busy making Mother's Day cards for the thrift store. I happened to have these three frames in my card parts, so I decided to use them. I simply picked some coordinating DSP  and some matching CS for the mat.


You can't really see it in the picture but I added Glossy Accents to the letters, which I had die-cut.  

I should have looked through my collection of dimensional letter stickers for the Ms and Os, but it didn't even occur to me!

I also added a few gems around the stamped sentiment on each card.


On this card, the frame had been cut from a sparkly CS and I didn't have any more of it, so I used a coordinating cardstock for the mat and the letters.


I added a stamped sentiment and a tiny die-cut flower to the inside of each card.

We had a medical emergency at the end of last week with my BIL. He thought he was having a heart attack, so we called 911 and the ambulance took him to the hospital. It turned out not to be a heart attack (thank goodness!), but was severe muscle spasms in his abdomen that caused him a lot of pain. He stayed in the hospital a couple of days but is home again now, a little worse for wear.

Thanks so much for stopping by, and remember to laugh--a little or a lot--every day.

Cheryl
Friday, April 21, 2023

Cute little dinosaurs...

 I found a sheet of dinosaur stickers at Dollar Tree and thought they'd be perfect for making some kids' birthday cards to donate to the thrift store. Here's what I came up with:

I thought the pink one would work well for a girl card.


I used purple cardstock for the base and some purple glitter cardstock for the sentiment.


The stickers are already layered and mounted on foam squares, so I didn't need to add anything else to them.

I also popped up each cloud on foam squares.


I made these two cards a few days after I had made the first ones. I still have enough dinosaurs left to make a couple more cards. I think that's pretty good for $1.25!

You can easily see the layers of the stickers in this photo. 

Children's cards sell quickly at the thrift store, and these were quick and fun to make, so I'm going to be keeping my eyes out for more stickers like these. 

We've had a couple of cold, rainy days here, so it's back to turning on the heat and wearing jackets when we step outside. Will Spring ever truly arrive? I do have some tulips that are being very brave about forming some pretty flower heads. They must be shivering at night, though, when the temperature dips to freezing and below. Poor things...


Thanks so much for stopping by, and remember to laugh--a little or a lot--every day.

Cheryl

Tuesday, April 18, 2023

Another word-shaped card...


When I ordered the "HAPPY" shaped card die set, I also ordered "HUGS" and "XOXO."  These cards are fun and so quick to make. 


I popped up the word "Sending," but didn't add any other embellishments. I thought about adding a few gems, but felt if I left it plain, it could be for a male or a female.


I used an old wooden stamp on the inside. I really like this sentiment and wish I would remember to use it more.

I'm looking forward to making some Valentines with the "XOXO" die set.


My brother-in-law has come to live with us while he builds up strength and looks for an apartment. He has lived in Alabama for many years, but his health now requires him to be closer to family. My husband spent a total of about 5 weeks in Alabama since the beginning of the year, helping him when he was seriously ill and then helping him to get ready for the move. It will take time, effort and determination for my brother-in-law to become strong enough to live on his own, and we're doing our best to encourage him. He is very weak and unsteady when trying to walk up or down stairs, so we carried our stationary bike upstairs from the basement and put it in the back porch for him to exercise on. Fingers crossed that he'll use it every day!

Thanks so much for stopping by, and remember to laugh--a little or a lot--every day.

Cheryl

Friday, April 14, 2023

Some shimmery, painted butterflies...


 I have this 3D embossing folder that is so pretty all by itself, but I decided to add just a little more to it. 


I got out my metallic paints and used them to paint just the butterflies. The large butterfly wings were painted with two different colors of shimmery paints, while the small butterflies were painted with a white metallic paint. This gave them a bit of shimmer, but no additional color.

I know that I need some practice on choosing colors and then blending them, but it sure was fun as a first try. I definitely plan to try this again. I just wish you could see the pretty metallic shimmer in the pictures!


I just happened to have this printed sympathy sentiment in my stash, so I cut it to size, matted it and used it on the inside of my card.

My hubs and his brother arrived back in Minnesota a couple of days ago. Mickey was so glad to see my husband, he went absolutely wild when he walked in the door. It took a few minutes to settle Mickey down again, but he's definitely happy to have someone else at home who pays attention to him. 

Thanks so much for stopping by, and remember to laugh--a little or a lot--every day.

Cheryl

Tuesday, April 11, 2023

Hello Sunshine...


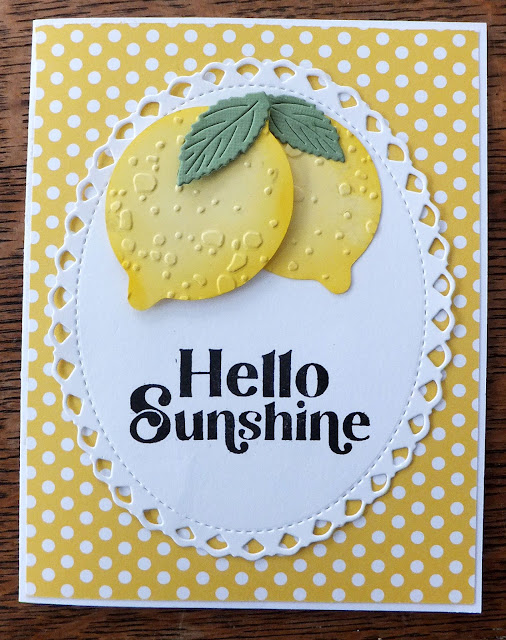
I had cut out a few lemons with my Silhouette for a commissioned card and had some left over, so I decided to make this card.. I added the die-cut fancy oval and a very bold stamped sentiment.


I inked around the edges of each lemon and then embossed them with a randomly bumpy embossing folder.

The leaves were created with some leaf dies in my stash. 

The largest lemon was popped up on foam tape.


I still had a small lemon, so I added that one to the inside of the card along with a stamped sentiment.

I actually still have three lemons left to make another "Hello Sunshine" card, which I hope to get done soon.

This week I have been culling some of the really, really old craft supplies in my craft area. I am either tossing them or donating them. It feels good to get rid of some of it. I had inherited a lot of items when my mother passed away in 1992. I figured if I haven't looked at them in 31 years, it's time to make them available to someone who will appreciate and use them. There were a lot of embroidery kits and craft books that I think someone else will enjoy. I also threw out a large box of dried and fake flowers that I had collected over the years. I saved just one little bunch of daffodils that I put on my dining room table.

Thanks so much for stopping by, and remember to laugh--a little or a lot--every day.

Cheryl

Friday, April 7, 2023

Elegant border Easter card...


I made a few Easter cards like this one. I've had the fancy border die for a long time. It has been really handy for cards like this. The "Happy Easter" sentiment is also a die-cut.


I thought this fancy egg die went well with the border die. I cut it out and then adhered some turqoise  cardstock behind it with a piece of double-sided adhesive sheet cut to the size and shape of the egg. Once I had adhered the fancy die-cut to the backer, I burnished some clear glitter into the open spaces. 

As a final touch I tied a narrow ribbon around the egg and then popped the whole thing up on foam squares.


On the inside I added a computer-generated sentiment.

I hope you all have a wonderful Easter, if you celebrate the holiday. If not, I still hope you have a great weekend with loved ones or friends.

Thanks so much for stopping by, and remember to laugh--a little or a lot--every day.

Cheryl

Wednesday, April 5, 2023

Let's Craft and Create Challenge #194: Anything Goes with the option of Pink & Grey...


Spring has finally sprung, and Let's Craft and Create is back with a new challenge for April. You can, of course, enter the challenge using the "Anything Goes" option, but I have chosen to make a card following the "Pink & Grey" alternative.

When I think of pink and grey, I most often think of baby girls. They always look so sweet in pink and grey. In fact, when my twin girls were little, I loved dressing them in these colors.

I had a baby carriage die-cut in my stash, which had been given to me by a friend long ago. It was perfect to use on this card.

I added some pink vellum behind the hood of the carriage and some darker pink cardstock behind the opening that is the bed of the carriage.
The embossed area was highlighted by using a finger dauber to lightly add some darker pink ink. 

As a final touch, I added three gems--one on the handle and one on each of the wheel centers.

The sentiment was stamped and die-cut, along with a tiny heart, and then popped up on foam tape.

The intricate doily was die-cut (it's one of my favorites!) and then cut in half before being added to the DSP on the bottom of my card front.


As a finishing touch, a little rickrack was adhered to finish off the edge of the DSP.


The inside of the card featured a stamped sentiment and two more of those tiny, die-cut hearts.

I hope you'll play along with our new challenge. I'm really looking forward to seeing other creations in pink and grey. Also, be sure to check out the prize that is being offered. You'll find it here.

Thanks so much for stopping by, and remember to laugh--a little or a lot--every day.

Cheryl


Tuesday, April 4, 2023

Sweet Easter bunnies...


I made four cards like these two for my granddaughters. Isn't that bunny so cute? I cut him out of off-white cardstock and then did a little inking and coloring on all the pieces before assembling him. 

I had printed a whole slew of strip sentiments onto some cardstock last year, so I used most of them on this year's cards. The bunny and the sentiment were popped up on foam tape.


I was also able to use up some scraps of DSP on these cards. I just had to find pieces that had coordinating colors.


And I used up the remaining white butterflies that I had purchased from Dollar Tree long ago.


I added a tiny dot to each eye with a white gel pen to give them a little life.
I found some free Easter egg clipart online to add to the inside sentiment. I liked the way the colors on the front of the cards were among the colors of the eggs.
I enjoyed making these cards, especially since the bunny didn't have too many tiny parts.

Mickey and I have been "batching" it the last week and a half since my hubs is down in Alabama helping his brother. We'll be alone for another week, before the two men make their way to Minnesota. One of Mickey's best attributes is that he LOVES eating the same dog food every single meal. No fancy cooking required! LOL

Thanks so much for stopping by, and remember to laugh--a little or a lot--every day.

Cheryl