Wish List

Tuesday, February 28, 2023

Thank you cards ...

 I needed some thank you cards for my stash and also some to donate, so I made a few of these.

I don't remember where I saw this layout (probably on Pinterest), but I liked it and it was a good way to use up some busily-patterned DSP. 


I picked out three colors in the DSP and die-cut a bunch of skeleton-style leaves.

After running a line of double-sided tape along the top of my card base, I adhered leaves randomly until I had filled the width of the card. Then I adhered my DSP and white punched border that had been stamped with "Thank You."


This card was made using the same process as the first card.


This time I picked the three palest colrs in the DSP for my leaves.


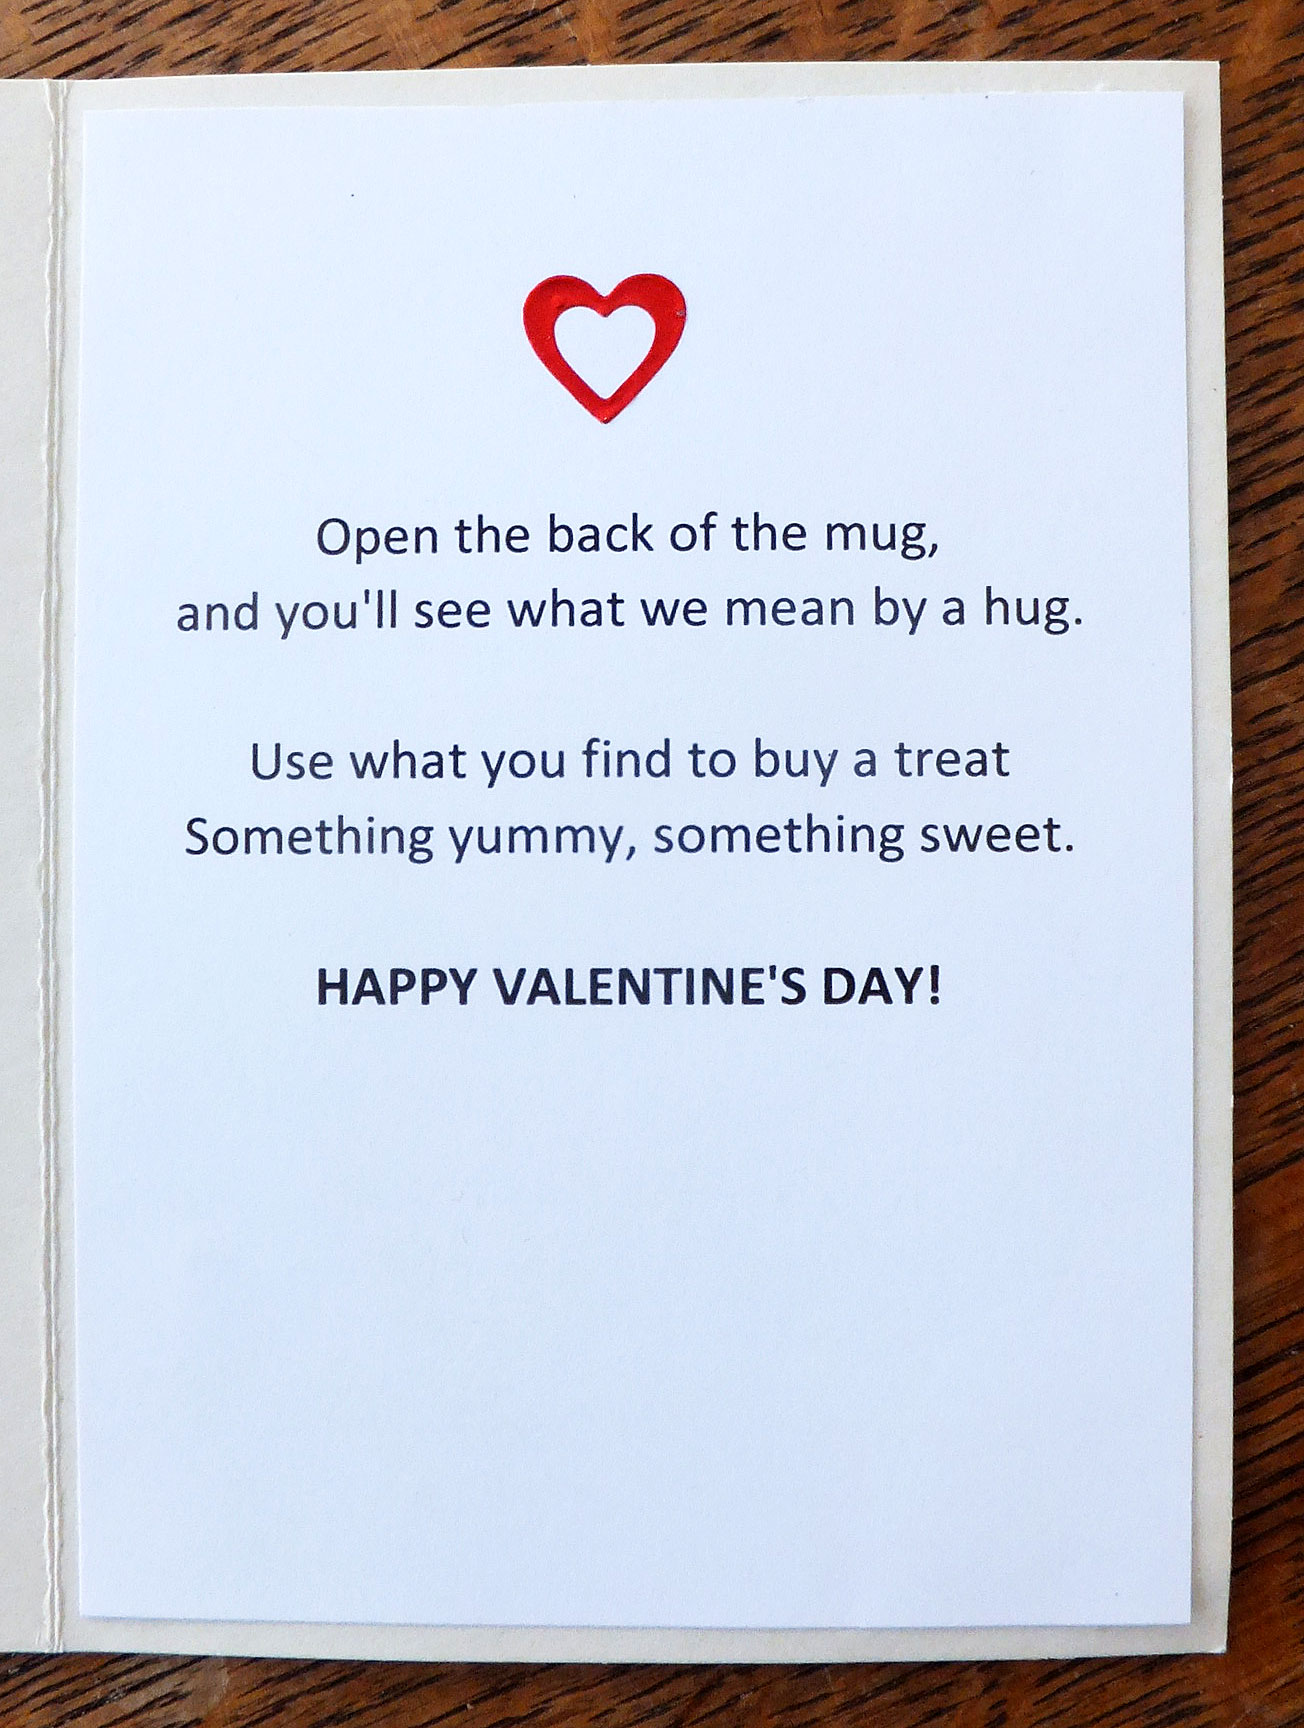
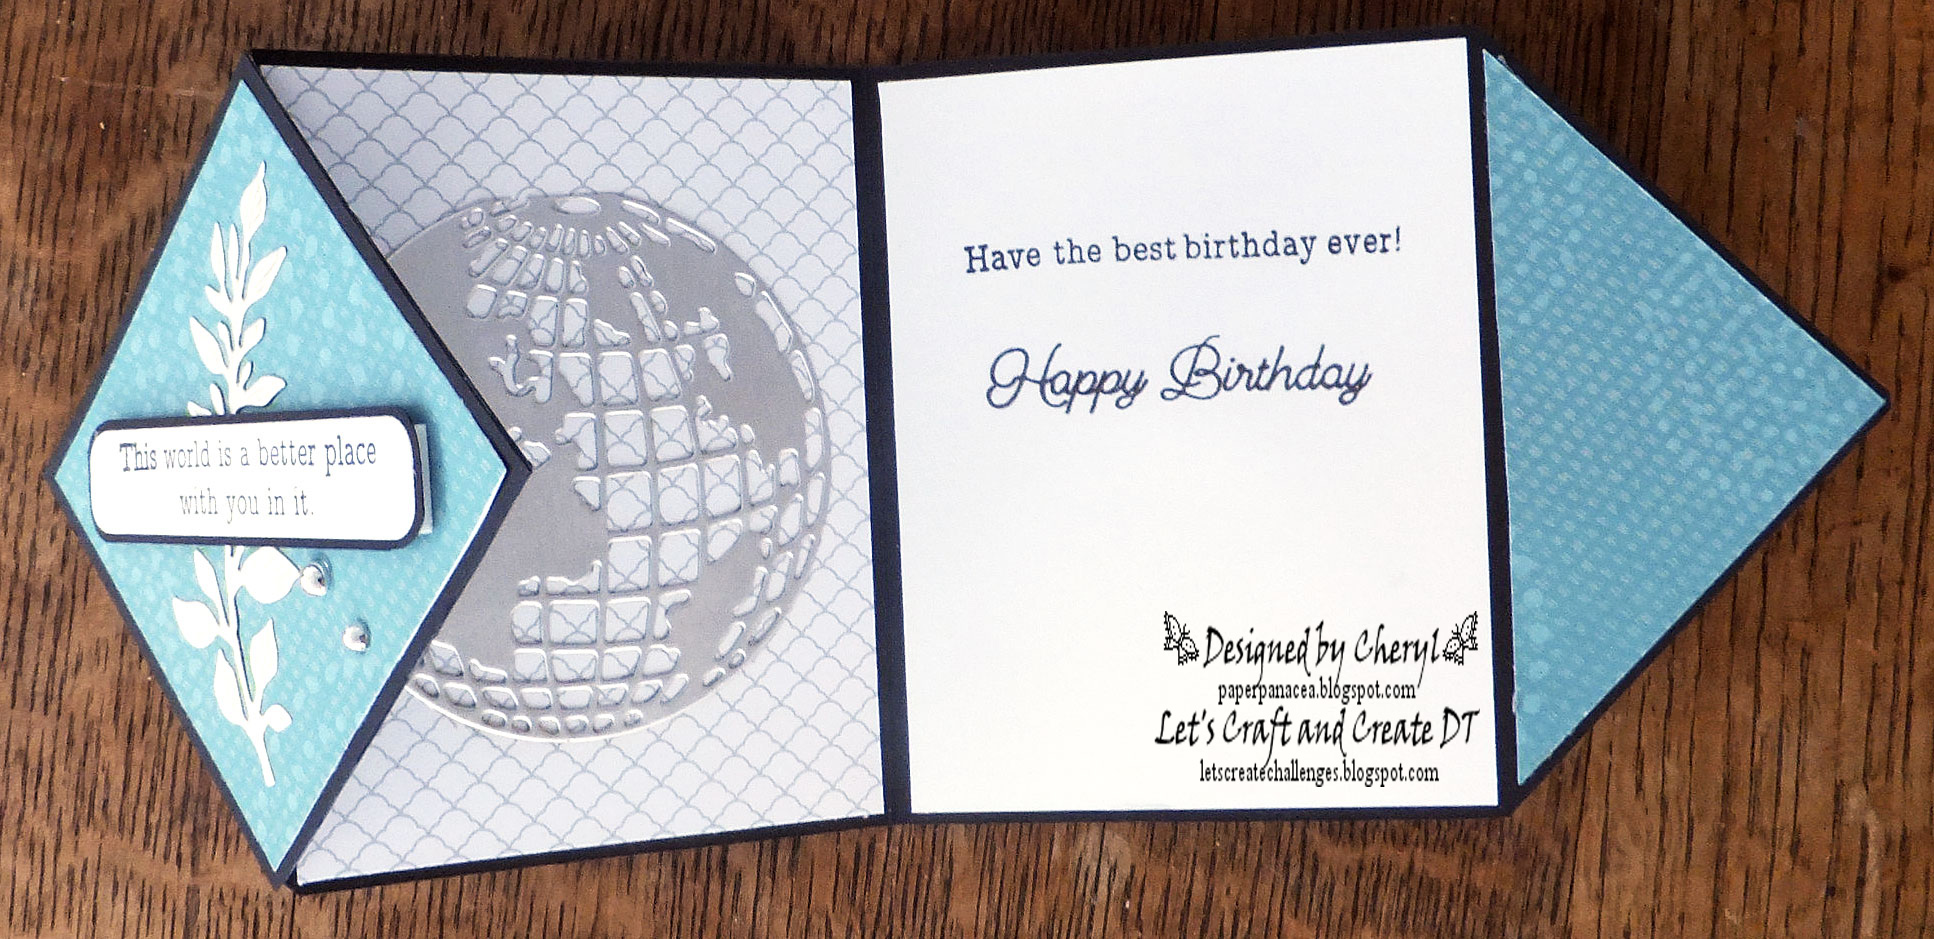
On the inside of each card I stamped a sentiment and added a couple of leaves as an embellishment.

I liked this layout and I'm trying to think of other small die-cuts I could adhere to the top in place of the leaves. Stars or hearts come to mind. Do you have any other suggestions?

I think this layout could definitely be used for other occasions, too. It could even be used for Christmas cards with different colors of jingle bells, for example, across the top. In fact, I may have to give that a try. 

Thanks so much for stopping by, and remember to laugh--a little or a lot--every day.

Cheryl


Friday, February 24, 2023

We always need a few birthday cards...


 This birthday card was so simple to make that I should have made about three more of them at the time. 

I had the "birthday" banner in my card parts, as well as the "happy" sentiment. All I had to do was die-cut a few gift packages from glitter cardstock and adhere them. The dots holding up my birthday banner are some sparkly ones from Dollar Tree. I wish they made them in more colors than the basic rainbow because I really like them. They are a little flatter than an enamel dot, so they don't add "bumps" that require extra postage.


The striped DSP in the background also has some glitter in the whitest stripes that you see in the design, so it's a very sparkly card.

I popped the middle and largest package up on foam squares and added a Nuvo Drop to the center of each bow.


A stamped sentiment was added to the inside. I really like this fun sentiment, especially for children's cards.


This card also uses up a card part. I've had the music-embossed background for ages, and I'm so glad I finally used it.  This card would work well for any music lover.


Both the black music staff and sentiment are die-cuts that have been glued onto the embossed background.


After stamping the sentiment on the inside, I added a few die-cut notes to finish it off.

Both of these cards were donated to the thrift store. I ended up making 17 cards for the store this week.


Well, our snowstorm is over and we ended up with about 13 more inches of the white stuff. The hubs and I spent part of yesterday afternoon out shoveling and snowblowing the walks and driveway. Thank goodness that job is done--for now.

Mickey loved all the new snow, so here's a little pic of him and my hubs standing out on our front walk.

Thanks so much for stopping by, and remember to laugh--a little or a lot--every day.

Cheryl


Tuesday, February 21, 2023

Crazy Cricut robots...

During one of my volunteer shifts at the thrift store, I was tasked with checking out a Cricut machine to make sure it worked well before we put it on the shelves to sell. Since I have had a Cricut for many years, I was familiar with how it worked. I brought it home and used one of my cartridges (Robotz) to cut out a couple of robots. I didn't want it to be a wasted effort, so I made a couple of cards with them.

After assembling the robot's various pieces, I added some googly eyes, silver Viva Decor drops and a balloon that was popped up with foam tape.


The main part of the robot was cut with silver metallic cardstock. I used a few scraps for the rest of it.


This is the second robot that I cut out. They really are fun to put together, but all those hands and arms can get a little confusing!


I again added googly eyes and some embellishments with a silver Viva Decor pen.

I think there are some young boys or girls out there who would enjoy receiving these cards. They were both donated to the thrift store and sold quickly.


On the inside of each card was a stamped sentiment.

Making these robots made me wish I had a bigger crafting space so I could have my Cricut out on a counter, ready to use at any time. But since my space is very small, it's just not possible.

Thanks so much for stopping by, and remember to laugh--a little or a lot--every day.

Cheryl

Friday, February 17, 2023

Balloons are not just for birthdays...

 After my cardmaking friend Shirley (Glittered Paws) sent me a card kit to make a balloon card (featured in this post), I was inspired to seek out my own similar die. It arrived not long ago, and here are a few cards I made with it:

For this card I first cut a card base from some plaid lavendar cardstock to which I added my white die-cut frame with white balloons attached. Then I added some balloons cut from different colors of cardstock (great use for those scraps!), popping up a couple of them. I glued a little piece of white CS behind the die-cut "glare" of each balloon.


The sentiment was one that I had in my card parts. I have popped it up on foam tape.


On the inside I added a couple of die-cut balloons (the die set comes with extra dies for single balloons), along with a stamped sentiment. Here, I simply drew the strings with a black fine-point pen.


I tried the same process again, this time using a black card base. Once again, I cut individual balloons from colored CS and popped up a couple of them. The sentiment was in my card parts and has been popped up on foam tape.

Finally, I tried using the die-cut balloon frame on a larger aqua card base (from my stash). After centering it on my card base, I again cut individual balloons - this time from glitter cardstock. 


As you can see, I created a sentiment with my computer that says "Sending you some get well balloons." 

Three of my glittery balloons were popped up this time.


I added the largest balloon to my somputer-generated sentiment on the inside.

A fun use for this balloon die set, don't you think? I'm going to make a few more of these to donate to the thrift store. Get well cards seem to sell very quickly.


Mickey continues to light up our days with his antics. He has such a sweet disposition, rarely barking and we've yet to hear him growl. He LOVES meeting other dogs and their masters on his daily walks. He wants to play with all of them, even when they aren't "feeling the love." He is definitely going to be a fun companion in the years ahead.

Thanks so much for stopping by, and remember to laugh--a little or a lot--every day.

Cheryl


Tuesday, February 14, 2023

A few Valentines...


I made several Valentines like these for some of my grandchildren. The mug is popped up on foam tape to allow for some space behind it (you'll see why, if you keep reading).

The heart on each mug came from an assortment of 100 self-adhesive felt hearts in pink, red and white that I got at the Dollar Tree.


The sentiment was computer-generated and was also popped up on foam tape.

The sad ending to making these particular Valentines is that I have lost the mug die. It must be somewhere in my crafting area, but I don't know where. I have looked and looked and just can't seem to find it.


On the backside of the card front, I cut some gate-fold doors. Inside these doors is the extra space from popping up the mug which allows just enough room to place a folded $5 bill inside. Once I had inserted the money, I closed the doors with a heart sticker like the one on the mug.


I wrote a short verse to explain that they need to look behind those little doors.

These were fun to make. Now if I can just find that darn mug die!!


This was another Valentine for the Grands featuring a gnome holding one of those felt hearts. I also used a thin die-cut frame. I recently purchased a die that cuts an entire panel of such frames in graduated sizes up to an A2 size. They really come in handy when making cards!


This gnome die set did not have any "hands" to hold the heart, so I just cut two more noses and used them as hands.


Another computer-generated sentiment for the inside.


And this is the card I made for my husband.


Both the circle and the sentiment were popped up with foam tape. My "rope" was held in place with a little double-sided tape.


I added a bit of a lovey-dovey sentiment to the inside. I think he'll like it. he he

We are bracing for rain today which will turn into snow tonight. That always makes for dangerous roads, so I'm glad I just get to stay home and craft!

Thanks so much for stopping by, and remember to laugh--a little or a lot--every day.

Cheryl


Friday, February 10, 2023

"Amazing" cards...


I purchased this "Amazing" die not long ago and decided to make a couple of cards with it to donate to the thrift store. I thought that both of these could actually be masculine cards, even though there's a bit of a frilly edge around my rectangle.

I found a sentiment in my stamps that started with the words "You are." I inked up just the "You are" by putting some washi tape over the rest of it while I applied the ink and then taking the tape off before I stamped. Then I die-cut the two words and popped them up on foam tape.

I used the same process for  the stamped portion of the sentiment on this card, too. 

The enamel dots were added with a bit of liquid glue, even though they are self-adhesive. I have found that they don't stick as firmly as I'd like them to, so now I always add a drop of glue to hold them in place.


On this card, the word "Amazing" was cut from some metallic blue cardstock. 

You may have noticed that I cut the little extra flourishes off the die-cut on the first card, but left them on for this card. Do you see them?

I stamped a fitting sentiment on the inside of each card to finish them.

I like having a few dies on hand like this "Amazing" die, because they give me the ability to make a card very quickly if I need to. I plan to think of a few more sentiments to work with it, like "You're thoughtfulness is Amazing," "To my Amazing friend," "To an Amazing couple," etc.

Thanks so much for stopping by, and remember to laugh--a little or a lot--every day.

Cheryl

Tuesday, February 7, 2023

Commissioned Valentines...

One of the thrift store customers who has purchased some of my cards there asked me to make three special Valentines for her family members. She also gave me personal messages to add to the inside. I won't share those, as they are quite personal, but I'm happy to share the card fronts.

This card was made for her daughter. It's a little hard to tell, but the mailbox is cut from some silver metallic cardstock that is a kraft color on the other side. I cut the post from the backside of the silver, which worked perfectly.


The word "love," made from self-adhesive gems, is from a sheet of gem stickers that all spell love. Sometimes it's hard to think of ways to use stickers like this, but Valentines are one of the perfect opportunities.


This Valentine was made for the customer's son. Both children are young adults, but I thought the X-O DSP and the tic-tac-toe game still worked for a masculine card. 


The little hearts and the sentiment were cut from some red foil. It has a nice, reflective shine without being sparkly.


This Valentine was made for the customer's husband.


Once again, I used some red foil for this heart die-cut. I backed it with the same color of cardstock that was embossed for the card front. The heart was then popped up on some foam squares.

I also used the same silver cardstock for the arrows that I had used for the mailbox on the first card.

I didn't put a sentiment of any sort on the front. I felt her sentiment on the inside said exactly what she wanted to say, and nothing more was needed.

I am sometimes stymied when trying to come up with new card ideas for people I don't know, but these actually came together pretty quickly. 


My DH has had to leave town for the rest of the week, so I am in charge of Mickey, our new furry family member. DH started walking him at least twice a day, so I guess I'll have to keep that up. Looks like I'll be getting my exercise, too!

Thanks so much for stopping by, and remember to laugh--a little or a lot--every day.

Cheryl

Sunday, February 5, 2023

Let's Craft and Create Challenge #192: Anything Goes or Say What? (Use a sentiment)...


It is a cold winter day in Minnesota--all the better to stay inside and craft! We hope you will join in this month's challenge at Let's Craft and Create and submit your creation, whether you've selected "Anything Goes" or "Say What?" as your inspiration.

I went with the "Say What?" option and made a card with a prominent sentiment.


This is such a fun card to make. It's called a diamond flip fold. If you would like to watch a tutorial, click here for some easy-to-follow instructions.


I made this card for my son's birthday. He is the superintendent of a residential school for the blind and visually impaired in Washington state, so he's definitely working hard to make this world a better place for the students he serves.


The diamond shaped portion on the front of the card can actually flip back and forth when you open the card. I adhered a die-cut of a world globe on the inside to go with the theme of my card.

The right panel was perfect for another sentiment.

This picture shows the card fully opened. It's such a fun design, so I hope you'll give it a try--and enter the results into our latest challenge at Let's Craft and Create. If special folds like this are not your thing, take a peek at all the inspiration from the rest of the Design Team on the LC&C site.

Thanks so much for stopping by, and remember to laugh--a little or a lot--every day.

Cheryl