Wish List

Tuesday, May 30, 2023

80th birthday card...


My oldest sister's DH celebrated his birthday a couple of days ago. This is the card I made for him.

I have a new humorous stamp set and used one of the sentiments for this card. I also used a "Bird Crazy" bird to continue the comic nature of the card.

As I was putting together my card front, I tried to add some enamel dots to the corner, but didn't get them straight. When I tried to carefully pull them off, they ripped off part of the paper. I certainly didn't want to start over, so I pulled out my decorative corner dies and used the one you see here to cover up the "boo-boo" I had made. As you can see, I still ended up adding three tiny enamel dots to the decorative corner.


Before die-cutting the bird, I colored him with alcohol markers. I also added a little Glossy Accents to his eyeballs. I love using Glossy Accents, but mine is getting hard to use. The last quarter of a bottle has gotten so thick that I am having a hard time squeezing it out. I read that it is water-based and you can add water, a drop at a time, to thin it out. I may try that. I'll let you know if it works!

Both the bird and the sentiment square were popped up on foam squares.


The inside sentiment came with the same stamp set. I thought it was a nice finish to the card.


I was actually able to visit with my brother-in-law on his birthday, as we were both at the same graduation parties (two of them!). He said he really enjoyed the card, so I was pleased.


Besides attending two graduation parties this past weekend, we also attended the graduation ceremony for our grandson Max. This is a photo of him with his family in front of his high school. We're so proud of him and wish him well as he prepares to head to college in the fall. I will share the card I made for him in another post.

Thanks so much for stopping by, and remember to laugh--a little or a lot--every day.

Cheryl


Friday, May 26, 2023

More fun with colored pencils...


I had this image from Bugaboo Stamps in my card parts for *ahem* years. It was time to color it up and use it on a card. I pulled out my Prismacolor Pencils and mineral spirits and finally finished it. 

I cut it out with a cross-stitch rectangle die and popped it up on dimensionals. I also popped up my stamped sentiment banner. The three red dots you see were made with a Viva Decor pen.

I was able to use up a snippet of red-striped DSP on this card, too. I always wonder why I save narrow little scraps--until they are the perfect piece for a card like this.


The Prismacolor Pencils make coloring so easy. I'm truly grateful to my friend Lynette for introducing me to them. I've long struggled with coloring, sometimes doing okay and other times simply tossing my failed efforts in the trash. I think there will be fewer failures now.


I turned this into a get well card by stamping the inside with the sentiment you see here.

This card was donated to the thrift store. And speaking of the thrift store, I volunteered there for five hours yesterday. While I was going about my duties, one of the cashiers told me how much the customers enjoy buying the cards I bring in. She said that one particular lady told her that she comes in every week just to check out the handmade cards, and today she bought six of them!

I want to say a public THANK YOU to Lynette for also donating cards for me to bring to the thrift store. She has donated hundreds (yes, hundreds!) of cards, and they are so appreciated.

Thanks so much for stopping by, and remember to laugh--a little or a lot--every day.

Cheryl

Tuesday, May 23, 2023

Birthday card for a sweet granddaughter...

I have a granddaugter who is just finishing up her second year of college, and this is the birthday card I made for her. It's a slimline center-step card. I've made center-step cards before, but never a slimline one.


Here is a picture of my granddaughter with her boyfriend, taken at a college swim meet. They were both on the swim team.

This card was a little tricky to cut, score and fold just right, but I managed it in the end. I was going to add some complimentary DSP for the narrow side pieces, but I decided that might make it look too busy. But looking at these photos, I wish I had used some subtly patterned red paper on each side. I think that might have looked nice. 


As you can see in this picture, I've inked around the edges of my scalloped panel and popped it up on foam squares.

The cherries were cut with a neat little die set that I've had for a while. I added some clear Nuvo Drops to the embossed areas on each cherry. It gives them a nice little shine.


On the inside, I added another scalloped panel that had been stamped with a birthday sentiment. I cut the cherries out again, split them into two separate cherries and adhered one on each side. The cherry stem on the left is actually the back side of the die-cut (so I could get it to face the opposite way). The red parts of the cherries are perfectly symmetrical, so I cut the cherry fruit and leaf and glued them to the back side of the stem. No one will be the wiser!

My granddaughter told me she loved this card, which is the best compliment I can get. She also told me she has saved all the cards I have made for her over the years. I was so very pleased. I guess we never know how our cards affect those who receive them. Most of us take for granted that a great many--probably most--of our cards will just be thrown away.

Thanks so much for stopping by, and remember to laugh--a little or a lot--every day.

Cheryl


Friday, May 19, 2023

A commissioned wedding card...

 During my crafting day at Lynette's (My Stamping Addiction) home, I used one of her pretty embossing folders.  Then I pulled out my metallic waterpaints and painted the central image. I was really pleased with the results.

The metallic paints have such a beautiful sheen, and I was able to get a bit of shading on my flowers by using a couple different shades of each color.

After cutting the panel to size, I matted it with some brushed silver metallic cardstock. I cut the sentiment out of the same sislver cardstock and layered it onto some matching white die-cuts to give it some dimension.


As a final touch, I glued on a few iridescent sequins. 

As soon as I saw how pretty the image turned out after painting it, I decided it would be perfect for a wedding card that I had been commissioned to make. 

An older (70+ years old) couple is getting married, and I thought they would appreciate the traditional simplicity of this card.


On the inside, I printed a wedding sentiment on a piece of vellum and adhered it only at the top, underneath the scalloped border. That border is actually cut from the same silver caradstock that was used on the front. I'm not sure why it looks so yellow in the photo. It might be reflecting a color in the room where I was taking the photo.

Thank you, Lynette, for your help with this card. It was your willingness to let me use your embossing folder that made it possible! 

Thanks so much for stopping by, and remember to laugh--a little or a lot--every day.

Cheryl

Tuesday, May 16, 2023

You're off to great places...


Talk about an easy graduation card to make! This is one of those five-minute cards. I have the graphic for the front in a Word file on my computer, and I just print it out so that it can be cut to size and put on an A2 card base.

I don't remember where I got the graphic (at least a year ago!), but I think it was a freebie on someone's blogsite. 


I have a die set to cut out the mortar board hat with its gold tassel. It's popped up on a couple of foam squares, but the end of the tassel is glued directly to the card front so that it doesn't accidentally get torn off.


My word file contains two card fronts and two card interior panels with the sentiment you see in the photo on the right.

Last night I printed out two more of these to make for the thrift store to sell. I'll be taking them, along with an assortment of other cards, to the store this week.

As I was creating this blog post, I wondered why the graduation cap is called a mortar board. That's really a funny name for this strange looking hat, don't you think? 

Nowadays, it's easy to find out all kinds of trivial information by Googling it, so that's what I did. I found that it's called a mortar board because it is shaped like the board that brickmasons use to hold their mortar. 

Then I thought, "But why is there a tassel?" Once again, the internet offered the answer. Graduation tassels date back to the 14th century. European universities used tassels to indicate different levels of academic achievement. This symbolism has now been given to honor cords which are hung around the neck and draped over the front of the graduation robe. But the tassels remain on the mortar boards.

Thanks so much for stopping by, and remember to laugh--a little or a lot--every day.

Cheryl

Friday, May 12, 2023

Having fun with layering stencils...


I recently purchased a set of layering stencils that create this pretty spray of flowers. I decided to use it to make some Mother's Day cards to donate to the thrift store. 

I began making this card by cutting a panel of white cardstock, stamping my sentiment, and then using an A2-size die with a pierced design to add a little interest to the background. Once my pierced panel was adhered to my card base, I was ready to create my spray of flowers.

I chose some bright, spring colors, using a couple of shades for each color. I placed a square of cardstock in the corner of my stamp positioner and then nestled each of my stencils into the same corner, to keep everything properly lined up.

Once it was all inked, I cut it out with the coordinating die and popped it up with foam dimensionals.


I printed out some sentiment panels with my computer and added one to the inside of each card.

Do you enjoying using stencils? I think I like it so much because it is a quick and sure way to get a pretty image, and with just a little prep work, you can easily make multiples of the same card.


My DH and I had a bit of a date night on Wednesday. We had dinner at a favorite outdoor restaurant that is located in a beautiful park very near to us. The restaurant is called SeaSalt and serves mainly fish and seafood, which I love! I had the Thai Shrimp Curry and my DH had a Crawfish Po'Boy. A very short distance from the restaurant is an iconic Minneapolis waterfall, and I just had to take a photo of it.

We've had a fair amount of moisture during the winter and spring months, so the water was really rushing over the edge. I love the sound of its roar as it crashes into the pool below.

Thanks so much for stopping by, and remember to laugh--a little or a lot--every day.

Cheryl


Tuesday, May 9, 2023

Fun with a fellow crafter...

Fellow crafter and fabulous cardmaker, Lynette, owner of My Stamping Addiction,  invited me over for a crafting playdate a short while ago. We had such a good time, and I wanted to share a few of the things we created.

I brought an NBUS stencil with me to Lynette's house and gave it a try whle I was there. Once I got home, I found I had this little framed tag that was just the right shade of blue. I adhered my stenciled panel to a blue card base and then added my tag with some dimensionals.


The letters were from a glittery self-adhesive alphabet that was in my stash. They were just the right size to put "thanks" on the tag.


Lynette stamped this image for me and then I colored it using her Prismacolor pencils and Gamsol. It was so easy and fun to use these pencils that I ordered some the very next day!


Here's a closer look at that pretty image of a flower. I think it looks like a peony-one of my favorites!


Lynette also showed me how her Glimmer foiling system worked. She foiled this image for me and I colored it with Prismacolor pencils at home. I didn't have any Gamsol, but I did have some odorless mineral spirits, and that worked well.


I did my best to angle my card so that you could see how beautiful the foiling is. Lynette foiled this same image for me in silver, and I'll be coloring that one very soon. I just have to decide what color roses I want.


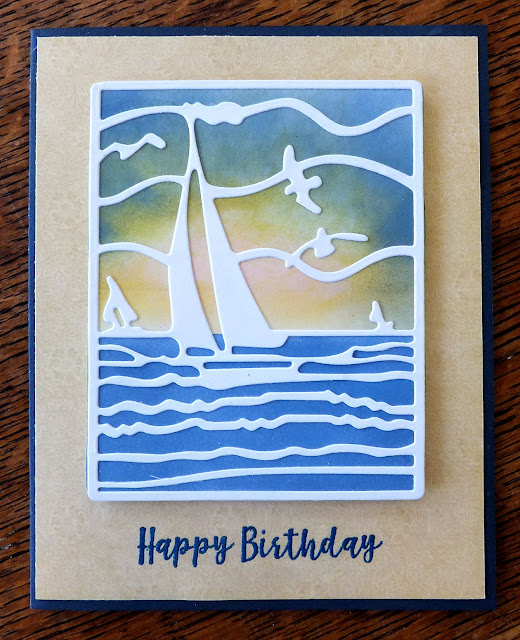
Both Lynette and I used this die to cut out a few sailboat scenes. I added an ink-blended panel behind my die-cut and popped it up on a card. The sentiment was heat embossed.


I could have done a better job with my ink blending (my sky looks like a storm is brewing), but there will be lots more chances to use this die in the future. I think it makes a great masculine card, and I've already sent out two cards very similar to this one.


Finally, I took along a little card kit for each of us. The card we made was an Angled Tri-fold Card. Click here to see a video with all the details for this card. We put together the basic card at Lynette's and then I added the flowers and sentiments later.

Here's how the card looks when it is fully open. It's a fun card to make, and it looks a lot more difficult than it is. It's also a great way to use up some DSP.

We did much more than this, and I'll be sharing more results with you in the near future. Mostly, we each made some card parts to feature on cards that we would put together later. And I don't think we stopped talking the whole time we were together! We have found that we have a lot in common. We even have daughters who are the same age with the same first name!

Thanks so much for wading through this long post, and remember to laugh--a little or a lot--every day.

Cheryl

Friday, May 5, 2023

Let's Craft and Create Challenge #195: Anything Goes or Ribbon, Lace, Twine (Use all or some)...


 Happy May, everyone! It's a new month and a new challenge at Let's Craft and Create

I have opted to create a vintage card for this challenge, using some dark green twine, a bit of burlap and lots of inking. A wonderful cardmaker and friend, Donna, of DesignByDonna.blogspot.com sent me several vintage background panels (Thank you, Donna!!) and I have used one of them as the background for this card.

My sentiment was cut three times and layered together for dimension. I inked the edges before gluing it to the background panel.


To achieve the scalloped edge on my burlap, I first put some strong double-sided tape on one side of it to keep it from fraying. Then I used a scalloped border die and my Big Shot Plus to cut the edge. It didn't cut all the way through the burlap and the tape, but it cut well enough that I was able to easily finish it with a scissor. 


The flower was created by die-cutting three layers of petals out of  pale pink cardstock and inking the edges before attaching them in the center with a tiny brad. The leaves were cut from a dark green cardstock that matched my twine.

I added a delicate butterfly, cut from heavy vellum and inked around its edges. As you can see, I couldn't resist adding a tiny bit of sparkle with two pale pink gems for the butterfly's body.


My off-white inside panel was inked around its edges, and I added a two-layer flower similar to the three-layer flower on the front.

I opted to use a gray ink for my stamped sentiment, to keep the coloring of this panel as subtle as the coloring on the card front.

I hope you'll join in the challenge with a creation of your own. For inspiration, check out what the Design Team has made at Let's Craft and Create.

Thanks so much for stopping by, and remember to laugh--a little or a lot--every day.

Cheryl

Tuesday, May 2, 2023

Beautiful stickers from Dollar Tree...

I always check out the craft items at Dollar Tree when I stop in there. One day, not long ago, I found some beautiful flower stickers. I believe there were 9 or 10 of them on the sheet. I've looked for more of them since, but they haven't been in stock. It's always hit or miss when shopping there.

I cut some DSP at an angle, die-cut a fancy border and added them both to a white card base. 


The stickers were made of a very thin plastic that had been embossed with the petal design. They had a translucent quality that made them especially nice.


I stamped and die-cut the sentiment before popping it up on foam squares.

As a final touch, I added three sparkly gems.


In this photo, you can see how you can see through the petals.


I think this was my favorite of the whole bunch. It's hard to capture how delicate it looks in a photo.


The inside of each card was rather plain with just a stamped sentiment.

So now for a little "news from home." I am happy to announce that my rhubarb has finally poked its chilly, frilly little leaves out of the ground. The weatherman is promising warmer weather in the days ahead, so I'm holding him to it! And I'm looking forward to some fresh rhubarb sauce. My DH doesn't even like it, so I get it all to myself. I also love rhubarb kuchen, rhubarb bread and rhubarb cake. Once, when I was in Germany, I had rhubarb yogurt. It was SO delicious!

Do you grow rhubarb? My plants came from my great grandparents. Root cuttings were handed down until they got to me and I've handed some down to one of my daughters, too.

Thanks so much for stopping by, and remember to laugh--a little or a lot--every day.

Cheryl