Wish List

Sunday, June 12, 2022

Pretty peonies and a sympathy card...


 Not long ago, I picked this bouquet of peonies from the plants beside our front steps. They are so full and pretty. I can't resist bringing bouquets of them into the house. We added two new peony plants this year, and I am looking forward to having even more flowers from which to make my bouquets next spring!

I also had to make a sympathy card recently, as our son-in-law's father passed away. He was a lovely man whom we had gotten to know over the years. We even stayed with him and his wife in Vermont when we were on an East Coast trip. We are so sad that he will no longer be with us, and I wanted to let his wife know how much we cared.

I started out by stamping my image onto a white slimline panel, using a light-colored ink. I had tried stamping it with black ink, but I didn't like the result. I thought the lighter ink was much better. Then I laid down a base of color on the flowers and leaves with alcohol markers.


I used colored pencils to add more shading, depth and detail. Some pale blue chalk was smudged around the edges of the flower spray, and at the last minute, I used a gel pen to add the light gold you see at the base of each tiny gold flower.

The sentiment was stamped onto the lower righthand corner, and the panel was added to a lilac cardbase.


Another sentiment was stamped on the inside, leaving lots of room for a personal message.

We are still working on getting our yard in shape. I planted more annual flowers recently, and my husband planted another grape vine. I love being able to use the grapes to make grape jelly in the fall.

Thanks so much for stopping by, and remember to laugh--a little or a lot--every day.

Cheryl

Tuesday, June 7, 2022

Ink-resist baby card...


I have a selection of ink-resist papers from Stampin' Up in my stash. I cut some pieces from one of the sheets and inked them with some pretty pastel inks.

The middle piece was cut from plain white CS and dry-embossed using the Swiss Dots embossing folder.


I had a few baby-themed stickers in my stash and used two of them on this card--the purple heart and the buggy. The little plastic hearts were selected from some that my sister sent me. They have texture and tiny scalloped edges and are very cute IRL.


The sentiment on the inside was stamped. It's from the very first "welcome baby" stamp set I ever purchased.


While I was in the mood for making baby cards (and using up some more of those stickers), I made two more.

The little baby jumper sticker is made from felt. I love the rickrack trim and the two tiny buttons.


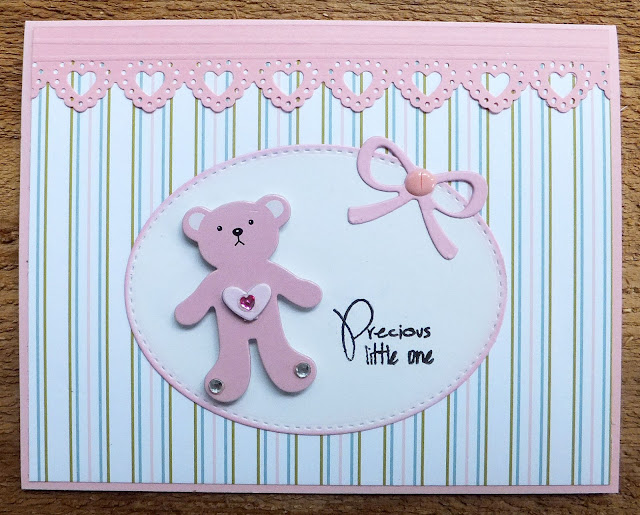
For this card, I used a Martha Stewart border punch for the scalloped heart trim across the top. I added a couple of scored lines to give it more dimension.

The oval was inked along its edges before I added the bear sticker, die-cut bow and stamped sentiment.

These last two cards had stamped sentiments inside that were exactly the same as the first card I shared with you today.

My seeds for green onions and zucchini have finally sprouted. We are desperately trying to keep the rabbits from eating all the new shoots. They can be so destructive! They are even eating the new shoots off of our climbing rose bush. We have tried scattering moth balls around and sprinkling hot pepper sauce on the plants. If you have any tried and true methods for keeping those critters from eating your garden plants, please let me know.

Thanks so much for stopping by, and remember to laugh--a little or a lot--every day.

Cheryl

Sunday, June 5, 2022

Let's Craft and Create Challenge #184: Anything Goes or A Penny for your Thoughts (use a sentiment)...

The alternate challenge this month at Let's Craft and Create was an easy one for me: A Penny for your Thoughts (use a sentiment). I almost always put a sentiment on the front of my cards, but this time I decided to look through my dies for a sentiment that could also work as part of the design of the card. I found a rather large border die that would be perfect! The border design includes the sentiment, a dotted line beneath it and a series of leafy flourishes below that.

I happened to have some pink and yellow plaid paper on my desk, so I set that aside to use as a background for my die-cut card front. Then I used my border die on the front of my yellow slimline card base.

Once cut, the front of my card base was glued to the plaid cardstock with some spray adhesive.


I used the border die to cut the phrase "Thank You So Very Much" from pink cardstock, too. Then I glued the pink letters into the letter spaces on the yellow cardfront. I also added some pink gems to the leafy flourishes beneath the sentiment.


Finally, I die-cut a flower twice, inked its edges, and added a yellow center and some of the same gems I had placed on the leaf flourishes. The petals of the top flower have been raised with tiny foam squares placed underneath them. I love the dimension this adds.

I also cut a white leafy flourish, using an old die that I have had for years, as a base for my flower.


The inside of my card had a simple sentiment stamped with pink ink.


Now it's your turn. There is some amazing inspiration on the Let's Craft and Create site. The projects made by the Design Team are outstanding! Don't forget to check out this month's prize giveaway, too.

Thanks so much for stopping by, and remember to laugh--a little or a lot--every day.

Cheryl

Friday, June 3, 2022

A few Father's Day cards...

 I have been making lots of Father's Day cards, as they are selling well at the thrift store. Here are three more of them:

I had a retro, die-cut automobile in my card parts, so it was time to put it on a card. I cut a stitched oval, inked its edges and glued the car to it. The oval was added to the card front with foam squares. 

Then I die-cut the letters for DAD several times and stacked them to add some dimension. The rest of my sentiment was printed with my computer and popped up on foam tape.


This photo gives you a little better idea of how everything has been popped up.


My inside sentiment was also a card part, left over from making Mother's Day cards. I decided it worked just as well for a dad, so I used it on the inside of this card.


This card was super quick and easy. I first used a background die on a light blue panel of cardstock to create the look of stars in the sky. Then I did some ink blending around the edges of the top and sides. Finally, I added a double-sided adhesive sheet to the back side and then rubbed clear glitter into the tiny holes for the stars. 

To finish, I die-cut my street scape, added some yellow CS behind the windows and adhered it to the bottom of my blue panel before adding it to my cardbase.

The sentiment was stamped, die-cut and popped up on foam tape.


The inside sentiment was done with my computer. Easy, peasy!


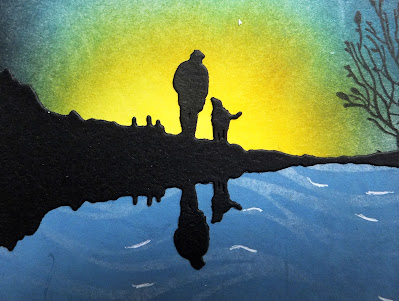
This was another quick card. I did some ink blending on a light blue piece of CS to create a sunset (or is it a sunrise?). I also ink-blended my "lake" beneath my sky. I stamped some foliage on the right hand side, masking off my water, then I glued my black die-cut across the panel where the sky and water meet.

I used a wave stencil to add some motion to my water and finished it off with a few marks made with a white gel pen.

The entire panel was matted with black and glued to a white card base.

The sentiment was printed and popped up on foam tape.


I used a stamp set to create the inside sentiment.


This week I am pet-sitting for my daughter's dogs and cats. It's not a hard job, but it does require that I stay at their house so that I can let them out in the night or wee hours of the morning, as needed. I don't mind helping out, but it definitely cuts into my crafting time. 

We're also finalizing the design for our new kitchen. I can hardly wait for them to get started! It'll be a great excuse to forego a lot of cooking and to patronize the local restaurants. I'll also have an excuse to not clean the house. "What's the use?" I'll say. "It'll only get dusty and dirty again with all the workmen here."

Thanks so much for stopping by, and remember to laugh--a little or a lot--every day.

Cheryl

Tuesday, May 31, 2022

Cards that are for the birds...


I've been consciously trying to use up the card parts I have accumulated over time. For this card, the lacy die-cut and the label for my sentiment were both in my card parts pile. The bird was a sticker from a sheet of birds with different colored wings that I've been trying to use up.

It felt good to use all three of these items on a single card.


The bird stickers were a really good buy, and I've used them on numerous cards. But it was time to use them up!

I stamped the sentiment onto my label and popped it up on foam tape before adding my bird, which was also popped up on a dimensional.


The inside featured a stamped sentiment, and that finished my card!


I had just two bird stickers left, so I decided to make a couple more cards. This one features the bookbinding fold. The black with polka dots is actually the reverse side of the aqua blue floral pattern. The sentiment was a die-cut--one of my favorites. I liked this card so much, that I decided to make another one.

This card was made exactly the same way; I just put the bird on the other side of the sentiment. I also changed where I put the little heart in the sentiment.


I have looked for more of these bird stickers at the Dollar Tree, but haven't found any. I thought they were so cute and the perfect embellishment for cards like this. There were 9 or 12 on a sheet and the wings were made from aqua, pink and yellow glitter CS.


The inside of each of these cards had a stamped sentiment which made them both get well cards.

We have had thunderstorms off and on during the Memorial Day weekend, so we have not spent a lot of time outside. The rain was welcome, though, for all our newly planted flowers and vegetables. Now we just need a little sunshine to help them grow!

Thanks so much for stopping by, and remember to laugh--a little or a lot--every day.

Cheryl

Friday, May 27, 2022

Those Dollar Tree stickers are coming in handy...

 A couple of months ago I purchased some metallic gold stickers at Dollar Tree. I thought they would be useful in making quick cards for the thrift store. They turned out even better than I expected!

This is a mini-slimline card with three apertures in the top layer. I simply added a sentiment and some of those gold stickers to the apertures. 

Although you can't see them unless you enlarge the photo, there are gold specks in the DSP of the top layer, so the gold stickers coordinate well.


The stickers are very dimensional and add some additional metallic shine to the card.


On the inside, I stamped one of my favorite birthday sentiments.


I also made a couple of Mother's Day cards with these stickers:

The sentiment on these two card fronts was heat embossed with gold embossing powder. The top layer on all three of these cards was popped up on foam tape, which added some nice dimension.


In this photo, you can definitely see how that top layer is popped up.


I stamped a simple sentiment on the inside.

I was pleased that all of these cards sold quickly at the thrift store. Even though they were super simple to make and used some inexpensive stickers, I thought they turned out nicely.


I am looking forward to the weekend. The weatherman has said we can expect some spectacular weather. That means I may not get much crafting done. I still have a couple of outside projects to complete, so, hopefully I'll get them done.

If you live in the U.S., I hope you are able to enjoy this long Memorial weekend. I also hope the weather is spectacular where you live!

Thanks so much for stopping by, and remember to laugh--a little or a lot--every day.
Cheryl


Tuesday, May 24, 2022

Some Father's Day cards...

My dad passed away in 2000 and I still miss him, but I continue to make Father's Day cards to donate. I always think of Dad while I'm crafting away. When I was a little girl, he would play his guitar and ask me to come and sing with him. He played country western songs, so I learned the words to many of them. I surprise myself by still remembering them when I hear them nowadays.

One of Dad's favorite stories about me was when I was a little girl--only 2-3 years old--I was in the narthex of the church with my siblings, waiting for church to be out when I saw my dad up on the altar singing with the choir. I thought it must be time to sing with dad, so I began walking down the aisle towards Dad singing "Don't Let the Stars Get in Your Eyes, Don't Let the Moon Break Your Heart," as loudly as I could. And I had little bells on the laces of my shoes for my accompaniment! My Dad always said he was very embarrassed, but I bet he thought it was kind of cute, too.

 Here are a few of the Father's Day cards I have made:

This was one of those easy-peasy cards where I used my Silhouette to trace a clipart golf card and cut it out. I simply added some rolling hills from my scraps, a few clouds with a stencil and a stamped sentiment. Oh, yes, and an enamel dot in the center of each wheel.


I created a computer-generated sentiment for the inside.


The thrift store had given me some partially used shell stickers and some 3-circle-aperture card bases, which were white. I started this card by covering the front of the card with a brown plaid paper.  I added one of the shell stickers and my sentiment which was printed and then popped up on foam tape.

I added some brown glitter alpha stickers from my stash to spell DAD in the apertures, after putting some DSP on the inside of the card.


Here's what the card looks like on the inside, with its printed sentiment. 


You may remember the counterpart to this card that I made for Mother's Day and shared in this post.  It sold immediately in the thrift store, so I decided to make a similar one for Father's Day since I already had the die set. 

I started by using a scrap of DSP that resembled a water-colored background in shades of yellow. I dry-embossed it and then added my die-cut letters for DAD, my hero figure and a few holographic stars. The hero figure was cut from white cardstock and colored with alcohol markers before assembling. It's a little fiddly, but really fun to see him come together.


The sentiment on the inside of the card was printed with my computer.


My DH and I worked out in our yard all afternoon yesterday. We were exhausted by dinner time! We did get a lot of planting done, though, including some peony bushes. I absolutely love peonies, so I'm excited for the new ones to blossom. They may not produce flowers this year, as it's a little late to be planting them, but I'm just happy they're in the ground. I also planted a lot of annuals and mowed the grass for the first time. Hubby can't do it yet, because he is still recovering from his knee surgery, and I don't want him to have any setbacks. It feels wonderful to have the outside work under control.

Thanks so much for stopping by, and remember to laugh--a little or a lot--every day.

Cheryl