Wish List

Tuesday, January 31, 2023

A couple of Christmas tree cards...


 I am trying hard to continue making Christmas cards so that I don't feel panicked about them come the end of November. I have a die that cuts a tree on the front panel of a card as shown in the picture above. I decided to use it to make a few cards.

For this card, I adhered a white panel beneath my card front to add more sturdiness to the die-cut. Then I cut all of the stars from gold metallic cardstock and glued them in place. They helped tie in the gold heat-embossed sentiment on the top left.


The stars also added a little spakle to my card. I love a little sparkle!


The inside sentiment was also heat-embossed with gold embossing powder.


On my second card, I backed the die-cut area with green vellum, which I carefully fussy cut to match the right edge. The white panel was matted with gold metallic CS and adhered to the right side of my card.  My stamped and heat-embossed sentiment fit perfectly in the upper right corner.


I stamped and heat-embossed a couple of hanging ornaments on the left side to add some balance on the inside of my card. 

As you can see, there is plenty of room to write a note and sign the card.

While I like the look of the first card best, with its inset gold stars, it was very time-consuming to cut and adhere them. Any ideas for what else I can do to add a little sparkle? 

Thanks so much for stopping by, and remember to laugh--a little or a lot--every day.

Cheryl

Friday, January 27, 2023

Two cards from one cake...

 One of my 12" X 12" paper pads had a sheet in it that had a very tall, many-layered cake on one side of it. I looked at this particular sheet everytime I searched the pad for something to use on a card, and I wondered how I could ever use it. Well, it finally came to me that I could fussy-cut the cake and divide it into two cakes. Here are the cards I made with my divided cake:

This is  the top part of the cake. It didn't have any candles on it, so I cut some using part of another die set and added them. The Happy Birthday sentiment is also a die-cut that has been adhered to the bottom two layers.


The candles were glued directly to the card front, but the cake was popped up on foam tape.


On the inside, I stamped a sentiment.


This is the bottom half of the cake on a slimline card base. This time I adhered the cake and its candles directly to the card front.


On the inside of this one, I added a stamped sentiment and some stamped candles at the bottom.

I was pretty pleased that I had figured out a way to use the entire cake!

We will be having family over for dinner on Saturday night to help me celebrate my birthday, which is today. We're going to order Chinese food and my husband is going to pick up an ice cream cake for dessert. 

I prefer a quieter, laid back celebration, rather than a big whoop-de-do. The only think I really don't want to do on my birthday is cook, so going out or ordering in makes it a party, as far as I'm concerned.

Thanks so much for stopping by, and remember to laugh--a little or a lot--every day.

Cheryl

Tuesday, January 24, 2023

Slimline cards...

I have a number of slimline dies and don't use them nearly enough. Part of the reason, I think, is that I always have to modify an envelope for them. That doesn't take much time, but it is an extra step that I don't always feel I have time for.

Here are three slimline cards I made recently:

The floral frame makes it pretty quick and easy to create a card. I cut the entire frame out of green DSP, and then I cut the individual flowers and their centers out of colored CS.


For this card, I added the sentiment on an oval die-cut. I had inked its edges with green ink and popped it up on foam squares.

I used some pink Nuvo Drops to make the dot embellishments.


This card is sporting a stamped banner. I just wish I had adhered that banner a little straighter! It is also popped up on foam tape. I would have removed it and straightened it out, but I had added some glue to the foam tape, and I was afraid it would rip the background apart if I tried to remove it. 

To make the sparkly dot embellishments on this card, I used two sizes of single-hole punches to punch some circles from gold, glittery CS. I glued these onto my card and then topped them with clear Nuvo Drops.


This one is my favorite. I like how perfectly the stamped sentiment fits inside the frame. 

I used a silver Viva Decor pen on the flower centers and to make the dot embellishments.


The flower petals were slightly popped up with tiny foam squares.


Here's an example of how I finished the insides with a stamped ssentiment and a small embellishment.

These were all donated to the thrift store. I think customers enjoy buying cards that are not the "usual" shape and size, so they sell quickly.

Our new fur baby, Mickey, has settled in and now seems right at home. He LOVES eating. We've been putting a spoonful of cooked pumpkin on his dog food at night to solve a slight digestion problem, and he even gobbles that down!

He is learning the rules of our house very quickly, and we're so thankful for that. He is such a quiet and loving pup. We are definitely lucky to have him!

Thanks so much for stopping by, and remember to laugh--a little or lot--every day.

Cheryl

Friday, January 20, 2023

Happy birthday flowers and a new family member...


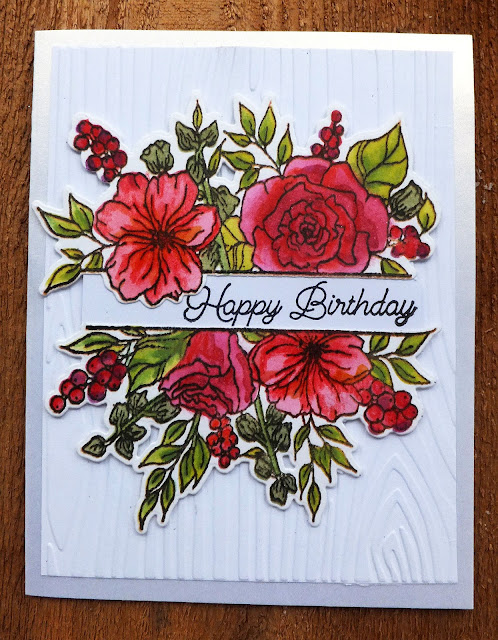
This card actually uses another card part - the white, woodgrain embossed background. It had been sitting there for a long, long time.


The flowers and sentiment came from a stamp, die and stencil set that I've had for a while. I stamped the flowers, used the stencils to color them and then cut them out with the coordinating dies--easy, peasy.

I should have varied the colors a bit more (and I definitely will the next time), but it actually looks better IRL


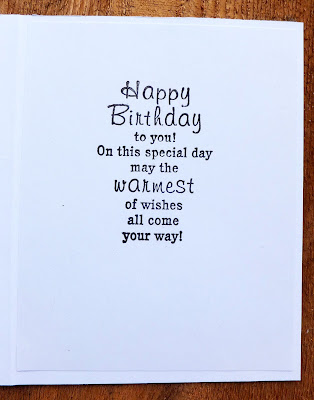
The sentiment on the inside was another card part. It had been stamped and cut out with a stitched rectangle die, so I simply adhered it to the inside of this card.                                                                                                                                                        


And now for the big news at our house - we are adopting a fur baby. His name is Mickey, he's a one-year-old Australian Cattle Dog mix, and he's with us for the next two weeks on a foster basis. After that, if all goes well (and I expect it to), we'll formally adopt him.

He has the sweetest temperament, loves everybody, and is even house-trained already. He's so quiet, too. We've had him for four days so far and I've yet to hear him bark. 

Yesterday he had to undergo neutering surgery. Poor little guy!! He was still loopy from the anesthesia when he got home and slept for a couple of hours. He perked up later, but I can tell his incision is uncomfortable. We have medication to give him for the next five days, but he's really good about taking it. Like me, he's definitely food-motivated. LOL

I hope you won't mind if I add a picture or two of him to my blog posts from time to time.

Thanks so much for stopping by, and remember to laugh--a little or a lot--every day.

Cheryl

Tuesday, January 17, 2023

Two quick cards...

I've been trying to make more cards to donate to the thrift store, now that I'm no longer making so many Christmas cards. Here are two that I made at the same time by cutting a double-sided panel at a slant:

The pink pattern on the bottom is the other side of the butterfly patterned paper.

I had the yellow border (Martha Stewart punch) in my envelope of saved borders, and I thought it was a nice contrast to the pink while coordinating with the yellow in the butterfly pattern.


I added the thin strip of glitter CS to finish off the edge of the yellow border. The sentiment on both cards has been popped up and a gem was added to each die-cut butterfly. Their wings were also popped up with tiny pieces of foam tape.


On the inside of each card was a stamped sentiment. 

I think these cards have already sold, so I need to make a couple more.

Yesterday, it rained all day here. To get an all-day rain in the middle of January is VERY unusual this far north. The scary part is when the temperature eventually does drop below freezing and all that standing water turns to ice. It is still warm enough for the walks to be covered in slush, but that will eventually turn to ice. We will need to be extra careful on our walks in the coming days.

Thanks so much for stopping by, and remember to laugh--a little or a lot--every day.

Cheryl

Friday, January 13, 2023

Starting the Christmas 2023 stash of cards...

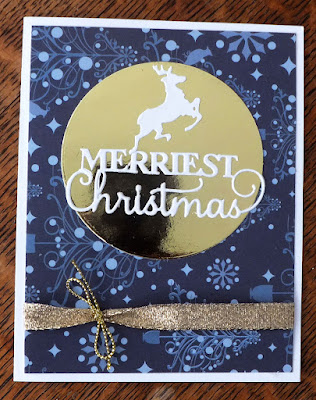
 I have made my usual vow to make Christmas cards all through the year in 2023 so that I don't get caught with not enough cards come December. So, as I was cleaning up my Christmas cardmaking supplies, I found 10 metallic gold circles that I had left over. I decided I would use them to make 10 cards for next Christmas, and here's what I came up with:

It's a simple design, but SO hard to photograph. The gold cardstock reflects everything! 


I made four cards using this background paper. I thought it looked like snow. I guess it could also be a starry sky with a golden moon.


I made six cards with this background paper. This one is definitely a snowy background. 

The gold ribbon was some I had in my stash, and instead of tying a bow with it, I used a bit of gold string for that purpose.


After practically standing on my head to get a photo of one of the cards with NO reflections, I thought I'd better share it with you.

I used a metallic gold ink pad to stamp a sentiment on the inside.

I'm not 100% happy with my gold ink pad. Do you have one you use that is crisp and clear when stamped? If so, I'd love to know the brand.

My book club met last night, and we had such a good time. We didn't meet over the holidays, and I really missed it. We discussed the book Giant by Edna Ferber. I had read the book and watched the movie. It was so interesting to hear other opinions about the book and Ferber's writing style. We also discussed the effect the story had on the citizens of Texas at the time (not good!).

Thanks so much for stopping by, and remember to laugh--a little or a lot--every day.

Cheryl

Tuesday, January 10, 2023

Using more card parts...

I had a couple of embossed panels in my stash that a friend had given me years ago. I pulled them out, determined to use them on a couple of cards. Here is what I made:

This rather unique embossed design featured a bride and groom. It was on off-white cardstock, so I chose a complementary black and off-white patterned cardstock from my stash for a card base.

I backed the panel with black and popped it up with foam tape. The sentiment was heat-embossed onto a strip of vellum and adhered, along with a small punched heart.


I used a "frosty white" ink pad that had a tiny bit of sparkle to go over the raised sections of the embossing, hoping that would help it stand out a little more. I think it did help--but not a lot.


On the inside, I added a stamped sentiment and a couple of those small punched hearts.


This second card features the green embossed panel that I received from the same friend. She actually sent me panels of every embossing folder she owned at the time.

I stamped "Birthday Wishes" and added the "Sweet" die-cut just above it on my die-cut oval. The oval was popped up on foam tape. 


The cherries were a random sticker I had in my stash. It's a layered sticker, and it had just the right green color in the leaves, so it looks quite nice on the card.


On the inside is another stamped sentiment. I also added a tiny heart that had been cut out with the word "Sweet."

Both of these cards were donated to the thrift store, so I hope they sell.


We have been dealing with lots of snow here in Minneapolis. Some of the streets are so narrow now, with snowbanks on either side, that two cars often  cannot drive past each other. One must pull over where it can and let the other pass.

Here's a photo taken from my front step:
While shoveling snow can be back-breaking, especially when it is as moisture-laden as this stuff  was, it is not as bad as the flooding that has taken place in California.  I feel so bad for those who have suffered catastrophic losses there. Please keep them in your prayers.

Thanks so much for stopping by, and remember to laugh--a little or a lot--every day.
Cheryl

Thursday, January 5, 2023

Let's Craft and Create Challenge #191: Anything Goes with Black and White option...


Happy New Year to you and your loved ones. I hope that 2023 is a remarkable year in all the best ways. May it be filled with joy and fulfillment with lots of time for crafty endeavors!

Our first challenge of the year at Let's Craft and Create offers a choice between "Anything Goes" and "Black and White." I decided to go with the latter option, and this is what I created:

I have some beautiful black papers in my stash, and I selected two of them to use for the cards pictured above.

This first card features a wonderfully embossed black paper that I've been hanging onto for just the right card. While I normally wouldn't use black for a sympathy card, I thought it worked in this case because of the lovely embossing.


This picture shows the embossing up close and also lets you see the tiny pearls I've adhered on and around the die-cut.

This particular die set cuts double layers for the two largest flower heads, the bud and a couple of the leaves. I really like that extra dimension.

The sentiment was stamped, die-cut and then popped up with foam tape.


The inside of my card features a simple, stamped sentiment.


The black paper for this card features a silver and white glittery design. I added a thin strip of silver glitter cardstock to coordinate with it and finish off the angled edge.


I thought this outline style die-cut worked very nicely on this card. It adds a bit of interest without being overpowering. 

The sentiment was stamped with Versafine black ink. I love Versafine for sentiments. It always seems to stamp clean and sharp with very little need for stamping a second time.


Once again, a sentiment was stamped on the inside and my card was done!

Now it's your turn, and I really hope you'll join in the fun. There is lots of inspiration from the Design Team over on the Let's Craft and Create site. Why not pop over and take a look?

If black and white isn't your thing, you can take advantage of the "Anything Goes" option.

Thanks so much for stopping by, and remember to laugh--a little or a lot--every day.

Cheryl

Tuesday, January 3, 2023

Using more card parts...


The card part that I used for this card was the embossed off-white panel. I've had it for YEARS (got it from a friend), and now I've finally used it.

I had also just gotten a new corner die. It's the type of corner that has little flaps that fold and fit behind the panel. I thought these added a little color to the panel which I then adhered it to an off-white card base.

I never get tired of making this pretty flower. It's my absolute favorite flower die set. I especially love popping up the petals with tiny foam squares. You can just see one peeking out on the left hand side.

I added a little bit of shading with a finger dauber to each of the petal layers and to the leaves.

There is an enamel dot in the flower center and three pink sequins for a little sparkle.


On the inside is a simple, stamped sentiment.

I made this card for the thrift store and put it on sale there last Thursday. When I do my volunteer shift this Thursday, I'll see if it has sold.


I also wanted to share with you some of the Christmas gifts we gave to our grandchildren.

For the gift pictured at left, I purchased the little dish at the Dollar Tree and filled it with floral foam. I used two wooden barbecue skewers for the tree trunk.

I folded the bills into graduated lengths and wired them to my skewers with some gold wire I had on hand. I added a glittery die-cut star to the top and pushed the skewers firmly into the flower foam.

I used my hot glue gun to adhere some shredded paper to the top of the floral foam and then added a little sign (also on its own skewer) that says, "Whoever said money doesn't grow on trees didn't have a crafty Grandma!"

Another way we gave money to the grandkids was to put it into a small envelope, attach the envelope with a ribbon to a note that said, "In case you get crap for Christmas, use this." The envelope was stuffed into the center of a roll of toilet paper so that the first thing that was seen was the note and the toilet paper. The older boys really loved this one!

And yet another gift involved 10 blown up balloons. Each had money inside and were put into a box, which also contained a large note that said, "Pop the balloons, one by one. We guarantee you'll find some fun."

Finally, we also purchased a box of nice candies from a local chocolatier. I took out all the chocolates and put them in a separate container. Then I put folded and rolled bills in the spaces where the candy had been. I put a piece of double-sided foam tape on the bottom of each "candy" to hold it in place temporarily. On top of the box, I put a note that said, "Just a little something to sweeten your holidays." And I gave the recipients both the box with the money inside and the extra container that held all the candy! 

We had a lot of fun giving these gifts, and the grandchildren seemed to love them.

Thanks so much for stopping by, and remember to laugh--a little or a lot--every day.

Cheryl