Wish List

Saturday, November 16, 2013

Our very first Christmas card came in the mail...

...and it is more beautiful than any card I'll make this year!

This card was designed and created by our grandson Max, who is 8 years old. Don't you just love all the details? The Christmas tree with ornaments, the garland across the top, the brick fireplace and Santa's boots just inside the hearth. I think Santa is on his way down because I don't see any gifts under the tree yet.

We are thrilled that Max and his family will be able to spend some time with us at Christmas this year, because they recently moved to a new home just 200 miles away. Hurray! Max has a younger brother and sister, so I'm not sure if the three faces he drew are the three of them, or if they're just indications of a happy little boy who has just finished making a wonderful card.

There was even a special message for us on the back. Now how sweet is that! It always brings tears to my eyes to hear the grandchildren say, "I love you." WE LOVE YOU, TOO MAX!

If you feel so inclined, please leave a note of encouragement for Max. I know his mom will show him this blog post and it would be wonderful if there were some comments just for him.

Thanks for stopping by today, and remember to laugh--a little or a lot--every day.
Cheryl


Monday, November 11, 2013

Thanksgiving card with Art Philosophy...


I made this card using my Art Philosophy cartridge. It's such a great cartridge with really useful, even elegant, images. This card was inspired by a card that Mary made on Cardz TV. You can see her video about making her card here.

I cut my acorns at 1 1/2". I think I cut my label at 1 3/4". It didn't have a shadow on the cartridge, but it's easy enough to create one using my Gypsy.


Here you can see that I inked around the bottom section of each acorn, embossed the brown tops with a herringbone embossing folder and then popped each acorn up on one layer of foam tape.

The little bows are made out of embroidery floss and attached with one of my tiny homemade glue dots. I love making my own glue dots, because I can make them as small or as big as I want.

The ribbon is some pretty felt-like ribbon that has a gold edging. I found it in the dollar bin at Michaels.


Here's the inside of my card with an extra acorn that I added to dress it up a bit.

I'm entering this card in the CARDZ TV GO-TO GALZ LINKY PARTY CHALLENGE #8 "HAPPY HARVEST".

We will be having 17 people for dinner on Thanksgiving Day. It is going to be a ton of fun...with a ton of food! I'm hoping to find a 24 lb. turkey to feed all these people. We'll have 9 extra people staying with us through at least Saturday so I'm hoping for a few leftovers so that I don't have to do too much more cooking beyond the big meal on Thursday.

I've done a little baking already and put it in the freezer - breakfast breads and cookies - but I need to add to that during the next two weeks. We're not only having Thanksgiving dinner here, but on Friday we're also having a birthday party for one of my granddaughters. I haven't even really thought about that yet! Yikes! I'd better get on the ball.

Have you started your Thanksgiving Day preparations yet? Will you be having people to a meal at your house, or are you invited elsewhere? Whatever your plans, I hope you have a fantastic holiday!

Thanks for stopping by, and remember to laugh--a little or a lot--every day.
Cheryl

Saturday, November 9, 2013

Excited about my new button dies...

I always like to use woodsy elements on my Thanksgiving cards, and here's an example of just such a card:
I used my wood grain embossing folder by Sizzix to emboss some kraft cardstock. Then I inked it up with some Frayed Burlap distress ink to give more of an appearance of real wood. Before I did all that, however, I die cut an oval where I wanted my sentiment to appear.  Then I stamped the sentiment (a Lawn Fawn stamp) with Versamark ink onto the brown mat and embossed it with some off white embossing powder. It looks pretty bright white in this photo, though, doesn't it?

The leaves were cut with my Cricut from the Art Philosophy cartridge and then stamped with the coordinating stamp that came with that bundle.

The little button is what I was most excited about on this card. It's actually made with a little Impression Obsession button die that I purchased on www.diesrus.com. The set contains six little button dies. Now I just have to make sure I don't lose any of them!

Here's what the dies look like, along with a couple extra buttons that I have made:
You can see in the above photo that the buttons have some dimension to them (note the shadow they cast because of their thickness!).  That's because I cut at least four little button shapes and glued them together to form a little thicker button. I think the little pink button actually has five layers. They honestly look like real buttons, but they're still thin enough to easily go through the mail--no extra postage needed, no rigid bumps to tear the envelope. I love that!
The photo above and the one below show the dimension of the buttons. Isn't that cool? When you glue four layers together, they become very sturdy, too.
I've always been reluctant to put buttons on my cards because of the extra postage/hassle to mail them. No more! And now I'll have just the right color of button every time!
 
Here's a look at the inside of the card and the sentiment, which was computer-generated. Please excuse the bad shadow. It has been a dark and dreary day today - no sun at all. It's so hard to get good pictures on a day like this. One of these days I'm going to invest in a little light box for taking photos. If you've got a light box and love it, please leave me a comment about what brand it is. I'd really love to know!!
 
Thanks so much for stopping by today, and remember to laugh--a little or a lot--every day!
Cheryl

Monday, November 4, 2013

An all occasion card...

I often need a blank, all-occasion card to send a note to a friend or family member. Here's one I made not long ago. I actually sent this card to a friend, and I wrote my note on a Post-It and stuck it inside the card. That way, my friend could pull out my note and send the card to someone else. Since this card was enclosed in a box with some other items, I didn't write anything on the envelope, either, so that it could be re-used, as well.

The flowers were made with a MS hydrangea punch. I shaped the petals with a stylus and added them to the Cheery Lynn Fanciful Flourish die cut. The corner cuts are by Lifestyle Crafts and the bottom border was made with a Fiskars punch. Oh yes, the scalloped oval is a Spellbinders die.

The inside was kept very simple with just the border at the bottom to add some interest. I didn't add any sentiment to the front or the inside so that the card can be tailored to any occasion with a hand-written note.

I've started making my Christmas cards, but haven't gotten very far. Right now I'm working on a few Thanksgiving cards. I'll be sharing those over the next week or two. Once they're done, I'll be diving headlong into the Christmas card-making frenzy!

Have you started your holiday shopping yet? I have only bought a few gifts - like maybe 4 or 5. We have 6 kids and their spouses plus 10 grandkids to buy for. We also usually get a small something for a couple of brothers. All told, that's a lot of shopping--and wrapping! But I love doing it.


Thanks so much for stopping by today, and remember to laugh--a little or a lot--every day!
Cheryl


Tuesday, October 29, 2013

I thought I was done...

...making Halloween cards until, at the last minute, I decided to make a couple for some special people in my life.
I made two simple designs, as I had to get them done quickly so that I could get them in the mail. This first card features a black rectangle of CS that is popped up on foam squares. I cut out the three circles, and then I cut three slightly larger orange circles to adhere to the card directly below each cutout.

I stamped the spiders and "Boo!" on the orange circles and used my glitter pen to give them each a little sparkle.


The inside was also simple - a sentiment, along with another spider, and a strip of the patterned CS across the bottom.


This was another simple, but fun, card that features the spider from the Doodlecharms cartridge. The main body of the spider is covered with black flocking (fun!), and I added a couple of googly eyes, too. I used the MS drippy goo border punch to get the black border across the top. The flat-backed gems are dark--almost black--but still reflect colors around them. They were perfect for this card.

The spider is actually popped up on a foam square to add some dimension. The "EEK!" sentiment was made with some black sparkly letter stickers by Reflections.

Another simple interior with room to write a quick note.

I'm entering this card into the following two challenges:

Thanks so much for stopping by today, and remember to laugh--a little or a lot--every day.
Cheryl

Saturday, October 26, 2013

Down to the wire for Halloween...

 
Halloween will be here in just a few days, and I've been working hard to finish up my Halloween cards. I am truly feeling down to the wire, but I think I am finally done! Here are some that I finished up yesterday: 
I made these four fun Halloween cards using an idea from a great tutorial from Dawn's Stamping Thoughts. Dawn called this card a Peek-a-boo Window Card. Click on the link to watch her great video tutorial.


The skull and crossbones on this card is cut from a Cuttlebug die. I put some green paper behind the eyes and nose and painted it with glow-in-the-dark paint.

The fancy label and shadow are cut from the Elegant Edges cartridge. I added a border at the top using Martha Stewart's drippy goo border punch.
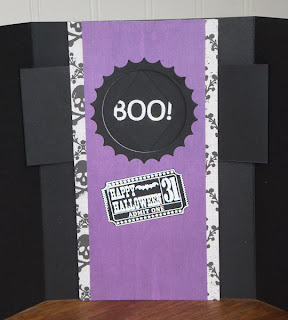


It's difficult to see how the peek-a-boo window works in this picture, but hopefully, you'll see it better on one of the other cards.

The ticket stamp was one that I found in the dollar bin at Michael's. I embossed it with white embossing powder on black cardstock. I love the way that looks.


Here's another card, very similar to the one above. I used the same tools for the border and label, and I also painted this skull and crossbones with glow in the dark paint.


Another card with a spider cut from the Doodlecharms cartridge. You can't tell in this photo, but I ran the body of the spider--a top layer that was cut separately--through my Xyron, added the googly eyes and then added flocking to it before I adhered it to the first layer of the spider. It's so cute in person.

The candies at the bottom of the card were dimensional stickers. Doesn't it look like that spider is just eyeing the candy corn, ready to pounce on it?


Finally, I made this card with three scalloped circles on the front. The top and bottom circles are adhered to the left side of the card, and the ghost in the center is adhered to the right side.


Here are some successive photos to give you a little idea of how the peek-a-boo works:
Once I got the hang of making these cards, they came together really quickly. The peek-a-boo mechanism is so much fun, and I think the kids are going to love it.

Thanks for stopping by today, and remember to laugh--a little or a lot--every day.
Cheryl


Wednesday, October 23, 2013

Why, yes...I drive a stick.


I've seen this sentiment in several places around the Web, and it makes me laugh every time! I just had to make a Halloween card with it.

The witch and the bats were cut from the Happy Hauntings cartridge. I embossed the straw end of the broom with a woodgrain embossing folder and then inked it up with Walnut Distress Ink. Did you notice that I added a sparkly band to the witch's hat with a glitter pen?

The moon is actually a circle cut into the gray swirly paper so that the pale yellow mat beneath shows through. The sentiment was punched out on a label maker. Then I just flagged the ends to make a little banner.


The inside is pretty simple. Just a stamped sentiment and a couple of stamped bats.

The "photo corners" were made by using a small die to cut out 2 scalloped squares with my Cuttlebug. Then, I cut them in half and notched the centers. Voila! You then have four photo corners.


I'm entering this card in the following challenges:

Thanks for stopping by today, and remember to laugh--a little or a lot--every day.
Cheryl

P.S. Oh yes, I DO know how to drive a stick!