Today is my grandson Max's birthday (HAPPY BIRTHDAY, MAX!), and this is the card I made for him:
I created my background by using mustard seed Distress Ink and a dauber to ink against a straight piece of cardstock. I decided on my center point, which would be directly behind the center of my focal image and just moved my cardstock around in a circle as I inked, keeping the tip of it at the center point.
My extreme bicyclist and the word "Extreme" are from the Dude! cartridge. I really like this cartridge for masculine cards - especially those for young males like my grandson, who is turning 10.
The other words were made with some stickers that I happened to have on hand. I think they came in a prize package that I won a long time ago. I also added a few red stars for a little more oomph!
See that dotted line on the left? That was made with a Paper Smooches die. I thought it added a nice touch to the front of my card. I backed it with black cardstock to make it show up better.
Yellow and black mats, some stars and a computer-generated sentiment finished off my inside. You can see the black strip of cardstock on the left that I used to back the line of dots on the front of my card. To make it look a bit more finished and purposeful, I adhered a red star to the top and bottom of it.
Our apricot trees are FULL of fruit this year, but the squirrels are doing their usual damage by picking the unripe fruit to get to the nut (pit) inside. I have to say, I DO NOT like squirrels AT ALL! I don't care how cute they may look, they drive me crazy when they demolish our apricots before we can even taste them. Drat those little rodents!!!!
Okay, rant over. I feel better now.
Thanks so much for stopping by, and remember to laugh--a little or a lot--every day.
Cheryl
Friday, June 19, 2015
Wednesday, June 17, 2015
A birthday forecast...
Tomorrow is my brother-in-law's birthday, and here is the card I made for him:
He received the card yesterday and called up to say, "So what's different about any other day?" He truly doesn't have low standards or make (too many) poor decisions, but he does enjoy a regular glass of wine or beer! It's so much fun to tease him, so I knew he'd get a kick out of this card.
I used a Spellbinders inverted scalloped circle die for my sun, and my clouds were cut with Impression Obsession dies. I was able to print the sentiment using MS Publisher to create the red background and white lettering. The stitch lines were added with a white gel pen.
Here's a peek at the inside (please excuse the partially out-of-focus photo):
I had two narrow pieces of the blue polka-dot cardstock left, so I cut them in half to create four strips and added them to the inside of my card for a little extra interest. I also inked around the edges of my sentiment mat with some blue ink. This sentiment was also computer-generated.
Today I went to visit a former next-door neighbor who is in a nursing home. She was so happy to see me, and I was so glad I went. I am going to try to make her some cards in the future and send them to her on a regular basis. I know she would really appreciate some happy mail, as she is quite lonely there. I told her I will come to see her again in another couple of weeks.
Thanks so much for stopping by, and remember to laugh--a little or a lot--every day.
Cheryl
Friday, June 12, 2015
Father's Day card with a fun fold...
I have a couple of special uncles who I like to remember on Father's Day, and here's one of the cards I made that has a very fun fold. I found the instructions for this fold on Dawn's Stamping Thoughts. Dawn has tons of fabulous card ideas, and I love following her blog.
You may not be able to tell from just looking at this card, that there is anything unusual about it. But take a look at the next couple of photos.
See how fun this fold is? I added a square with the heat-embossed image on the inside of the card front, just to finish it off nicely.
I also added a little message on the inside of the tiny "card" that is adhered to my card front. It just adds one more interesting twist to this already interesting card design.
This is one fun fold that I will use again and again. It is SO EASY and really adds a fun element to any card. The strong geometric design makes it perfect for a masculine card, but it would certainly work well for a feminine card, too.
I was able to get outside today and do some weeding in my flower beds. We've had so much rain that the weeds were growing like mad and about to take over! I've still got more to do, and I've vowed to get out there and put in an hour or so several times a week to try to stay on top of it. I really love all the flowers that are now blooming, with lots more to come, so that's my incentive to keep at it.
Thanks so much for stopping by, and remember to laugh--a little or a lot--every day.
Cheryl
Thursday, June 11, 2015
Pretty tags from doily scraps...
Remember the sparkly doilies I used for the card and treat bag in my last post? Well, I had a portion of a doily left over, and I couldn't let it go to waste! Here's what I did with it:
I used a small tag die (not sure of the manufacturer at the moment, but I think it could be Sizzix) to cut out two white tags.
I cut my doily scrap in half and added each half to a tag. Each piece was just big enough to cover the major portion of a tag.

I added one of the little yellow flowers that I had used on my previous project and a yellow ribbon. Then I added some liquid pearls in the center of each flower and a couple of left-over leaves. My centers got a little "gloopy," but since this is just a tag that will be thrown away as soon as the package is opened, I didn't feel bad and decided to leave it as is.
I searched through my stamps and found a Fiskars "for you" stamp that fit perfectly.
This was such an easy project, and I felt good about not throwing away a single scrap of that pretty doily. These will be perfect for my granddaughter's birthday gifts!
I know I haven't been posting much lately, but I've been trying to catch up on other things after a four-day trip to visit my three sisters. Luckily, they all live within 45 miles of each other, so I can see them all in one trip.
My youngest sister is also a cardmaker, so it was fun to spend a few minutes in her craft room looking at her most recent creations. She does beautiful work and is an inspiration to me!!
Thanks so much for stopping by, and remember to laugh--a little or a lot--every day.
Cheryl
I used a small tag die (not sure of the manufacturer at the moment, but I think it could be Sizzix) to cut out two white tags.
I cut my doily scrap in half and added each half to a tag. Each piece was just big enough to cover the major portion of a tag.
I added one of the little yellow flowers that I had used on my previous project and a yellow ribbon. Then I added some liquid pearls in the center of each flower and a couple of left-over leaves. My centers got a little "gloopy," but since this is just a tag that will be thrown away as soon as the package is opened, I didn't feel bad and decided to leave it as is.
I searched through my stamps and found a Fiskars "for you" stamp that fit perfectly.
This was such an easy project, and I felt good about not throwing away a single scrap of that pretty doily. These will be perfect for my granddaughter's birthday gifts!
I know I haven't been posting much lately, but I've been trying to catch up on other things after a four-day trip to visit my three sisters. Luckily, they all live within 45 miles of each other, so I can see them all in one trip.
My youngest sister is also a cardmaker, so it was fun to spend a few minutes in her craft room looking at her most recent creations. She does beautiful work and is an inspiration to me!!
Thanks so much for stopping by, and remember to laugh--a little or a lot--every day.
Cheryl
Friday, June 5, 2015
Let's Craft and Create Challenge #102 - Add Some Sparkle!
It's time for a new challenge over on Let's Craft and Create. This month we're asking that you add some sparkle to your creations. How fun is that?
For this challenge, I decided to use some colored doilies that were given to me by my online friend Taunya Butler (Daisies Girl) and make them SPARKLE!
I applied spray adhesive to the front sides of two of the doilies and then laid them in my glitter tray with a liberal amount of clear glitter. The result was so pretty! Then I used those doilies to make this card and treat bag:
Those Dove chocolates are the yummy treat I put in my bag.
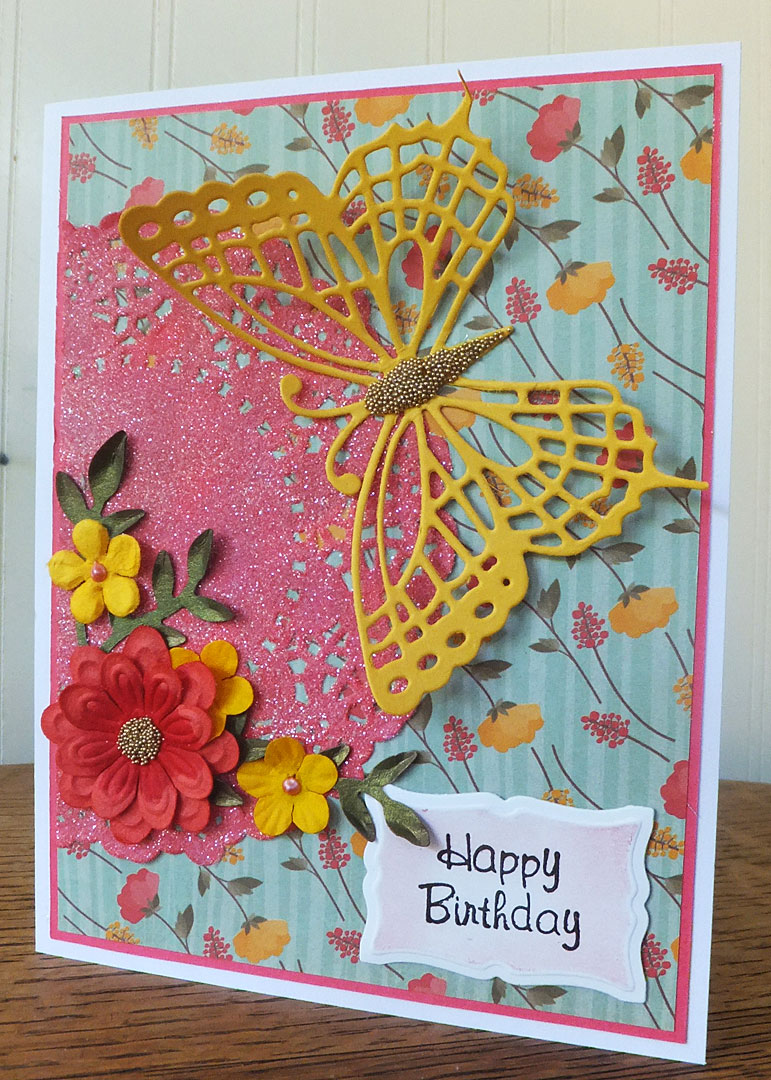
Here's a closer look at my card. I think you can clearly see the sparkle on my doily here.
The butterfly is a Marianne Creatables die, and I've added some gold microbeads to the body. You'll see some of those same microbeads in the center of my deep pink flower. They add some additional sparkle and dimension!
On the inside of my card, I added some more of the pretty DSP, matted with pink cardstock and a single flower.
My sentiment was stamped on white CS and cut out with a Spellbinders Label #8 die and lightly chalked while the CS was still in the die.
The sentiment stamp was one that I purchased used, so I'm not sure of the manufacturer. There's nothing on the wood block to identify it.

My little treat bag is a "one-sheet" bag made with a single 8.5" X 11" piece of DSP. You'll find the tutorial I used for this treat bag here.
After I folded my doily in half, I adhered the back of it to the backside of my treat bag. This is an optional step, because the doily is also held on with the ribbon. The little flowers and leaves were adhered only to the doily so that the bag can be easily opened.
My butterfly trail and the butterfly's body were both made with Liquid Pearls.

I punched holes through all layers of the doily and bag. I threaded a narrow ribbon through these and tied a bow in the front.

Here you can see that it holds quite a few of those yummy Dove chocolates.
The flowers on both the bag and the card are a combination of ones I purchased at my local used craft supply store and some that I won in an online challenge like this one.
My fellow Design Team members have really rocked this challenge. I think it's pretty clear from their gorgeous creations that they all love to add a little sparkle!
Click on the names below to see their fabulous creations. Then create a sparkly project of your own and upload a photo on Let's Craft and Create. This is a monthly challenge so there's plenty of time. There's a fun prize up for grabs, too. Check it out here!
For this challenge, I decided to use some colored doilies that were given to me by my online friend Taunya Butler (Daisies Girl) and make them SPARKLE!
I applied spray adhesive to the front sides of two of the doilies and then laid them in my glitter tray with a liberal amount of clear glitter. The result was so pretty! Then I used those doilies to make this card and treat bag:
Those Dove chocolates are the yummy treat I put in my bag.
Here's a closer look at my card. I think you can clearly see the sparkle on my doily here.
The butterfly is a Marianne Creatables die, and I've added some gold microbeads to the body. You'll see some of those same microbeads in the center of my deep pink flower. They add some additional sparkle and dimension!
On the inside of my card, I added some more of the pretty DSP, matted with pink cardstock and a single flower.
My sentiment was stamped on white CS and cut out with a Spellbinders Label #8 die and lightly chalked while the CS was still in the die.
The sentiment stamp was one that I purchased used, so I'm not sure of the manufacturer. There's nothing on the wood block to identify it.
My little treat bag is a "one-sheet" bag made with a single 8.5" X 11" piece of DSP. You'll find the tutorial I used for this treat bag here.
After I folded my doily in half, I adhered the back of it to the backside of my treat bag. This is an optional step, because the doily is also held on with the ribbon. The little flowers and leaves were adhered only to the doily so that the bag can be easily opened.
My butterfly trail and the butterfly's body were both made with Liquid Pearls.
I punched holes through all layers of the doily and bag. I threaded a narrow ribbon through these and tied a bow in the front.
Here you can see that it holds quite a few of those yummy Dove chocolates.
The flowers on both the bag and the card are a combination of ones I purchased at my local used craft supply store and some that I won in an online challenge like this one.
My fellow Design Team members have really rocked this challenge. I think it's pretty clear from their gorgeous creations that they all love to add a little sparkle!
Click on the names below to see their fabulous creations. Then create a sparkly project of your own and upload a photo on Let's Craft and Create. This is a monthly challenge so there's plenty of time. There's a fun prize up for grabs, too. Check it out here!
Cheryl (That's me!)
I'm so looking forward to seeing all your sparkly creations. Thank you so much for stopping by, and remember to laugh--a little or a lot--every day.
Cheryl
Monday, June 1, 2015
Belated Birthday card...
A few weeks ago I received the April issue of Cardmaking & Papercraft, which comes from the UK. One of the fun aspects of this magazine subscription is that each issue includes a gift and some pretty papers.
The April issue included these stamps and embossing folders, along with several sheets of DSP:
I decided to use some of these supplies right away and make some cards. The first card I made was a belated birthday card.
The flowered paper in the background is one of the papers that came in the magazine. Isn't it pretty? I thought it was perfect to put behind my Floral Oval (Spellbinders) die-cut that showcases the Bentley Bear stamp. Isn't he cute?
I've colored him with my ProMarkers and adhered a little bow at the bottom of the oval.Doesn't that sad little bear face look like he feels badly about missing a birthday?
My sentiment stamp is from Fiskars.
I try never to miss birthdays, but it does happen from time to time, so I'm sure this card will eventually come in very handy.
The inside of my card features a computer-generated sentiment and a be-ribboned and scalloped strip of the DSP.
I have made a couple more cards with these awesome supplies, but I'll share those in a future post.
The flowers that I planted around my house in May have taken root and are beginning to bloom nicely. So far, I've been able to cut some bouquets of irises and bring them inside. I love to keep cut flowers in the house as much as I can during the summer months. They make life prettier, even on gloomy, rainy days!
Thanks so much for stopping by, and remember to laugh--a little or a lot--every day.
Cheryl
The April issue included these stamps and embossing folders, along with several sheets of DSP:
The flowered paper in the background is one of the papers that came in the magazine. Isn't it pretty? I thought it was perfect to put behind my Floral Oval (Spellbinders) die-cut that showcases the Bentley Bear stamp. Isn't he cute?
I've colored him with my ProMarkers and adhered a little bow at the bottom of the oval.Doesn't that sad little bear face look like he feels badly about missing a birthday?
My sentiment stamp is from Fiskars.
I try never to miss birthdays, but it does happen from time to time, so I'm sure this card will eventually come in very handy.
The inside of my card features a computer-generated sentiment and a be-ribboned and scalloped strip of the DSP.
I have made a couple more cards with these awesome supplies, but I'll share those in a future post.
The flowers that I planted around my house in May have taken root and are beginning to bloom nicely. So far, I've been able to cut some bouquets of irises and bring them inside. I love to keep cut flowers in the house as much as I can during the summer months. They make life prettier, even on gloomy, rainy days!
Thanks so much for stopping by, and remember to laugh--a little or a lot--every day.
Cheryl
Friday, May 29, 2015
Masculine Happy Birthday...
Just a few days ago, my brother-in-law celebrated a birthday (Happy Birthday, Harold!), so I made this card for him:
Quite a while ago, my card-making sister let me use her Spellbinders Cattails die to cut out the focal image for this card. It's a rather tricky die to cut, as it is very fine and detailed.
I used some distress inks to create my sunset behind the cattails. I first masked off my moon, thinking that it would be okay to leave it white. It looked a bit harsh, though, in its whiteness, so I sponged on some yellow and liked it much better.
I used an old stamp for my sentiment. Not sure of the manufacturer. The tiny black scalloped borders were actually part of the design of the DSP, which came from an Autumn/Halloween stack by DCWV.
On the inside of my card I used a simple black mat and a flourish stamp as the only decoration.
The sentiment stamp I used on the inside was one that I purchased at our local used craft supplies store, so again, I'm not sure of the manufacturer.
I also made a coordinating envelope. I love using my envelope punch board and some DSP that is white on one side for my envelopes. That is some double-sided tape that you see on the flap.
I really enjoy making these little sunset scenes with distress inks. They don't all turn out well, but it's still fun to try!
Thanks so much for stopping by, and remember to laugh--a little or a lot--every day.
Cheryl
Subscribe to:
Posts (Atom)