Wish List

Tuesday, September 25, 2018

Getting older stinks...

Today I'm sharing a super fun masculine birthday card. It was easy to make, and even my husband loved it!


I stamped all my cardstock with a large wood-grain stamp and did a partial cut with a large rectangle die to make the door. My hinges are little strips of cardstock with some tiny "nailheads" of Nuvo Crystal Drops and the door handle is a brown brad. My smallest star die worked perfectly to create a small opening in the top of the door.


Isn't it fun to have the little door open on the front of the card?

All the sentiments for this card were computer-generated.


I kept the inside of this card really simple with room to write a personal note.

This card was so much fun to make that I actually made two of them--one for my husband and one for my BIL. 

The idea for this card came from Pinterest, but I've added my own spin to it. What did we do before Pinterest? I have so many card ideas saved to my Pinterest boards and often browse through them for ideas.

Thanks so much for stopping by, and remember to laugh--a little or a lot--every day.
Cheryl

Friday, September 21, 2018

Happy birthday to my brother...

My brother, who lives closest to me and also volunteers each week at a local thrift shop, celebrated a milestone birthday on September 15th. I decided to make him a pop-out card that has great visual appeal on the inside.


The front of the card was pretty simple--a couple of large die-cut numbers and a computer-generated sentiment.


This is the inside of the card. It was cut on my Silhouette using Design #65331 from the Silhouette Design Store. I've used this cut before, and it has always turned out great.

To give this card a little extra pizzazz, I backed each of the letter cut-outs with packing tape and then sprinkled glitter on the front of each letter. It adds just a little sparkle, and the light still comes through.

I've had to make lots of masculine birthday cards in the past couple of months. With all the practice I've had, you'd think male cards would be a breeze--but they're not. I always struggle to come up with fun or meaningful ideas.

Thanks so much for stopping by, and remember to laugh--a little or a lot--every day.
Cheryl


Tuesday, September 18, 2018

Set of notecards...

As I have mentioned many times before, I volunteer at a thrift shop, and I often make paper products for said shop. Recently, I made some sets of notecards for them to sell.  Here's a peek at them.


This photo shows the notecards in a little box that I made to display them. The label came from a 12X12 paper pack that had a couple sheets of various kinds of labels. This label with the dotted lines worked perfectly for my purposes. It still has room to write a price, and I just added the little paper bow to decorate it.


Here you can see the different patterned papers I used (two notecards from each pattern). I used a Sizzix die set to cut all my notecards and then made the appropriate size envelopes with my CTMH envelope punch board.

Each notecard is blank inside so that there's lots of room to write a personal note.

I really love making items like this, and it's even more fun when they actually sell!

Thanks so much for stopping by, and remember to laugh--a little or a lot--every day.
Cheryl

Friday, September 14, 2018

More birds on a wire...

Back in June I shared a card in this post that featured my Martha Stewart Birds on a Wire border punch. Well, I decided to make another one using a slightly different approach.


Just as I did on my previous card, I punched the birds out of white cardstock and then colored each one differently with my Promarkers.


This time, however, I did not cut an aperture in my card front and cover it with vellum. Instead, I cut a pink mat and then a white mat to serve as a base for my birds.

The rectangles and the "hello" were all made with unbranded dies.


The inside of my card featured a yellow mat, but no sentiment. I'll use this card to write a personal note.

I like to keep a number of cards like this on hand, as they are great for writing a quick note or expressing thanks.

Can you believe summer is nearly over? I often wonder why time seems to pass so quickly now that I'm retired. If you are retired, do you feel the same? It seems like life should slow down--a lot--but that isn't how my world works at all.

Thanks so much for stopping by, and remember to laugh--a little or a lot--every day.
Cheryl


Tuesday, September 11, 2018

Scrabble tiles are great for masculine cards...

This card is one I made a couple of months ago, but never shared. It was for my brother-in-law who reached a milestone birthday.


I found an image of Scrabble tiles online and printed it out after re-sizing so they'd fit on my  card. Each tile is popped up on a little square of foam tape to give it some dimension.

The 75 was cut out with some large letter dies, and I used my paper cutter to make some really thin strips of black cardstock to use for a little added decoration (and also for the hyphen between the number words).

I used my computer to print "is only 23 in Scrabble!"


My inside sentiment was something I came up with and printed out on my computer.

I'm not sure how much I'll be able to post over the next six weeks. We'll be traveling in our little RV, so an internet connection might be pretty iffy at times. We are actually heading for the southeastern quadrant of the country, so I'm thinking today about all those in the path of Hurricane Florence. It sounds like a wicked storm, and I just hope everyone stays safe and is able to evacuate if necessary. Our travel plans include visiting both North and South Carolina, if possible. We'll see what happens with Florence and adjust our plans, if need be.

Thank you so much for stopping by, and remember to laugh--a little or a lot--every day.
Cheryl

Friday, September 7, 2018

Card with interior four-panel fold...

Here's a fun card that I made recently. I don't remember where I got the idea for the interior four-panel fold (probably Pinterest), but I loved the idea and I think it turned out great.


I used the same stamps for this card that I used in this post, plus a few more random stamps for the inside.

My little bow is an unbranded die set that is getting lots of use. I really love it. The sequins were from my stash.


And here's the inside. Isn't that fun? I simply took a piece of paper that was the same width as my card base, folded it into four even sections. I adhered four different stamped panels (each a little smaller than my four sections) onto four slightly larger mats and then onto my folded paper. I really did use paper--not cardstock--for the folded piece. It helps keep the thickness of the card to a minimum.


It was so much fun to go through my smaller stamps and pick some out for each panel.


'

I'm always surprised by the cute little stamps I find when I really look! Isn't that balloon with the ladybug a sweet image?

I colored the bird and balloon images with my Promarkers. The flowers above were stamped with colored inks.


Well, our company (who have been here for the last six weeks) left today. In fact, they haven't flown out quite yet, but are at the airport waiting at their gate to board. Their flight is scheduled to take off in a little less than two hours.

I think I am in dire need of a nap. I told my DH that he is getting a bowl of granola and a toasted muffin for dinner tonight. I really can't work up the energy or interest to cook a meal. Besides that, I happen to like granola and muffins!

Thanks so much for stopping by, and remember to laugh--a little or a lot--every day.
Cheryl


Wednesday, September 5, 2018

Let's Craft and Create Challenge #141: BEST OF FRIENDS (Anything friendship related) with the option of Anything Goes...

I'm so glad you stopped by to check out the latest challenge at Let's Craft and Create. Our challenge this month is "Best of Friends," which inspired me to use a stamp set by Hero Arts that had never seen ink! I decided to make a couple of encouragement cards that I can use to cheer up a couple of friends.


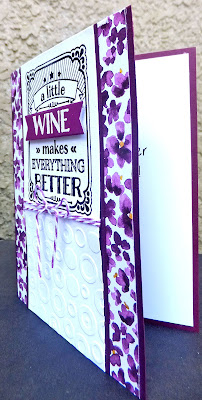
Since purple is my favorite color, I chose purple card bases and some purple-patterned DSP. I thought it worked particularly well for the wine card. I guess I could have used some brown tones for the chocolate card, but since I had the purple paper out, I just cut and stamped both cards at once.


Here's a closer look at my "wine" card. I sure would enjoy a glass right now as I type this post, but, alas, there is none in the house.

The embossing on the bottom of the white strip was done with a Cuttlebug EF. It reminded me of the bubbles in sparkling wine.

My "wine" banner is popped up on foam tape.


I think you can see that I've popped up that banner in this shot.


I had fun with the sentiments for these two cards. This one was created on my computer, so I was able to easily turn the word WINE purple.


My second card was made exactly the same as the first, except for the word "chocolate."


And my inside sentiment was, once again, created with my computer. I think it will bring a smile to a friend's face.

So there you have it--two cards featuring two of my favorite comestibles. And I don't have either one in the house as I type this. I think I need to stop at the store tomorrow!!!

I hope you'll consider joining this month's challenge and making a card for a friend. If that idea doesn't suit you, you can always enter the challenge via "anything goes."

Head on over to Let's Craft and Create for lots more inspiration. You'll see the fabulous creations from the other DT members and just where to post your creation.


Thanks so much for stopping by, and remember to laugh--a little or a lot--every day.
Cheryl