Wish List

Friday, October 18, 2024

Another frilly ghost and more...


I love this frilly-skirted ghost, and I thought this time she needed a starry sky background.

I had some pretty 6" X 6"night-sky papers and chose one of them for her background. I also had the bat and "Spooky" stickers in my Halloween supplies box. They were the perfect addition to this card. Because the bat looked a little blah, I gave it some white eyes with Nuvo Drops. Much better!


The ghost face was backed with a scrap of black cardstock so that the eyes and mouth weren't just empty holes.

She's been popped up on foam squares to give her some extra dimension.


I used some purple ink to stamp the sentiment and a few stars on the inside.


This card was a quick make. I had the Halloween verse printed onto white cardstock already (a leftover from last year). I cut the panel just wide enough to hold the verse and 5 1/4" long.


To put my card together, I cut two narrow strips of black and white Halloween DSP that were each 5 1/4" long and added them to the front of my card on each side.

Then, I added the center panel with the verse. I centered it so that it overlapped each strip of DSP slightly, and then I added a narrow orange strip of CS on each side of it.

Finally, I stamped a bat at the top and popped up a die-cut pumpkin at the bottom.


I stamped "Happy Halloween" on the inside and colored in the "Happy" letters with an orange marker to complete the card.


This card used up a bunch of scraps from my Halloween stash. I created the background first and then added it to my card base.


I cut the arched shape out of white cardstock and then did some ink blending on it, using a few colors from the striped background.

Once the shape was sufficiently inked, I added a die-cut witch on her broom (left over from last year), a "Spooky" sticker and a few holographic stars.

The arched panel was popped up on foam squares.


I stamped a sentiment on the inside, and then I added a strip sentiment with one of those holographic stars at the end of it. I added some purple ink around its edges and popped it up on some narrow foam strips.

I believe I have made close to 50 Halloween cards so far (most of them were donated), and I'll continue to make 20 or so more of them. I'm not sure why, but they are my favorite cards to make, so I'm really having a good time doing it!

Thanks so much for stopping by, and remember to laugh--a little or a lot--every day.

Cheryl

Wednesday, October 16, 2024

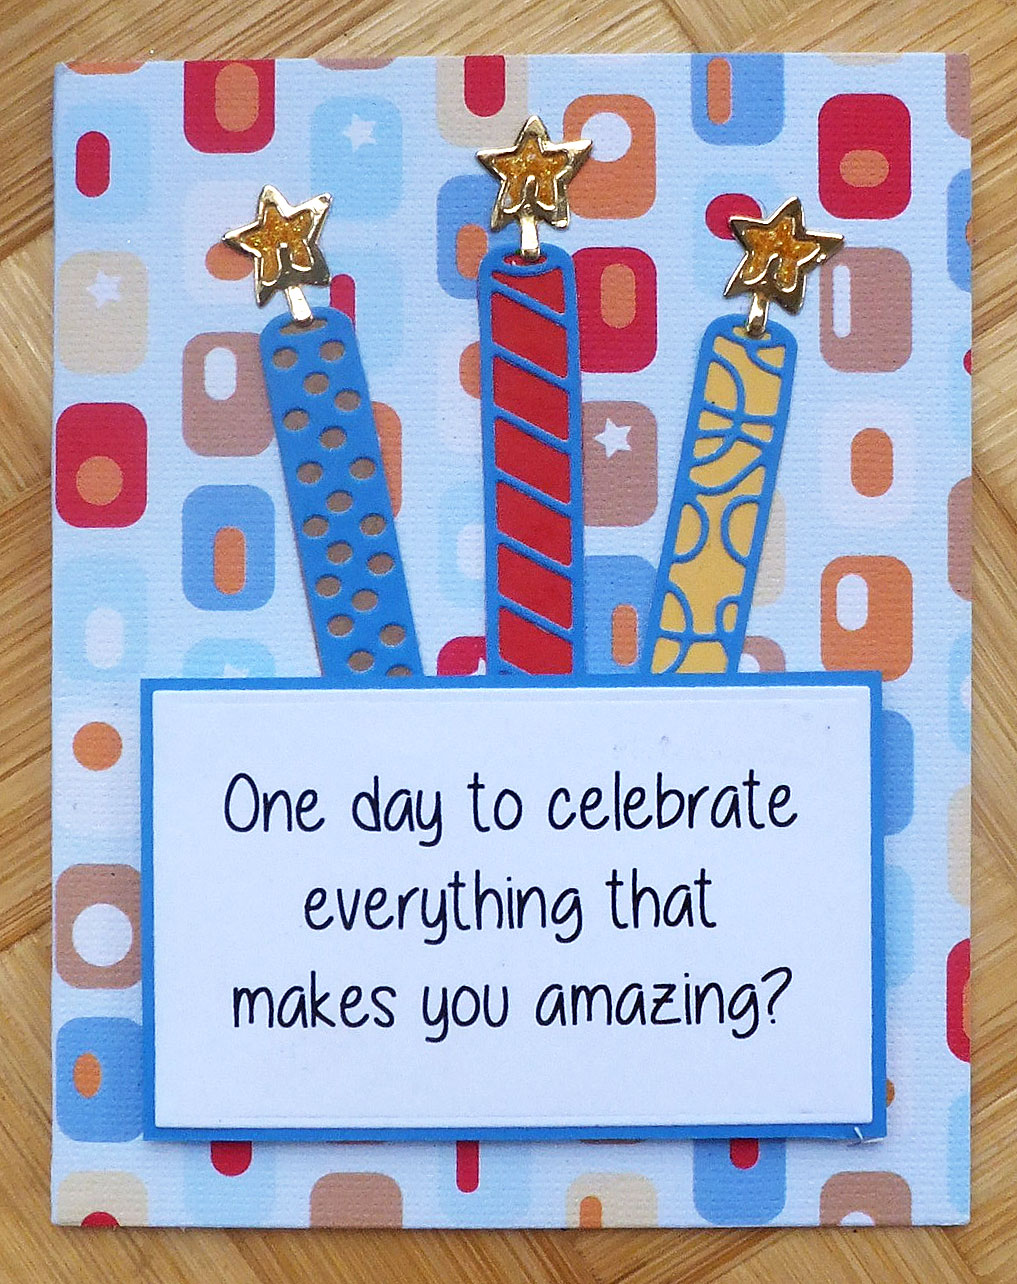
A colorful birthday card...

 I'm always trying to use up old supplies, and this card was one that came out of that effort.

This colorful cardbase had been in my stash for ages. For a long time, I couldn't figure out how to use it. The sentiment, which I had printed with my computer, was matted with blue cardstock and popped up on dimensionals. I know it doesn't seem to make sense with that question mark at the end, but it will when you read the sentiment on the inside.


I selected some scrap pieces of cardstock that matched the card base and die-cut some candles.

The "star" flames were cut from yellow glitter and metallic gold cardstocks. The stars were very sparkly IRL.

The candles were tucked behind the sentiment panel and glued directly to the card base.


See? I told you it would all make sense when you read the inside!

This was fun to make and satisfying in that it used up at least a little bit of that old stash.


We are back from our little trip to watch our 15-year-old grandson play football in West Fargo, ND. Here's a photo we were able to get just after the game:


It was a chilly night so we were bundled up, but our grandson was hot and sweaty. He played nearly every minute of the game because his coach has assigned him both offensive and defensive positions. I didn't know coaches ever did that, but our grandson wasn't complaining. He loves the game!

Thanks so much for stopping by, and remember to laugh--a little or a lot--every day.
Cheryl
Monday, October 14, 2024

Bachelor Buttons and a Halloween card...


My maternal grandmother always had Bachelor Buttons growing in the flower beds around her house, so I try to plant them from time to time, too.  When I saw this AI image, I just had to use it for a card.


I embossed a white panel and adhered it to a white card base. Then I matted my image and popped it up on foam tape in the center of my card front.

The sentiment was heat embossed and added at the top.


The inside was very simple with a sentiment stamped with blue ink.


This card started with a gray card base. I cut a gray and white patterned piece of DSP and blended some gray ink onto all four edges before gluing it down.

The "BOO" die was new for this year's Halloween cards. I cut it out of some dark gray glitter cardstock. After cutting it out, I used a black Sharpie to color the spider.


I really like the webs inside the letters. They add lots of interest, don't you think?

To finish off the card front, I added a little skeleton that I had in my stash.


Once again, I added a stamped sentiment on the inside to finish the card.


We are going to watch my grandson, who is 15, play football tonight. It should be fun! It will be the first football game I have been to in a long time.

Thanks so much for stopping by, and remember to laugh--a little or a lot--every day.

Cheryl

Friday, October 11, 2024

Oops...I printed it in black and white...

I recently printed out an AI image of a floral background to use on a card. I thought I was printing it in the original palette of blues so that it would look like this:


I was going to use it to create a sympathy card. But when I picked it up off the printer, I saw that I had actually printed it in black and white!

I didn't want to make a black and white card, so I decided to blend some pink ink over the image, and this is how it turned out:

When I did my ink blending, some of the details of the petals and butterflies nearly disappeared, so I grabbed some colored pencils and did my best to add them back in. I actually liked the softening of the edges in the design, though. I think it added to the tranquility of the image.


I matted the image with black CS and added my stamped and die-cut sentiment with some foam squares.

I had considered adding a sheer ribbon, but in the end, I thought just the sentiment was enough.


I printed a sentiment for the inside at the same time that I printed the floral image (I do that a lot!).

Now I think I'd like to try printing it in black and white again, and then blending some yellow ink onto the white/light areas. I could even add some gold and orange details and shading with colored pencils.

Thanks so much for stopping by, and remember to laugh--a little or a lot--every day

Cheryl


Wednesday, October 9, 2024

Fun with an AI image...

I recently printed out several copies of a colorful AI image that featured delicate flowers around all four sides of a rectangle. I sized the image to fit an A2 card base, printed it out, and here is what I created:


The "thanks" was sitting on my desk. It had been cut from gold metallic cardstock, and I thought it would look pretty on this card. 

I stamped the second sentiment, cut it out and popped it up on a thin strip of foam tape.

The lilac gems were a final embellishment to add a little sparkle.


The stamped sentiment on the inside creates a nice link to the gold "thanks" on the front of the card. I also added a punched heart from gold metallic cardstock.


I happened to have this oval on my desk with "happy Birthday" printed on it. I added a little bit of ink around its edge and popped it up on the center of my card. 


Then I added three butterflies--one yellow/pink (die-cut) and two little blue ones (punched). The blue ones each have a blue gem in the center of their bodies.


A simple sentiment was stamped on the inside.


For this card, I once again reached for a sentiment that was laying on my desk. I cut it into three separate words, lightly inked the edges, and popped each one up at an angle.


This time, instead of adding butterflies, I scattered a few blue gems around my sentiment words.


I stamped the same sentiment in this card as I had used on the previous card.

These three cards were made lickety-split! They were all donated to the thrift store and have sold, so someone liked the floral image as much as I did.

I have really enjoyed using AI images for some of my cards. I know most of you probably use DSP, but I really don't want to purchase more than I already have. Printing out a few images now and then scratches my itch for new paper designs.

Thanks so much for stopping by, and remember to laugh--a little or a lot--every day.

Cheryl

Monday, October 7, 2024

Making Halloween cards with old supplies...

I had some leftover bits from last year's Halloween cardmaking sessions, so I dug into them to help me make a few cards this year.

The background paper on this card was purchased this year, but the felt hat and witch's shoes were stickers from last year. I only had a few of them left, so I'm trying to use them up on some cards.


The white circles were glued directly to the DSP and the felt stickers were placed onto the circles - no extra dimension needed!

The sentiment was stamped, cut out and then popped up with some thin foam strips.


I stamped a sentiment and a witch's hat on the inside.


This gatefold card also features some new (this year) DSP in the background, but the pumpkin image was in my stash. I'm not even sure where it came from. I adhered it to a deckle-edged, die-cut square and then glued it to the left side of the gatefold.


I used my computer to print out a sentiment for the inside and added a die-cut jack-o-lantern as an embellishment.


The moon/bat image was sitting in my stash from last year. It had been stamped, heat-embossed and fussy-cut. Also, the bat had been given some red eyes.

I cut a subtly patterned lilac panel and then inked around its edges, first with purple ink and then with some black ink.

I glued on the yellow moon/bat image and added a die-cut tree on top of that.

As a final touch, I glued some googly eyes amongst the tree branches and popped up my stamped "Ghostly Greetings."

I really do enjoy pulling out old supplies and coming up with ways to use them. As they say, "Waste not, want not."

Do you save all your bits and bobs, and do you enjoy creating something new with them? Or do new supplies get your creative juices flowing more easily?

Thanks so much for stopping by, and remember to laugh--a little or a lot--every day.

Cheryl

Saturday, October 5, 2024

Let's Craft and Create Challenge #212: Anything Goes or Just Purple (Option)...


This month, our optional challenge at Let's Craft and Create is to create a card or other project using "just purple." That was the perfect option for me because purple is my favorite color!

I started with a deep purple card base and added a pale lilac panel on which I had used a background die with a pinpoint design. I thought the hearts in the design were perfect for an anniversary card.


The sentiment was stamped with purple ink onto a scrap of the lilac cardstock and then die-cut. It's been popped up with foam squares.

I die cut the sprigs of heather out of green cardstock first. Then I cut the flower portions out of the same deep purple as the card base and glued them onto the green die-cuts.

I just happen to have the perfect lilac ribbon in my stash, so I tied a bow and glued that onto my heather bouquet.


Since the option was "just purple," I used a lilac panel on the inside of my card, too, and stamped my sentiment and a little heart with purple ink.

I really liked this simple design for an anniversary card. I have some other small flower dies that would also work, if I wanted to change up the colors.

I hope you'll join our challenge this month and enter a project of your own. I am SO looking forward to those projects that are made with the "just purple" option in mind! But I really do love seeing all of them.

Pop on over to Let's Craft and Create to see what the other members of the Design Team have made. I know you'll be inspired.

Thanks so much for stopping by, and remember to laugh--a little or a lot--every day.

Cheryl