Just a quick post today to share a gift card box that I made a while ago. I found the instructions to make this box here on Splitcoaststampers, and I absolutely LOVE it. I've shared a couple others that I have made here and here, so you can see how different you can make them look. They're fun, quick, easy and look pretty impressive to the receiver.
In this photo, you can see how the box opens up to reveal the gift card inside.
I like to present gift cards this way, rather than slipping them inside a card, because it adds the excitement of opening a small gift.
FYI, the flowers were made with a couple of Recollections flower punches, the leaves were hand-cut from glitter paper and the little doily behind them is a Spellbinders die.
This close-up shows you how the gift card sort of "pops up" when the box is open.
I made this one in colors that coordinated with the other gifts I gave for the occasion.
Well, we have a busy weekend ahead. There is a lot to get done today and a rainstorm heading our way, so I had best get a move on!
Thanks so much for stopping by, and remember to laugh--a little or a lot--every day.
Cheryl
.
Saturday, August 22, 2015
Thursday, August 20, 2015
Kraft wedding card...
When I make wedding cards, kraft cardstock is definitely not the first paper that comes to mind, but I thought I should give it a try to see what I could come up with.
I stamped my image (old stamp--a garage sale find) with Versamark and then heat-embossed it with white embossing powder.
Once embossed, I colored it with ProMarkers, being careful to stay within my white lines. I've found that alcohol markers can color the embossing if I'm not careful.
I think you can see in this photo that I used a couple of different markers on each part of the image, hoping it added a little shading and depth.
My paper lace that runs beneath my ribbon was made with the "border stitch lace" die by Marianne Designs. I love this little lace die as I think it looks like it could be tatted lace.
For the inside of my card, I used a little rose stamp across the top and a sentiment stamp that isn't really a wedding stamp. I thought it contained wise advice for any marrying couple, though, so I used it. I'm not sure of the stamp's maker, but I'll try to add that info to this post later today.
Life has been getting in the way of crafting lately. My two little Concord grape vines in the back yard have decided to produce grapes in such abundance that I have to tend to them every day for a while, picking, cleaning, cooking, mashing, straining and canning jar after jar of grape jelly. I also plan to freeze some of the juice and try my hand at some homemade grape juice. Wonder what the juice would taste like were it to ferment a bit... Hmmmm.... Concord grape wine, anyone?
Thanks so much for stopping by, and remember to laugh--a little or a lot--every day.
Cheryl
Thursday, August 13, 2015
If I told you once, I told you a MINION times...
My youngest grandchild is celebrating his 6th birthday today. Oliver (or Ollie, as we all call him), is a little character. We love him to bits, even when he gets into mischief. He truly is a little Minion with a big smile on his face, so I just HAD to make him this card:
I used an A2 yellow card base, cutting about 3/4" off the top so that I could add some hair, but have it still fit in an A2 envelope. To achieve the strands of hair, I punched a small section with my Fiskars grass border punch. I then cut the individual hairs from the blades of grass.
The goggles were cut from silver mirror cardstock and backed with white. I adhered my last two really big googly eyes and hand drew the crooked smile.
I decided my Minion needed to have the correct logo on his overalls, and a quick search on the internet found the perfect one! It was already colored blue and black, so all I had to do was print it and cut it out.
The buttons on the overalls are enamel dots.
Here's a peek at the inside of my card. I felt like both sides needed a white mat. The rounded tops on the card base and the inside mats were achieved with circle dies.
Did your mother ever say to you, "If I told you once, I told you a million times...?" Mine must have said that at least three times a day with six kids who were never paying attention and always goofing up!
Cheryl
I used an A2 yellow card base, cutting about 3/4" off the top so that I could add some hair, but have it still fit in an A2 envelope. To achieve the strands of hair, I punched a small section with my Fiskars grass border punch. I then cut the individual hairs from the blades of grass.
The goggles were cut from silver mirror cardstock and backed with white. I adhered my last two really big googly eyes and hand drew the crooked smile.
I decided my Minion needed to have the correct logo on his overalls, and a quick search on the internet found the perfect one! It was already colored blue and black, so all I had to do was print it and cut it out.
The buttons on the overalls are enamel dots.
Here's a peek at the inside of my card. I felt like both sides needed a white mat. The rounded tops on the card base and the inside mats were achieved with circle dies.
Did your mother ever say to you, "If I told you once, I told you a million times...?" Mine must have said that at least three times a day with six kids who were never paying attention and always goofing up!
I just want to wish our little Ollie a very, very happy birthday. We love you, Ollie, and hope your special day is the best one ever!
Thanks so much for stopping by, and remember to laugh--a little or a lot--every day.Cheryl
Monday, August 10, 2015
Happy birthday to a beautiful 10-year-old...
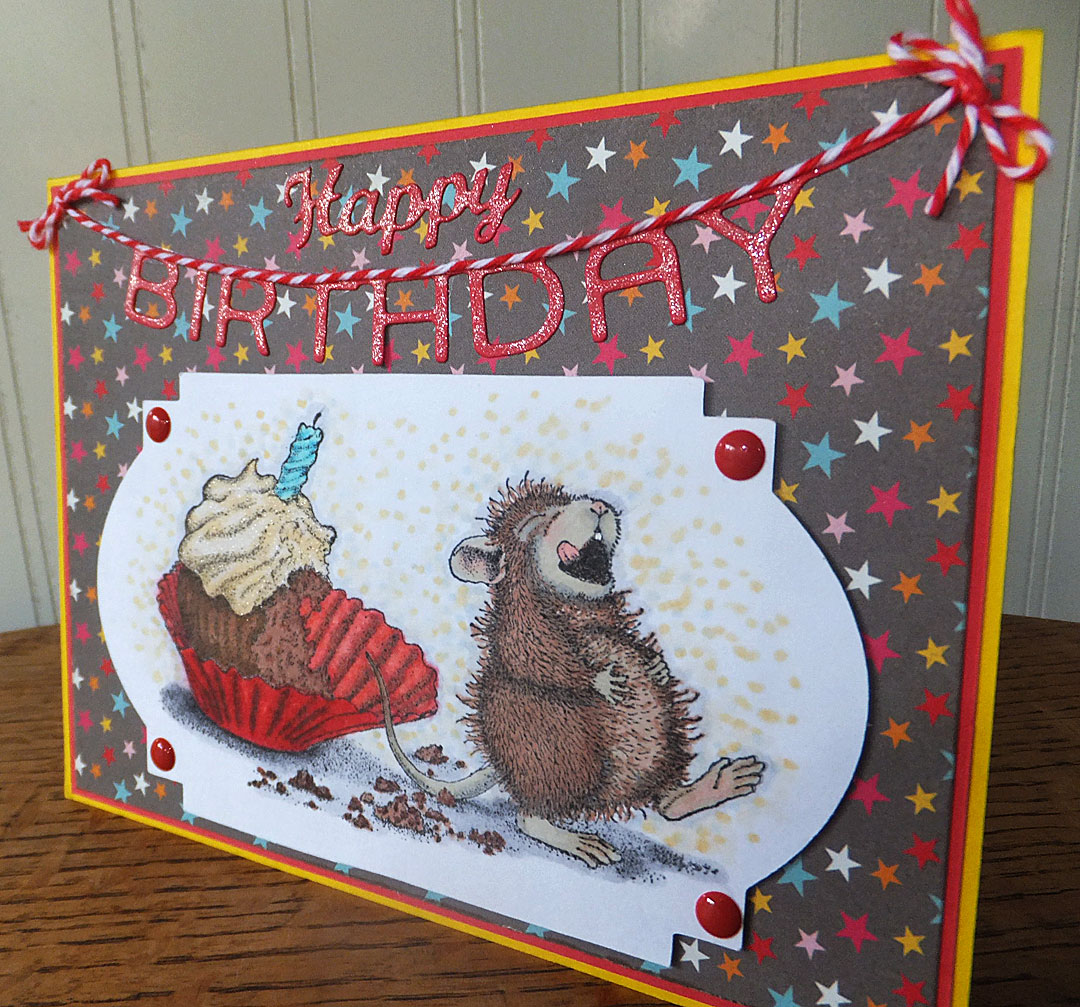
Today - August 10 - is my granddaughter Polly's Golden Birthday. She's very excited about being a 10-year-old.
Knowing what a soft heart she has for animals - especially small ones - I decided to use a House Mouse stamp for her card.
Polly has a hamster named "Chubs," and this little mouse reminds me of Chubs, who does his name proud with his rotund little physique.
I colored the image with my ProMarkers. I also added lots of dots in the background with three different pastel markers. I'm not sure this really works well, but the white cardstock just didn't look right to me.
I love my clear Wink of Stella pen and used it on the frosting to add just a little sparkle. I'm hoping if you click on the picture at right to see it in a larger format, you'll be able to see the glitter.
I also added a die-cut "Happy Birthday." The "Happy" is from Elizabeth Craft Designs and the Birthday banner is by Die-Versions.
I also added some Wink of Stella to all of the letters and adhered some twine across the top of the banner with a little bow at each end.
It's a little hard to see the red letters against the brown patterned paper. I think if I make this card again with the same papers, I'll use some yellow CS for the Happy Birthday.
My inside is pretty simple with just some layering and a stamped cupcake. My sentiment was computer generated.
August is a very busy card-making month for me. We have four grandchildren and several other family members and friends who all celebrate their birthdays this month. I always feel a great sense of accomplishment when I get the August cards made and sent or hand-delivered.
I'm entering this card in the following challenges:
Seize the Birthday: Anything Goes
Simon Wednesday Challenge: Tie It Up
The Ribbon Girl: Any Image Anything Goes
Edited to add: I am also entering this card into the House Mouse Monday Challenge #200, taking advantage of their Anything Goes option.
Thanks so much for stopping by, and remember to laugh--a little or a lot--every day.
Cheryl
Friday, August 7, 2015
Another card from freebie stamps...
I LOVE getting the little extras that are sent with each issue of Cardmaking & Papercraft magazine. In the last issue, some lovely Asian-influenced stamps were included, and I decided to make a card with them right away. Here's what I came up with:
Isn't this a lovely image? I was immediately drawn to this beautiful lady and her floral parasol. I first selected a pre-made card base that I thought would provide the perfect background. Then I got out my red cardstock to use as a mat for my image and for the pretty edge on the right side. I actually used this Martha Stewart border punch, but I cut off all the little teardrops, which I thought might get bent or wrinkled anyway in this application.
I colored the obi sash with my ProMarkers and paper-pieced the kimono with some deep red patterned paper.
I actually paper-pieced the parasol with some plain blue paper and then colored in the flowers and leaves, again with my ProMarkers. The gold flower centers were added with an opaque metallic marker.
I don't recall which stamp set the sentiment is from. I looked at so many "thank you" stamps to determine which one would work best, and then I didn't write down which one I selected!
On the inside of my card, I added the narrow piece that had been cut off to allow for the fancy red border. I decided it made the border look more finished and purposeful.
The stamp set also included this pretty little hand fan, which I colored with my ProMarkers. Because alcohol markers will bleed through ordinary cardstock, I stamped this on a piece of white cardstock that was slightly smaller than my card base and adhered it on the right side after I was done coloring.
All in all, I was pleased with how this card turned out. It was fun to create with some new and very different (for me) stamps. I'm already looking forward to the next issue and the freebies that will inspire me again, I'm sure!
Thanks so much for stopping by, and remember to laugh--a little or a lot--every day.
Cheryl
Wednesday, August 5, 2015
Let's Craft & Create Challenge #104: Pearls or Lace
Today we begin a new challenge at Let's Craft & Create. We hope you will join us in creating a project featuring pearls or lace. For inspiration, the DT has come up with some amazing creations. Mine is below, but you'll want to look at all of them. They are sure to inspire you!
For my project, I have turned to one of my favorite color combinations: red, black and white. I realized that I did not have any anniversary cards in my card box, so that is what I decided to make.
I selected a deep red card base and then began choosing some black and white elements to go along with it. The first thing I did was to cut out a large label shape out of black cardstock for my centerpiece, using a Lifestyle Crafts die.
The lace across the center of my card is some that I found at a thrift store. I love when I can find treasures like this for just a few pennies! I backed it (partially) with a strip of the red cardstock to highlight it. Otherwise it might have gotten lost on my patterned paper.
The foliage is a memory box die-cut that I cut out of some wide glitter tape. The white flowers were made with the Martha Stewart hydrangea punch and the red flower is a Spellbinders die.
This photo shows the white flowers and the glittery foliage a little better.
Flat-backed pearls were used for the flower centers and also scattered around them for a little more bling.

My sentiment was stamped onto a little circle that was cut with a Spellbinders die. It's difficult to see, but those are little embossed hearts around the edge of the circle.
I used the same label die for the inside of my card and a Fiskars sentiment stamp. Do you see the two little pearls that I added to the left of the word "Happy?" I thought I needed a little bling on the inside of my card, too!
I hope you will check out all of the DT projects. There are so many great ideas and wonderful techniques that you will want to see.
For my project, I have turned to one of my favorite color combinations: red, black and white. I realized that I did not have any anniversary cards in my card box, so that is what I decided to make.
I selected a deep red card base and then began choosing some black and white elements to go along with it. The first thing I did was to cut out a large label shape out of black cardstock for my centerpiece, using a Lifestyle Crafts die.
The lace across the center of my card is some that I found at a thrift store. I love when I can find treasures like this for just a few pennies! I backed it (partially) with a strip of the red cardstock to highlight it. Otherwise it might have gotten lost on my patterned paper.
The foliage is a memory box die-cut that I cut out of some wide glitter tape. The white flowers were made with the Martha Stewart hydrangea punch and the red flower is a Spellbinders die.
This photo shows the white flowers and the glittery foliage a little better.
Flat-backed pearls were used for the flower centers and also scattered around them for a little more bling.
My sentiment was stamped onto a little circle that was cut with a Spellbinders die. It's difficult to see, but those are little embossed hearts around the edge of the circle.
I used the same label die for the inside of my card and a Fiskars sentiment stamp. Do you see the two little pearls that I added to the left of the word "Happy?" I thought I needed a little bling on the inside of my card, too!
I hope you will check out all of the DT projects. There are so many great ideas and wonderful techniques that you will want to see.
Cheryl – that’s me!
For more information about the challenge and the prize, visit the Let's Craft & Create blog and link your Pearls or Lace project there soon.
Thanks so much for stopping by, and remember to laugh--a little or a lot--every day.
Cheryl
Saturday, August 1, 2015
Wedding bells...
My nephew is getting married today, so here is the card I have made for him and his new bride:
I decided to go with an all ivory card and lots of embossing. For my dry embossing, I used a Cuttlebug folder called "Textile Texture." I also tried something new (for me) to adhere this panel to the card, and that was to add a full-size piece of fun foam behind it to pop it up. It worked great and added a lot of stability to my embossed panel. Sometimes, the embossing can weaken a piece of cardstock, and using fun foam this way seems to remedy that.
I used some Tea Dye distress ink on the edges of all of my card's layers, including the Spellbinders oval that I cut for my sentiment. The embossing powder I used is called "Pirate Gold." I think it's a little darker than a bright gold would be, so it works well for sentiments.
I happened to have some ivory ribbon that had a wee bit of gold thread in it, so I used that across the center of my card.
I also had some tiny, ivory-colored gathered ribbon trim that worked perfectly at the top and bottom of my front layer to finish it off. I used some strong, narrow tape to attach it to the back of my panel.
For the inside of my card, I simply layered a couple pieces of my ivory cardstock. On the top layer I had printed the sentiment I wanted to use. To get the color of my font just right, I looked up the RGB numbers for metallic gold. Then I simply darkened it (all this was done within Word) until I had the right shade.
As a final touch, I heat-embossed the same little leaf that was also on the front of the card.
As you read this, I may be witnessing the vows of my handsome nephew and his lovely bride. I love weddings! They're such happy occasions. Besides that, they're often filled with lots of great crafty ideas. (he he) I'll be looking for those, too.
Thanks so much for stopping by, and remember to laugh--a little or a lot--every day.
Cheryl
Subscribe to:
Posts (Atom)