Wish List

Friday, October 30, 2020

Some final Halloween cards...

Here are a few final pics (and a short video) of a couple of the Halloween cards I made this year. As I have said before, I really love making them. I'm not sure why...I guess I'm just a ghoul at heart!

For this card, I cut my "Boo to you" out of self-adhesive fun foam. That made it very quick to apply to the front of my card. 

I have a set of six small ghost dies that I just love. Each ghost has a different shape and expression, and I've used four of them on this card. The bats, too, are from a favorite set of bat dies of various sizes and positions (some flying, some hanging upside down).

Have you noticed that there's a small semi-circle cut from the center right of my card? That's because this card was made as a sleeve (top and bottom edges glued together) so that it could hold a surprise. Watch the short video below to see what the surprise is.


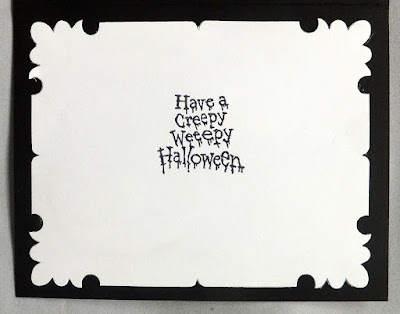
Here's another peek at the back of my card. 

It was fun to make these, and I hope the grands had fun pulling out their pop-up pumpkins.


For this card, my sister gave me several spider web die-cuts like the one you see in the right hand corner. In fact, she gave me enough that I have some left to use next year, too. Thanks, Michelle! I love the curl-i-ques on the ends of the web. 

You may have noticed that the spider's body looks a little different than the rest of him, and that's because I added some glitter pen to it.

My sparkly rickrack was a decorative piece I had in my stash, as was the poison bottle sticker. 


For the inside of my card, I had a sentiment printed on some cardstock from last year. I decided to use a long, skinny, rectangular die to cut out each part of it. 

As I was making my last cut, the cardstock moved as it went through my Big Shot and caused "in the night" to be crooked. 

I considered re-doing the print-out and re-cutting it, but then thought, "This is a Halloween card! Things get a little crooked on Halloween, so why not just go with it?" And so, I did.


It looks like we will have some beautiful weather this weekend. It's been so cold and dreary, so I am looking forward to a little sunshine and mild temps.

Thanks so much for stopping by, and remember to laugh--a little or a lot--every day.

Cheryl

Tuesday, October 27, 2020

Simply sunflowers...

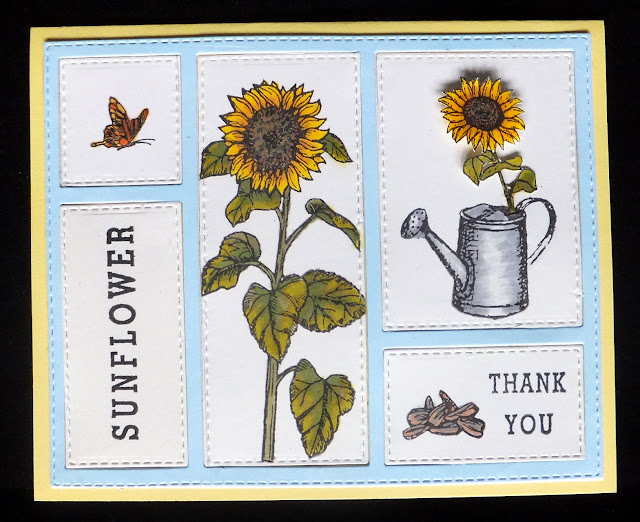
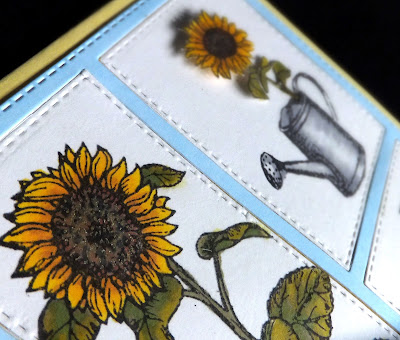
 I received a sunflower stamp set from In Love Art Shop and decided to use as many of the stamps from the set as I could on one card. FYI, this set is available at https://inloveartshop.com, and you can use the code G-26257 for a 15% discount.

I love the look of an entire field of sunflowers with their faces turned toward the sun. I learned recently that only immature sunflowers follow the arc of the sun as it moves across the sky. Mature sunflowers react to the sun the same as any other flower.

Anyway, I cut my frame twice and glued them together to give it a little dimension and sturdiness. Then I stamped all of the negative pieces, colored them with Promarkers and put them back in place.


My little butterfly was covered with Wink of Stella twice to give it lots of shimmer and shine.


To put the stem of my smallest sunflower into the watering can, I made a small slit in the top of the can. After fussy-cutting the flower, I slipped the stem into the slit and popped the flower head up on a foam square.

I left the inside of my card blank so that I can write a personal note.

When I was 21, I had my own unique run-in with sunflower seeds. I use to love eating them, and I would chew on the shells to get all the salt out of them (I can be a bit of a salt-a-holic). I believe that I must have swallowed a sliver of a shell that lodged in my appendix, causing it to become inflamed. I was taken to the emergency room with severe abdominal pain and was immediately whisked into surgery to have my appendix removed. In those days, an appendectomy was major surgery, and I was in the hospital for an entire week! Since then, I haven't eaten many sunflower seeds.

Thanks so much for stopping by, and remember to laugh--a little or a lot--every day.

Cheryl

Saturday, October 24, 2020

Halloween is just around the corner...

 Here are a couple of the 25 or so Halloween cards I made:

This card was inspired by one I saw on Pinterest. I found a ghost image in the free clipart online and traced it with my Silhouette. I also used my Silhouette to create a speech bubble and to write the sentiment on it with an attached sketch pen. 

The bow was cut from glitter CS using a tiny die that I happen to have. No idea what set it came from, it was simply in with my other bow dies. 

The spider web is a portion of a web doily. I bought a package of them (black, orange and gold) a couple of years ago. I use them every Halloween, but they never seem to get depleted. Spooky!


My inside sentiment was computer-generated. I added a strip of my green DSP across the bottom. I hope it looks decorative, but it's really covering up the fact that I cut my panel too short!

I added another little bow here because I thought it looked cute and added a little color and sparkle to the inside.


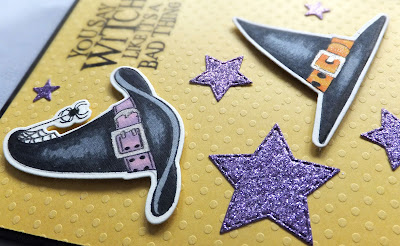
For this card I used a new Halloween stamp set that features witches' hats. The sentiment on the front is from the same set.

I stamped the hats with Memento ink and then colored them with Promarkers before adhering them to my card with pop dots. 

My yellow background was cut from a sheet of factory-embossed cardstock. 

A few glittery die-cut stars were all that was needed to finish off my card front.


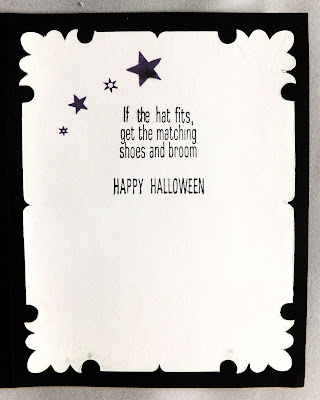
On the inside of my card I used a pre-cut fancy panel that I had in my stash.

The line-of-stars stamp and sentiment are from the same stamp set as the hats. I've actually added some Wink of Stella to the stars, but it doesn't show up in the photo. Also, they've been stamped with dark purple ink, even though it looks black.

This week, I managed to get all my Halloween cards in the mail, and now I'm trying to sort through and clean up the mess in my craft area. Sheesh! I don't know how I manage to put things in such disarray when I'm crafting. It's nice that I can just turn my back on it, though, and walk away at the end of the day since it's in the basement!

Thanks so much for stopping by, and remember to laugh--a little or lot--every day.
Cheryl

Wednesday, October 21, 2020

Twofer Card Challenge: Silhouettes...

 Here I am again, just under the wire, posting my entry for the latest Twofer Challenge.


Since I was in the midst of making Halloween cards (I just need to make three more and I'll be done!), I thought I'd make a spooky card and a decidedly non-spooky one for this challenge.

I guess I should have photographed these on a lighter colored surface, but you'll be able to see each of them better in the following photos.

I actually really loved how this card turned out. I used a piece of gray/blue cardstock that had some sparkle in it. It was cardstock that was left over from my daughter's wedding--and that was 17 years ago!! It's time I used it, don't you think?

I recently purchased some Wilted Violet Distress Oxide Ink and, after masking off my moon, I blended some of that onto my panel starting at the bottom.  I LOVE Oxide ink and wish I had more of it. Doesn't it almost glow?

Then I began blending a darker purple hybrid ink from the top down to where it met up with the lighter color. Finally, I blended just a little black Memento ink around the top edges and as clouds across my moon.

I've had my tree die for a very long time. I think it's by Spellbinders, and it was one of the first dies I ever bought. The bats were also die-cut, and my three little pumpkins are dimensional stickers.

The sentiment was heat-embossed with silver EP.

For the inside, I happen to have some of these fancy pre-cut rectangles and decided to use one of them. It was just the right size.

I stamped my sentiment, and this card was done.


I've been itching to use the NBUS stamp you see on this card, and I thought it would go well with a white tree and some tiny "heart" blossoms. I love how it turned out--simple but it gets the message across! And since the stamp set is NBUS, I'm entering this card into the latest NBUS challenge.

I cut the tree from some packaging material that had a glossy finish. I think it really added to the whole look of my card.


On the inside, I used another one of those fancy die-cut rectangles. I added another sentiment from the NBUS stamp set I had used on the front and finished it off with a single pink heart.

I sure hope this card will brighten someone's day.

Last week I got a large zucchini from a neighbor. I have used all but one small piece of it, and here's what I made: 5 loaves of zucchini bread, 1 dozen zucchini muffins, 1-9"X13" zucchini chocolate cake and some raw zucchini slices to have with Ranch dip. That was all from ONE zucchini. I should have taken a picture of it to show you how big it was.


Thanks so much for stopping by, and remember to laugh--a little or a lot--every day.
Cheryl


Tuesday, October 20, 2020

An October birthday card...


This was a card I made for my son-in-law's birthday, which was just a few days ago. The pick-up die set came with a pumpkin die, so given that it is October, I decided I may as well fill the bed up with pumpkins! And I thought those big pumpkins went well with the die-cut message on the tailgate.

I created my clouds with a blending brush and a torn piece of cardstock. My stamped message is from a masculine set of fun sentiments.

The pick-up was really easy to put together. Even though there are a few small pieces, it all fit together quickly and easily. I added some vellum in the rear window, can you tell?


I kept the inside simple--just a stamped birthday greeting and a little bit of colored cardstock on either side of my stamped panel.

We got 8-9" of snow here today. It was very wet, heavy stuff that made the roads icy. I heard on the news there were 350-400 accidents in the metro area. I'm just glad I didn't have to drive anywhere!

Thanks so much for stopping by, and remember to laugh--a little or a lot--every day.
Cheryl


Saturday, October 17, 2020

More In Love Art Shop products...


 This is another card using some fun In Love Art Shop products. First, I laid this stencil over the white panel and blended on three different colors of ink. 

I used this die set to cut the word "thankful" and its vellum shadow.

Both the word die and the stencil can be purchased at In Love Art Shop using this discount code: G-26257

I found a stamp in my stash that said "for you" and created a little sentiment strip to add with foam tape below my main sentiment word.

Because I have a hard time leaving well enough alone, I added some clear Nuvo drops to the little circles in my stencil design. They added some nice texture and didn't detract from the overall simplicity of my card, so I actually rather liked them when they were done.

The inside of my card was left blank. I only added a narrow left-over strip of my stenciled background. 

If the weather cooperates (we actually had snow flurries yesterday!), I have decided to plant some tulip bulbs today. I'm excited about having something special to look forward to in the spring. I love tulips and have planted them before, but they have always died out on me after one season of blossoms. Not long ago I received dozens of tulip bulbs from Holland as a belated birthday gift from my stepdaughter and her family, so I really hope these bulbs take hold and produce flowers for at least a few years. 

Thanks so much for stopping by, and remember to laugh--a little or a lot--every day.

Cheryl
Monday, October 12, 2020

Witch silhouette for Halloween...


For this card I used this stamp set from the In Love Art Shop (Discount code: G-26257). I began with an off-white panel with a circle mask on the center upper half. With my mask in place, I used my blending brushes to apply some ink until I had a spooky night sky.

Once my ink blending was done and the ink had thoroughly dried, I stamped my witch and bats with Versafine black ink. I like this ink for solid images because it gives such great coverage. I also blended some black ink onto the bottom of my panel.

The jack-o-lantern was stamped onto some orange CS. I added glitter pen to the eyes, nose and mouth for some sparkle. I attached my pumpkin to my sentiment strip, which was popped up on foam squares.


The inside of my card was stamped with a verse and a couple more bats. I think this is one of the quickest Halloween cards I have ever made! It was so easy to pull together. This would definitely be a great stamp set (Discount code: G-26257) to add to your Halloween card-making supplies. Because I love making Halloween cards, I try to get at least one new stamp set each year.

We've had such beautiful weather for the last week or so, but I think it's all going to change very soon. I had to turn the heat on tonight as it is getting quite chilly out. I am NOT looking forward to snowbanks!

Thank you for stopping by, and remember to laugh--a little or a lot--every day.
Cheryl


Friday, October 9, 2020

Gorgeous autumn leaves from In Love Art Shop...

 I received a wonderful stamp set from In Love Art Shop (Discount code: G-26257that I had to use immediately, because I had some techniques in mind that I wanted to try.


Just look at those lovely leaves! To achieve the different colors in them, I first blended some fall ink colors randomly onto an off-white piece of cardstock. Once the ink had thoroughly dried, I cut the piece to size, stamped my leaves with Versamark ink and sprinkled them with clear embossing powder, which was then heat set.

After that was done, I sponged on some dark brown ink, which the embossed images resisted. The clear embossing powder allowed the colors to shine through.

The design on each leaf includes a little round circle, which was the perfect place to glue a sequin for just a little sparkle.


On the inside of my card, I added a computer-generated sentiment and a small leaf punched from some of the original ink-blended paper I had made.

I loved how this card turned out, but I wanted to try something else with this stamp set, which I've shared with you below.


For this card, I took some of my ink-blended cardstock, stamped my leaves with Versamark once again, but this time I sprinkled them with gold embossing powder and heat set it.


I fussy-cut each leaf (they're pretty simple to cut out) and added them to an embossed dark brown background. Finally, I added a gold die-cut word and a few sequins.


For this card I added one of the leaves to a banner and put a little coordinating bow on the stem. The same die-cut word was also glued to my banner.

Aren't those leaves pretty! This stamp set was so much fun to play with. You can find it here on the In Love Art Shop site.  Discount code: G-26257


We're at peak leaf-viewing in Minneapolis right now. This is a picture that was taken by my step-son Bryan Winget. He's a wonderful photographer, and he snapped this photo of one of the streets in the Minneapolis/St. Paul area. 

Thanks so much for stopping by, and remember to laugh--a little or a lot--every day.
Cheryl

Monday, October 5, 2020

Let's Craft and Create Challenge #164: Paper strips instead of ribbon...

Can you believe our summer is over and Autumn is here in earnest? We are quickly approaching peak leaf colors here in Minnesota. The trees are truly beautiful! 

But the beginning of a new month also means there's a new challenge at Let's Craft and Create. This month's challenge is to create a card using paper strips instead of ribbon. Remember when we used to use a LOT of ribbon on our cards? I sure do, which is why I have two boxes of assorted ribbons!

Here's the card I came up with:

I die-cut three pumpkins and inked around their edges. I also die-cut the word BOO out of black glitter cardstock and added one letter to each of the pumpkins. 

I spaced my pumpkins evenly down the left side of my card front and popped them up on foam squares. Then I added my strips of orange dotty paper which had been fishtailed on one end.

My final step was to add some die-cut bats. I just love the hanging ones and couldn't resist putting one on the front and one inside.

Here is a little better look at my pumpkins and the glittery letters on them.


Here's a peek at the inside where you can see my  stamped sentiment and two more die-cut bats.

I don't know if you've noticed, but I used a white gel pen to dot their eyes, just to give them a little character.

Now I hope you'll take a stab (had to throw in that creepy Halloween term) at making a card using strips of cardstock or DSP instead of ribbon. The Design Team has lots of inspiration for you at Let's Craft and Create. And don't forget about the prize for our winner! There's always a prize at LC&C, which makes the challenge even more fun.

Thanks so much for stopping by, and remember to laugh--a little or a lot--every day.

Cheryl


Friday, October 2, 2020

Pretty in purple...

 This card is sooooooo simple, but I actually really like it.

After adding my DSP to the front of my card, I punched a couple of holes (they were actually small slots) in preparation for adding a faux bow.

Once that was done, I die-cut a wildflower, a pussy willow twig and a leafy twig. I added them to my card front along with a heat-embossed sentiment. Then, I created my faux bow, and my card front was done.

I also put my DSP on the inside of my card, along with a wonky-stitched rectangle and a get well sentiment.

So simple, so quick, but I love the way it turned out.

Today I received some tulip bulbs from Holland. My stepdaughter in Germany sent them to me as a belated birthday present. They are a variety of types and colors, and I can't wait to get them planted and see them bloom next spring. I don't have the best of luck with tulips--they tend to only last a couple of years--but I really enjoy them anyway.

Thanks so much for stopping by, and remember to laugh--a little or a lot--every day.

Cheryl