Wish List

Tuesday, March 31, 2020

Easter gatefold...

I've had some pre-made gatefold card blanks sitting around for a few years, so I decided to use one of them for an Easter card.


The card base was pink, so I picked out some pretty DSP (Stampin' Up) and went to work.


I found some matching cardstock and used an unbranded die to cut a fancy oval and some flowers. I also cut some leaves from some gray cardstock

I inked the petals of my flowers before shaping them and gluing them together. The flower centers are gray Nuvo Drops. I also did a little inking on the edges of my fancy oval.

My sentiment was heat-embossed with silver embossing powder.


In my Easter card parts collection was this stamped sentiment on a large, shaped label. I decided to add it to the inside of my card since the words nicely reflected the sentiment on the front of my card.

Even though it seemed like I pulled this card together with card parts, I really liked how it turned out.


I think spring has truly come to Minnesota. Yesterday was a beautiful day so my DH and I went for a bike ride around Lake Nokomis, which is quite near our house.


You can see in this pic that the trees have not yet leafed out, but our Maples are actually starting to do that. I think the lilac bush will soon get leaves, as well. They're usually very early to leaf out in this part of the country. I also noticed that our rhubarb is up. I love any and all rhubarb recipes and can't wait to make some sauce, bread, cake, etc. with it.

Thanks so much for stopping by, and remember to laugh--a little or a lot--every day.
Cheryl


Friday, March 27, 2020

Colorful foam flowers...

My sister shared with me a pretty card she had made by die-cutting some flowers out of thin foam and then using her heat gun to shape them. Since I have had some thin foam sitting in my stash for months, I decided to give it a try, as well.


I cut out 5 different sizes of my flower shape--three of the larger ones for the petals and two for the yellow centers. I also cut out some leaf shapes and inked some veins through the die. The thin foam that I had on hand was brightly colored so I didn't do any other inking.

I held each layer with a tweezer while using my heat gun to heat the foam a bit. I did this from a couple of inches away and made sure to keep my heat gun moving evenly over the layer as it shrank and curled a bit. I continued to shape them with my fingers while they were still warm. I did the same with my leaves.


When that was done, I glued all my layers together and adhered them to my card with a hot glue gun.

My sentiment was heat-embossed onto my die-cut circle.


I decided to make this card a Mother's Day card and used a couple of different stamps for my inside sentiment.

Because of the bulkiness of my flowers, this card will need a box-type envelope, which I will make for it.

As another somewhat crafty endeavor today, I am going to make some noodles. There were none on the shelves in the store, so I will use my hand-crank noodle maker (which actually works really well) to make some noodles of varying widths and lengths. I have a particular recipe I want to make that calls for extra-wide noodles, so I'll be giving that a try this weekend.

Thanks so much for stopping by, and remember to laugh--a little or a lot--every day.
Cheryl

Tuesday, March 24, 2020

Stencilling some Easter cards...


I had some fun using a stencil to make these simple Easter cards.


I used several different pastel inks and some pastel-colored cardstock for a mat on each card.


I die-cut the sentiment from the cardstock as well as from some foam board (from Dollar Tree). The CS sentiment was glued on top of the foam board one and then both were adhered to the card front.


I tried angling my sentiment on one of the cards but decided I really didn't like it that way.


So the rest were made with the sentiment placed horizontally, and a few coordinating sequins were added for sparkle. I'm not sure why the sequins in the photo above look so blue; they really are purple!

The inside of each card featured a coordinating mat and a computer-generated sentiment.

I had so much fun making these cards. I don't know what it is about stenciling that I find so satisfying, but I really do love it!

We have been staying home for the most part. My DH still goes to his office each week day, but he is the only one there, so there's not much chance of him coming into contact with any nasty viruses.

I've been doing more cardmaking. I even got some Christmas cards made that I will share with you later.

Thanks so much for stopping by, and remember to laugh--a little or a lot--every day.
Cheryl

Friday, March 20, 2020

Easter colors...


I had this pretty striped cardstock in my stash, and with its Easter colors, I thought it would make a perfect base for an Easter card.

I also had a fancy doily die-cut that's been in my card parts box for more than a year! It was cut out of white cardstock, so I applied some very pale yellow ink with a blending brush (love them!) to give it a softer look. The soft yellow nicely complements my striped background. I added a turquoise and a soft orange circle behind the doily to give some color to the negative spaces. My stamped sentiment was heat embossed and the sequins were from my stash.


I grabbed a number of floral dies to create my spray of flowers and gave them Nuvo Drop centers.


On the inside of my card, I inked around the edge of my sentiment panel to give it some definition. Then I stamped my sentiment (from My Sentiments Exactly) and added a flower.

I spent this afternoon volunteering at the local thrift shop--and yes, I took a protective face mask and gloves with me to make sure I was safe. They are very short of help right now, so as long as I feel it is safe and productive for me to go, I will do so. My brother was there volunteering, as well, and I am always glad to see him once or twice a week and confirm that he is doing okay.

Other than that, we are staying home. Friday nights are usually our designated movie nights when we go to a local theater and also to a coffee/wine shop kitty corner from the theater that has live music. Both of those venues are now closed, so we will have to have movie night at home.

How has your entertainment life changed since the Coronavirus decided to invade our/your country? I hope you'll share the answer with me and other readers of my blog. I think we need to stay in contact online as much as we can so that we all don't go stir crazy!

Thanks so much for stopping by, and remember to laugh--a little or a lot--every day.
Cheryl

Monday, March 16, 2020

Tomorrow is St. Patrick's Day...

...and I decided to make a few cards for the occasion. Here are two that I made:


I used my Silhouette Cameo to create this card. I had an image of a shamrock in my files, so I copied it and added an offset to create my shaker frame. I cut five of them and stacked them to create my frame and a space for my sequins.  I also cut a piece of clear plastic to fit my shamrock and create a window.

I really do think shaker cards are fun to receive, and this one was fun to make, too.


When I cut the "frame" part of my shaker, I was left with the negative shamrock cuts. Why not make some cards with them? This simple design came together quickly.


All of the cards I made had this sentiment on the inside, which was computer-generated.

Most of these cards are currently at the thrift store, if they haven't already sold. I hope the customers have been adding them to their shopping baskets.

Right now when we are all isolated from each other, sending a card might be a good way to stay in touch--just don't lick the envelope or the stamp!


As a final note to today's post, I want to share a little visitor that came to my yard to say hello.


I took this picture by pointing my camera lens through a couple of slats of the mini-blinds that hang on the window in a spare bedroom. Mr. Cardinal didn't seem to notice that I was even there.

Thanks so much for stopping by, and remember to laugh--a little or a lot--every day.
Cheryl

Friday, March 13, 2020

Twofer Card Challenge #25: Spring Animals...

https://twofercardchallenge.blogspot.com/2020/03/twofer-card-challenge-25-sping-animals.html

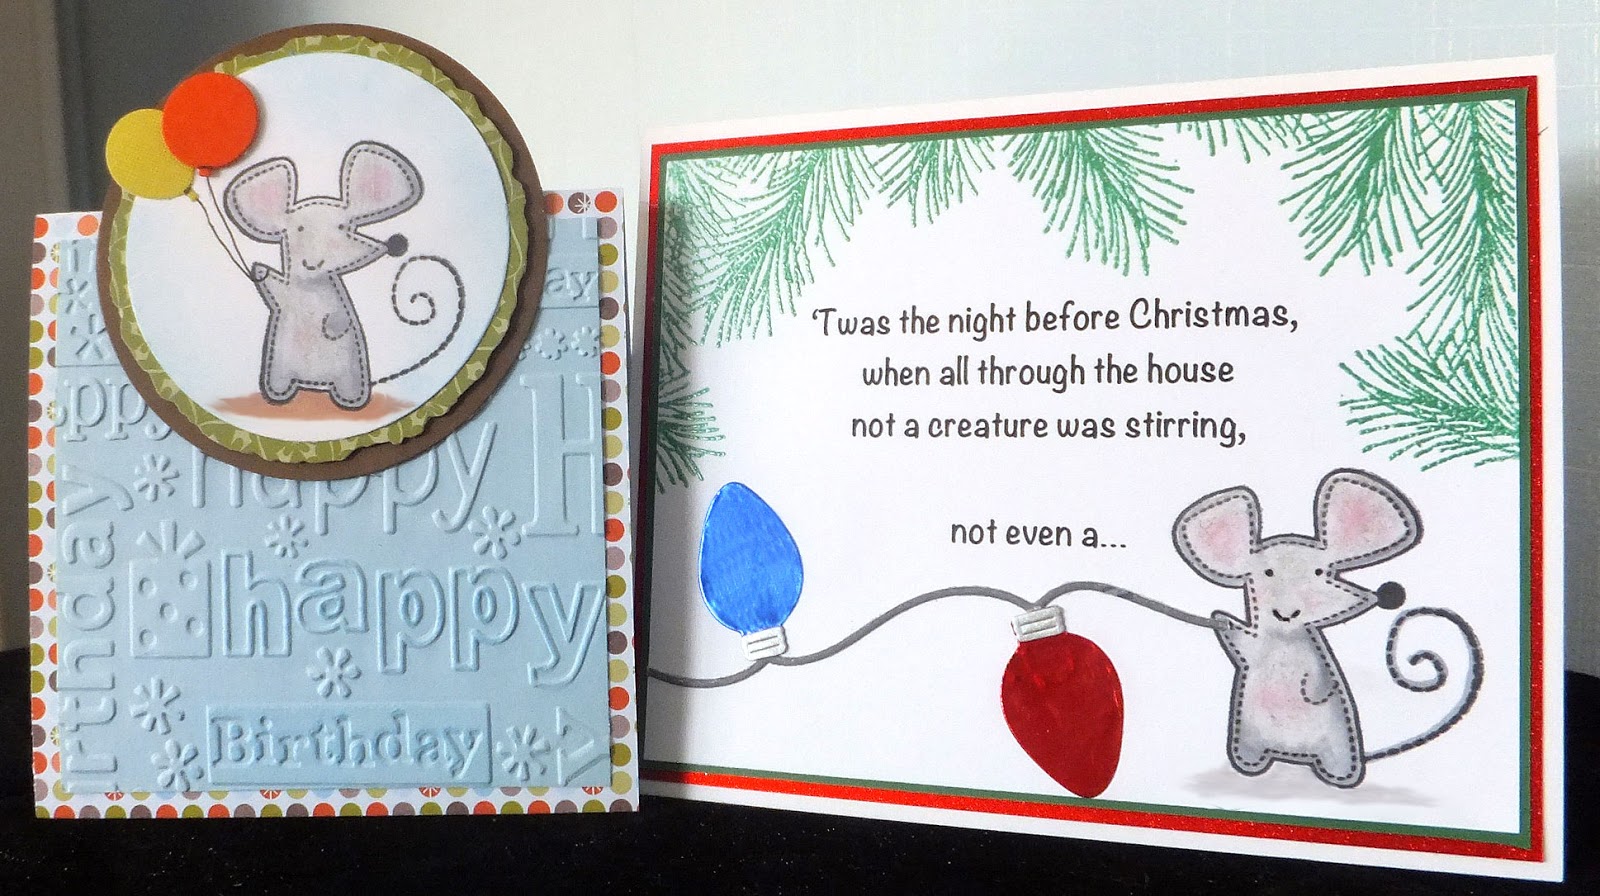
I don't have many animal stamps, so I had to search to find an image that would qualify for the latest Twofer Card Challenge.  I decided to use a little mouse image from a very, very old stamp set. It's so old that it has lots its packaging and I have no idea of the brand name.

The stamp set had a few different animals, but I chose the little mouse. Mice have babies in the spring, don't they? They probably have babies all year 'round, but I'm going to stick to "mouse babies in the spring" in order to qualify them as spring animals.


My little mice were stamped and then colored with Promarkers and colored pencils. The embossing folder that I used on the birthday card is by Cuttlebug. For the Christmas card, I heat-embossed the pine branches and used a die set to cut out the string of lights. The bulbs were cut from some colored  foil, so IRL they're very shiny.

After I took this picture, I decided to add some Glossy Accents to the mouse noses, which added a nice little bit of dimension.


This is the inside of my birthday card with its very simple, stamped sentiment.

 This part of the card measures 4 1/4" X 4 1/4".  The circle on the front extends above this part of the card to make the total height 5 1/2". That means that it will fit nicely into an A2 envelope.


My stamped Christmas sentiment is on a panel that has a double mat--one in green CS and one in red glitter paper (identical to the card front). As we all know, glitter paper is crazy expensive so before I mounted my panel to it, I cut out the center of it with a rectangular die. I also did this with the glitter paper on the front of the card, so now I have two pieces I can use on other cards.

I hope you are all staying well and keeping clear of any viruses that are lurking around. Thanks so much for stopping by, and remember to laugh--a little or a lot--every day.
Cheryl

Tuesday, March 10, 2020

Water colored rose...

Let me preface this post by saying, "I am really awful at water coloring!"  I'm trying to get better, and, in fact, yesterday I watched about 2 hours of videos trying to learn some water coloring tips, tricks and techniques.

I had thought about never sharing this card, but since I made it (and will probably use it), here it is:


I stamped my rose image on water color paper using very light ink so that I could try my hand at line-less painting. I starting by doing a little bit of coloring with my water color pencils, using at least three different colors on both the rose and the leaves. Once that was done I used my water brush to blend (sort of) the colors. After it was dry, I partially fussy cut two of the leaves so that they could hang outside my little frame.


I added some Wink of Stella to my rose blossom, and I was hoping you could see that in an angled shot. I really don't think it's visible, though. The Wink of Stella actually helped to blend my colors a little more and shift some of the focus away from my (very) amateur coloring.

I have a set of crocus stamps that I want to try water coloring for a few Easter cards. We'll see how that goes.

It's a lovely day here today, although not overly warm. I need to go out and run some errands, so I'm looking forward to being out and about with no ice and snow to worry about. It has nearly all melted--hooray!

Thanks so much for stopping by, and remember to laugh--a little or a lot--every day.
Cheryl