Wish List

Wednesday, August 21, 2024

With deepest sympathy...


My favorite method for making sympathy cards is to start by using a 3D embossing folder to add an embossed design to a piece of cardstock. I did just that with a piece of aqua cardstock, and then used a dark blue ink pad to lightly add some color to the raised areas of the design. This was then adhered to a dark blue card base.


I die-cut a leafy sprig out of vellum and adhered it to my card front.The sentiment was stamped, die-cut and popped up on foam tape.


At left you see the stamped sentiment I added to the inside.

I decided to share a sympathy card today because we sadly experienced a death in our family in the wee hours of Tuesday morning. My brother-in-law, who had come that day to stay with us for a while, passed away after suffering a cardiac arrest. He had been in poor health, so it was not completely unexpected, but deeply sad, just the same. We are still a bit in shock and trying to determine the next steps to settle his estate. He had no other close family members, so we must carry out his wishes as best we can.

Thanks for stopping by and letting me share a bit of my personal sorrow.

Cheryl

Monday, August 19, 2024

Big wishes for another grandson...


We have yet another grandson who has a birthday this month. He is turning 17 and is the one who is the incredible swimmer, He has qualified for two pro-cuts (allowed to compete in professional/Olympic level swim competitions) in the 200 yard backstroke and the 50 yard backstroke.

I chose the blue on blue DSP for the front of his card because it reminded me of water and bubbles.

Each panel on the inside includes a swimming image (clipart) that features one of the three strokes he most often swims. The two panels in the middle pop out, which adds a fun feature to the card.

Here's a closer look at the first two panels where you see the butterfly stroke on the left and the freestyle stroke on the right. All of the sentiments were created with my computer.

Here are the last two panels which show the backstroke and a pocket in which to put some birthday money. The small piece of light purple paper just shows how the money can be slipped into the pocket.

We have been working hard to get ready for three family members who are traveling here from Germany. They actually arrive today. Our grandson will stay for two weeks, our son-in-law will stay for three weeks, and my stepdaughter will stay with us until October 3. The meal planning for extra people is the biggest change for me. I'm just not used to cooking for so many people any more. My DH and I tend to eat very simple meals, and we actually LIKE leftovers.  I guess I'll have to up my game for a while. lol

Thanks so much for stopping by, and remember to laugh--a little or a lot--every day.

Cheryl

Friday, August 16, 2024

Folded book card with pockets...

 Recently, I watched this video by Heidi Collins (On Y Go! Stamping) and learned how to make a folded book card with pockets. I thought it looked like fun, and I was looking for something a little bit different for my granddaughter's birthday card.

Here's the card I made following Heidi's tutorial:

I first decided on an apple theme with pink and red elements. The apples were die-cut, and the middle one is popped up.


When the card is opened to the first section, this is what you see. Notice there is a pocket on the left that holds a tag-like card.


When the card is pulled out, this is the message and image that you see. 


When the first interior "page" is turned, there is a flap on the left that can be opened (notice the arrow that I heat embossed?). On the right is a die-cut apple basket which will hold some birthday money and another pocket that holds a second card/tag.


This is the message under the flap with a stamped apple image. She turned 19 this year, so that is why all those 19s were stamped at the top of the white strip.

I used the inside of the flap to write a personal message and sign our names. Even though it is patterned, it is a pale enough design to write on.


This is a view of the tag that was tucked into the pocket behind the apple (money) basket. The sentiment and the apple were stamped onto the white card.

I made one change to Heidi's directions, and that was to make my card 4" X 6", rather than 4" X 5 1/2". The directions can easily be adapted to a different height. In fact, you could make it a 4" X 4" card if you wanted to.

We have two more family birthdays yet to celebrate in August, but I've got those cards done and have already shared one with you in this post. I will share the other one in a future post.

Thanks so much for stopping by, and remember to laugh--a little or a lot--every day.

Cheryl

Wednesday, August 14, 2024

A never-ending birthday card...

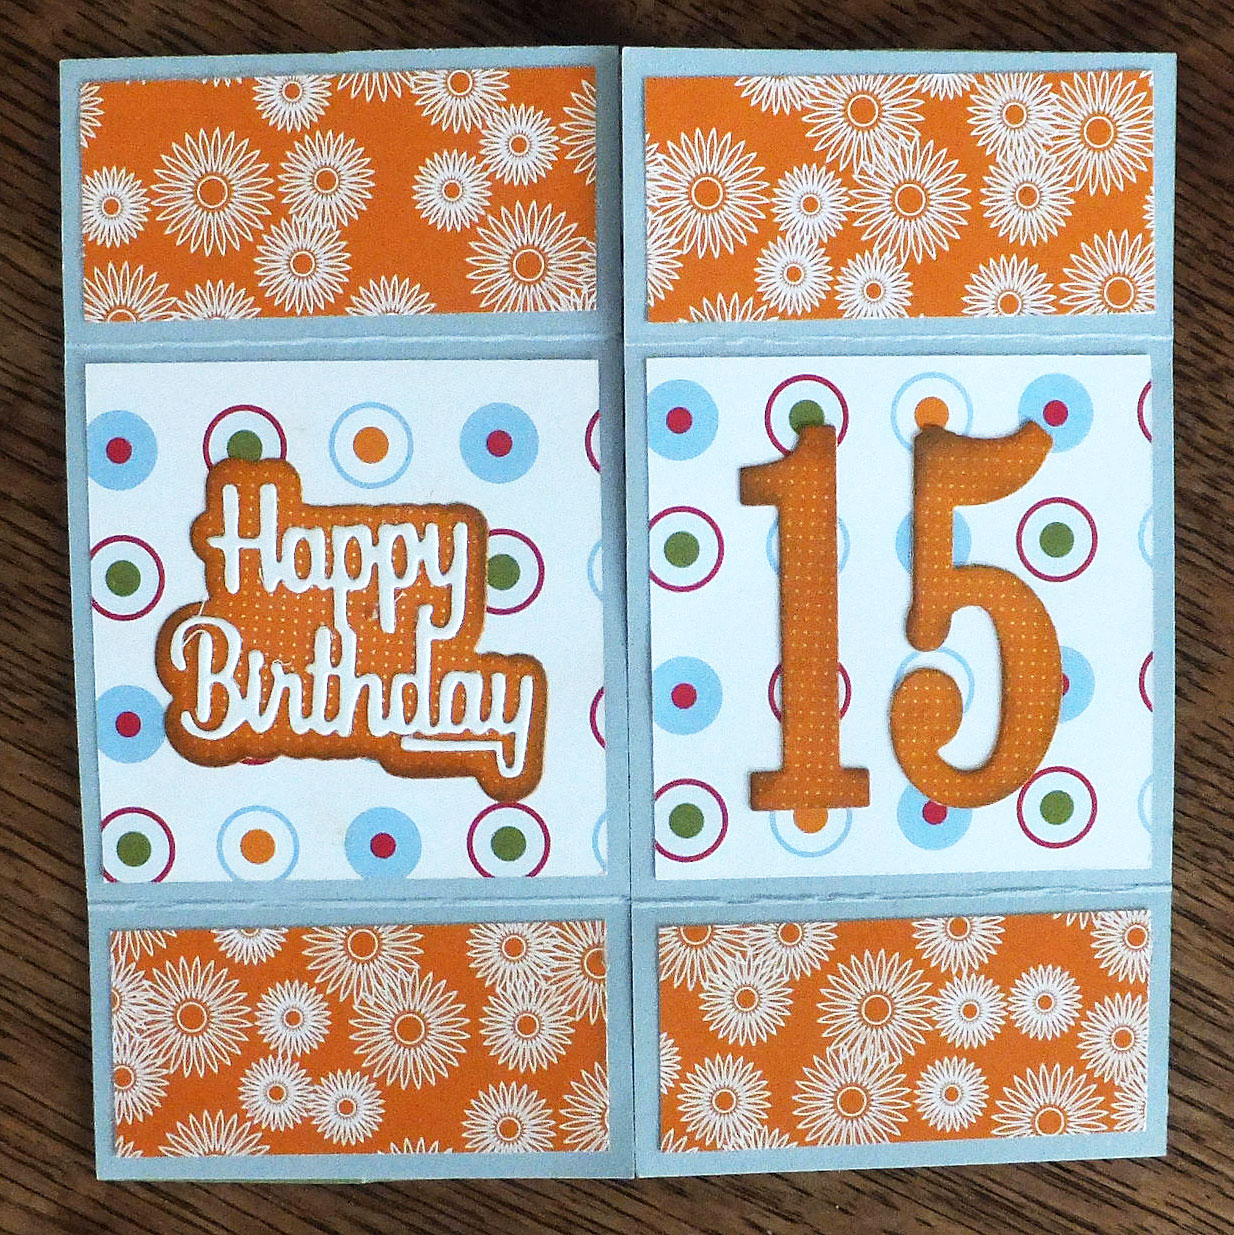
My grandson's 15th birthday was yesterday, and I decided to make him a never-ending card. If you have never made one, they are definitely fun, and here's a video that will explain how.

I made my card 6" X 6", the same size as the card in the video. I ended up making a custom envelope for it, but I made sure the envelope was rectangular (6 1/4" X 7"), because square envelopes require more postage. 

You could definitely make this card smaller, e.g., 5" X 5". You would just cut your card base pieces at 5" X 2 1/2" and score them all across the 5" side at 1 1/4" and 3 3/4". Then you'd have to adjust the size of your decorative panels to fit each area on your card. For instance, the larger square pieces would each be 2 1/4" X 2 1/4".

The photo above shows the front panels of the card, or what you see when you pull it out of the envelope.


This is what appears when the first two panels are folded back.


This is what you see after the previous center panels are folded back.


This is the final set of panels that come into view when the two center panels are folded back. The white square was left blank to give me space to write a note and sign our names. The "Happy Birthday" was made with an old border punch and was glued on so as to create a little pocket in which to add some birthday money. When these panels are folded back, you end up back at the beginning, or what you see in the first picture.

I sent my grandson a few basic instructions for opening it so that he wouldn't be completely baffled and wonder what he was supposed to do with this crazy card. I think he'll have fun with it, and maybe even wonder how the heck his grandma made it.

I finally cleaned up my tiny crafting space this week. I simply have too much "stuff" and not enough room to store it all. The thrift store continues to give me supplies when they can, and, of course, I can't say no if I can envision using them in any way. In fact, they gave me some pre-decorated scrapbook pages last week, and I was able to make four wedding cards out of one of the pages. I'll share those with you soon.

Thanks so much for stopping by, and remember to laugh--a little or a lot--every day.

Cheryl

Monday, August 12, 2024

A pop-up hummingbird card...


The front of this card is pretty boring, even though I did add some Wink of Stella to the sentiment. I saved all the real excitement for the inside!

The lacy edge on each side was cut with a really, really old die. I don't remember who made it (the packaging is long gone), but it's still one of my favorites.

It was difficult to get a good picture of the inside, but both the flower and the hummingbird pop up. Honestly, it looks much nicer IRL


It took some time to ink up the pieces for the hummingbird and the flower and put them together. Then they had to be added to the liner before it was glued to the inside of the card. If you would like to see a video of the process, click here.

I made five of these cards, one for each daughter and daughter-in-law for their birthdays. It took a couple of hours to make each one, so making five of them was definitely a time investment.

I like to make special cards for family members, but I can drive myself a little crazy trying to come up with something new each year. In fact, I've printed out lots and lots of ideas and put them into a binder so I can look through them each time I need something just a little different. It helps, but I still get a little frantic.

Thanks so much for stopping by, and remember to laugh--a little or a lot--every day.

Cheryl

Friday, August 9, 2024

A couple more masculine cards...

 I thought today I'd share a couple more masculne cards that I made to donate:

I have a men's shirt die that is quite large, but I can make it work on an A2 card by tilting it to one side. I think it looks okay at an angle.


I cut the collar, pocket and front placket out of plain cardstock. After inking them around the edges, I added them to the front of my shirt.

As a final touch, I used some dark-colored Nuvo Drops for buttons.

The sentiment was stamped, die-cut, and popped up with foam tape.


This is the sentiment I stamped on the inside.


You've probably seen me use this retro vehicle die-cut on cards in previous posts. It's the type of die that has openings that allow you to ink the cardstock while it's still in the die. That adds some nice shading to the image. 


After stamping the sentiment at the top of the white panel, I added headlights to the car and a few gears (for embellishment) cut from some silver holographic cardstock.

If you look closely, you'll see that I've also added a silver flat-backed pearl to the center of each wheel.


I kept the inside simple by just stamping "Happy Birthday." I like the font of this one for masculine cards. It has a casual look that I think would appeal to a man.

My brother's angiogram went well. He spent one night with us and then went home. I so appreciate your kind well wishes!

Thanks so much for stopping by, and remember to laugh--a little or a lot--every day.

Cheryl

Wednesday, August 7, 2024

A simple masculine birthday card...

I wanted to make a few masculine birthday cards to donate to the thrift store, so this is one of the designs I came up with. I had this piece of striped paper in my stash, which had some nice, masculine colors in it. After adding the panel to a brown card base, I chose three of the colors in the DSP for my banners, which were die-cut in different lengths.

I staggered them on the front of my card and then popped my sentiment up on top of them. It had been computer printed and die-cut.


The hat was also die-cut. The cardstock I chose to use had a bit of a sheen, so you're seeing it reflect the light in the photo at left. 

You may also notice that I have added a little ink to the hat band to help it stand out a bit more.


I stamped a sentiment on the inside and added one more short banner there as an embellishment.

I will be spending most of today at a local hospital with my brother. He is scheduled to have an angiogram done. It is likely that the surgeon will be putting a stent in place in one of his leg veins, as it has narrowed some since my brother last had surgery.

He will then come to my house for the night and hopefully he'll feel well enough to go home tomorrow. If not, he'll stay another night.

Thanks so much for stopping by, and remember to laugh--a little or a lot--every day.

Cheryl