Wish List

Friday, August 14, 2020

Gear up for a great day...

 I've been working on filling a rack with cards to sell at the thrift store. I will price them really low--most will be $2.00 or less, in order to make them really affordable. After all, a thrift store is supposed to be affordable, right? And it makes me happy to think that someone can get a handmade card for a low price.

Here is one of the cards I have made for my rack:

I've been making mostly flowery, feminine cards, but I figured I had better get my act together and make a few masculine cards, too.

I had the gear die set, so decided to make that the focal point. My sentiments (both front and inside) were computer-generated.

The cardstock that I used for the gear frame and extra gears is copper-colored with a metallic sheen.


Here's my interior sentiment. I was pretty proud of myself for coming up with this one! he he

I think it will work well for an older boy, particularly one who drives, or a grown man.

That's all I've got in the card department today.

We had a long line of strong storms work their way through Minnesota tonight. The tornado sirens went off just before the storm came through. We tend to sit up and take notice when that happens! Some funnel clouds were sighted outside the city, but there was no real damage other than a few downed trees and a loss of electricity for a few thousand residents. Thank goodness.

I hope you are all staying safe and healthy. Thanks so much for stopping by, and remember to laugh--a little or a lot--every day.

Cheryl


Tuesday, August 11, 2020

Happy birthday with a concertina step card...

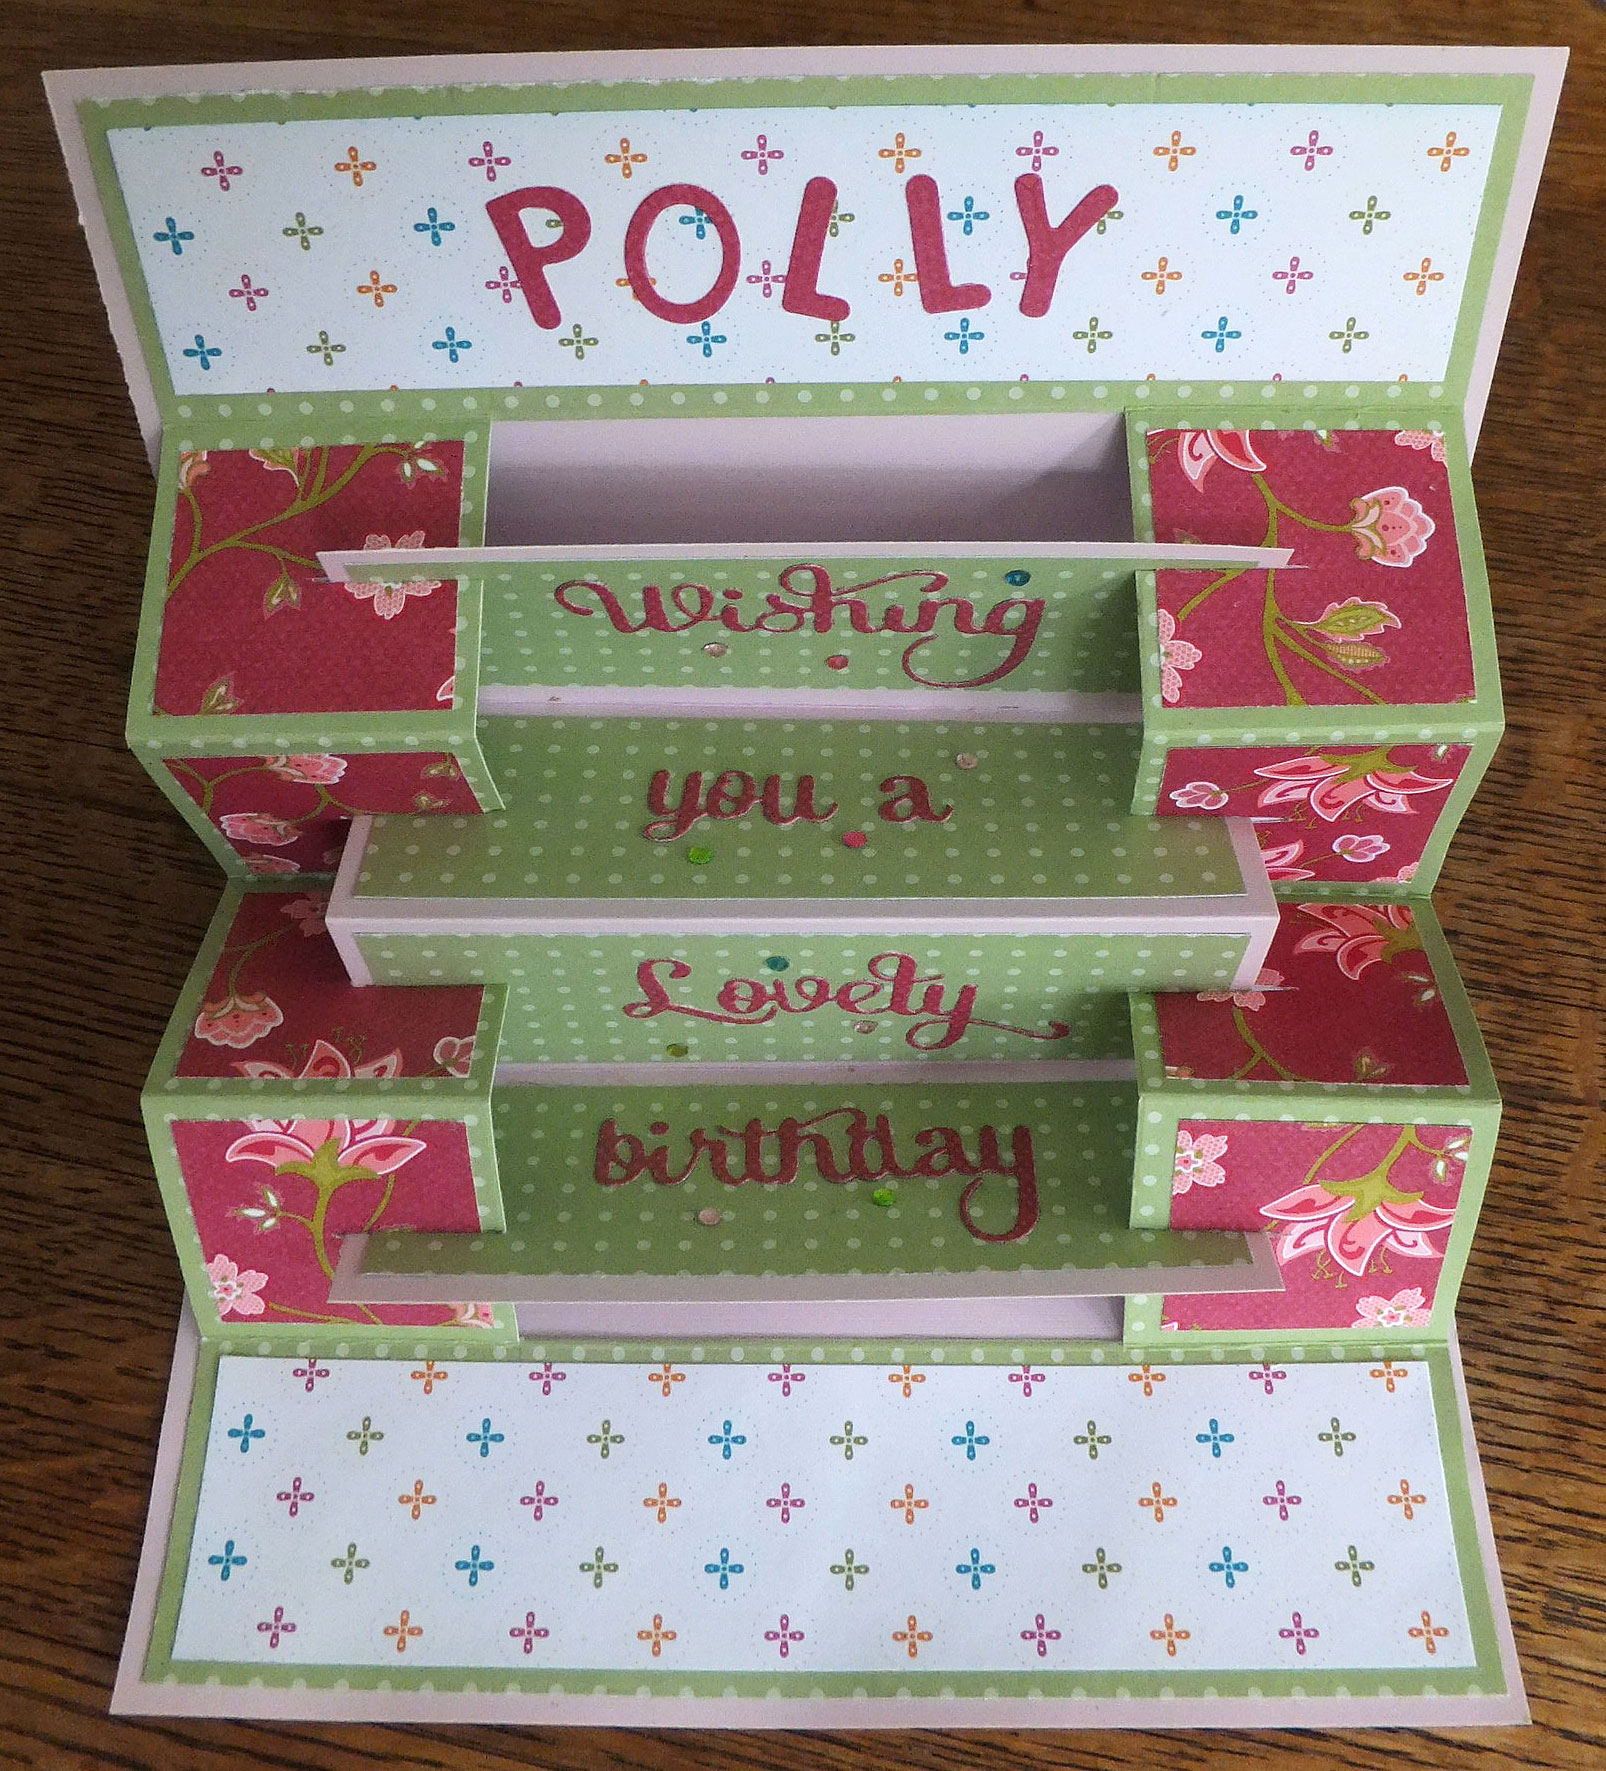
 Yesterday was my lovely granddaughter Polly's 15th birthday. She is such a sweet girl, and I wanted to make her a special card. After roaming around Pinterest for a while, I came across this post featuring a concertina step card. I decided to give it a try.

The front of the card doesn't make a big impact. I just layered a couple of patterned papers onto mats and cut one of my larger tag dies for decoration. I stamped the word "Enjoy" on the tag and lightly inked around the edges. Finally, I popped up a little strip on which I had stamped "today," tied a small bow and adhered a few gems.


When you open the card, this is what you see. It really makes quite a statement. Polly's response was: "Wow, this is an elaborate card!" The die-cut words on each step were actually all connected when I first die-cut them. I simply cut them apart and adhered them as you see in the photo. I think I may have had to die-cut them a couple of times, because in cutting them apart, I sometimes had to cut into connected words.

Here's what it looks like from the side. You can see the concertina effect and how it all folds together when the card is closed.


I used the bottom panel to write a brief message and sign our names. Even though it has a pattern, there was enough white space to make writing on it perfectly legible.

This card took a little extra time but was a lot of fun to make. You may want to give it a try, too!

It is a beautiful summer day in Minnesota today. We had some terrible storms on Sunday night with lots of lightening and rain. Some areas even had large hail--up to baseball size--and 75-100 mph winds, but thankfully not where I live.

Thanks so much for stopping by, and remember to laugh--a little or a lot--every day.

Cheryl

Saturday, August 8, 2020

Two very different cards...

Today I want to share two very different cards with you. I made them at essentially the same time, so I'm not sure what that says about how my mind works.

My first card features a pretty hibiscus die-cut. The die is from In Love Arts. I cut it out of mixed media cardstock and then colored it with alcohol markers. I love the exotic look of the hibiscus flower, so I think I'll use this one quite a lot.


My background panel was dry embossed, and I used a deckle-edged rectangle die to cut the small white panel that my flower is on.

I cut a folded banner from pink vellum and heat-embossed my sentiment on it.

While they're hard to see, I did adhere a few translucent sequins to my embossed panel. I didn't want them to detract from my focal image, but I did want the added sparkle.

If you want to order this die, you'll find it here, and you can get a 15% discount by using this code:

G-20849


I really LOVED making my second card. The gorgeous snowflake corner die is also from In Love Arts. You'll find it here.

I started making this card by cutting a medium blue square panel and inking around the edges with navy blue ink so that the center of my panel remained lighter in color. Then I cut four of the snowflake corners and adhered them. Finally, I die-cut my sentiment, applied some spray adhesive to it and then put it face-down in ultra fine glitter. It sparkles beautifully IRL. To finish off my card front, I added a few flat-backed gems.


I just love the effect of inking around the edges with a darker ink. 

Now I know that square cards cost more to mail if they're sent in a square envelope. I avoid the extra cost by making rectangular envelopes for my square cards.


On the inside of my card I added a navy blue mat and a stamped sentiment.  

After I had finished taking my photos, I realized that my card didn't say "Merry Christmas" or "Happy Holidays" anywhere, so I added it beneath this sentiment.

Once again, you can order this die here, and receive a 15% discount by using this code:

G-20849

I'll have some more projects featuring In Love Arts products in the future. I hope you enjoy seeing them as much as I enjoy making them!

Thanks so much for stopping by, and remember to laugh--a little or a lot--every day.

Cheryl

Wednesday, August 5, 2020

Let's Craft and Create Challenge #162: Lots of Layers...

It's amazing that we are nearly through the first week of August. It seems to me that summer whips by faster and faster every year.  I am happy, though, that this means it is time for another challenge at Let's Craft and Create. 

Our August challenge is "Lots of Layers." I don't usually put a lot of layers on my cards so this was definitely a stretch for me. To try to get more comfortable with the concept of "Lots of Layers," I decided to make two cards--both of them for Thanksgiving.


I found some Stampin' Up papers in my stash that were in fall colors; one of them was printed with leaves and acorns. I decided to use those elements as accents on my topmost layers.


For this card I pulled out my acorn dies and cut them from some kraft paper. I colored the tops a darker brown with an alcohol marker.

The stamped sentiment and enamel dots finished my card front nicely.


Here's a peek at my acorns. You can see that I've popped one of them up on some double-sided foam.

For the inside of my card, I used my computer to create a sentiment. I matted it and added a gold strip of cardstock at the bottom.


For my second card, I found a layout online that I liked and, using the same papers as the first card, I created my card front.

I printed my front sentiment with my computer and then stamped a single leaf below it. I fussy-cut the mat behind my sentiment panel, added some enamel dots and popped it up on foam squares.


This card also has a computer-generated sentiment on the inside. I think I may still add a colored strip of CS across the bottom like I did on the first card, just to add a little color to the inside.

I see in the photo there is a tiny piece of white paper at the bottom of my sentiment panel. I'll remove that, too!

I hope you'll join in this month's fun and create a card with Lots of Layers. The Design Team has provided lots of inspiration for you over on the Let's Craft and Create blog. There will be a crafty prize to be won, so it's well worth your time.

Thanks so much for stopping by, and remember to laugh--a little or a lot--every day.
Cheryl

Monday, August 3, 2020

Little banner dies...

In Love Arts sent me a set of four small banner dies called Small Belt Label Dies, and I think they are going to come in very handy. I love that they are each a different shape.

It you're interested in purchasing these or any other products at In Love Arts, you can get a 15% discount off your purchase by using this code:

G-20849

Here are a couple of cards I made with them:


This card features all four of the banners in the set. When in doubt, use them all, right?

These dies are small and solid--you cannot see your pre-stamped or pre-printed sentiment through them. Since I like to print my sentiments first (these were printed with a computer) and then cut them out, I made a little template to help do that. I cut each die out of a larger piece of cardstock. Then I used that negative space to line up where my die would go over my sentiment. I used some washi tape to hold my template in place, then set my die into the negative space. You can feel when it nestles into place. I taped my die in place and ran the whole shebang through my Sizzix. As you can see, it worked perfectly!

These were all cut out of white cardstock. I colored each banner after they were cut using a blending brush and ink pad. I also popped back into place on the pink, yellow and aqua ones a heart, star and oval cut from coordinating cardstock.

Each of my little banners were popped up on foam squares.


On the inside, I added a stamped sentiment and a couple strips of lavender cardstock to match my card base.


For my second card, I stamped "Love" on a white panel and then dry-embossed it with a Sizzix (I think) embossing folder.

I actually cut out the little heart banner first this time and then stamped it. I popped it up on foam squares and added a flat-backed rhinestone in the heart opening.

I used the banner die to cut out the three little hearts, popped them up on foam squares and added a teeny, tiny flat-backed rhinestone to each one.

This card has a blank, white panel on the inside. I may add a stamped or computer-generated sentiment later, depending on how I decide to use this card.

Well, that's it for me today. I managed to get my laundry done and now have to think about preparing dinner. Why do husbands have to eat every. single. day? Couldn't they skip a day or two now and again? LOL

Thanks so much for stopping by, and remember to laugh--a little or a lot--every day.
Cheryl

Friday, July 31, 2020

Doily time...

In Love Arts sent me a pretty little die called a Clover Wreath Die. You can find it in their shop here, AND you can get a 15% discount on your order by using this code:

G-20849

I decided to make three distinctly different cards with it, and here they are:


For this card I used the doily as a backdrop for my flower. I thought it turned out quite pretty with my curved and scalloped edge on the top flap.

To make my flower, I cut out three layers of petals, inked the centers a bit and then scrunched them all up into little balls. Then I carefully unfolded them and glued them together. I like the dimension that this gives to the flowers. An enamel dot finished off the center.


The little banner die is also from In Love Arts and you can find it here.

The card is blank inside so I can write a personal note.


My next card was a Christmas card. Once again, I used the doily as a backdrop to my flower--a ponsettia that has inked edges on the petals and Nuvo Drops in the center.

The music DSP is from an old Heidi Swapp ( I think) stack. I cut out a piece big enough for my card and inked the edges with distress ink.

My sentiment has been die-cut twice--once from black CS and once from gold metallic CS. I glued them together with the black offset just a bit to give a little better definition.


The inside of my card has a simple stamped sentiment. I might go back and add a little something else to dress it up a bit.


Finally, I die-cut several doilies and then cut a couple of them apart into the heart shapes that make up each one. I glued them randomly to a card front by sponging some liquid glue onto the back side each one. I added some sequins and a heat-embossed sentiment that is popped up on foam tape.

I have left the inside of this card blank, but I may add a stamped or computer-generated Valentine's sentiment to it later on.

I had a lot of fun coming up with three different cards using the Clover Wreath doily die.

Have a great weekend, and thanks so much for stopping by. Remember to laugh--a little or a lot--every day.
Cheryl

Tuesday, July 28, 2020

In Love Arts...

I was contacted by a new (to me) online craft shop called In Love Arts. They asked if I would be willing to try some of their products and post about them on my blog. Of course, I was happy to!

In Love Arts is generously offering a 15% discount to any of my readers. Just use this code:
G-20849

One of the items they sent me was the "Motto Words" stamp set which has some great sentiments.


These sentiments are a very nice size and stamp well. I decided to make a card for every single sentiment in the set.


For this card, I chose a pre-made card base from my stash that had a fun pattern. Then I cut some 1/2" strips of patterned CS that coordinated with the colors of my card base. I fussy-cut the tops of the candles to look like they might have melted just a bit. My flames are actually leaves cut with a foliage die that I had in my stash. I colored them just a bit with Promarkers and added some Wink of Stella. My big sentiment and a few self-adhesive stars finished off my card.


This card came together very quickly! Once again, I used a pre-made card base that had the soft green shading on it. I stamped my sentiment with green ink. I left my card base in my stamping platform, and when the ink was dry, I stamped the sentiment again with Versamark. I sprinkled on some clear embossing powder and used my heat gun to give it a nice glossy finish. It looks a little blurred in this photo because of the texture of the card base.

The strawberry and flower were cut with my Silhouette and had been sitting on my desk for months and months. Time to finally use them on a card!


When I saw the sentiment "Small Wonder," I thought of a baby card, but I definitely think it could be used in other ways, too. I dug out a teddy bear die, tag die and a corner die. I cut and dry embossed my bear and corner die-cuts. Then I added a little color to parts of my bear and popped him up in front of my tag.


Another pre-made card base was used for this card. I cut the "thanks" with a die, backed it with a strip of black cardstock and stamped my sentiment. It just doesn't get any quicker or easier, and I think it's a rather elegant thank you card.


This card is a 3 1/2" X 5" notecard. The glittery panel was adhered to the front, then the die-cut heart with its heat-embossed sentiment was popped up with foam squares. The sequins were added for a little sparkle. My pinks actually match much better IRL.


My final card is a wedding card. The background die is also from In Love Arts, and the sentiment is from the set above and was heat-embossed onto a heavy vellum oval.

This die, called Curl Pattern, cuts a beautiful pattern but takes some extra care in getting a good cut. I used a couple of shims to make sure it cut through and then I took great care in getting my cut design out of the die. Some of those swirls are really narrow, but aren't they beautiful?

After cutting my panel I adhered it to my card base with some double-sided sheet adhesive. I burnished some clear glitter into all the openings of my die-cut where the adhesive was exposed. It has such great sparkle!

To finish my card front, I added two narrow strips of silver glitter cardstock and a few flat-backed gems.

I hope these cards have piqued your interest in In Love Arts and the crafting supplies they offer on their site. I'll be sharing more products with you in the near future.


Thanks so much for stopping by, and remember to laugh--a little or a lot--every day.
Cheryl