Wish List

Thursday, August 29, 2013

Happy 60th birthday!

First, just let me say to my BIL, "Happy Birthday, Leigh!" He's turning the big 60 this year, and here's the card I made for him:

I cut the coffee mug from the Love you a Latte cartridge. The letters came from Cricut Font and Basic Shapes digital cartridge and the George cartridge. The sentiment was computer-generated and adhered directly to the card. The mug was popped up on dimensionals.


Here's a look at the inside. My BIL enjoys a glass of beer now and then, so I thought this was appropriate for him.


The foamy mug of beer is just a clip art image. I printed it, then colored it with my ProMarkers. I also coated the mug with some Diamond Glaze to make it shine like glass and added some white flocking to the foam. It looks kind of cool IRL.


I hope my BIL has a really super birthday!

Thanks for stopping by. Remember to laugh--a little or a lot--every day.
Cheryl

Tuesday, August 27, 2013

When we forget a birthday...

I decided I needed to have a couple of cards on hand for those inevitable times when a birthday comes and goes before I remember to send a card. This is a card for just such an occasion. I used the Martha Stewart Pop Up Cosmos punch (now retired) to create a focal point for this card.


I punched three flowers evenly on an off-white strip of paper. Then I slipped a piece of scrap paper underneath the pop-up petals so I  could sponge them with some pretty pink ink. I also glued a small circle of brown cardstock behind each flower center, which is why the flower centers have those dark spots.

I also used my Fiskars scallop border punch and a small Lifestyle Crafts scalloped rectangle to finish off the front.

The sentiment was computer generated.


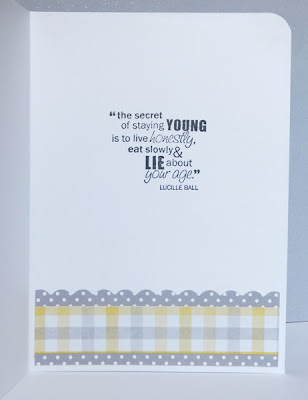
I think that letting someone know how young they look is a positive way to offer belated birthday wishes, don't you?

I have made another belated birthday card that I'll share in another post. That one I actually had to use!


Thanks so much for stopping by. Remember to laugh--a little or a lot--every day.
Cheryl

Sunday, August 25, 2013

It's never too early...

When you're a member of a big family, like I am, it's never too early to start preparations for Christmas. When I worked in downtown Minneapolis, I started my Christmas shopping for the next year during the post holiday sales. Minneapolis has a skyway system which connects most of the major downtown stores. I could go shopping during my lunch hour without ever going outside--no coat, hat or scarf, even when there was a foot of snow and the temperature was below zero! Here's a photo of one of the double-decker skyways:

I learned my way all over the downtown area through these skyways and loved going for my daily walk. It was such a great way to go shopping get exercise.

I no longer work downtown, but I still believe in starting my holiday preparations as soon as I can. That is why today's card is a Christmas card.
This card was made with some pretty paper from DCWV's "The Heirloom Christmas Stack." I'm going to try to use as much of this stack for my 2013 cards as I can. I'm thinking of challenging myself to use the whole stack. Not sure I could do that--some of the papers are clearly for scrapbooking, not card making--by I'd like to give it a try and see what I can accomplish.  The sentiment was heat embossed with some Ranger red embossing powder.


The poinsettia was made with the Cheery Lynn Holly Leaves die. Love that die. It makes a great poinsettia!

The center is a self-adhesive faux glitter brad. I tried a couple of other things in the center - liquid pearls, loose glitter, etc. None of them satisfied me, but I'm okay with this faux brad. I'll keep trying other things, though, until I'm really happy. If you have any ideas for me, please leave them in the comments. I'd love some suggestions!


I stamped the sentiment on the inside with some Stazon red ink and added some green holly leaves to two of the corners. You can see that the edges of the paper on both the front and interior of the card were inked to give a bit of a vintage look to match the style of the paper.

It feels really good to get started on my Christmas cards. I'll be making lots of duplicates of some of them. Just not sure which ones yet.

Have you started on your holiday card making, gift buying, etc.?


Thanks so much for stopping by. Remember to laugh--a little or a lot--every day.
Cheryl

Thursday, August 22, 2013

Embossed vellum flowers...

I've been planning to try my hand at some embossed vellum flowers for a long time now. In fact, months ago I purchased a sheet of yellow vellum just for that purpose. I have finally given it a go, and here's what I came up with:
I really love how these flowers turned out. They're even prettier in person. If you look closely at the photograph, you can see that they are translucent. You can just make out the plaid paper underneath.


This picture is a little fuzzy, but I thought I'd share it anyway. I simply stamped the images onto the yellow vellum with Versamark ink and then heat embossed with white embossing powder. Once they had cooled, I hand cut them and adhered them to my card with a few pretty pearls in the centers.


The sentiment was stamped and cut out with a Spellbinders Fancy Tags die. I popped the oval part of the die up with some foam tape, but glued the two flourishes on either end directly to the card and added a pearl to each.

Just a bit of decoration on the inside and a stamped sentiment from Fiskars. This card is for my stepdaughter's birthday--which just happens to be TODAY! I hope she has a marvelous day and the best year yet!

Thanks for stopping by, and remember to laugh--a little or a lot--every day.
Cheryl

Tuesday, August 20, 2013

Hey! Slow Down!

My grandson turns 6 years old today. He's visiting his other grandparents in Vermont, so we won't get to see him, but we send him all our love and lots of hugs anyway!

He's all boy and loves anything with wheels. It's so funny how little boys seem to gravitate to toys with wheels. Here's the card I made for him:
Isn't this image just perfect? It's a digi stamp by Angelique at sliekje.blogspot.com. You can find this particular image here.

I used some glittery letters by Reflections (Michael's brand) for the sentiment. To line them up in a perfect arch, I used some washi tape to hold a smaller circle die the correct distance away from the edge of the bigger circle. Then I simply laid out the letters along the top of that die. Simples!

The image was colored with my ProMarkers. The only other embellishment was the Card Candi in each upper corner that I also colored with a red ProMarker.


Here's the inside of the card. It's SO true. This little guy is growing up way too fast. He's such a fun--and funny--little kid. I'm so glad he's not too big yet to sit in my lap. Love his snuggles!

Happy birthday, little guy!

Thanks for stopping by, and remember to laugh--a little or a lot--every day.
Cheryl

Sunday, August 18, 2013

Sympathy card...

Sadly, we needed a sympathy card lately and I went searching for some pretty, but quiet, papers to use. I found this paper in a stack that my DD had given me a while ago. I thought it was the perfect paper for this kind of card. It has a simple elegance and muted colors. I heat embossed the sentiment and added some flat-backed pearls. That was  truly it! But I like the way it turned out,

For the inside of the card, I once again heat-embossed the sentiment. Because the paper was quite plain, I added the scalloped strip in the same green cardstock as the mat. It took me much longer to choose the papers for this card than to actually make it. Does that ever happen to you?

Thanks so much for stopping by, and remember to laugh--a little or a lot--every day.
Cheryl

Friday, August 16, 2013

Angry birds fly high...

Our grandson turned four years old on August 13. I cannot believe he is already F.O.U.R! It seems like just yesterday that he was a tiny baby.

Here's the card I made for him:

My daughter said he recognized this Angry Bird as soon as he saw it. I put the bird together by using various punches and hand cutting a few of the parts. The sun was cut with a an inverted scallop circle die by Spellbinders. I'm sure you guessed that the slingshot is the letter "Y" (cut with my Cricut) which was also embossed to give it a wood grain look. The rubber band is actually....a rubber band!

The one cut that may surprise you is the grass. It's actually made with the Martha Stewart Drippy Goo border punch. I simply used a scissors to "sharpen" up the drips of goo. I've always meant to pick up a grass border punch (I know Fiskars makes one) but I just haven't gotten around to it yet.


I couldn't resist using my "Fly  High" stamp again and also wishing my grandson a "Happy Bird-day." I sure hope he had a great day! He lives 500 miles away so I don't get to see him very often. I'm saving up my hugs for when I do see him again. Get ready, Ollie!


Thanks so much for stopping by, and remember to laugh--a little or a lot--every day.
Cheryl

Tuesday, August 13, 2013

Happy Birthday, Sport...

Our grandson turned 10 last week and here's the card I made for him:
Isn't that the coolest card? The shoe image can be found on the "Nifty Fifties" cartridge. I simply downloaded two of the shoe images onto my Gypsy. Then I flipped one of them horizontally, overlapped the heels slightly and welded them together. The shoe images were actually cut at 6.5" high, which resulted in a card that was about 5.75" from heel to toe.

The image is tilted on the screen when it's first uploaded (which is why I had to cut it at 6.5"), so to see how long it really was, I rotated it so that it was horizontal. That way I could easily see how long the finished card would be.

You can see in the photo that I inked the white sections of the shoe with a little black ink. After all, what 10-year-old boy has spankin' white shoes?

Here's what the inside looks like:
To make this liner, I just cut another welded shape out of white cardstock and cut it in half. I then trimmed about 1/8 inch off all the way around to get a perfect fit. I thought about adhering the other half to the left side of the card interior, but in the end, I didn't think it was necessary. You can see in the above photo how the shoe is welded at the heel and at the very top.

This card was SUPER simple to put together. Now that I have it saved on my Gypsy, I may be making quite a few of these in the future.

Thanks for stopping by today. Remember to laugh--a little or a lot--every day!
Cheryl

Saturday, August 10, 2013

Happy Birthday, Polly!

My sweet granddaughter turns eight years old today. EIGHT! I can hardly believe it. It seems like just yesterday she was a baby.

Polly loves to climb the monkey bars and hang by her knees. I remember loving that, too, when I was her age. When I saw Tiddly Inks' "Wryn Hanging Around" digital image, I had to purchase it for Polly's birthday card. I did make one little alteration to the image, however. I added some glasses. Polly has worn glasses since she was less than a year old. The other day she pointed at an image of a little girl with glasses and said that she likes girls with glasses better than those without, so I wanted Wryn to have glasses, too!

Polly  has long, luxurious hair, just like Wryn. She's also at that "gangly" stage with long, thin arms and legs--again, just like this image of Wryn. I added a couple of buttons, tied with embroidery floss, to add some round edges to this mostly rectangular card. I also added a little blue chalk to the background, but it's difficult to see in the photos.


I colored Wryn up with my ProMarkers. It was a quick coloring job, as I didn't do anything fancy.


I cut the number 8 out with my Cricut and glued it to the computer-generated sentiment. I popped the sentiment circle up on foam tape and then popped the red mat up on some foam tape, as well.

You can't see it in the photo, but I added some glitter to the word "GREAT" and the 8 with a glitter pen.


I kept the inside simple, with some more of the red-dotted blue paper matted with red. The sentiment panel is off-white, like the card base and I stamped the "Happy Birthday" and gave it some sparkle with my glitter pen. The stamp is a from the Fiskars Make a Wish set of clear stamps. I've gotten a lot of use out of that set for birthday cards.


I hope you enjoyed my birthday card for Polly, and I sure hope she likes it, too!

Thanks for stopping by, and remember to laugh--a little or a lot--every day.
Cheryl

Thursday, August 8, 2013

Even wrapping paper works...

While visiting one of my daughters recently, I watched her wrap a gift with some lovely, thick wrapping paper. Honestly, it was a higher quality paper than most of the DSP I have on hand right now! She insisted that I take a little of it home with me, and here's the first card I made with it:

I love that funky orange and gray print. It's a small print so it's easy to use as a background paper.
 
I cut some small scalloped squares out of shimmery gray cardstock with a Cuttlebug die. I just happened to have a few orange Petaloo flowers on hand that worked perfectly as embellishments.
 
 The sentiment was stamped onto some white cardstock and then punched out with an EK Success label punch and backed with some of the same shimmery gray cardstock.
 
I decorated the inside by adding a strip of the wrapping paper with a scalloped edge of gray peeking out.
I always keep my eye out for great paper--you never know where you're going to find it!  Thanks so much for stopping by. Remember to laugh--a little or a lot--every day!
Cheryl


Saturday, August 3, 2013

Matching cards to personalities...

When I create cards, I usually try to match the card to the personality of the receiver. At the same time, I put a little of my own preferences into each card.

I needed to make a thank you card for some friends this week. Knowing that they love the outdoors and also enjoy watching the birds at their bird feeders, made it easy. My first thought was to grab some C'oredinations Colorcore cardstock and my Cuttlebug "Bird Call" embossing folder.
I embossed the green cardstock and while it was still sitting in the embossing folder, I sanded it to highlight the embossing. The card base is Kraft cardstock, which I also used for the little tag, cut with a Spellbinders die. A black mat and some rustic black twine finished the outside of the card.


On the inside of the card, I used some light beige paper matted on black. To tie in the bird theme, I stamped some foliage and a small bird.


During the years that I've been making cards, I've really come to believe that even simple-to-make cards can be the perfect choice. I think our friends are really going to like this card!

Thanks for stopping by, and remember to laugh--a little or a lot--every day.
Cheryl