No, I don't have a wedding to go to, but I still felt like making a wedding card. I had purchased the Flourish Impressabilities template a few months ago. I immediately embossed a white piece of paper and while it was still in the template, I spritzed it with some Tattered Angels Glimmer Mist in the "Bubbles" color. As soon as I saw the result, a wedding card came to mind, but I set it aside to use later. Well, later is now, and here's the result:
This is not a good picture (I took it at night) but I think you can see the pretty embossed design with just a hint of the light blue Glimmer Mist.
I cut the label using the "Tie the Knot" cartridge and added a border around it with Liquid Pearls.
I embellished the inside with a little of the same ribbon that I used on the outside.
This was a very simple card to make, but I think the embossing and misting really makes it look special.
Thanks so much for stopping by. Remember to laugh--a little or a lot--every day.
Cheryl
Saturday, June 29, 2013
Thursday, June 27, 2013
Happy Birthday, Max!
Today my grandson Max celebrated his 8th birthday. He actually turned 8 last week, but the party was today. He has grown out of the cutesy cards and likes cards that aren't "for babies," as he puts it.
When I was deciding on what kind of card to make him this year, I knew it needed to be more masculine and more grown up. An image on the Father's Day cartridge gave me an idea, and this is what I came up with:
I don't think you can get much more masculine than a monster truck! The image on the cartridge doesn't have as many layers as you see here, but I just cut it out on different pieces of CS until I had what I needed. I thought it turned out pretty cool! I think the truck was cut at about 3".
I honestly can't remember which cartridge I used for "Wish Big." It could have been Birthday Bash, but I may have even cut each word from a different cartridge. "Wish" was all one word that I layered on top of the letters for "BIG." I inked around the gray letters with some black ink.
I popped the truck up on foam tape to give it a little dimension. The banner was cut from some banner-patterned paper, which is such an easy way to add this embellishment! The "cracked" yellow paper came from the same pad as the banner--the paper stack is called "The Good Life" by Fancy Pants Designs. I love that stack and use it a lot.
The inside is pretty simple - another banner and a fun sentiment that I printed from my computer.
I sure hope Max had a Monster of a party. Hugs to you, Max, from Grammy and Papa! We can hardly believe you are EIGHT years old!!
Thanks for stopping by today. Leave a comment if you have the time. I love hearing from you, and remember to laugh--a little or a lot--every day!
Cheryl
Tuesday, June 25, 2013
Birthday Bash card...
I used the Birthday Bash cartridge to make this fun birthday card. It was one that I sent to my daughter for her stash of cards. She has a "card drawer," and I love making cards for her to add to the drawer. With three children going to birthday parties, she goes through lots of birthday cards in a year.
The inside sentiment was also cut from the cartridge and embellished with some stickles. Easy peasy!
I think I cut the kitten-in-a-cake image at 3 inches. I used "hide contours" on my Gypsy to remove the cuts on the face and stamped it, instead, with a Peachy Keen Cute and Cuddly stamp. I inked around the edges of the kitty, added some pink chalk to the cheeks and used a white gel pen on the eyes. Oh, yes, I used a ProMarker on the nose and mouth, too.
I also cut the sentiment from the Birthday Bash cartridge, too, and adhered it to a scalloped rectangle cut with a Lifestyle Crafts die.
If you look closely, you can see that I used some clear stickles on the sentiment.
The inside sentiment was also cut from the cartridge and embellished with some stickles. Easy peasy!
Thanks for stopping by, and remember to laugh--a little or a lot--every day!
Cheryl
Friday, June 21, 2013
Purple is one of my favorite colors...
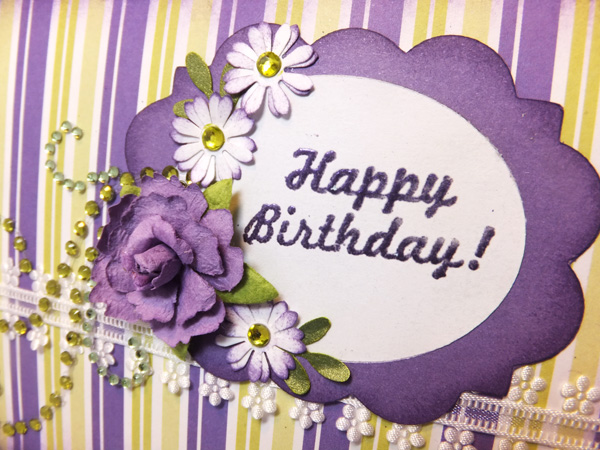
Here's a birthday card I made for my stash that has LOTS of purple in it. It all started with the pretty Prima purple rose that I had. I simply found some paper to coordinated with it and went from there.
I added a Zva Creative rhinestone flourish in a pale green that I thought would give the card the requisite "bling." Love my bling!
I punched a few more daisy-type flowers using a Recollections punch, inked the edges of the petals and added a green gem to the centers. I also punched some additional leaves with an EK Success punch.
The lacy ribbon was some I had in my stash. It's actually a wired ribbon, but to make it easier to work with, I just pulled the wires out. I did save them, though--these thin wires make great butterfly antennae.
I cut the frame using the Elegant Edges cartridge and inked the edges of it, as well.
I heat embossed the sentiment with some purple embossing powder.
For the inside, I added a purple mat and another shape just like the one on the front. Do you think I should have inked that, as well?
I really love the Elegant Edges cartridge. It has so many interesting frames and shapes. I just got it recently, and I'll be using it a lot in the future!
Thanks for stopping by. I hope you have a FABULOUS weekend - the first truly Summer weekend of the year. Remember to laugh--a little or a lot--every day.
Cheryl
Wednesday, June 19, 2013
Caution! You're about to look at underwear...
I have a brother-in-law (my husband's sibling) who has a great sense of humor. He likes to tease me a lot, so when I get the chance, I tease him back. We have a good time, and it's always all in fun.
Since his birthday was yesterday--June 18--and I love to tease him about being older than me, I decided to make a card with a bit of humor in it. Here's what I came up with:
My husband and I called him on his birthday and he said he loved his card. He appreciated that I spent so much time thinking about it and then creating it, just for him.
Here's the inside with the punch line. I didn't make this up--I actually found it online somewhere a long time ago. When I read it, I laughed out loud. I knew I'd find a chance to use this in a card someday.
To make the boxers, I used a pair of boy's pants from the Everyday Paper Dolls cartridge. I used the "real" sizing for the image and cut them to about 3", I believe. I then cut off the legs to the appropriate length and did a little coloring and shading to make them look a little more realistic.
For the briefs, I actually used a pair of girl's pants from the same cartridge. I cut them off so that they had the shape of briefs. Then I took a gray alcohol marker to put in the lines. You should have seen me, using a pair of my husband's briefs as a model!
The faux brads are Card Candi that I colored with a ProMarker to match the blue in the boxers and the cardstock mats.
This card was so much fun to make, and I'm glad my B-I-L enjoyed the humor in it (I just knew he would).
Thanks for stopping by, and remember to laugh--a little or a lot--every day.
Cheryl
Monday, June 17, 2013
The simple life...
Today was a gorgeous day in Minnesota. My DH and I went for a bike ride tonight around a nearby lake, and it couldn't have been more pleasurable. Sometimes simple things--like bike rides on a beautiful day--are pure joy!
Doesn't the girl in this image look as though she lives the simple life? I love her little apron and her straw hat.This is one of those second-hand stamps I picked up at our local ArtScraps store--a great place where they sell donated crafting items of all ilks. It's so fun to browse through the shelves and imagine how you might use some funky rolls of paper, strange colors of ribbon or little plastic boxes.
Because this image reminded me of a little farm girl who lives a healthy, but simple, life, I decided to keep the card simple, as well, and use some paper with pretty earth tones in it. I also colored her in some of those same earth tones with a few of my ProMarkers.
The scalloped oval is a Lifestyle Crafts die and the sentiment oval is a Spellbinders die. I inked around both of them with some Tea Dye distress ink and added a khaki brown button and a little natural twine for embellishment.
The border across the center of the card was created with a Martha Stewart border punch.
The inside was kept simple, too, using the same papers and a scalloped rectangle. The "Thanks a Bunch" stamp was another secondhand stamp I purchased for less than a dollar at ArtScraps.
I hope you've been able to enjoy some simple pleasures today. Thanks for stopping by, and remember to laugh--a little or a lot--every day.
Cheryl
Saturday, June 15, 2013
Quick and easy thank you note...
I needed a quick thank you card recently, and wanted to try a card layout that I had seen somewhere on the net.
I cut a piece of white cardstock and a piece of pink striped cardstock to the width I needed for my card (5.25") and about 1" shorter than the height of the card. This made each piece 3.25" X 5.25". I layed the white piece 1/8" from the top of my card base first and then temporarily adhered the patterend piece on top of the white so that it was 1/8" from the bottom of the card base.
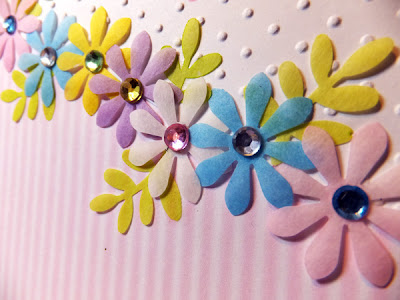
I then lightly sketched a curvy line from side to side and cut on that line through both papers at the same time. This way I could stamp and emboss the top white piece separately, and it would match up perfectly with the striped piece when I was ready to adhere it permanently to the card base. I did my inking, stamping and embossing (Cuttlebug Swiss Dots folder), and then adhered them both down.
I punched all the flowers from heavy vellum, using a Recollections daisy punch. In person, they do have some translucency, but it doesn't show up in the photo.
Then I colored them (except for the white ones) with some bright ProMarkers. I also punched out some leafy branches with an EK Success punch and colored those with a spring green marker. I know they look rather yellow in the picture, but, trust me, they're green. I adhered the flowers and leaves with some glue dots.
The final step was to add a few flat-backed gems. I found this was a great way to use up some gems when I had only one or two left on a sheet.
The card was done in just a few minutes. I think it would be fun to make a whole set of these with different sentiments. I am also going to try this with different weights of vellum for the flowers, to see if I can get even more translucency.
Thanks for stopping by today, and remember to laugh--a little or a lot--every day!
Cheryl
Thursday, June 13, 2013
A couple of Father's Day cards...
I got a wonderful paper stack at Michael's on sale a while ago and it had the perfect paper to make a Father's Day card for my husband.
The stack is by DCWV and is called Nana's Kitchen. Doesn't sound like it could possibly work for guy's card, does it?
Well, here's the card I made for my DH:
The orange gingham paper came from the stack. There was also a couple of sheets with all kinds of Weber-type grills and grilling items on it. I cut out the spatula, meat fork, ketchup and mustard bottles and the apron from that sheet. I used my computer to print "King of the Grill" on the apron, and since the ties were too fine to cut out, I used some crochet thread to add some new ones. Oh yes, and I inked around all these little items before I added them to the card.
The grill was cut from the Father's Day cartridge. It looks almost exactly like our grill. I scored a few lines on each side tray and chalked them to add some dimension and to make it look even more like our grill.
I used a Fiskars border punch to make the bottom border. For the two matching corners, I punched out a 1" square, cut it in half diagonally, and then used the punch to take out the little triangular piece in the center of each. I also inked the edges of the border and the two corners.
A little bit of extra dimension was added to the grill handle/knob and the wheels with some black dimensional paint.
My husband does all the grilling at our house, and he does a fantastic job. I love it when he grills because it's a lot less cooking for me!
Here's the inside of the card. The oval was cut with the Father's Day cartridge. I used the same border punch on the inside as I did on the front of the card.
I also wanted to make a couple of Father's Day cards for two elderly uncles. Here's what I came up with for them.
I had come up with this card layout when I made a birthday card for my brother-in-law. I thought it would work great for a Father's Day card, as well. The chair was just a digital image I found online. I printed it onto patterned cardstock, then added some shading with ProMarkers. I also used some Liquid Pearls for "buttons."
You can see that I've used Card Candi for the faux brads in the two corners. I REALLY love Card Candi. I use mostly white and just color it with my ProMarkers to coordinate with my project.
For the inside, I stamped a little easy chair (I think it might be an Inkadinkadoo stamp) and colored it to coordinate with the chair on the front. I sut it out and adhered it directly to the border piece of DSP.
I hope you enjoyed seeing my two Father's Day cards. Thanks for stopping by, and remember to laugh--a little or a lot--every day.
Cheryl
Monday, June 10, 2013
Another fun birthday card...
This card is another one that I made for my daughter to have on hand for whenever her children are invited to birthday parties. I've had this monster image on my computer for a long, long time, so I'm not sure where it came from anymore. I've since learned to indicate the origin of the image in the file name. I may learn slowly--but I do eventually learn!
I think I had not colored this image when I first got it because I couldn't think what sentiment I would use with it. Well, when I started planning a few birthday card layouts for my daughter, I thought it might be fun to use it as a "scared monster" rather than a "scary monster."
You can see in this photo that I've added some stickles to the birthday hat and some Diamond Glaze to the eyes.
I love the "crackled" paper behind the image. It's from a stack by Fancy Pants Designs called "The Good Life." This 12" X 12" stack was on sale at Archiver's a while back for $3.99 or some crazy price like that, and I couldn't pass it up. So glad I bought it!
The image (head and tail) were colored with my ProMarkers and I printed the sentiment on my computer.
Here you can see how I've popped up just the top of each part of the image. The "holes" are adhered directly onto the patterned paper.
The sentiment is also popped up for a little dimension.
The inside is simple, with the second part of the computer generated sentiment. I'm hoping my grandkids will have fun giving this card to one of their friends.
Thanks for stopping by, and remember to laugh--a little or a lot--every day.
Cheryl
Friday, June 7, 2013
A final graduation card...
We got a graduation announcement in the mail a couple of weeks ago and I needed to whip together a card for the young man who just finished high school. I found a great free "subway art" graphic on eighteen25.blogspot.com. They have tons of interesting ideas on this blog, but you can find the graduation subway art here.
Here's the card I came up with - and it honestly took only minutes to make!
I added another, smaller mortar board on the inside with my computer generated-sentiment.
This card was fun to put together - all because of the ease of printing out that subway art graphic.
THANK YOU EIGHTEEN25!
And thank you for stopping by today. Remember to laugh--a little or a lot--every day.
Cheryl
Here's the card I came up with - and it honestly took only minutes to make!
It's impossible to tell in this photo, but the card blank was a deep purple (his school colors were purple, white and black with a little silver). I embossed the white mat with a Darice "Star Border Frame" embossing folder. The subway art graphic is is on a black mat and popped up on dimensionals.
I cut the mortar board from the Create a Critter cartridge and added a tassel made from silver-colored embroidery thread. I also popped it up on a dimensional so that it could overlap the graphic just a bit.
I added another, smaller mortar board on the inside with my computer generated-sentiment.
This card was fun to put together - all because of the ease of printing out that subway art graphic.
THANK YOU EIGHTEEN25!
And thank you for stopping by today. Remember to laugh--a little or a lot--every day.
Cheryl
Wednesday, June 5, 2013
Welcoming a baby girl into the world...
A former co-worker recently had her first baby - a lovely little girl - so I needed to make a card for this happy little family of three! Die Cuttin' Divas currently has a sketch challenge on their blog, so I decided to follow the sketch and enter the challenge with a "welcome baby" card.
Here's the sketch they've asked us to follow:
And here's my interpretation of the sketch:
I absolutely love these little shoes from the Kate's ABCs cartridge! I didn't cut the flowers that are a part of the image on each shoe--instead, I punched a couple of little daisies (I think it's a Fiskars punch) and a leafy little branch with an EK Success punch. I layered the flowers and added some Liquid Pearls to the centers and cut the little branch apart so that I could put just one small leaf on each side of the flower. I was really pleased with the way they turned out.
The banner was cut from the same pink cardstock as the mat and embossed with the Swiss Dots embossing folder.
I also added a Liquid Pearls "button" to each shoe strap. The cardstock that I used for the shoes is pearlescent, so that really helps draw the eye to the shoes as a focal point.
The scalloped oval for the sentiment was cut with a Lifestyle Crafts die. The "Baby Girl" sentiment is a rub-on.
I threaded some pink crochet thread through two of the tiny scalloped openings and tied a little bow for embellishement.
On the inside, I've simply used a pink mat and printed the message with my computer. This picture is a little fuzzy, so I know it may be hard to read.
I did not print the inside message in black, but rather used a soft gray instead to stay with the soft tones of the card. The little pink heart is from a hole punch that I have, believe or not! You can't imagine how many times I have used that punch to make tiny little embellishments like this.
See? I've even put a couple of those little hearts on the envelope.
The "tiles" in the upper and lower right hand corners are some fun little self-adhesive ones I found in the clearance room at Michaels. They actually have some sparkle embedded in them and are translucent. I think they were the perfect touch for this card, because they mimic the square pattern of the gingham paper. I did only use three total on this card. I felt that four (as they show in the sketch) would have been just a bit too much, as they are a larger embellishment.
My oldest sister had given me the gingham and solid pink cardstock when I visited with her over the Memorial Day weekend. I was so glad I had them when I found out I needed to make this card. Thanks for all the card-making goodies, Pat!
I hope you enjoyed seeing today's card. Why not enter the challenge over at Die Cuttin' Divas yourself? I actually have not entered a sketch challenge before--this is my first--and I really enjoyed it.
Thanks for stopping by, and remember to laugh--a little or a lot--every day.
Cheryl
Here's the sketch they've asked us to follow:
And here's my interpretation of the sketch:
The banner was cut from the same pink cardstock as the mat and embossed with the Swiss Dots embossing folder.
I also added a Liquid Pearls "button" to each shoe strap. The cardstock that I used for the shoes is pearlescent, so that really helps draw the eye to the shoes as a focal point.
The scalloped oval for the sentiment was cut with a Lifestyle Crafts die. The "Baby Girl" sentiment is a rub-on.
I threaded some pink crochet thread through two of the tiny scalloped openings and tied a little bow for embellishement.
On the inside, I've simply used a pink mat and printed the message with my computer. This picture is a little fuzzy, so I know it may be hard to read.
I did not print the inside message in black, but rather used a soft gray instead to stay with the soft tones of the card. The little pink heart is from a hole punch that I have, believe or not! You can't imagine how many times I have used that punch to make tiny little embellishments like this.
See? I've even put a couple of those little hearts on the envelope.
The "tiles" in the upper and lower right hand corners are some fun little self-adhesive ones I found in the clearance room at Michaels. They actually have some sparkle embedded in them and are translucent. I think they were the perfect touch for this card, because they mimic the square pattern of the gingham paper. I did only use three total on this card. I felt that four (as they show in the sketch) would have been just a bit too much, as they are a larger embellishment.
My oldest sister had given me the gingham and solid pink cardstock when I visited with her over the Memorial Day weekend. I was so glad I had them when I found out I needed to make this card. Thanks for all the card-making goodies, Pat!
I hope you enjoyed seeing today's card. Why not enter the challenge over at Die Cuttin' Divas yourself? I actually have not entered a sketch challenge before--this is my first--and I really enjoyed it.
Thanks for stopping by, and remember to laugh--a little or a lot--every day.
Cheryl
Monday, June 3, 2013
Birthday card for a boy...
While I usually struggle with male-oriented cards, cards for boys can be pretty simple. What boy doesn't like sports balls? I used the All Sports cartridge to cut some ball images at 2.5" for the following card:
I used the "Tiny Bubbles" embossing folder by Cuttlebug for the basketball and the "Swiss Dots" folder for the football. I moved the football image several times inside the embossing folder and kept running it through my Cuttlebug in order to get enough indentations in the "pigskin." Once I had enough, I just used an embossing tool to reinforce the dots that had been flattened by the extra runs through the Cuttlebug.
The red borders were made with a Fiskars border punch.
I kept the inside pretty simple. I just put the the borders on the ends, instead of the top and bottom, and added a Sizzix die cut with my sentiment on it. I used my computer to generate the sentiment and used a red pen to draw some faux stitch lines around the die-cut.
This card fits inside a business envelope and is approximately 3.75" X 9".
Hope you enjoyed my card today. Thanks for stopping by, and remember to laugh--a little or a lot--every day.
Cheryl
Saturday, June 1, 2013
A Goofy birthday card...
As I mentioned in this blog post, I have some of the world's greatest sons-in-law. One of them has the quickest wit and often makes me laugh out loud. He is so smart and has tremendous writing ability. I hope he writes a book some day. I'd be the first in line at Barnes & Noble for a signed copy!
Anyway, he can act goofy with the best of us, and I LOVE that about him, so I decided to cut a Goofy image for his birthday card.
He was rather fiddly to put together - with all his different layers and pieces - but I think he turned out looking like the real Goofy! Goofy was always my favorite of Mickey's cohorts, so it was fun to revive him on paper.
Here you can see how I popped Goofy up on some foam squares to give him a little added dimension.
The inside was kept pretty simple and computer-generated. I just wanted my son-in-law to know how grateful we are that he is part of our family. He has added so much to our motley crew, and I think at least one of his boys (my beautiful grandsons) is taking after him. His youngest, at age 3, is one of those kids who can say--and DO--the darnedest things! Oh, the stories that could be told about him.
Thanks for dropping by today. I hope you liked my "Goofy" birthday card.
It's Saturday, and I'm looking forward to catching up on lots of things around the house, planting some more flowers, doing some mega-grocery shopping (the cupboards are pretty bare) and maybe even relaxing a little.
Remember to laugh--a little or a lot--every day. It's good for your soul. And when you have a son-in-law like I do, that's an easy thing to do. Have a wonderful weekend!
Cheryl
Anyway, he can act goofy with the best of us, and I LOVE that about him, so I decided to cut a Goofy image for his birthday card.
I love this image of Goofy. It's so classic and takes me back to watching Disney cartoons in the 60s. Goofy is tall and lanky (for a toon), like my son-in-law, and is always involved in one caper or another. I cut Goofy at 3.5 inches from the Mickey & Friends cartridge. The tiny cuts for his teeth were sooooooo small that I used a white gel pen, instead, to color them in.
He was rather fiddly to put together - with all his different layers and pieces - but I think he turned out looking like the real Goofy! Goofy was always my favorite of Mickey's cohorts, so it was fun to revive him on paper.
Here you can see how I popped Goofy up on some foam squares to give him a little added dimension.
The inside was kept pretty simple and computer-generated. I just wanted my son-in-law to know how grateful we are that he is part of our family. He has added so much to our motley crew, and I think at least one of his boys (my beautiful grandsons) is taking after him. His youngest, at age 3, is one of those kids who can say--and DO--the darnedest things! Oh, the stories that could be told about him.
Thanks for dropping by today. I hope you liked my "Goofy" birthday card.
It's Saturday, and I'm looking forward to catching up on lots of things around the house, planting some more flowers, doing some mega-grocery shopping (the cupboards are pretty bare) and maybe even relaxing a little.
Remember to laugh--a little or a lot--every day. It's good for your soul. And when you have a son-in-law like I do, that's an easy thing to do. Have a wonderful weekend!
Cheryl
Subscribe to:
Posts (Atom)