Wish List

Tuesday, February 25, 2014

February Christmas cards and tags...

Well, I've managed to keep my commitment for two whole months now. In case you're not sure what I'm talking about--I made a resolution for 2014 to make 4-5 Christmas cards and tags each month so that its not such a BIG job come November and December.

Here are my cards for this month:
For this month's batch of cards, I used a Christmas house stamp and coordinating die. I'm not sure who the manufacturer is. It was a gently used stamp and coordinating die set that I purchased at Archiver's during their going-out-of-business sale. The packaging was not all intact, but I got it at a very good price, and you can see that it makes a cute Christmas card.

On each of the cards, I added an embossed strip with a contrasting scalloped edge across the center. On the two cards above, I also added some red Card Candi in the corners. I thought the Card Candi helped brighten up the darker paper and fill in some empty areas on the portrait-style card. I ended up liking the landscape look best, so I made three more like that.

Here are the other three cards for a total of five. I didn't add any Card Candi to these, thinking that the papers were busy enough without it. To get the red and white candies on each of the houses, I stamped the bottom half of the house with red ink on white cardstock and fussy cut them out so that I could paper-piece them onto the house.


The houses were stamped on kraft cardstock and then portions were colored with my ProMarkers.  As a last step, I added some snow with a Marvy Snow Marker. When I applied the liquid applique with the Snow Marker, I sprinkled on a little white glitter to add just a little bit of sparkle. I know you can't see it in the photos, but it does add a nice touch in real life.


I kept the inside of the card nice and simple. I used some red Stazon ink for the greeting. I just haven't found another red ink that stamps as clean and crisp as Stazon.


One of the most fun things to make with this stamp and die set is Christmas gift tags.
I love how these turned out. I cut the same shape out of white cardstock and adhered it to the back of the little house. Then I used my crop-a-dile to punch a hole in the peak of the roof, add a ribbon and voila!--a cute little Christmas tag.


I used all the same products and techniques on the tags that I used on the cards. These tags turned out so darn cute, I think I'll need to make some more of them. They're fun to make and go together fairly quickly.


So now I'm already thinking about what kind of Christmas cards I'll make in March. It's a good feeling to know that I already have 10 Christmas cards done, and there are still 10 months to go until the holidays!

Thanks so much for stopping by, and remember to laugh--a little or a lot--every day.
Cheryl

Saturday, February 22, 2014

Mostly white sympathy card...

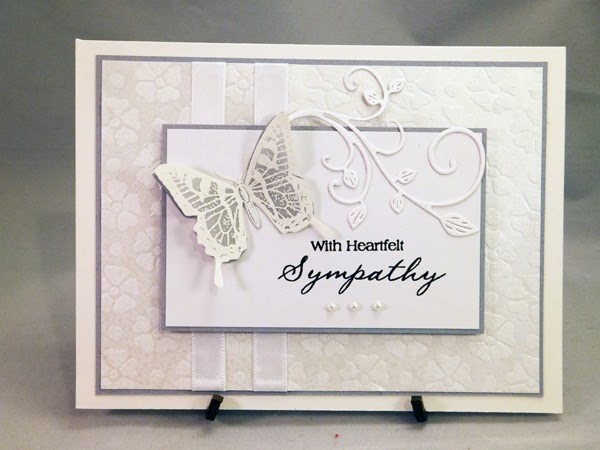
Sadly, I needed a sympathy card for a co-worker whose father-in-law had passed away. I always like to use "quiet" colors for my sympathy cards, so here is what I came up with for this one.

The pretty embossed cardstock was some that I got in a pack from Costco several years ago. I only have a couple of sheets left, so I tend to use it sparingly. It's wonderful, luxurious paper that looks beautiful on cards.

The butterfly was stamped and heat-embossed on white vellum, then cut out by hand.  I used a gray-blue cardstock for my mats and for the bottom layer of the butterfly.

The flourish is cut with a Cheery Lynn Fanciful Flourish die. I tucked one end behind the rectangle and then adhered the rest to the front. Three small flat-backed pearls accent the sentiment.

I cut another flourish and added it to the inside, too.

I'm hoping to get a couple of other sympathy cards made to add to my own card supply. It's so much more difficult to make them on short notice.

Thanks so much for stopping by today, and remember to laugh--a little or a lot--every day.
Cheryl
Wednesday, February 19, 2014

Hats off to you! masculine card...

Today is my son-in-law's birthday and this is the card I made for him.

HAPPY BIRTHDAY, ROB!

I cut the hat from the Create a Critter cartridge and used some paper from a wonderful masculine paper stack that I've had for a couple of years. I think it's from DCWV. My husband actually gave it to me a couple of Christmases ago, and I've used it for quite a few masculine cards since then. 

The sentiment is computer-generated. The little ribbon loops started out as white ribbon with black polka dots. I just colored it with one of my brown ProMarkers to get a nice brown/black color combo that coordinated well with the hat.


I think you can see in this angled photo that I've added some black flocking to the hat. I love to put flocking on my embellishments whenever I can. I think it adds such a special touch.

To adhere the flocking to the hat, I simply spray the item with spray adhesive and then put the sticky side into the flocking. I burnish the flocking into the adhesive with my fingers to make sure it sticks in an even coating. It's a bit messy, but I love the finished result.


This is the inside of the card. I just used a strip of the hat paper, a black mat and some faux brads to tie into the look on the front of the card.

I hope my son-in-law has a great day and an even better year. I also hope he enjoys his card.

Thanks so much for stopping by, and remember to laugh--a little or a lot--every day.
Cheryl


Sunday, February 16, 2014

Nadine's beautiful cards and tags...

Our son-in-law is from Germany, and we have come to know and love his family there. He has a lovely sister named Nadine who is a wonderful seamstress and paper crafter. Yay! I'm so glad Nadine and I share a love for this hobby, even though we're an ocean apart!

She was so kind to send me some samples of the things she has made. Following are a few of the items she sent, and I'll be showing more of them to you in another blog post.
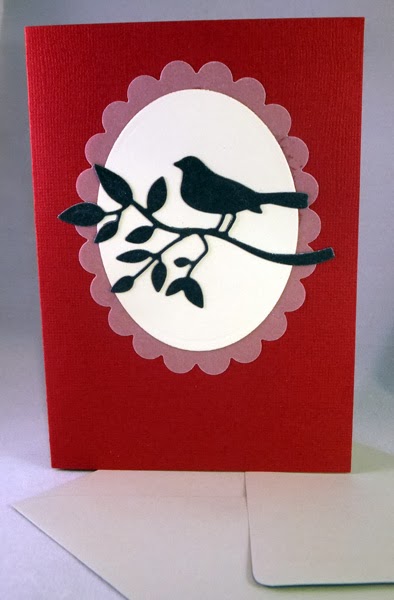
Nadine made this beautiful card, and one of my favorite parts of this card is the scalloped oval mat cut from vellum. Everything is so perfectly placed and adhered, and the bird/branch silhouette is so striking against the white and red.


Here's a little closer look at the central image of the card. I'm not sure what she used to cut the bird image, but I really love it!


Here's a look at the inside of the card. You can see that the liner has a deckle edge. The greeting means something akin to "A loving greeting."


Here are three adorable note cards that Nadine made. I think she must have a kitten punch. So cute! These cards are blank inside, so there is room to write a personal note. Wouldn't a set of these make a fun gift for a friend?

These lovely tags will make any gift more special. The ones Nadine stamped with brown ink are also heat embossed. Here, you also see the bird image again - perfect for a tag, too! And don't you love the big eyes on those owls?


Here's a little closer look at the owls. They make me smile, just to look at them.


And a little closer look at this winter scene. This would also look great on a masculine card. We all seem to have more trouble making cards for men, and stamps like this are the perfect solution.


As I mentioned at the top of this post, these are just some of the items Nadine sent. I'll be sharing more in another post.

Isn't Nadine a wonderful paper crafter? Please leave her a note, if you can, and let her know that even though we may live in different countries, we're all part of the same craft-loving community!

Thanks so much for stopping by, and remember to laugh--a little or a lot--every day.
Cheryl

Friday, February 14, 2014

Happy Valentine's Day!

I hope you are all having a Valentine's Day filled with love and lots of hugs. Here are some of the final Valentines that I made for my own kids:
I just let the pretty paper do the talking on this one. The double ribbon at the bottom added a nice touch, I think. I colored the two little hearts to match the darker ribbon, colored them with a Sakura glitter pen and added a pink heart gem (which had been clear, but I colored them with a ProMarker).

For this card I used Spellbinders Majestic Elements/Marvelous Squares dies. I managed to pick them up for less than half price! They are so intricate and cut some lovely elements for cards. I just need to work with them a little more and figure out how best to use them.

I just love the Memory Box Precious Hearts dies that I used on this card. I cut the white paper lace with a Lifestyle Crafts die and added some gems to the heat-embossed sentiment and the bows. I always love me a little bling!

For this card, I cut a heart border from the Cindy Loo cartridge. The border image only has two hearts, but I pulled up 3 of these 2-heart borders on my Gypsy and welded them together to make a longer 6-heart border. I was then able to trim away one of the hearts with a scissors, and it fit perfectly across the front of my card. I love this border and will use it again, I'm sure. The red "pearls" look a little wonky. I used a Viva pearl pen and didn't get them quite all the same size. Oh well...it's the thought that counts, right?

The insides of these cards were all pretty simple.

This one just mimicked the front of the card, but left room for me to write a personal note.

Do you make Valentines for your grown kids or other adults? I think Valentines are fun to make. There's not nearly as much pressure to get them "just right" as there can be with birthday cards and Christmas cards.

Thanks so much for stopping by, and remember to laugh--a little or a lot--every day.
Cheryl

Thursday, February 13, 2014

Easy Valentine treats for the kids...


I bought some Hershey's Kisses with caramel and some Rolo candies to make some special Valentine treats for my grandchildren


Here's what I turned them into:

These were really fun and fairly quick to make. After adhering a Hershey's kiss to the top of the Rolos, I cut some cardstock to fit around each roll, using my pinking shears on one end. I scored the cardstock at 1/2" intervals to make it look like the sides of a pencil, wrapped it around the Rolos and adhered (I had cut it so it overlapped about 1/4").

The erasers were made by first cutting a circle that was approximately 1/4" larger in diameter than the end of the Rolos. I snipped about 1/8" in at 1/8" intervals all the way around the edge of the circle. This created little tabs which I bent down over the end of the Rolos and adhered with 1/8" sticky tape. I covered these little tabs with a little strip of pink cardstock and then added another strip of self-adhesive metal duct tape.


As a final touch, I added these little tags which I had cut out with a Cuttlebug die.
As a treat for my adult kids, I made these:


This little boxes hold 4 Ghirardelli squares perfectly.

I only added some quick hearts to the front, which helped to hold the box closed, and a tag to the top of each box. Simple!


Here you can see how the box closes. It was made from one piece of cardstock and is super easy to put together. There is a great tutorial here on the Splitcoaststampers site.

Obviously, you can do a lot more decorating of this little box, but I decided to keep it quick and easy. I'm thinking these little candy treats will disappear quickly, anyway. Who doesn't love Ghirardelli chocolate?


Are you doing something special with your significant other on Valentine's Day? We don't have anything planned....yet. Maybe I'll try to make a special dinner since all the restaurants get so crowded, especially when this day falls on a weekend.

Thanks so much for stopping by, and remember to laugh--a little or a lot--every day.
Cheryl

Wednesday, February 12, 2014

More Valentines for my grandchildren...

I created this Valentine for one of my grandsons using the Dude! cartridge (for the motorcyclist) and the Elegant Edges cartridge for the white mat with its heart cutouts. The motorcycle image is a little fiddly to put together, but I know my grandson will like it. They're all getting to that age when they like the "tough-guy" images.


I added one glittery heart on the inside above the computer-generated sentiment. I think boys need a little glitter, too!


This is one of the Valentines I made for my granddaughters. The perfume atomizer is from the Forever Young cartridge and the purse and nail polish are from Mickey and Friends. I created my own layers for the purse, as it was a single-layer image, and added a couple of flat-backed pearls as the clasp. The atomizer and nail polish are popped up on foam squares, and my sentiment is computer-generated.

You wouldn't think that a Disney cartridge would be the place to find the purse and nail polish images, but when I looked for those items on mycutsearch.com, I found exactly what I wanted on this one, which I happened to have in my collection.

If you've never used mycutsearch.com to find the image you want, I'd suggest giving it a try. It's a great help and so much quicker than paging through your manuals. It's not perfect, because some images may not be linked to the keyword you're using. I usually try different keywords if I'm not finding what I'm looking for. It's still a great help, and I use it often.


The inside for this one is simple again - the mat from Elegant Edges, a sentiment from my computer and one glittery hearty sticker for bling.


Thanks so much for stopping by today, and remember to laugh--a little or a lot--every day.
Cheryl