Wish List

Tuesday, May 12, 2020

Quilting fun...


After finishing up my Easter cards, I had some scraps laying on my table that I wanted to use up. Seeing so many of the quilt-themed cards online, I decided to make one myself.

I began by using a square punch to punch squares from several patterns of CS. Then I adhered the squares to a piece of copy paper and added my little baker's twine ties so that it looked like a tied quilt. I thought those little ties added a fun touch.

Finally, I embossed my rectangle using a 3-D EF, cut it to size and adhered it to a card base. I think this base was 4 1/2" X 6".

My sentiment was computer-generated and put on a pre-made fancy label that I had in my stash. A few Nuvo Drops finished my card. I left the inside blank so that I have a place to write some personal news and good wishes to a family member or friend.

Speaking of good wishes, I send my very best to all of you who are staying home and doing your best to slow and/or stop the spread of the coronavirus. It is lonely and boring, I know, but I'm hoping that our efforts together will keep later surges of the illness at bay. The 1918-19 flu pandemic saw many more deaths in its second surge than it did in the first. In fact, it was so deadly that in one year there were 675,000 deaths in this country alone and it dropped the U.S. life expectancy by 12 years! I pray that doesn't happen this time around. So let's all wear our masks, wash our hands and follow the CDC guidelines for staying alive and well.

Thanks so much for stopping by, and remember to laugh--even if it's only for a moment--every day.
Cheryl

Friday, May 8, 2020

Sympathy in pink and white...


Sadly, my sister's MIL passed away last month from health issues unrelated to COVID-19. I know she will be missed, and I wish there was more I could have done besides sending a card. As I'm sure you all know, funerals are private affairs these days. I wasn't even able to attend my Uncle's funeral at the end of March.

Today's card is one that I sent to my sister and her family. I cut my pink panel and heat embossed the sentiment in the lower right-hand corner. Then, on a white panel, I cut a scalloped corner at the bottom and an oval aperture at the top before dry-embossing it with the Cuttlebug Swiss Dots EF.


With my lily-of-the-valley die, I cut several stalks and leaves from white cardstock and colored them with Promarkers. The camera washed out my green some, but I did try to keep it a pale green so as not to contrast too much with my pale pink.


Here's a better look at the heat embossed sentiment at the bottom of the card front.


I tried something new on the inside. I heat-embossed my sentiment on another pink panel. Then I created a frame, which I dry-embossed with the Swiss Dots EF, and popped it up on  some thin foam tape for a little added dimension.

The card still closed fine, and this frame coordinated with the front of the card and added a special touch to the inside.


On a lighter note, I wanted to share a recent achievement of mine: I managed to cut my entire head of hair by myself. I did have my DH straighten out the nape a bit, but other than that I personally wielded that scissors like a light saber, cutting close to an inch off all over. It doesn't seem to look tooooooo bad. At least I haven't noticed anyone pointing at my head and laughing when I've been out and about. Of course, they could have been laughing behind their face masks.

Thanks so much for stopping by, and remember to laugh--a little or a lot--every day.
Cheryl

Tuesday, May 5, 2020

Let's Craft and Create Challenge #159: Ribbons/Lace/Twine...


As we all know, trends come and go in paper crafting. When I first started making cards more than a decade ago, ribbons were often used to embellish my card fronts. I even remember seeing online photos of the vast ribbon collections of my fellow crafters. I had a box full of ribbon, but my assortment paled in comparison to their special ribbon display shelves and containers filled with every color of ribbon under heaven.

I haven't used much ribbon in recent years, so I was glad when this challenge came along on the Let's Craft and Create challenge blog.  It encouraged me to look into my ribbon box once again and select something to use on a card.


After cutting my pink floral cardstock panel, I used a craft knife to carefully make regular 1/2" slits in three rows, staggering them so that I could thread my ribbon through them in a regular pattern. This took a little time, so I think I'll use my Silhouette Cameo to design this panel when I do this again. That way, I can cut two at once for some quick cards.


I chose three 1/2" ribbons and three 1/8" ribbons from my box. It was easy to weave the 1/2" ribbons through the slits I had made and then glue on my little bows.

I stamped my sentiment with blue ink, then cut it out with a die and popped it up on foam tape. And I couldn't resist adding some sequins for a little sparkle.

For the inside of my card, I use some more of the pink floral CS as a mat and left my white panel blank. I will use this card to send a hand-written note of encouragement to a family member or friend.

Now it's your turn to join in the fun! Dig out those ribbons, lace or twine and get creative. You can use any, or all three, or enter the challenge by choosing the "anything goes" option. As usual, there is a prize to make this challenge even more interesting.

Thanks so much for stopping by, and remember to laugh--a little or a lot--every day.
Cheryl

Thursday, April 30, 2020

Pop-up diorama cards...

I have some pop-up diorama Easter cards that I never shared, so I thought I'd share them now. They all use NBUS dies and one uses an NBUS stamp set, as well.


On these two cards, both the egg and the bow were NBUS dies. As you can see, I cut one egg out of purple glitter CS and one out of white. Then I just swapped the negatives and Voila! - two cards.

I did a little bit of inking on my bows to give them more definition, since they're just flat die-cuts.


The inside of my card has an egg-shaped opening (cut with an NBUS die from a set of graduated egg sizes. Peeking through my aperture is a stamped chick, still in the egg shell, but celebrating Easter with his bunny face and ears. This was stamped with an NBUS stamp set for the most part. I did stamp the face using a Peachy Keen stamp set that I've used before (and had for years and years).

I added a stitched rectangle at the bottom for a personal note and to sign our names.


This is how these cards look from the top. They're super easy to make, but fun to look at and receive. If you'd like to try making one, there's a great tutorial on Splitcoaststampers under Pop-up Diorama Card.


Here's another one using the same egg die, but a different die-cut bow.


I did the inside on this one a little differently, too, adding a die-cut bunny in some grass, rather than a stamped one.

I'm going to link these cards to the NBUS Challenge Blog. I usually forget to do this when I'm using all that NBUS I've got piled up!

Today was a lovely day. We even went and purchased some flower seedlings, an azalea bush and a tomato plant and got them all into various pots and places in the flower beds. I just love it when the pots and beds are filled with blooming flowers. We don't plant many vegetables as we don't have a sunny enough spot for them, but I stubbornly try planting a few (a VERY few) every year.

Thanks so much for stopping by, and remember to laugh--a little or a lot--every day.
Cheryl

Tuesday, April 28, 2020

Start each day with a grateful heart...


I used my Silhouette Cameo to cut this reminder, which I purchased from the Silhouette Design Store. It's really a good reminder these days when we feel like we have lots to complain about.

Today I am so grateful that I already planted the little seedlings that I started inside the house about 6 weeks ago. We have had a couple of nice rains in the days since I did that, so their chances of survival have been greatly increased! I planted quite a bit of kale, which I like to add to soups, salads and other dishes. I've even made kale chips by roasting it in the oven for a few minutes.


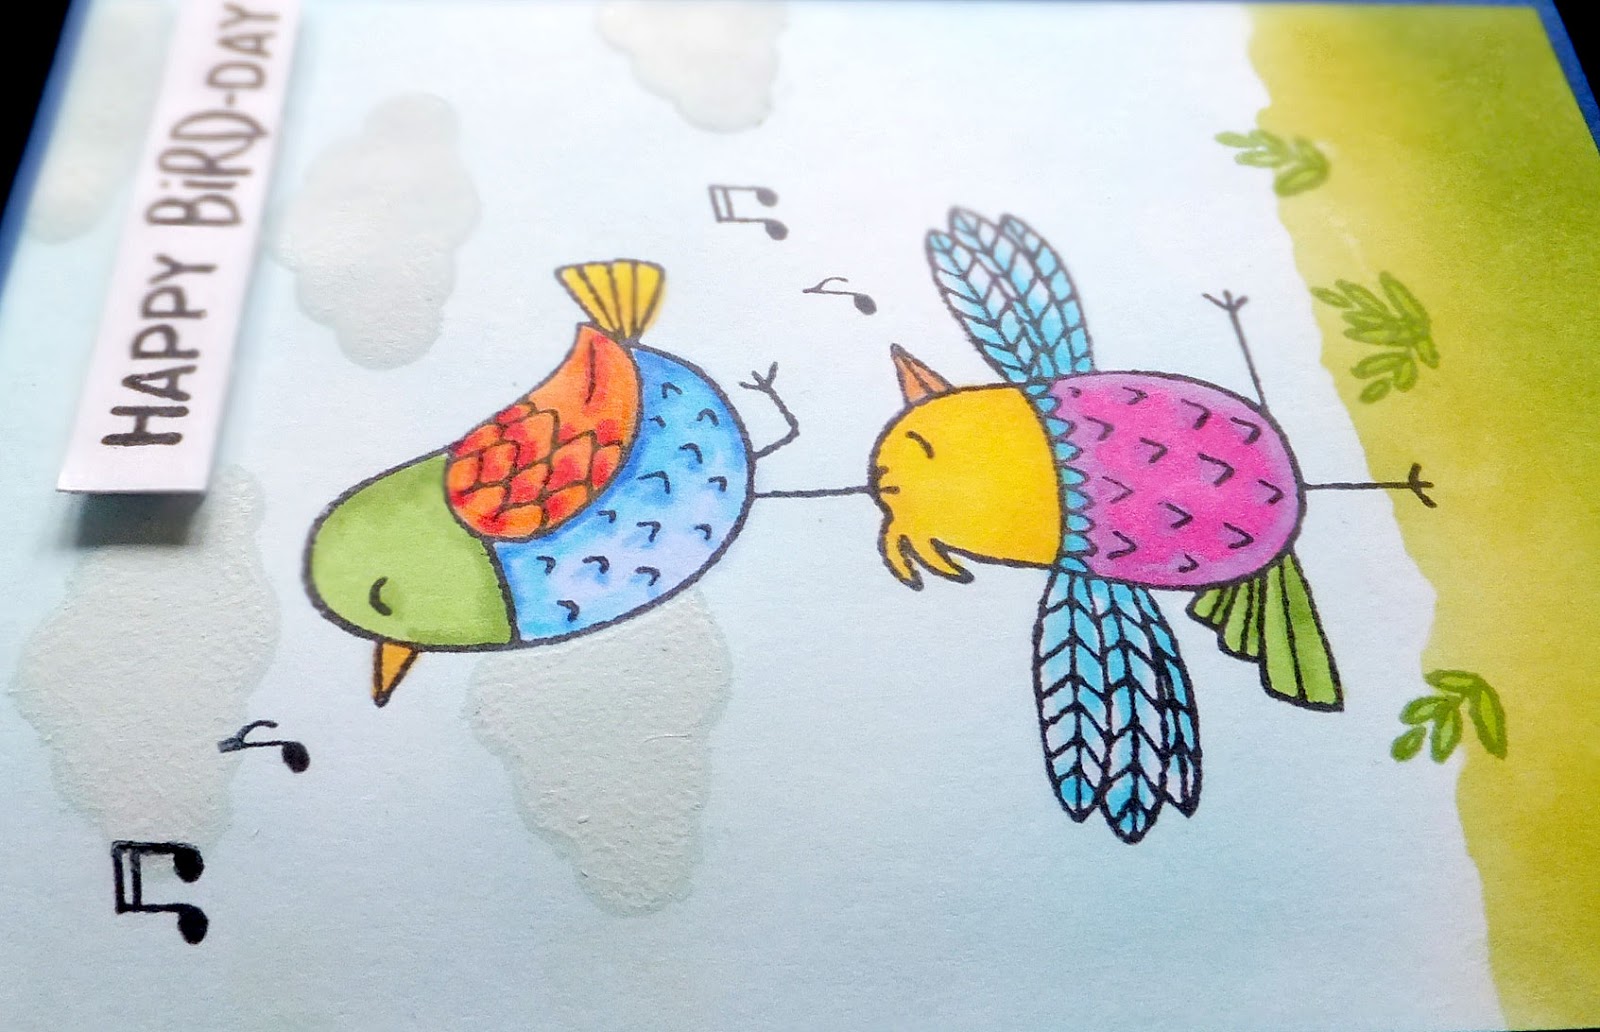
Besides sharing this cup with you, I thought I should also share a card I made recently.


I've had this stamp set for some time, and it was definitely time to ink it up. After stamping my birds and masking them off, I used some brushes, ink and a piece of torn paper as a mask to create the sky and grass. I then cut a cloud shape (with a die) from a piece of cardstock. Using this as a stencil, I applied several layers of white ink through my "stencil" to form my clouds.

I think you can really see those clouds in this sideways photo.


I had fun with my Promarkers, making the birds as colorful as I could. I think their whimsical design lends itself well to bright colors.

After stamping a few notes around their heads and some leafy fronds at their feet, I was ready to work on the inside.


The sentiment here was computer generated, but the notes were added with stamps. I tried to find a font that went well with the font used for the stamped sentiment on the front of my card.

To add just a bit of color to my panel, I drew several lines close together with the Promarkers I had used to color my birds. I know it's hard to see, but I actually used different colored markers at the top and bottom of my panel.

That's it for me today. Thanks so much for stopping by, and remember to laugh--a little or a lot--every day.
Cheryl

Friday, April 24, 2020

More fun with glitter paste and a stencil...


I am having such a good time playing with stencils and some Martha Stewart clear glitter paste. For this card, I first used three different colors of yellow ink and a stencil to add the design to my white panel.


Once that was done, I left the stencil in place and added a thin layer of the clear glitter paste. The only drawback in doing this is that the clear glitter paste that you are using absorbs some of the ink and takes on a yellow hue, so you really can't put any excess back into the jar. I just try to start with as little as possible and add a tiny bit more if need be.

When the glitter paste was dry, I mounted my panel onto a black mat and then onto my gold card base.


I love the dimension and sparkle it adds to my card.

My sentiment was cut with a die out of black foam board from Dollar Tree, so it is very dimensional, as well.

I left the inside of this card blank, as I will be using it to send a personal note to a family member.


It is a gorgeous day in Minneapolis today, so we will be going for a walk later on. In fact, our BIG plans are to walk a half-mile or so to a service station where a taco food truck parks. We're going to have "dinner out" from the food truck. How exciting is that? Bet you're all jealous. he he

Thanks so much for stopping by, and remember to laugh--a little or a lot--every day.
Cheryl

Tuesday, April 21, 2020

Killing two birds with one stone...

...not that I want to kill any birds. In fact, I definitely do not! Now squirrels are another matter.

But back to the issue at hand: The lovely Darnell of djkardkreations.com has two challenges this month for your cardmaking pleasure. One is the ever-popular NBUS (Never Before Used Schtuff) Challenge and the other is the TwoFer Card Challenge. I will be entering and linking to both of these fun challenges from this blog post--hence, the two dead birds.


First, I'll share the two cards I made for the Twofer Card Challenge. Since the April theme is rain/umbrella, I decided to incorporate both into my cards.


The first card is an encouragement card and the second, a get-well-soon card.

I began by using a rain stencil on a die-cut circle. After inking the raindrops, I kept the stencil in place and added a layer of Martha Stewart Glitter Paste. Can you see the sparkly dimension of the raindrops? A few weeks ago I had used a Michael's coupon for 50% off to purchase a jar of clear glitter paste just before the lock-down occurred. It has given me something new to play with while we self-quarantine.


On the inside of the card I added a few more raindrops and a computer-generated sentiment. I know we "ladies" are not supposed to go stomping about, but honestly, don't you just want to stomp out your frustrations sometimes?


I did not add any glitter paste to the raindrops on my second card, but I did add some nice dimensional grass, cut with a die and inked on the tips of the blades. The sentiment has been popped up on foam tape, as has the center of the umbrella.


I added a sun to the inside of my card, hoping it will cheer someone up. Once again, my sentiment was computer-generated.


Since I was playing for the first time with my umbrella die set, I also made a card for the current NBUS challenge. In fact, this was the first card I made of the three.

I designed it as an encouragement card--we need a lot of those nowadays, don't we? I love the idea of an umbrella filled with flowers, so that's what I made. The shaft of the umbrella is cut from gold foil CS to match the gold sparkle in the umbrella's canopy (I had to look up the names of those umbrella parts!).


The inside of this card features a matted panel with one of the flowers displayed in the corner--just a little something to brighten up the inside.

I hope you'll join in on one or both of these challenges. They're both so much fun and they definitely help me look through that pile of NBUS and select something to actually use!

Thanks so much for stopping by, and remember to laugh--a little or a lot--every day.
Cheryl