The challenge this month at Let's Craft and Create is truly a fun one. Who doesn't love to create cards and other projects featuring four-legged friends?
I decided to use my Silhouette Cameo and some clipart featuring cat silhouettes to create my card.
I started with some pretty paper from my stash for my background and a "happy birthday" sentiment, cut with an Elizabeth Craft die. I added a strip of brick embossed pink CS at the bottom to serve as a ledge on which I could set my cats. The embossing folder was by Sizzix.
I found some fun cat clipart online and used my Silhouette to trace and cut the images out of some different patterned papers--all in brown tones. I inked around the edges of each cat and added some collars made from tiny metal gems.
I added some sequins and liquid pearls to my flowers for a bit of bling.
The inside of my card is very simple with just a matted piece of white cardstock and a computer-generated sentiment.
This card was for my daughter--she loves cats and has three of them!
The rest of the Design Team has created some outstanding projects to inspire you. We've got some new team members this month who are top-notch. Head over to Let's Craft and Create and check them out! Then channel all that awesome inspiration into your own project and add it to the LCC site. I'm really looking forward to seeing what you create.
Thanks so much for stopping by, and remember to laugh--a little or a lot--every day.
Cheryl
Tuesday, July 5, 2016
Thursday, June 30, 2016
Chevron frame card...
A few days ago we celebrated my stepson's birthday, and I turned to my Cameo and Design ID #82527 from the Silhouette Online Store to make him a birthday card.
I cut the Chevron frame out of black CS and backed all four sides with some blue CS.
Then I backed the entire front of my card with a piece of white cardstock on which I had printed my sentiment. Well, I guess I should say most of my sentiment. The "B" was actually cut out with an old Cuttlebug die several times and glued together for dimension before adhering it to my card. The colon was made with a single-hole punch.
Did you notice that I printed all my capital "Bs" in blue?
On the inside of my card, I used another computer-generated sentiment on white CS. You can see the white CS on both sides of my card's interior in the photo above.
We arrived home from Oregon last night. Even though there is only a 2-hour time difference, I feel like I have jet lag. I'd just like to lay down and have a long nap. Maybe tomorrow...
Thanks so much for stopping by, and remember to laugh--a little or a lot--every day.
Cheryl
Monday, June 27, 2016
Another baby girl card...
When I was making my last baby card, which was featured in this post, I decided that it only made sense to make two cards. After all, my desk was filled with girly papers and baby stamps, so why not?
I decided to use a swing-card die set by Sizzix for my card base.
I found some pretty pastel heart-patterned paper in my stash that was perfect for my background panels. The flowers were cut with a set of graduated flower dies (not sure of the brand, and I'm half-way across the country so can't run down to my craft room to check), and the leafy flourish is a Cheery Lynn die.
The little bird came from a Sizzix stamp and die set. It was the perfect size for my card!
The stamps used on this card are all from My Craft Spot. It's the only set of baby stamps that I have, so if I want something different, I have to create it on my Cameo or the computer.
The scalloped and pierced circle dies were all part of my swing card die set.
On the back side of my swinging circle, I added another stamped sentiment and a couple of flowers. I felt they needed a little leaf, so I cut another flourish (Cheery Lynn), cut off a couple of the larger leaves and nestled them next to my little flowers. I thought this added a nice touch to an otherwise plain-looking area of my card.
We are currently having a grand time in Oregon. We went with my son and daughter and their families on a 10-mile bike ride yesterday and then went out for a yummy Mexican meal (my favorite!).
Today we are enjoying the beautiful weather in our son's gorgeous back yard.
I hope you're having as much fun this week as I am. Thanks so much for stopping by, and remember to laugh--a little or a lot--every day.
Cheryl
Friday, June 24, 2016
Girly birthday card...
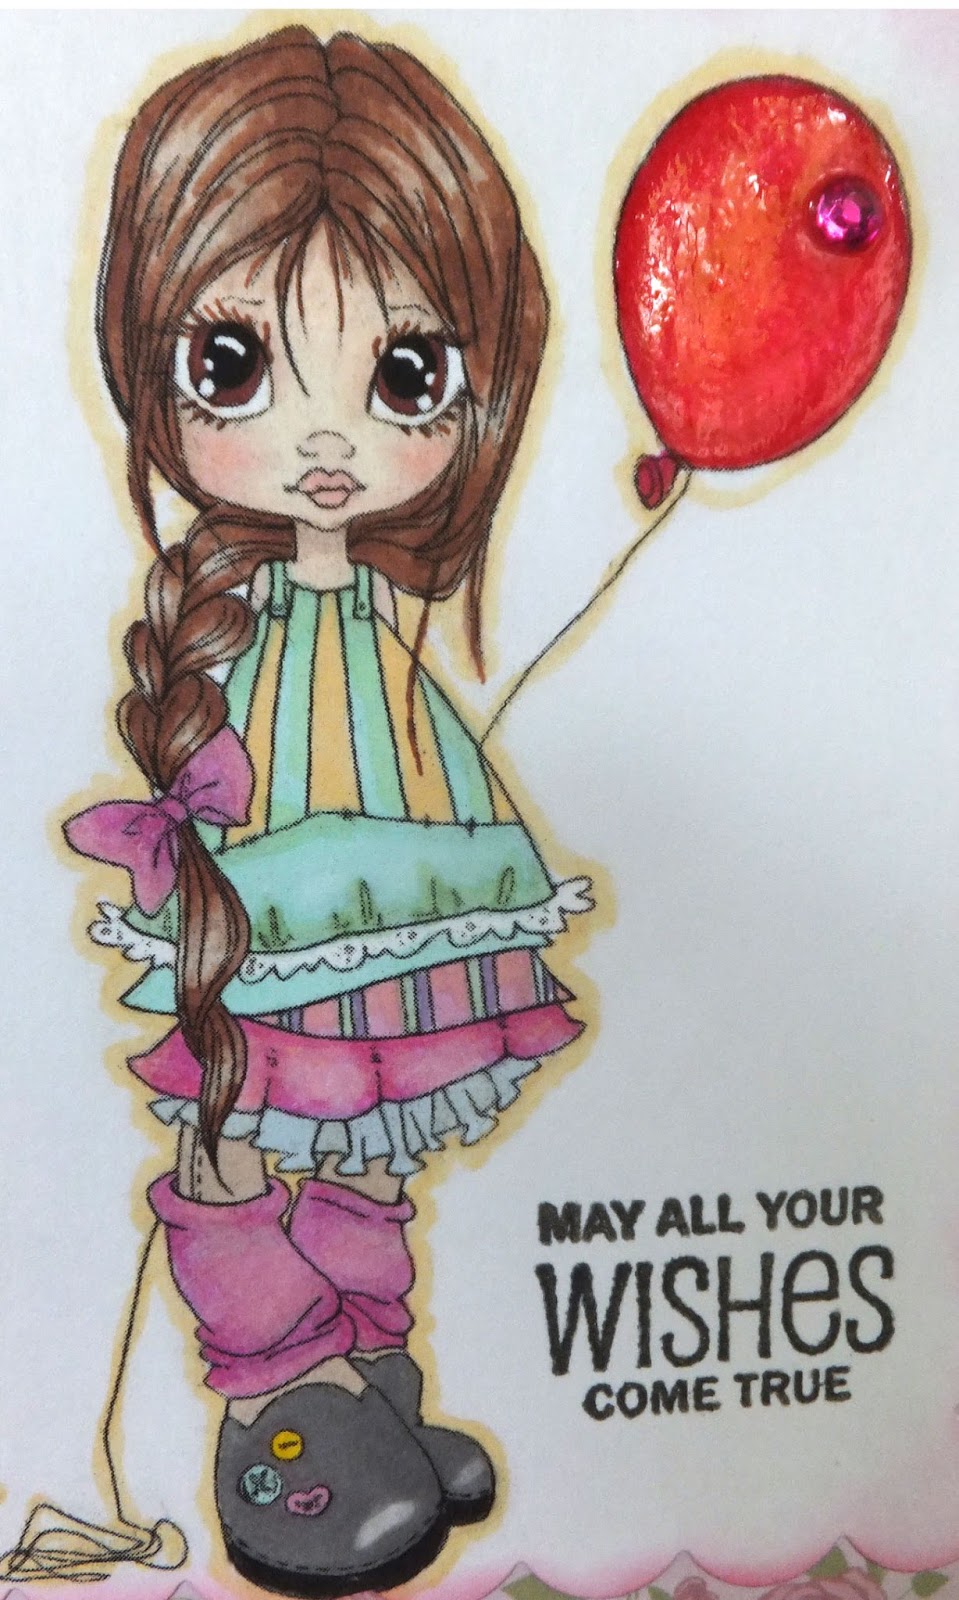
As I have mentioned in past posts, I've been making several birthday cards for boys for my daughter to have in her stash. While I was making those cards, I decided to also make a rather girly card. Even though my daughter had specifically said she needed "boy" cards, I figured I may as well make a feminine one, too, for my granddaughter to give to a friend.
I've had this image colored up for some time now, and have just been waiting for the opportunity to use it. I had cut it out with a Lifestyle Crafts scalloped rectangle. So I inked around the edges of that and added my sentiment. Then I backed it with some pretty paper (from a craft magazine) and put it all onto a pale green card base.
This sweet image is from Cuddlebug Cuties. I've used her images before, and just love coloring them up! I always use my ProMarkers for these, because they blend so nicely
I've added some Glossy Accents to the balloon, along with a sequin for a tiny spot of bling.
I was in a bit of a hurry while making this card, so my inside is very plain--just a stamped sentiment. I think it will do for my young granddaughter to give to a friend, though.
Today we are heading off to the northwest area of the U.S. to visit a daughter and son and their families. I'm so excited! I love that part of the country. It'll be a short visit--just five days--so I'm sure it will be jam-packed with fun.
Thanks so much for stopping by, and remember to laugh--a little or a lot--every day.
Cheryl
Tuesday, June 21, 2016
You deserve a break today...
Do you remember the classic McDonald's TV ad with the jingle, "You deserve a break today...?" If not, you can listen to a 1970s version here and a 1980s version here.
For some reason, that jingle came to mind when I was thinking about what kind of card I'd like to make my grandson for his 11th birthday. This is what I came up with:
The "full meal deal" was another old advertising campaign, but I think it might have actually been Dairy Queen that used that one.
The soda bottle and burger were cut with my Cricut using the Nifty Fifties cartridge. I cut the bottle from a piece of vellum cardstock and tinged it with a bit of green using a ProMarker.
The burger was cut from white cardstock and each layering piece was colored with ProMarkers. I love how it turned out doing that. It enabled me to add some shading to all the pieces and make it look more realistic.

This time the inside of my card is pretty plain, with just a computer-generated sentiment. I left lots of room to write a personal note.
I told my grandson he'd need his mom to sing the jingle for him (I just hope she remembers it!), so he would know what it's suppose to sound like.
I think this card would work for all ages, don't you? The soda bottle and burger were really fun to put together. It was also fun to cut with my Cricut again. It's been a looooooong time since I've done that. I've been too enamored with the Silhouette Cameo to even think about using my Cricut. I'm going to try to use it a bit more in the future, though. What's the use of having a machine if you don't use it???
Thanks so much for stopping by, and remember to laugh--a little or a lot--every day.
Cheryl
For some reason, that jingle came to mind when I was thinking about what kind of card I'd like to make my grandson for his 11th birthday. This is what I came up with:
The "full meal deal" was another old advertising campaign, but I think it might have actually been Dairy Queen that used that one.
The soda bottle and burger were cut with my Cricut using the Nifty Fifties cartridge. I cut the bottle from a piece of vellum cardstock and tinged it with a bit of green using a ProMarker.
The burger was cut from white cardstock and each layering piece was colored with ProMarkers. I love how it turned out doing that. It enabled me to add some shading to all the pieces and make it look more realistic.
This time the inside of my card is pretty plain, with just a computer-generated sentiment. I left lots of room to write a personal note.
I told my grandson he'd need his mom to sing the jingle for him (I just hope she remembers it!), so he would know what it's suppose to sound like.
I think this card would work for all ages, don't you? The soda bottle and burger were really fun to put together. It was also fun to cut with my Cricut again. It's been a looooooong time since I've done that. I've been too enamored with the Silhouette Cameo to even think about using my Cricut. I'm going to try to use it a bit more in the future, though. What's the use of having a machine if you don't use it???
Thanks so much for stopping by, and remember to laugh--a little or a lot--every day.
Cheryl
Friday, June 17, 2016
Skateboarder birthday cards...
Here are a couple more cards I made for my daughter to have in her stash. She has two boys who regularly attend birthday parties for their buddies, and she needed some cards on hand for those occasions.
I started with a blue card base and added a black mat. Then I cut a piece of white CS that was rounded on one side (with a circle die). I used my score board to add some rays that all started from the centerpoint of the rounded side. Once my scoring was done, I inked it up with some distress ink. The rays absorbed more of the ink so became more prominent, which was perfect! I added a sparkly star border, a couple of single stars and some silver metal dots to complete my card.
For the next card I used the same process but different colors. Instead of stars, I added a simple border made with a Paper Smooches dots border die.
My skateboarder silhouettes were from a cutting file that I purchased in the Silhouette Online Store (Design ID #83811). I think they work great for these pre-teen boy birthday cards.
The HB2U were black glittery number/letter stickers from my stash.
The insides of my cards were pretty simple with a computer-generated sentiment.
Well, I am nearly to the end of my childcare stint with my grandkids. I will have a rest over the weekend, and then Monday is my last day on duty.
Yesterday, I brought my three grands (ages 13, 10 and 8) to my house for a couple of hours to craft a Father's Day gift for their dad. They had so much fun and did such a great job. I only wish there had been time for me to take pictures of what they created, but we were in a big rush.
They are at an age when they can really make some fabulous items, and they have such good ideas! I think I should have them around all the time, if only to help me brainstorm and plan my next project.
Have a wonderful weekend and thanks so much for stopping by. Remember to laugh--a little or a lot--every day.
Cheryl
Tuesday, June 14, 2016
Sweet baby girl card...
A while back I needed some baby girl cards, and this is one that I made.
The little baby elephant was cut with a mini die by Cottage Cutz. Isn't it so cute? I don't actually have this die, but my sister does, and she let me cut out a few to have on hand.
After cutting it out, I used some pink distress ink to add some shading. I also colored the heart with a marker and then covered it with Glossy Accents.
My fancy rectangle was cut with a Spellbinders die. My sentiment is from a stamp set by My Craft Spot, and the ribbon and background paper are from my stash.
I adhered the ribbon with some Glossy Accents, which works really well. I always put a little weight on the ribbon until the Glossy Accents is dry to make sure it stays in place and that I get good adhesion.

On the inside of my card is another sentiment from My Craft Spot and a little punched heart.
I matted both the front and inside panels with pink CS.
That was it! Easy peasy.
I was supposed to take my 8-year-old grandson to soccer practice tonight, but it was raining buckets!! We had some thunder and lightening, too. I love a good summer storm, as long as no one suffers any damage.
Thanks so much for stopping by, and remember to laugh--a little or a lot--every day.
Cheryl
The little baby elephant was cut with a mini die by Cottage Cutz. Isn't it so cute? I don't actually have this die, but my sister does, and she let me cut out a few to have on hand.
After cutting it out, I used some pink distress ink to add some shading. I also colored the heart with a marker and then covered it with Glossy Accents.
My fancy rectangle was cut with a Spellbinders die. My sentiment is from a stamp set by My Craft Spot, and the ribbon and background paper are from my stash.
I adhered the ribbon with some Glossy Accents, which works really well. I always put a little weight on the ribbon until the Glossy Accents is dry to make sure it stays in place and that I get good adhesion.
On the inside of my card is another sentiment from My Craft Spot and a little punched heart.
I matted both the front and inside panels with pink CS.
That was it! Easy peasy.
I was supposed to take my 8-year-old grandson to soccer practice tonight, but it was raining buckets!! We had some thunder and lightening, too. I love a good summer storm, as long as no one suffers any damage.
Thanks so much for stopping by, and remember to laugh--a little or a lot--every day.
Cheryl
Subscribe to:
Posts (Atom)