Wish List

Tuesday, February 11, 2014

Happy Birthday, Deb...

It is my sister Deb's birthday today. I hope she has a wonderful day and is treated like a queen!

Here is the card I made for her:
I embossed the turquoise panel with a Lifestyle Crafts embossing folder. I love this particular one that came in a set of two called "Classic." I think you can see that I also slightly inked the raised parts of the embossed image to give it a bit more dimension.

The doily was cut with a Lifestyle Crafts die out of some sparkly turquoise paper. Luckily, I just happened to have some turquoise glitter paper that matched my turquoise cardstock. The banner was made from 1" satin ribbon.

Because I didn't exactly tell the truth on the front of the card (shhhhh - my sister is a "little" older than 29), I decided  I might as well embellish the truth on the inside of the card, too. I really don't weigh 110 lbs. I mean, I REALLY don't weigh 110 lbs!

I did a little more embossing on the inside, added a little ribbon and a couple of decorative corners cut with a Cuttlebug die.

This card was a lot of fun. I just hope it makes my sister smile on her big day.

Once again....
Happy Birthday, Deb!


Thanks so much for stopping by, and remember to laugh--a little or a lot--every day.
Cheryl

Monday, February 10, 2014

Happy Birthday to my son...

Today is my son's {gulp} 40th birthday!! I can hardly believe that my little boy is 40 years old. I must have given birth when I was about 5 years old. Surely I'm not over 45 myself. Ha ha!!

Anyway, 40 is a milestone and needed a special card to let him know how much we love and admire the wonderful man he has become. Here is what I came up with:
I got this idea from Helen over at It's All Fiddlefart. She's done a number of these cards and if you search through her blog, I'm sure you'll find more of them plus a lot of other great ideas.

I created the basic design of the card in Microsoft Publisher. I cut two layers of the word "Exclusive" so that I could pop this up on foam squares.


This photo is of my son when he was a year old. He really is eating his birthday cake here. Do you see the balloons I added with real thread and tied to the spindle on his high chair? I did end up trimming that long thread before I sent him the card. I pierced a hole on either side of the spindle, used a needle to pull the thread to the back and then up again on the other side, and finally tied them together in a bow.

Wasn't he an adorable little boy? His bib says "Today I am a li'l stinker." He could definitely be a little stinker at times, but he always had so much charm that he could melt my heart in no time flat.
I don't know if you've noticed but when you see those blank spaces in the text, it's because I've erased his last name using Photoshop, just to give him some anonymity here.

The little gifts were punched out with the Martha Stewart deep-edge "Gifts" punch. One of my daughters gave me this punch for Christmas. It makes the perfect little gifts and I can see adding them along with all kinds of images on my cards. With their simple shapes, they are so easy to back with a contrasting color of cardstock.
Martha Stewart Gifts Punch
You can see on Scott's card that I punched a gift out of blue paper and one out of a gold glitter paper. Then I backed them with a contrasting color and popped them up on some foam squares.

On the inside, I added a black mat to mirror the one on the front of the card, and I also added a couple more balloons (Cuttlebug die). For these balloons, I just drew on the strings.

This card was so much fun to make, even though it's kind of tough to admit that I have a 40-year-old child. He'll always be about 4 or 5 in my mind and ageless in my heart!

Happy Birthday, Scott!  I love you!

Thanks so much for stopping by today, and remember to laugh--a little or a lot--every day.
Cheryl

Saturday, February 8, 2014

Another boy Valentine...

Little boys are never a problem when it comes to cardmaking.  But when they get to be 9, 10 and beyond, they don't want those "cute" cards anymore. They're much too "tough" for little cars, trucks and trains or even puppy dogs or other pets.

Because I like to make my cards as personal as possible, I always think long and hard about the design and content of the card, especially when it comes to my older grandsons. One of them is taking snowboarding lessons this year, so here's the Valentine I made for him:
This image was cut from the "Dude!" cartridge. I think you can see that the snowboarder is popped up on some foam squares for a little added dimension. I did add one little heart up in the corner and used lots of red cardstock. It is a Valentine, after all.

I had to go online to look up some snowboarding lingo for the sentiment, which is computer generated. Gnar-shredding??? Have you ever heard of that?? I sure hadn't until I worked on this card.


For the inside of the card, I added a little strip of the DSP, another strip of the punched border and a couple more hearts.

I sure hope my grandson likes it. I think he'll be surprised to see a snowboarder on his card.

Thanks so much for stopping by, and remember to laugh--a little or a lot--every day.
Cheryl

Thursday, February 6, 2014

A Valentine for my husband...

The cards I make for my husband are usually simple in design...and this one is no exception. I used the "Birds on a Wire" Martha Stewart punch for the birds. I received this punch as a Christmas gift from one of my daughters.


Martha Stewart Crafts - Edge Punch - Birds On A Wire
I am so loving this punch! It's easy to just trim the birds' tails from the cardstock or even trim away most of the birds, as I have done for this card.


Here's a peek at the folded banner that I created for my sentiment. I inked the edges just a bit to make it stand out a little more.

Just yesterday, I received some La La Land folded banner dies in the mail that I had ordered.  I'm excited to use them in the future, rather than making my own.

The sparkly little hearts that I used above the birds and near the sentiment were some dimensional stickers that I got at a big discount last year after Valentine's day. They have really been coming in handy this year.

I don't recall who makes the cloud patterned paper. What I do remember is that when I found it online a couple of years ago, I ordered quite a few pieces. I've been using--and loving--it ever since.

I still have more Valentines to share with you, and I'll try to get them all up and on the blog before the big day.

Thanks so much for stopping by, and remember to laugh--a little or a lot--every day.
Cheryl

Wednesday, February 5, 2014

Special handmade birthday cards...

It was my birthday on January 27th, and I received several beautiful cards. Some were purchased and some were handmade, and I loved all of them!

Because I focus on handmade cards on this blog, however, I thought I'd share the two I received that were crafted by two dear people - one by my sister Michelle and the other by Nadine, the sister of my son-in-law who lives in Germany.

This beautiful card was made by Nadine. I believe the sentiment translates as "Take time to be happy!"  The two-tone ribbon you see across the center of the card is actually three 1/8" ribbons adhered side-by-side. I'm not sure what punch she used for the butterflies, but I love the shape of their wings and the embossing that gives them extra definition.

This card was made by my sister Michelle. She used a Cuttlebug embossing folder for the white mat and the Quickutz "Floral Doily" die for the focal point. The sentiment is on a self-adhesive dimensionl sticker that is encased in a metal form (also self-adhesive).


My favorite embellishments on this card are the two fancy little heart brads in the corner. Aren't they pretty? And they just add a special touch to the whole card.


I hope you enjoyed seeing Michelle's and Nadine's cards. Thank you again, Nadine and Michelle, for sending me these lovely cards. I appreciate them and will be using them for inspiration for the cards I make.

Thanks so much for stopping by, and remember to laugh--a little or a lot--every day.
Cheryl

Monday, February 3, 2014

A couple of girly Valentines...

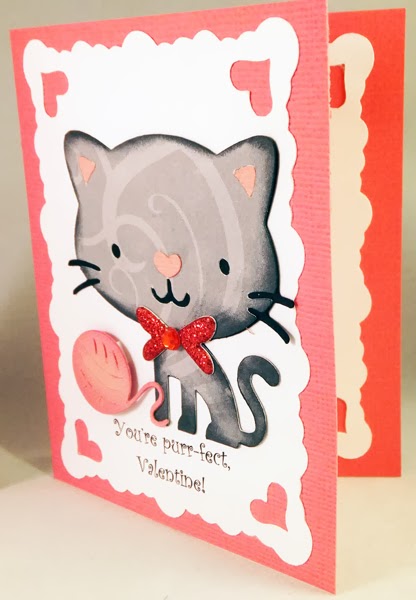
I had fun making a couple more Valentines for  my granddaughters. These were made using the "Create a Critter" cartridge for the kitten and ball of yarn and "Elegant Edges" for the white mat.
I did not cut out the little bow that is part of the kitten image. Instead, I used two tiny dimensional heart stickers and an adhesive-backed gem for the knot in each bow. Because the stickers were glittery, they added just a bit of sparkle to these girly Valentines.

The gray cardstock that I used for the kitten is a swirly pattern, which I thought would work just fine. After all, kittens are almost always patterned in one way or another, aren't they? I inked around the edges of the kitten and the ball of yarn for a little more dimension. In the picture above, you can see how I popped the yarn up on some foam squares, as well.

The inside has another of the pretty mats from Elegant Edges and a computer-generated sentiment. I added another of the glittery heart stickers for extra measure.

Thanks for stopping by today, and remember to laugh--a little or a lot--every day.
Cheryl


Saturday, February 1, 2014

More Valentine's from my sister's stash....and a St. Patrick's Day card to boot!

Today, I'm sharing some more of the Valentines my sister has made. The following three cards were made with the Simple Holiday Cards cartridge. She says it is a great cartridge when you're short of time, because it takes so few additional embellishments to have a great looking card.


The next three cards were made using the Victorian Romance cartridge. I think this heart image is especially pretty...and so romantic!


Finally, I thought I'd share the St. Patrick's Day card she made, also from the Simple Holiday Cards cartridge.
Isn't this a fun card? I love that she made it out of glitter paper. It cut beautifully and the sparkle just makes me happy!

Thanks again, Michelle, for letting me post your cards here on Paper Panacea. I still have a couple more to share and will do that in another post.

Thanks so much for stopping by, and remember to laugh--a little or a lot--every day.
Cheryl