Wish List

Saturday, June 30, 2012

Speaking of black and white...

Nothing says "summer" more than yellow and butterflies.  And this card, which was cased from a card by Mary of StampinPretty, really says summer to me. I love black and white papers, especially when they're combined with a bright color.  I decided I wanted more yellow in my card than Mary has in hers, so I used a yellow card base instead of white.

As I put together this card, I remembered my first experiences with black and white television. I was a small child when it was just becoming commonplace in the home.  I remember the first television (b&w, of course) my family had. My dad actually made it from a kit - which you could get in those days.  He put the whole thing together, and when the magic moment came to turn it on for the first time, we were all gathered around in great expectation.  He turned it on, did a little tuning and a very, very snowy picture of a clown appeared on the screen--upside down! My dad had the TV sitting on the counter upside down.  We had that TV for years.  It never fit properly in the wooden cabinet we had for it, we could only get a couple of stations, and the screen was perpetually snowy. No matter, we enjoyed it anyway.

Years later my dad worked in a job where he could buy an RCA color television at a reduced cost and by making monthly payments. I believe that TV was over $400 which was a LOT of money in those days - especially for a family with 6 kids.  He surprised us one day by bringing that very special TV home. We were so excited! We were the first family in my small town to own a color TV set (keep in mind we lived in a town of 300 people in the middle of North Dakota).  There were only a couple of TV shows in color at the time, and one of them was Arthur Murray's Dance Party. I thought those colorful twirling ball gowns were the most beautiful thing I'd ever seen.

What has all this got to do with today's card?  Not a thing. Just thought I'd share a little personal story.

You can see this is a pretty simple layout.  Yellow cardstock and a couple of pretty black and white designer papers, all from my stash.  The butterflies and sentiment label were cut in my Cuttlebug with Spellbinders dies. The sentiment is raised up on dimensionals and each of the butterflies has a yellow flat-backed pearl at its center. I added a punched border in black and tied a couple pieces of narrow yellow ribbon at the top.  I was nearly done...except for the inside.

Here you can see that I added the same black punched border on the inside and used a Fiskars birthday sentiment and a butterfly stamp (not sure of the manufacturer of this one.)

Once again, for fun, I am entering this card in the following challenge:

Dutch Dare Card Challenge - #171 Flutterby Butterfly-Crafty Sentiments

Thanks for stopping by and remember to laugh--a little or a lot--every day.
Cheryl

Thursday, June 28, 2012

Starry banner birthday card...

Yet another kid's birthday card made for my daughters to put in their own card stash.  This time, I decided to use a little banner across the top of the card.
I cut the banner flags using my Cricut and the CTMH Art Philosophy cart.  I punched tiny holes in the upper corners and joined them using a couple of tiny silver brads. I also punched out some little stars and adhered them to the banner flags and added some faux stitching with my white gel pen.  I added some sparkle to the stars with a clear glitter pen.  A couple of little bows made with green baker's twine make the banner look as though it is tied on. The final touches are a birthday sticker on white cardstock, matted with red and yellow, and a couple of rounded corners--another card is added to the stack!

Because it's fun to take part in card challenges, I'm entering this card in the following:
1.)  365 Cards - Day 119 - mailable - this card is definitely mailable. Just a little bit of dimension with the (thin) foam tape under the banner flags and a couple of mini brads

2.)  Anything Goes Challenge - Challenge 70 - polkadot with a birthday theme - I love the lettered dots on this cardstock! And they simply couldn't be more birthday themed.

3.)  Send a Smile 4 Kids Challenge - birthday fun for kids - What I like about this birthday card design is that it will work for either a girl or a boy.

Thanks for stopping by, and remember to laugh--a little or a lot--every day.
Cheryl

Wednesday, June 27, 2012

Happy Birthday, with sprinkles on top...

Today I'm sharing another of those simple little birthday cards I'm making for my daughters. Once I get a half dozen or so done, I'll send them off in the mail so they can have a few of them on hand.

Cupcakes are in so many Cricut cartridges and in many, many stamp sets.  I cut this cupcake from the CTMH Art Philosophy cartridge and added the score lines in the cupcake paper with my scoreboard.  I ran the frosting piece through my Cuttlebug in the Divine Swirls embossing folder.  Then I add some glitter glue and sprinkled on a generous helping of multicolored seed beads.  I was pleasantly surprised at how securely they adhered to the card.  They truly won't fall off easily!

On the inside of the card it says, "Happy Birthday with sprinkles on top!" Again, I really like the card blank and was able to cut a couple of the candles out from a scrap and use them on the inside of the card. The inverted scallop circle behind the cupcake was cut with a Spellbinders die and inked along the edges to give it a little dimension.  I also used one of the birthday stickers and labels that were included in the "kit" with the card blanks.
Remember to laugh--a little or a lot--every day.  Laughter provides the "sprinkles" that make each day fun.
Cheryl


Monday, June 25, 2012

Puppy in a wagon...

I've been busy making a few birthday cards for my twin daughters.  They have small children who are invited to numerous birthday parties and said they'd like to have a few to keep on hand.  So...I've set to work to make each of them a few cards, and I'll be sharing them with you as I complete them. 

I actually ordered a birthday card "kit" but it only came with the prescored CS for 20 cards, some birthday themed clear stickers and the labels on which to put them.  Thank goodness the kit only cost $5, as it didn't even include the envelopes! I do like the birthday themed card blanks, though, and have had fun dressing them up a bit.

Here's the first of the cards I have made so far.

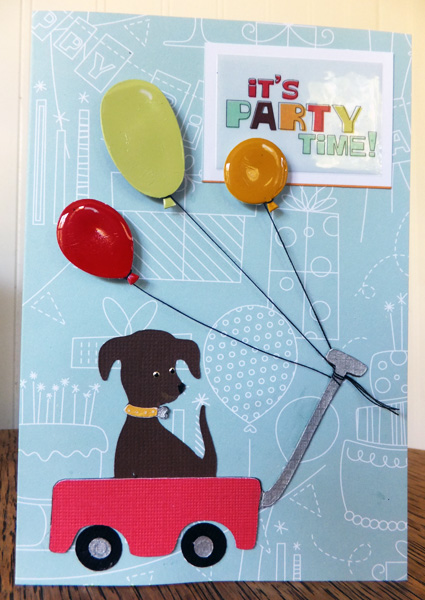
I found this little doggy in a wagon image in my Nate's ABCs cartridge.  I decided that any little kid would love this image--especially if I added a few balloons tied to the wagon handle.  You can see the fun birthday-themed card blank and the sticker/label in the upper right of the above photo.  I cut the balloons using a Cuttlebug die, added some black thread as the string and tied all three to the handle.

In the photo at the left, you can see that I applied some Diamond Glaze to each balloon to give it dimension and shine.  A simple "Happy Birthday" stamp on the inside finishes the card.  I plan to make five or six different birthday cards - we'll see how quickly I can get them done - and then also do a couple of adult cards, perhaps some with no sentiments on them so they can be used for any number of occasions.
I hope you enjoyed this simple little birthday card.  Have a great week and remember to laugh--a little or a lot--every day.
Cheryl        


Friday, June 22, 2012

I love paper lace...

I bought a lace border die by Lifestyle Crafts the other day.  It's this one which is 12" long and cuts a piece of paper lace that is about 1 1/2" wide.  As soon as I got it I had to try it out, because I love paper lace!
I use my Cuttlebug for dies like this. Although I don't have the extra long Cuttlebug plates to accomodate these longer dies, I can still make it work by simply repositioning the die and running it through the Bug a second time.

Once I had cut my piece of lace, I inked the edges with some distress ink and then ran an aqua ribbon through it.  Here's the card I came up with.
The plaid background paper has a little sparkle to it.  You can't see that in the photo, but it's really pretty.  I cut the front of the card 1" shorter than the back and attached the lace at the bottom. 

Below, right is a photo of the card standing up.  You can see in the this picture that the lace forms the bottom edge of the card.
The flower image is the same stamp I used in this post. I also bleached the flower petals on the image for today's card and you can see that the bleach had a dramatic effect this time! I used a blue ProMarker to color in the leaves and also an ivory ProMarker to add a tiny bit of color back into the petals.  I finished them of with some adhesive-backed pearls and matted the whole image on a piece of light aqua paper.  I also added pearls to the lace border.                             

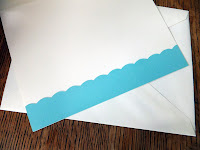
The sentiment is actually a vellum sentiment that I had in my stash.  I just adhered it to the aqua cardstock after I had cut both pieces with a label die. I also added a couple of tiny butterflies cut with a Fiskars punch.  I haven't added a sentiment to the inside, yet. I think I'll wait and see if I want to use a stamped sentiment or just handwrite a note.  I did add a scalloped strip of aqua cardstock on the inside to help show off the lace border when the card is closed.
I think I'm going to have a lot of fun with this die. I'm already thinking about how I can layer it on a card. I'm also going to try cutting it in half lengthwise and using each half separately.  I'll surely post some of these ideas as I am able to incorporate them in my cards or other projects.
Thanks for stopping by, and remember to laugh--a little or alot--every day.
Cheryl

Wednesday, June 20, 2012

Two cards for men...

Cards for boys and men are always harder for me than cards for women or girls. I know a lot of you feel the same, so I thought I'd share a couple of cards for some male members of my family that I made lately.  The first was a card for a 75th birthday.

I had some wonderful herringbone patterned cardstock that my husband gave me as part of my Christmas gift. In fact it came from a stack of papers that were all male-oriented. I loved it! It's not something I would necessarily have been drawn to in the store, but I really need to have paper like that on hand for cards like this.

I used the Heritage cartridge and my Cricut to cut out the clock at 4 inches.  Since the images in this cartridge don't have layers, I added a couple of hand-cut layers behind the clock face and the pendulum.  Then I added some dimenson and highlights with a gold gel pen (for the pendulum) and some gold liquid pearls.  I also colored the hands of the clock with a black pen. 

The sentiment was computer generated, cut out with a Spellbinders die and inked along the edges. I also added some dark green twine with three brown beads anchoring each end. I used just a little dot of glue that dries clear on each side of the three beads to keep them in place on the twine.
The clock was adhered to the card with foam dimensionals as you can see in the picture on the right.  This was a fun and simple card to make and perfect for a guy, I think!

I always think that men like simpler cards, so here's another card made for a younger member of the family.
I used another paper in a herringbone pattern and added a square of a red plaid paper for interest and a pop of color.  I also decided to use my herringbone embossing folder to emboss a piece of vanilla colored cardstock. I lightly inked it with a red distress ink and adhered it to the center of the card.  I used my Spellbinders ticket die for the sentiment (from a Fiskars set of birthday sentiments) and added a couple of sticky-backed faux brads on the left side.

I used another strip of the red plaid paper  to decorate the inside of the card. I also mimicked the ticket shape (hand cut) for the inside sentiment and inked the edges.

I think both of these cards work well for men. Now I need to work on a few more - lots of guys in my family with birthdays in the coming weeks.

Thanks for stopping by and remember to laugh--a little or a lot--every day!

Cheryl


Sunday, June 17, 2012

One-color card...

I needed to make a birthday card for a friend, and since she seems to be fond of pastels (judging by the clothes she wears), I thought this card, done in shades of aqua, would be just right.  There is a one-color card challenge during June on Enfys' blog, Going Buggy, and this card meets the criteria so, hey, why not enter it?
First I cut a scalloped rectangle card base with a Lifestyle Crafts lacey rectangle die.  I simply folded some white cardstock in half, placed the die so that it would not cut the fold and ran it through my Cuttlebug.  Then I chose a nice soft shade of aqua cardstock and cut a full rectangle (scalloped edging on all four sides).  I embossed it with  the Textile Texture embossing folder, using a technique so that the embossing did not extend onto the scalloped edging. Before adhering it to the front of the card base, I added a white ribbon across the center of it with sheer aqua ribbon over top, tied into a triple bow.
I cut a round doily shape (Lifestyle Crafts die) from white cardstock and a smaller round circle of the aqua cardstock on which I had stamped a floral image in a darker aqua shade of ink which I also embossed with clear embossing powder.  This stamp was a used stamp that I bought at our local ArtScraps store that sells all sorts of used items, factory overruns, and odds and ends that people donate. It's a great place to find a very good deal on craft supplies.

I actually used some bleach to remove some of the color from the flower petals in the image.  You can see that it didn't remove a lot--in fact very little--but I quite liked the effect. I am always amazed at how differently bleach acts on different types/brands of cardstock.  I added a tiny bit of color back in with a Pastel Aqua ProMarker at the base of each petal and then coated the flower petals with Diamond Glaze.  I also colored the leaves and stems with this same  marker and added a flat-backed pearl to the center of each flower.
On the inside of the card I cut a piece of the aqua CS to fit, stamped it with Happy Birthday and ran a piece of the white ribbon, topped with the aqua ribbon, across the bottom.

The sheer aqua ribbon started out white and I colored it with the Pastel Aqua ProMarker to match the rest of the card. 

This ended up being a very delicate looking card and I do hope the receiver likes it.  I had a lot of fun making it.
Thanks for stopping by, and remember to laugh--a little or a lot--every day!
Cheryl

Wednesday, June 13, 2012

Tickets of thanks...

Ticket shapes seem to be everywhere in papercrafting these days. If you think about it, they aren't normally considered decorating items - except when they are saved in our albums so we don't forget a memorable concert or other kind of performance. I have come to really like using ticket shapes on my cards along with the stamps that are available to adapt them to any occasion.

Here's a card I made using a ticket die from Spellbinders and a ticket-shaped thank you stamp from Close to My Heart that fits perfectly on the die-cut.  The tickets were cut from kraft CS and stamped with a brown chalk ink.
I used papers from my stash and punched  a border from white CS that I also inked along both sides to help define it a bit more.  I had just the right length of green ribbon left to run across the center of the punched border and create a couple of small tails to peek out from beneath the Petaloo flowers. A few pink flat-backed pearls, a little faux stitching with a pink marker and my thank you card was done.

I think I'll be using the ticket shape quite a bit in the future. It really is versatile and adds a nice point of interest.

Thanks for stopping by.  Remember to laugh--a little or a lot--every day.
Cheryl

Monday, June 11, 2012

omg...

Just a quick post today.  One of my sisters and her husband have planted 2,000 asparagus plants. Yup, 2,000! This year was the first year they were able to harvest them, and while they live 8 hours away, her husband brought us a large bag of spears while on a trip with his brother to our city. I was so taken aback. We love asparagus, and to have it this fresh was such a treat. 

Well, I just had to make a card to let them know how much we appreciated that they shared some of their first harvest with us.  This is what I came up with:
It's a super simple card - some glittery black chipboard letters on patterned paper that was matted with black--all items that I happened to have on hand. 

Here's what it says on the inside:

I think it gets my feelings across. I sure hope they like it and realize from this card how much we enjoyed that asparagus.

Thanks for stopping by, and remember to laugh--a little or a lot--every day.
Cheryl
Friday, June 8, 2012

Basketball birthday card...

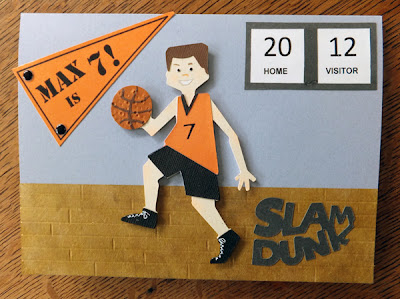
My grandson Max (this is a photo of him at his aunt's wedding - isn't he handsome?) is turning 7 in just a few days. I found out that he is going to a basketball camp this summer and he is very excited about it. I immediately began to think about making a basketball card for him for his birthday.  It was a nice change from the usual flowers and pretty paper. I do hope my daughter will not let him see this post until after his birthday, though!

I looked through my All Sports cartridge to find the right image.  I decided on this little guy, cut him out, using scraps from my stash, and glued all the layers together. The colors of his jersey and the pennant are the colors of the high school team where my grandson lives. The eyes were so small that I decided to try something new.  I used a small drop of white liquid pearls where each eye should be.  When that was dry, I touched the top of each pearly mound with a black permanent marker.  Voila! Two little eyes!


I added the computer-generated pennant and scoreboard. I thought I'd use the year (2012) as the scores, just for fun.  The "7" on the little guy's jersey is a rub-on - not sure of the manuacturer. The gym floor was a piece of craft paper which I scored to look like wood flooring and did a little inking on it to give it some dimension.  Finally the "Slam Dunk" was cut out from the same cartridge. In the smaller photo you can see that my little basketball player is on dimensionals. I certainly had to cut some tiny pieces of foam tape to support that little hand of his!  Did you notice that I drew in some shoe laces?

The inside of the card needed a little dressing up, too, so I cut out a ball and a basket and added them to the inside along with the sentiment.

In case you can't read the sentiment in the photo, it says,: May all your "swishes" come true! Happy Birthday.


Thank you for visiting.  Remember to laugh--a little or alot--every day.
Cheryl

Thursday, June 7, 2012

Wedding card with metal tape embellishment...

I love using unusual products to make embellishments for my cards. One of my favorite things to use is metal tape that is usually used to seal ductwork in your home.  This tape is made of a heavy aluminum foil and is adhesive backed. One of the fun ways to use it is to stick a piece down onto cardstock and then emboss it in an embossing folder.


Here is a wedding card I created that includes a heart embellishment made with metal tape.  I used a small Cuttlebug embossing folder that had this heart as part of the overall embossing design. After embossing, I simple cut the heart out (the metal tape cuts easily with scissors), punched a small hole and added a tiny bow using 1/8" ribbon. I only wish I had more embossing folders with this type of image!

The sentiment label was cut and inked and adhered to the card front. I used an adhesive backed silver stud/button thingy at the top of the label to coordinate with the silver heart.


Here's a photo of the roll of metal tape and the completed card.  The white border on the right side of the card is a piece of subtly striped vellum that I stamped using a border stamp and Versamark ink. I heat embossed with white embossing powder and then cut it out on the scalloped side. The dark purple strip that serves as a transition between the DP and the scalloped border was punched with an EK Success punch. I then adhered some double-sided tape to the backside and added fine glitter to the tiny square holes on the front side.  The glitter stuck in the holes and added just the right amount of sparkle. It was then super easy to take off the tape backing and adhere this strip to the card.

This card was a lot of fun to make. I need to come up with some more uses for this fantastic tape before my husband realizes it is no longer residing in his tool storage area!  If you've got some other ideas, I hope you'll share them with me.

Thanks for stopping by and remember to laugh--a little or a lot--every day!


Wednesday, June 6, 2012

A tag flower...

Sometimes it's fun to try making an embellishment with an unexpected tool. A while back my name was selected as one of the winners in the Spellbinders Spring Blog Hop.  My prize was a set of Spellbinders Labels and Tags dies. I was excited to receive these dies, as you can imagine.  I've used several of the dies in the usual way on a number of cards since receiving them, but I wanted to find some more creative ways to use them, too.  After studying them, I decided that the small oval tag looked a lot like a flower petal.  It's the one with the arrow pointing to it.

I cut out several "petals" using this die, molded them a bit with an embossing tool and used a purple Promarker to add some flicks of a deeper color.

Once I had them looking a little more like actual petals, I lined up the tiny holes at the end of each tag and joined them together with a glitter brad.  This was the result:
I thought they made quite a pretty flower!  I then cut out a couple of ticket shapes, stamped them with a Close To My Heart stamp that fits beautifully, and added them just under the flower.  With a punched border, some embossing with a Cuttlebug Swiss Dots folder and a little bit of pretty paper, my thank you card was done.  And it took hardly any time at all!
As you can see, I even added a narrow strip of the paper to both the back and the front of the envelope for a coordinated look. 

What tools do you have that you've used in unusual ways? I'd love to hear your ideas.

Thanks for visiting, and remember to laugh--a little or a lot--every day.
Cheryl

Monday, June 4, 2012

Black and blue thank you...

It isn't often that I turn to black and blue as my color choices for a thank you card, but a wonderful blog candy package helped me make that decision.
These lovely butteflies were part of a fantastic collection of flowers, butterflies and feathers from the Petaloo - Little Yellow Bicycle blog hop.  I was thrilled my name was selected to receive the Petaloo package, and I decided to use some of the products they sent me right away.  I was immediately drawn to the blue butterfly - maybe because of the amazing brilliant blue butterfly I once saw in a rain forest on the east coast of Costa Rica (Caribbean side).  Costa Rica is famous for its blue morpho butterflies, which are some of the largest butterflies in the world. I can tell you from experience, they are stunning!

I happened to have some light blue/black Core'dinations cardstock.  I ran a piece of it through my Cuttlebug in the "Birds and Swirls" embossing folder.  While the paper was still in the folder, I sanded the black side of the cardstock to reveal the light blue core.  I loved the result.  Then I cut a computer-generated sentiment out with a Fancy Tags die from Spellbinders and chalked the raised areas with a little blue chalk to give it more dimension.  I added two of the beautiful blue Petaloo flowers, one stacked on top of another, that came in the prize package.  Even the glittery flower center was included!

I think I will be using many more of these butterflies and flowers with other colors of my Core'dinations cardstock for some more dramatic cards.  I think this technique and these supplies would also work well for an anniversary card or even a sympathy card.

I want to take this opportunity to thank Petaloo for their generous prize and to urge you to check out their wonderful products.

And don't forget to laugh--a little or a lot--every day!

Cheryl


Sunday, June 3, 2012

Happy Anniversary card...

This post will be a quick one as it has been a very busy day and it is late, late, late.  Tomorrow we will be heading to an early church service and then taking my husband's cousin and aunt out for lunch. His aunt is 89 and a dear, wonderful lady. I enjoy both her and her daughter's company so I'm really looking forward to sharing a meal with them.

Here's a an anniversary card that I made for some friends of ours in the Chicago area.  It was quick to make and has a lighthearted appeal, which is what I wanted. 
I used a Cuttlebug border folder for the embossing across the top and the swiss dots folder for the bride's "dress." The "tux" was formed by cutting a black heart about 2/3 down the center, folding back the two sides to form lapels and then adhering it to a white heart that had been lightly inked along the top edge so that it showed against the white background.  The little bow tie was hand cut from some extra black paper.  A banner for the sentiment, a few flowers, gems and pearls, and it was done.

Hope you are having a great weekend. I know I am. I was even able to finish  a card today, so I hope to edit the photos and post it tomorrow.

Remember to laugh--a little or a lot--every day!
Cheryl