Wish List

Tuesday, October 29, 2013

I thought I was done...

...making Halloween cards until, at the last minute, I decided to make a couple for some special people in my life.
I made two simple designs, as I had to get them done quickly so that I could get them in the mail. This first card features a black rectangle of CS that is popped up on foam squares. I cut out the three circles, and then I cut three slightly larger orange circles to adhere to the card directly below each cutout.

I stamped the spiders and "Boo!" on the orange circles and used my glitter pen to give them each a little sparkle.


The inside was also simple - a sentiment, along with another spider, and a strip of the patterned CS across the bottom.


This was another simple, but fun, card that features the spider from the Doodlecharms cartridge. The main body of the spider is covered with black flocking (fun!), and I added a couple of googly eyes, too. I used the MS drippy goo border punch to get the black border across the top. The flat-backed gems are dark--almost black--but still reflect colors around them. They were perfect for this card.

The spider is actually popped up on a foam square to add some dimension. The "EEK!" sentiment was made with some black sparkly letter stickers by Reflections.

Another simple interior with room to write a quick note.

I'm entering this card into the following two challenges:

Thanks so much for stopping by today, and remember to laugh--a little or a lot--every day.
Cheryl

Saturday, October 26, 2013

Down to the wire for Halloween...

 
Halloween will be here in just a few days, and I've been working hard to finish up my Halloween cards. I am truly feeling down to the wire, but I think I am finally done! Here are some that I finished up yesterday: 
I made these four fun Halloween cards using an idea from a great tutorial from Dawn's Stamping Thoughts. Dawn called this card a Peek-a-boo Window Card. Click on the link to watch her great video tutorial.


The skull and crossbones on this card is cut from a Cuttlebug die. I put some green paper behind the eyes and nose and painted it with glow-in-the-dark paint.

The fancy label and shadow are cut from the Elegant Edges cartridge. I added a border at the top using Martha Stewart's drippy goo border punch.
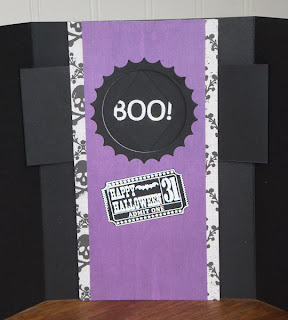


It's difficult to see how the peek-a-boo window works in this picture, but hopefully, you'll see it better on one of the other cards.

The ticket stamp was one that I found in the dollar bin at Michael's. I embossed it with white embossing powder on black cardstock. I love the way that looks.


Here's another card, very similar to the one above. I used the same tools for the border and label, and I also painted this skull and crossbones with glow in the dark paint.


Another card with a spider cut from the Doodlecharms cartridge. You can't tell in this photo, but I ran the body of the spider--a top layer that was cut separately--through my Xyron, added the googly eyes and then added flocking to it before I adhered it to the first layer of the spider. It's so cute in person.

The candies at the bottom of the card were dimensional stickers. Doesn't it look like that spider is just eyeing the candy corn, ready to pounce on it?


Finally, I made this card with three scalloped circles on the front. The top and bottom circles are adhered to the left side of the card, and the ghost in the center is adhered to the right side.


Here are some successive photos to give you a little idea of how the peek-a-boo works:
Once I got the hang of making these cards, they came together really quickly. The peek-a-boo mechanism is so much fun, and I think the kids are going to love it.

Thanks for stopping by today, and remember to laugh--a little or a lot--every day.
Cheryl


Wednesday, October 23, 2013

Why, yes...I drive a stick.


I've seen this sentiment in several places around the Web, and it makes me laugh every time! I just had to make a Halloween card with it.

The witch and the bats were cut from the Happy Hauntings cartridge. I embossed the straw end of the broom with a woodgrain embossing folder and then inked it up with Walnut Distress Ink. Did you notice that I added a sparkly band to the witch's hat with a glitter pen?

The moon is actually a circle cut into the gray swirly paper so that the pale yellow mat beneath shows through. The sentiment was punched out on a label maker. Then I just flagged the ends to make a little banner.


The inside is pretty simple. Just a stamped sentiment and a couple of stamped bats.

The "photo corners" were made by using a small die to cut out 2 scalloped squares with my Cuttlebug. Then, I cut them in half and notched the centers. Voila! You then have four photo corners.


I'm entering this card in the following challenges:

Thanks for stopping by today, and remember to laugh--a little or a lot--every day.
Cheryl

P.S. Oh yes, I DO know how to drive a stick!

Monday, October 21, 2013

Halloween "Trick or Treat" craft...

I had this Pepperidge Farm cookie tin sitting around for a long time, waiting to be turned into something fun. When we decided to go and visit my daughter and her family in their new home this past weekend, I knew I wanted to fill this can with a fun treat to take along. First, though, it had to be "modified."

The first thing I did was take my black ProMarker and color the edges that I knew would not be covered with DSP. Look at the amazing coverage I got. This turned out to be the perfect solution. Using either paint or paper in these areas would have made it impossible to put the cover on, but it was no problem after using the ProMarker.  Is there anything these markers cannot do?

Then I covered the sides and the cap with some fun Halloween paper. I also added a spooky, gooey border and the "Trick or Treat" cut from Create a Critter 2. The inverted scallop circles were made with some Spellbinders dies. The little dotted line around the upper edge of the can was made with some gold Liquid Pearls.

The can had a circumference of about 13". That meant that a 12" X 12" sheet of DSP would not fit around it. I found, however, that if you angled the sheet of paper it would come together perfectly, albeit at an angle like you see in the photo above. I figured that was okay for this project, since I made sure that the seam was in the back.

My sweet granddaughter Polly helped me mix up the goodies to put inside - candy corn and dry-roasted peanuts! Together they taste like a salted nut roll.

In fact, this treat is so tasty that it was completely consumed in just two days!

I'm entering this project in the Cardz TV's Challenge #38: Ghost and Goblin Party

Thanks so much for stopping by today, and remember to laugh--a little or a lot--every day.
Cheryl

Sunday, October 20, 2013

Thanksgiving will be here before we know it...

I decided to take a break from making Halloween cards, and I made a Thanksgiving card instead. I've had this strong desire to do some paper piercing, so I decided to give that a whirl for this card. I even bought an honest-to-goodness paper piercing tool, instead of using some other sharp object or a needle from my sewing supplies.

Here's what I came up with:
I was pleased with how this turned out. It's what I would call a "quiet" design - not a lot of frills or embellishments. The sentiment was computer-generated and cut out with a Spellbinders oval die.

The piercing didn't take long at all. I just printed a flourish design from Gem's Cottage, used some temporary adhesive to hold it in place over my cardstock and poked away. I did not have an extra mouse pad laying around to use as a cushion, so I used a piece of fun foam that I folded in half for extra thickness. This is something that is easy to do in front of the TV while watching your favorite shows.


Here's a little closer look at the piercing detail. The rust-colored cardstock has a white core, so after piercing it, I did go back and "poke" each hole with a black, fine-tipped pen so that the white core wasn't so obvious. Next time I will try this technique with some solid core paper. I think that will eliminate having to go over my pierced pattern with a black pen.


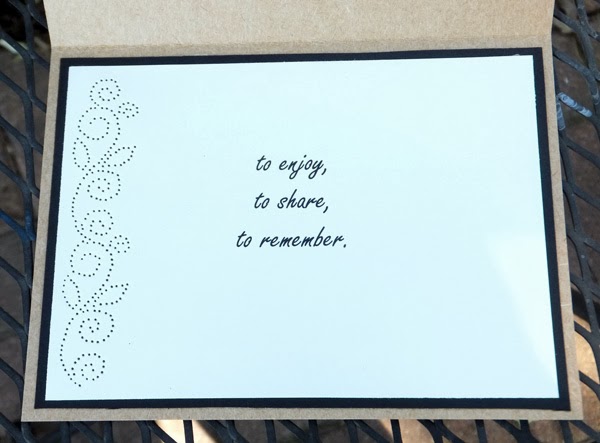
I decided to do some piercing to decorate the inside, as well. It not only adds a design element to the card, but it also adds some texture. I find myself running my fingers over the design after it's done to "feel" how pretty it is.


I generally send out at least a dozen Thanksgiving cards, so I've got quite a few more to make. I think I'd better finish my Halloween cards, first, though!

I'm also really going to have to focus when it comes to finishing my Christmas cards. With about 75 more to make, I'll need to keep my nose to the card-making grindstone.

Thanks so much for stopping by today, and remember to laugh--a little or a lot--every day.
Cheryl

Friday, October 18, 2013

A couple more Halloween side-step cards...


I am having a lot of fun creating these Halloween side-step cards for my grandkids. I embellished these two cards using mostly stickers that I picked up last year after Halloween. It feels a little like cheating to use stickers, but they were so inexpensive and so cute that I couldn't help but buy them.


Don't you love the expressions on the faces of these little ghosts? And I love that they have more than one layer. All of these stickers came in one package, which cost less than a dollar.

You can't see it in these photos but the ghosts and skulls (in the card below) are a glittery white. So fun!


I thought I was pretty clever, putting just this eyeball sticker on the inside. I did enhance the sticker a bit by adding some Diamond glaze to give the eyes a little shine.


Here's another card made with some more of these dimensional stickers. Notice that I added some Diamond Glaze to all of the eyeballs on this one. I did die cut that purple striped candy. It was left over from another project and I thought it added just a touch of "sweetness" to this ghoulish card. LOL


I have a Halloween banner stamp that I used for the inside of the card. I also used green and purple ProMarkers to color the banners to match the front.


If you'd like to see just how to make a side-step card, there's a great tutorial on Splitcoaststampers. This type of card can work for any occasion, and I find that they are a great way to use up some smaller pieces of DSP.


Thanks for stopping by today, and remember to laugh--a little or a lot--every day.
Cheryl

Wednesday, October 16, 2013

Happy anniversary...

Today is my husband's and my wedding anniversary. I decided to use a few distress inks (six of them, to be exact) to create a little scene on my card for him.

 
I tried to create a little scene by first using a mask to ink a yellow moon in the sky. Then I created the sky by inking the top half of the card in blues and a little purple. I brought a little of the blue ink across the moon to give the illusion of some wispy clouds. The bottom half was inked with more purple and some dark greens and browns. The last thing that I did was to stamp some trees on either side with black ink.

The sentiment was computer generated and matted with black CS. The little scene was also matted with black CS.


I kept the inside very, very simple. I believe this is a Fiskars sentiment stamp.

I hope he likes this card. I thought about what a great guy he is the whole time I was making it. I'm a lucky woman!


Thanks so much for stopping by, and remember to laugh--a little or a lot--every day.
Cheryl