Wish List

Wednesday, July 31, 2013

She is truly grand...

...and I'm talking about Mt. Rainier in Washington State. My DH and I just returned from a trip to Portland, Ore., and Seattle, Wash. We visited two of our kids and their families in the Portland area and then traveled by train to visit some friends in Seattle. Our friends have a gorgeous home on a hilltop with windows that frame a wonderful view of Lake Washington and Mt. Rainier. My DH took this photo from their deck:
He did use the zoom on our little digital camera, but we have no special lenses or other equipment. Isn't it amazing how Mt. Rainier just seems to rise up out of the ether? She is 14,411 feet high and is the highest peak in the lower 48.  Since this mountain is formed by a volcano, we asked our friends when they thought it might erupt, just as Mt. St. Helens did in 1980. Their answer? It could happen at any time!

When we were in Portland, we got to spend some time with this little cutie:
This photo was taken at the beautiful Chinese Garden in the heart of downtown Portland. Hadley is 5 years old and we don't get to see her often enough. Isn't she just a lovely little girl?

When we visited, I was able to take a few birthday cards I had made for Hadley to use when she is invited to her little friends' birthday parties. Here's one of them:
This is just a simple card with an image of Pluto from the Mickey & Friends cartridge. I wondered how much I'd use this cartridge when I got it, but I find that it is pretty great for birthday cards. Everybody seems to love the classic Disney characters, so I've had a good time picking just the right image for various cards. The red patterned card base came from a tablet of card bases that also contained the "Party hardy" sentiment.


The inside is simple, with just a red mat setting off the sentiment panel. I created the inside sentiment with my computer.


Thanks for stopping by, and remember to laugh--a little or a lot--every day!
Cheryl

Friday, July 26, 2013

With a cherry on top...

For today's card I used another one of those wonderful images from Angelique at Sliekje's digi Stamps.
 

Isn't this image of these two little mice enjoying some cake just precious? I colored it up with my ProMarkers and then added some Diamond Glaze to the cherries and some Stickles to the whipped cream.


Here you can see that I popped the matted image up on some foam dots to give it some dimension.  I also cut a long banner, stamped "Happy Birthday" in the center of it, and then scored it so that I could tuck a short section of the banner underneath on each side.
I used some glue dots to hold it in position. I think it turned out so cute and adds lots of dimension.

The yellow chevron patterned paper that I used is from Fancy Pants Designs - The Good Life.


I had a little bit of fun on the inside, too. I used my computer to generate the sentiment, but then I hand drew two little stems and a leaf and added two small flat-backed gems for the cherries.

This adds just the right amount of sparkle to the inside. This picture truly doesn't do it justice!


A red envelope really sets off the red in this card. I am definitely going to use this image again. If you'd like to use it, you'll find it here.

Thanks for stopping by, and remember to laugh--a little or a lot--every day.
Cheryl

Wednesday, July 24, 2013

Are you a knitwit?

My daughter is definitely a "knitwit." She's a smart, beautiful, kind, generous, fun knitwit - but a knitwit, nonetheless. She knits up a storm (although not so much in the summer when it's hot) and gives her gorgeous hand-knitted items to family members and friends. I've been lucky enough to be on the receiving end of some of those wonderful gifts.

While I don't knit, I wanted to let her know how much I support her in her hobby. I visited a wonderful little yarn shop in my area, bought a few skeins of yarn and then made these notecards to send to her along with the yarn:

These are really just some simple notecards, but I hope she finds them fun to use. I colored the yarn and basket images with ProMarkers and the knitting needles with Letraset metallic markers. I used some flat-backed gems for the ends of each of the knitting needles.

I looked up some knitting quotes and put a different one inside each notecard.  Here's a sample:
It was fun to whip together these few notecards for my daughter. I hope she uses them--and asks for more when these are gone. I love making cards for my kids to use.

A bright envelope for each card helped make this set even more fun.

Thanks for stopping by, and remember to laugh--a little or a lot--every day.
Cheryl

Monday, July 22, 2013

Sweet hedgehog birthday card...

A while ago I discovered Sliekje's digi Stamps. Angelique, the owner of that blog, is a wonderful artist and offers her artwork as free digi stamps for others to use. Here's a birthday card I made with one of her images:
Isn't that the cutest little hedgehog? I colored it up with my ProMarkers and added a little bit of brown Stickles to the flower centers and a little glitter pen to the butterfly. I then matted it with some purple glitter paper to add a little more sparkle.


I added a little daisy to the sentiment banner. I punched out two flowers with a Reflections punch, colored them and added some brown Stickles to the center.


For the inside, I just stamped an additional daisy in yellow ink and added more brown stickles to the center.

Visit Sliekje's digi Stamps and look over Angelique's many images. She may just have the perfect image for your next card!


Thank you so much for stopping by. Remember to laugh--a little or a lot--every day!
Cheryl

Thursday, July 18, 2013

Christmas in July...

I've seen a lot of "Christmas in July" posts out in the card-making blogosphere, so I thought that maybe I should join in. I'd really like to get an early start on making my Christmas cards, anyway. Here's my first for 2013:
This card was made with the December 25th cartridge and the Cuttlebug 5" X 7" embossing folder called "Holly Ribbons."  I cut the deer at 3" and the Noel at 1.5".  I embossed only part of the green panel so that I had a flat area where I could adhere the Noel. I also stamped some snowflakes with gold ink on the off-white panel behind the deer. The cardstock for the deer and the Noel is gold and has a really nice sheen to it, but I definitely did not capture that with my camera!

The ribbon is some that I bought at either Michael's or Joann's during their after-Christmas sales. I loved the rustic look of the plaid.

I also thought the red flat-backed gems added a little sparkle, but didn't take away from the more "homespun" look of the card.


The inside panel was stamped with a couple of snowflakes and then I stamped the sentiment with Versamark ink and heat-embossed it with some gold embossing powder.


I am entering this card in the following challenges:
1.)  Always Playing with Paper: Merry Monday "Month Long Anything Goes Christmas" Challenge
2.)  Pink by Design Stamps: Christmas in July Challenge
3.)  Exploring Cricut: Christmas in July

Thanks for stopping by, and remember to laugh--a little or a lot--every day.
Cheryl

Wednesday, July 17, 2013

Pretty paper and a tiny bit of embellishment...

I recently needed a sympathy card and didn't have one on hand. I've needed a number of sympathy cards lately, so just when I get one made, it seems I need to send it to a friend or family member.

To begin creating this most recent card, I selected this pretty paper to start:
While this paper has its own quiet beauty, I decided I wanted to step it up a notch, so I used a couple of markers and a white gel pen. Here's the result:
Just a little color adds some depth to the pattern. I also matted it with some dark blue CS that matched the darkest blue that I had added to the paper.


The inside was also kept quite simple with the same mat, a sentiment stamp and a flourish stamp.  While it's very hard to see in the photo, I also added some dots to the flourish with a white gel pen.


Since this card has already been mailed, I'll need to make yet another sympathy card for my stash. It's sometimes sad to make these cards, but I try to focus on the comfort they may bring.

Thanks for stopping by today, and remember to laugh--a little or a lot--every day.
Cheryl

Monday, July 15, 2013

Happy birthday to the world's best husband!

Today is my DH's birthday. He is the BEST husband, and I am blessed to have him in my life!

Lately, we have been talking about the day when we can take some extended RV trips to different parts of the U.S. and Canada. There is so much to see in both countries, and it is so much fun to travel in an RV. We're considering both renting and buying. We've rented RVs before and really enjoyed it, but if you're going to do multiple trips, it can get expensive. We're now thinking that maybe we'll look into purchasing a used one. Nothing big or fancy, just something that can be our home away from home while we travel.

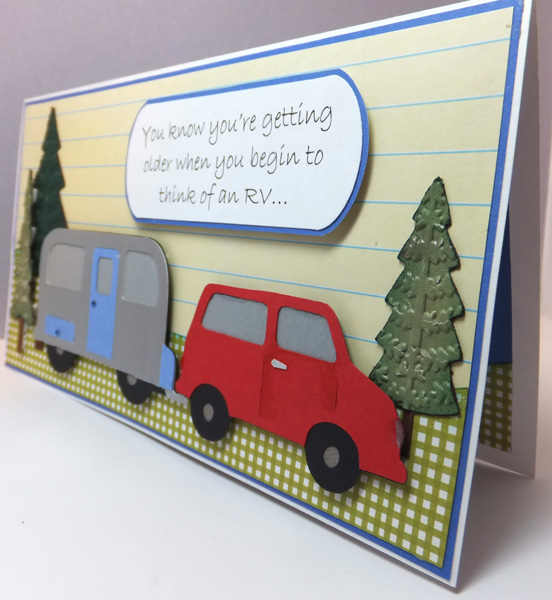
Anyway, with that bit of background info, here is the birthday card I made for him:

We're not planning on getting a trailer, but since none of my cartridges had a motorized RV, I settled for this one from the Every Day Paper Dolls cartridge. The car is also from there, I just flipped them horizontally so they'd be facing to the right. They are under "accessories" and don't have any layers, but I've added some, just by cutting them several times.

While it's hard to see in the photo, there is vellum in the windows. The trees were cut from the Winter Woodland cartridge, using the black out feature. Again, I cut them twice--once from green cardstock and once from brown to get the tree trunk the way I wanted it.


I also dry-embossed the trees with a Sizzix embossing folder called "Evergreen Trees." You can see the embossing a little better in the photo on the right. You can also see how I popped up one of the trees, as well as the trailer and the car for a little more dimension.


The inside of the card deserved some special attention, too. I added three more trees and a label cut with a Lifestyle Crafts nesting die for the sentiment.


I couldn't stop there! Since this was a larger card (4 1/4 X 8), I also made my own envelope. I used a nice masculine plaid paper and added three more trees. Sure glad I cut all those trees, even if I didn't have plans for all of them in the beginning. I used another Lifestyle Crafts die-cut as a label on the envelope.


A final look at the card and envelope together. This card took quite a bit of time - mostly for deciding what to make and then for creating my own layers - but it was fun, and I am pleased with the result!
Thanks so much for stopping by today, and remember to laugh--a little or a lot--every day!
Cheryl