Wish List

Friday, February 28, 2020

Another "Oldometer" card...

My son-in-law recently celebrated a milestone birthday, and this is the card I made for him:


It's very hard to photograph this card because of the silver metallic cardstock. The best picture I could get was taken at a bit of an angle, where the reflection wasn't too bad.

I used some basic dies to cut the apertures for my numbers (they were also die-cut) and the word "Oldometer." The decorative strip across the bottom was a self-adhesive border that I have had in my stash for years. It's about time I used it!


This is the inside of my card. The sentiment was computer-generated. This card is a repeat of one I had made for my nephew a year or so ago. It's a great guy card, since most men can relate to the car theme, and they get a kick out of the inside sentiment.

We had two of my son-in-law's brothers and his grown daughter staying with us last weekend. They were here as a surprise to help him celebrate. It was a fun time, and I'm so glad we live close and could celebrate with him, too.

We're looking forward to some spring-like weather this weekend. We still have about 4" of snow on the ground, but they are predicting that a lot of it will melt in the coming days. Good riddance, is all I can say!!!


Thanks so much for stopping by, and remember to laugh--a little or a lot--every day.
Cheryl

Tuesday, February 25, 2020

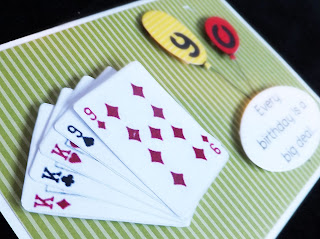
Turning 90 is a really big deal...


My uncle turned 90 years old recently and this is the card I made for him. I found the playing card images online and simply printed them and cut them out by hand.


The balloons were cut with a really, really old Cricut balloon die. It was one of the first dies I ever bought years and years ago. I also had some old number punches and punched the 9 and the 0 into my balloon die-cuts and then backed them with black CS.

My sentiment was computer-generated.


On the inside of my card I printed the sentiment with my computer and then inked the edges of the sentiment panel.

We had a good time with company over the weekend. They came from Boston, Massachusetts; Jackson Hole, Wyoming; and Brooklyn, New York. It's really fun to visit with folks from other parts of the country. No matter where we live, we have a lot in common!


Thanks so much for stopping by, and remember to laugh--a little or a lot--every day.
Cheryl

Friday, February 21, 2020

Pretty die cut, easy birthday card...


This post will be short and sweet. I am in the midst of finishing up my house cleaning in preparation for company this weekend, but thought I'd take a break and share a card with you.

I got this no-brand die online in hopes that it would make quick work of a birthday card, and it definitely does! All I did was prepare my card base, then cut the sentiment and apply with spray adhesive. I added some clear Nuvo Drops and a little glitter to my flower centers and rounded my two bottom corners. This all took about 10 minutes and my card front was done!


I used my computer to print out a sentiment. To better define the sentiment panel against the white interior, I ran a coral ink pad along the edge of it. If you look carefully, you can just see the pinkish line around the panel.

My first guest will be arriving in a couple of hours. It should be a fun weekend, and it looks like the weather is going to cooperate--sunny and in the 30s, which is warm for MN this time of year.


I hope you have a wonderful weekend, filled with rest, relaxation and fun! Thanks so much for stopping by, and remember to laugh--a little or a lot--every day.
Cheryl

Tuesday, February 18, 2020

Strawberries in the dead of winter...

Since it is such a "bleak" time of year, I decided to make some summery, fruit-inspired cards today.


A couple of years ago, I had purchased the strawberry basket image from the Silhouette Design Store. I just love that little basket. It reminds me of the ones that strawberries were sold in when I was a kid.


For this card I cut the different pieces of the berries and basket, then did a little ink shading on them. After putting my berry basket together, I popped it up with foam tape on a die-cut doily.

I even used my Silhouette and a red sketch pen to write out the sentiment, which is also popped up on foam tape. Three enamel dots finished off my card front.


I wanted to add a little something to the inside of my card, but I wasn't quite sure what. I finally decided on using a wonky-stitched rectangle die to cut out my stamped sentiment panel. Then I added a tiny scalloped edge on one side, cut from the same CS as was used on the front of the card.


For the second one, I actually designed the card base in the Silhouette software, making the circle aperture on the front and then cutting a mat from the yellow patterned CS to exactly fit.

Once again, I also used the Silhouette and a sketch pen to write the sentiment on my little banner which is glued in place on either side of the circle aperture.


When you open the card, you can see that the two strawberries are popped up with foam tape on the inside.

I stamped "Heartfelt Thanks" with red ink, as this will be used as a thank you card.

It is cold here today, and we got another couple inches of snow last night. It is supposed to warm up by the weekend (into the 30s), which is good, because we will be having a houseful of company.

Thanks so much for stopping by, and remember to laugh--a little or a lot--every day.
Cheryl
Friday, February 14, 2020

Happy Valentine's Day...

I hope you have something fun and/or romantic planned for today. My DH and I are going to a movie tonight. I actually tried this morning to get dinner reservations at a nearby restaurant, but they are completely booked! Guess I'll go ahead and make something for our dinner.

On Wednesday, I learned that the thrift store had sold all of the Valentines I had made for them so I quickly made a few more.


These two were the most complicated ones I made. They are shutter cards with the little peek-a-boo mechanism on the inside. The ribbons are adhered to the backs of the cards with some double-sided adhesive. When tied, they hold the cards neatly closed.


I think it's so much fun to have the inside sentiment revealed behind the "shutter" when you open the card. I used a variety of stamps and dies on these cards.


For this card, I cut the image/sentiment with my Silhouette. This file was a freebie from the Silhouette School site. The heart border at the bottom was made with a Martha Stewart punch. I rounded the two bottom corners of the back of the card so that they didn't stick out behind the red border.

On the inside, I used a pierced label die-cut and a sentiment die-cut. I really didn't have time to get too fancy, especially since I made two of these cards.


This card was super easy. The "Love" came from a paper stack. I simply cut it out and matted it with gold. Then I used a Thank You die to just cut out the "You" from some upcycled gold packaging.


This sentiment was stamped with an old wooden stamp that I had purchased at the thrift store. It was just the right size for this card!


Finally, I made two of these 3.5" X 5" cards. I had the pre-cut card bases in my stash, so all I had to do was line them with a pale pink patterned paper (it's very hard to see any of the color or pattern inside the heart in this photo) and add some stickers (Love, You, and square gems).


Inside this one is a simple, stamped sentiment.

All in all, I made 7 Valentines in just 3 hours or so. I thought that was pretty quick--at least for me. I tend to be a slow and messy card maker.

Thanks so much for stopping by, and remember to laugh--a little or a lot--every day.
Cheryl

Tuesday, February 11, 2020

Valentine and a birthday card...

I have made approximately 40 Valentines so far this year. Of course, I not only send them to grandchildren and other family members, I also take some to the thrift store for them to sell.  Here's an example of some that I have made:


I have this "starry sky" background die that works perfectly for cards like this.


I cut a piece of medium blue cardstock and then inked it using one of those soft make-up brushes and some navy blue ink.  When that was done, I created my starry sky with my background die.

The moon was cut from some satiny silver cardstock using two circle dies that were slightly different in size--the larger one for the outside cut and the smaller one for the inside cut.

The heart was cut with a small heart die out of glitter cardstock. To finish off my card front, I adhered my moon, silver cord and heart with foam squares and added a few tiny, iridescent stars for good measure.


While the sentiment on the front of my card was computer-generated, the one on the inside was stamped. I happened to have a few heart off-cuts on my work table, so I added three of those, too, for a bit of color.


My son's birthday was yesterday, and since he likes sloths (or at least he likes seeing them in the wild), I dug out my sloth die set and made him a card. He's been so busy lately, working on his doctoral degree and serving as superintendent at a State School for the Blind, that I thought my (computer-generated) sentiment fit perfectly.


This little guy is so cute, and I love cutting him out and putting him together. I have made Valentines with him, too, which you can see here.

My clouds in the background were inked using a torn piece of cardstock as a stencil.


The inside of the card is pretty simple with just a mat and another computer-generated sentiment.

That's it for me today. I need to finish cleaning up the Valentine mess in my craft area and then try out some new dies that I purchased in the last couple of weeks. I should also make a couple of Christmas cards--I've already fallen behind my self-imposed schedule on those!


Thanks so much for stopping by, and remember to laugh--a little or a lot--every day.
Cheryl


Wednesday, February 5, 2020

Let's Craft and Create Challenge #156: Mother's Day (UK)...

 Is it February already? It seems just yesterday we were celebrating the New Year. But since it really is February, it's time for a new Challenge at Let's Craft and Create. This month we're asking you to create a Mother's Day, birthday, just because or similarly-themed card and play along.

Here's what I've come up with as a Mother's Day card for one of my aunts, since my mother is no longer with us. Can you guess what kind of paper I used for my background?


I used a very pretty, shiny gold wrapping paper. My brother gave me a book for my birthday last month, which he had wrapped in it. As I unwrapped it, he reached to take the paper from me in order to throw it away. I nearly slapped his hand away! "Don't take that!" I said to him in a rather demanding voice (you know how we crafters get when it comes to pretty paper). "I'm going to use that to make some cards."

He just gave me one of "those" looks and let me have my way. It was my birthday, after all. LOL


I used a pretty, unbranded background die to cut my background pattern and adhered it to a white card base with spray adhesive. Even though the wrapping paper was quite thin, it still worked beautifully. I only wish you could see the metallic shine. The camera really doesn't do it justice.

I added a sentiment on a wavy, die-cut strip, which is popped up on foam tape. Then I decided to add just a tiny pop of color by gluing on some pink and purple sequins. I love the bit of color and sparkle that they add.


On the inside, I matted my computer-generated sentiment with some more of the wrapping paper.

I liked this card so much that I am going to make two more, as I have three aunts that I like to remember on Mother's Day.

Now it's your turn--and you don't even have to upcycle any supplies as I have done. Simply create a card--Mother's Day, birthday, just because--and post it here. The Design Team loves seeing all your amazing creations, and there will be a prize for the winner. Check it all out at Let's Craft and Create!

Thanks so much for stopping by, and remember to laugh--a little or a lot--every day.
Cheryl

Monday, February 3, 2020

Shaker Valentine...


Since I have a jar shaker die and a set of conversation heart dies, I knew I wanted to use them together on the same card.

First, I added a decorative panel to my card base. It was a pre-cut panel--one from a pack of them in assorted colors that I had gotten at the thrift store. I believe they are by David Tutera.

I cut the jar and frame from some pale gray-blue CS. I also cut the frame shape from some Dollar Tree foam board. That's such an easy way to create the space you need for your shaker elements. The clear plastic I used on the front of my jar was cut from an old piece of packaging. I have saved so much plastic packaging over the years that I could make shakers from now until the day I die without using it up!


The conversation hearts were cut from scraps of pastel CS. I really love using up some of my scraps when I'm making cards.

My tiny little tag with the heart cutout is from an older Sizzix/Stephanie Barnard die set of tiny tags and stamps.  I've had it a long time, but I did find that it is still available. Click here for a link, if you're interested.


On the inside of my card, I have a computer-generated sentiment with a heart and flourish stamp below it.

I think you can see that I've added a little sparkle to my heart.


This past weekend we went across the river to St. Paul to see some of the ice sculptures that were entered in a Winter Carnival competition. Yes, we have an outdoor carnival here in the winter, no matter how cold it gets.


This one looks like some sort of arachnid, but I'm not sure what the pole with the half-circle on it is supposed to be.


This, of course, is an eagle perched on a wave catching a fish.

Isn't it amazing what some artists can do with ice? These sculptures were actually not in prime condition because the air temperature had warmed into the 40s, so there was a lot of melting going on. They were still beautiful to look at, though.

Thanks so much for stopping by, and remember to laugh--a little or a lot--every day.
Cheryl