Wish List

Thursday, July 30, 2015

A card made with freebies...

Do you receive Cardmaking & Papercraft magazine? If you do, then you know about the freebie papers and tools that come with each issue. I like to try and use at least some of them right away. There are always several examples to inspire the readers on the inside of the magazine, so I study these for a bit, and then see what I can do that is just a bit different.

A couple of issues ago, the magazine came with these:


I was intrigued by the square embossing folder (it's the only square one I have), so I opted to use it and the birdcage and rose stamps.

Here's what I came up with:

After embossing my cardstock, I sanded the design to make it more visible. I then stamped my birdcage and my sentiment with Versafine ink. Finally, I matted my card front with black CS and added two Spellbinder's corner die-cuts.


There was something about a lone bird in a cage that made me think of a sympathy card. Maybe it's because a caged bird always seems lonely to me - similar to the loneliness one might feel after losing a loved one.

When I die-cut a bird and birdcage, I like to put the bird on the outside of the cage. I always feel better about them having the ability to fly where they wish, I guess.


My siblings and I actually had a pet silver parakeet named Silver (we weren't very imaginative with names!) when we were young. We have photos of ourselves with Silver sitting on our arms. I'm not sure whatever happened to him, but I hope we were always gentle and took good care of him.

 On the inside of my card, I used the rose stamp from the freebie set and stamped it twice with lavender ink. I love adding stamped images on the insides of my cards whenever I can.

Well that's it for me. I have grandkids coming over soon, so I'd best get ready for them.

Thanks so much for stopping by, and remember to laugh--a little or a lot--every day.
Cheryl

Tuesday, July 28, 2015

Whimsical new home card...

I have an old stamp set that features a couple of whimsical houses along with trees, bushes and some indoor furnishings. I'm not sure who made this stamp set, since I have long ago thrown away the wrapper. That was way before I created this blog, and I had no idea I'd want to know those details in the future!

Anyway, I used this set to make this whimsical "new home" card:
The cloud paper in the background came with an issue of Cardmaking & Papercraft. The other papers were just scraps from my stash. The house was stamped with red ink onto kraft paper. The little bushes were also stamped onto kraft, but the tree was stamped with brown ink onto green paper and then inked a bit.


My little house and the bushes on either side are popped up on foam tape.

I also added some Wink of Stella sparkle to the hearts and the windows, and I made a little doorknob with a Viva Décor pearl pen.


For the inside of my card, I created a sentiment with my computer and added another little heart.

My 7-year-old grandson is spending a couple of hours with me today. He's watching an old, old sitcom, "Mr. Ed," while I'm typing this post. Remember that show? Clint Eastwood is the guest star in today's episode. I had forgotten how bad the acting was in some of those shows. I remember thinking they were all great!! I'm sure they were at the time, but, my oh my, how far we've come!

I hope you are having a spectacular week. Thanks so much for stopping by, and remember to laugh--a little or a lot--every day.
Cheryl

Friday, July 24, 2015

Another masculine birthday card...

One of my brothers celebrated a birthday this month, so, of course, I had to make him a card. This particular brother really enjoys a nice glass of wine, so I thought this card would fit him perfectly.

Once again, I used my birthday embossing folder for the background. My sentiment was stamped with individual letter stamps. It's a set that I purchased at a thrift shop, and I think it's called "circus letters." Each letter is very individual and can have lots of additional markings as you see with the "n" and the "e." I didn't worry about getting them in a perfectly straight line. I intentionally wanted them to be a little "off" from one another.

For the inside, I stamped a wine bottle and a glass of wine on vellum, colored them on the backside and paper-pieced the bottle label and the cork.

My sentiment on the inside was computer-generated.

I spent most of my day today volunteering at the St. Paul Scrapbook Expo as a demonstrator for Maria B, the Sizzix lady of itscheaperthantherapy.com. I was showing how to make accordion cards with some of the Karen Burniston Pop It Up Elizabeth Craft dies. It was so much fun to talk with all of the Expo participants and to see all of the merchandise displayed in the booths. Talk about sensory overload! Wow! I wanted at least one of everything, but restrained myself and only bought a couple of small items. I did have time to take part in one make and take, which was a lot of fun.

I'm looking forward to going back tomorrow and demonstrating some more. I'm not sure if I'll be showing how to use the same dies or will be moving on to something else. I know I'll enjoy it, whatever my assignment. Maria is a crafting rock star and a super person to work with, so I consider this a privilege. If you're at the Expo tomorrow, please stop by the booth and say hi!

Thanks so much for stopping by my blog today, and remember to laugh--a little or a lot--every day.
Cheryl

Tuesday, July 21, 2015

Happy birthday banner makes a quick card...

At the same time that I bought the Thank You banner that I featured in this post, I also bought the Birthday banner. I love having these on hand to make quick cards when I need them. I think they add a nice embellishment that looks quite professional.

On this card you can see that I glued a piece of black and white baker's twin along the edge of my banner and added a few coordinating enamel dots. The "Happy" was stamped from one of my random birthday stamps (identifying wrappers were lost long ago!).


Here you can see how I've curled the ends of my fishtail banners up slightly. I'm sure they'll get flattened in the mail, but at least I tried to add this little bit of dimension.

If you look closely, you can also see that I've inked around the edges of my banners.


I decided to decorate both the top and bottom of the inside of this card. I think it adds some interest and makes the card a bit more special.


The sentiment on the inside is from a Fiskars birthday stamp set.

I will probably be sharing quite a few more birthday cards during the next couple of months. My family has a TON of summer birthdays. I can hardly keep up!


I asked my 7-year-old grandson tonight what he would order to eat at a restaurant if he could have anything in the world. Here is his menu of choice: Cheese pizza, garlic cheese bread, banana bread, a big sundae, a glass of apple juice and a glass of chocolate milk. This little guy has obviously contracted the family condition of carboholism. We all seem to love our carbohydrates, and some of us older family members have the thighs to prove it!

Thanks so much for stopping by, and remember to laugh--a little or a lot--every day.
Cheryl

Friday, July 17, 2015

A pretty bouquet of roses...

I recently went to a yard sale where someone was selling ALL their crafting supplies - all their stamps, paper, Cricut cartridges, their Cricut, Zutter Bind-It-All and numerous other items. I had a great time shopping at this sale. Many, many of the stamps were from Stampin' Up. One of them was a beautiful rose stamp that I have used for the following cards:

The stamp that I used for the envelopes and the inside of each card came with an issue of Cardmaking & Papercraft.


Here's a little closer look at the stamp on the envelopes. I stamped off before stamping on each of them so as to make more of a watermark, rather than a detailed image.


I first heat-embossed my roses onto watercolor paper, using Versamark ink and white embossing powder. Once that was done, I used a couple different colors of Tim Holtz Distress Ink for each rose and simple blended them as best I could.

For my leaves, I used an old Cuttlebug die. Once they were cut out, I added some dry-embossed lines by putting the leaf on a sheet of fun foam and then drawing the veins onto the leaf with a stylus. I thought this gave them some nice dimension.

This purple rose is one of my favorites. I used Broken China and Dusty Concord Distress Inks for this one. You've probably noticed by now that each card has a different sentiment.

Once each rose was properly embossed, colored and fussy-cut, I sprayed them all with Tattered Angels Glimmer Mist to give them just a little sparkle. The pictures really don't capture it, but it is so pretty IRL.

Here's a little peek at the inside of each card:


This get well card is the only one I left blank inside. I don't have a sentiment stamp that would work, and I felt that a personal, hand-written message would be best anyway.


Here's one last peek at my little "bouquet of roses." I had so much fun making these cards. I think they would make a nice set to give away as a gift.

Thanks so much for stopping by, and remember to laugh--a little or a lot--every day.
Cheryl

Tuesday, July 14, 2015

Happy Birthday to my awesome husband...

July 15 is my husband's birthday, so of course I had to make him a card.

This card is made with "manly" colors of cardstock and is very simply designed--something I think most men appreciate. I used the Cuttlebug "Happy Birthday" embossing folder for my background. My sentiment was computer-generated, and my only embellishments are the four self-adhesive chrome dots.

When I make cards for my husband, I always feel that the message is the most important aspect.

I really believe that he is A.W.E.S.O.M.E. He is patient, kind, compassionate, hard-working, fun, adventurous, generous, smart, handsome, and I am so thankful he is married to ME!

Happy birthday, Love, and many, many happy returns! I need you around for a very long time.

Since this card fits so nicely into Challenge #79-No Designer Paper on the Cardz 4 Guyz Challenge Blog, I thought I'd enter it as a contender.

Thanks so much for stopping by, and remember to laugh--a little or a lot--every day.
Cheryl

Saturday, July 11, 2015

Happy birthday to my beautiful twins...

Today is the birthday of my beautiful twin daughters. They will spend it together for the first time in many years, as they live 1,000 miles apart. I'm excited for them to have this chance to be together again. They are identical twins and very much alike in so many ways.

When their older sister got married in Vermont, they lived in different parts of the country and traveled separately to the wedding. They had not discussed what they were going to wear, but when they arrived in Vermont, they discovered that they had both purchased the SAME DRESS, just in different colors.

When they were small, they often got into trouble together. We were lucky to live on a circular street with all the homes on the outside and a huge area in the center where all the neighborhood kids played together. The kids were in and out of our home and the neighbors' homes and everyone watched everyone else's kids. Well. My twins went into a neighbor's home one day when this particular neighbor was sleeping. They were quite small - between 2 1/2 and 3 1/2. They climbed onto her countertop, found her sugar, dumped it out onto the countertop and were eating it by licking their fingers and dipping them into the sugar. What a mess! My wonderful neighbor was SO very understanding and didn't even scold them when she walked in on them.  I certainly did, though, when I found out about it!!

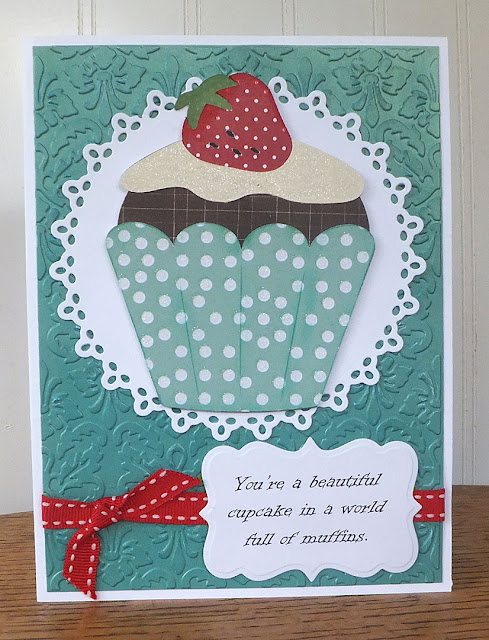
Here are the cards I made for my fabulous twins who are now beautiful women with children of their own (Watch out girls, what goes around comes around!):

I used the "Love you a latte" cartridge to cut out this pretty cupcake. The doily and the sentiment label are Lifestyle Crafts dies.

 I saw this fun sentiment somewhere online and thought it would be perfect. I wish I could remember where I found it so I could give proper credit.

The red stitched ribbon behind it is from my messy stash of ribbons.


I actually didn't use one of the layers for this cupcake. The image came with two sections of the cupcake wrapper that could be cut from different cardstock. I wanted to use just this glittery dotted CS, so didn't bother with that final layer. I did ink around the edges a bit, though, as well as in the vertical cuts between the scallops.

Oh, yes, the teal CS behind my image has been embossed with a folder called Kassie's Brocade by Cuttlebug.


On the inside of my card I stamped a little cupcake and added a computer-generated sentiment.


This is the card for my younger (by 11 minutes) twin daughter. She lives in Portland, Oregon, a city that KNOWS its coffee!! I probably should have thought of a cooler theme for her card, since they've been having a mahoosive heat wave there, but I love this cup from the "Love you a latte" cartridge and had to use it.

Do you see the sparkle on the steam rising out of the coffee cup?  After cutting the pieces, I "winked" them with my Wink of Stella glitter brush. LOVE that thing! I'm wishing I had more colors of those glitter brushes now.


I have a Fiskars stamp set of coffee-themed images, so I just had to stamp a similar cup onto the envelope, too. I thought it turned out so cute. I "winked" that steam, as well!


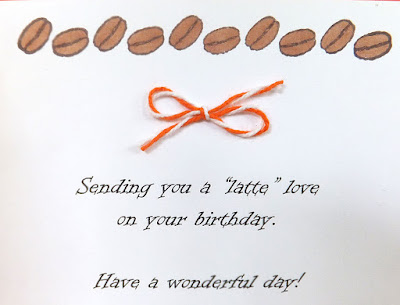
On the inside of this card, I stamped a row of coffee  beans in dark brown ink and then colored them with a medium brown ProMarker.

Since I had a little piece of orange and white twine left after trimming back what I used on the front, I tied a little bow and added it here.

I really love the details I was able to add to the inside of this card.


My sentiment on this card was also computer-generated.

HAPPY BIRTHDAY, GIRLS, AND HAVE A FANTABULOUS YEAR! I LOVE YOU TO THE MOON AND BACK AND MISS YOU EVERY DAY!

Well, that's it for me today. Thanks so much for stopping by, and remember to laugh--a little or a lot--every day.
Cheryl

Tuesday, July 7, 2015

A pastel Christmas card...

I was inspired by challenge #84 on the Crimbo Crackers challenge blog to create a Christmas card using pastel colors. I love the look of pastel holiday cards, so I thought it would be a great idea to create some for my family to send out this year.

I decided on pink as my pastel color of choice--mostly because I had some pink vellum that I really wanted to use. You can see my creation in the photo above, and I LOVE how it turned out. It's actually even prettier IRL.


I tried to get an angled shot where you could see the embossing a little better. Not sure I succeeded!

I used a pale pink cardstock for my mat that perfectly matches my pink vellum strip.


I heat-embossed the word Noel on my vellum with some sparkly silver embossing powder. It is so sparkly and pretty! I added a little gem on either end to frame my sentiment.

The vellum strip is folded over my embossed mat on either end and secured onto the back of it with tape. I also added some double-sided tape on the backside of the "Noel" where it wouldn't show.

I kept the inside of my card pretty simple. Once again I heat embossed the sentiment with my sparkly silver embossing powder.

I also punched three little snowflakes from white cardstock and glued them around my sentiment.

A pink mat sets it all off, and my card is done!

I'm also entering this card into Winter Wonderland's challenge--all that glitters.

I hope you like my pastel Christmas card as much as I do.

Thanks so much for stopping by, and remember to laugh--a little or a lot--every day.
Cheryl

Sunday, July 5, 2015

Let's Craft & Create: Challenge #103 - Butterflies or Birds

First of all, I want to wish a belated happy Independence Day to all my U.S. readers!

Now, on to the new challenge over on Let's Craft & Create. The Design Team has been asked to create some inspirational projects with a "Butterflies or Birds" theme. I decided to make one of those cute little totes filled with cards that are so popular right now. I thought it would be the perfect little gift for a friend who is currently living in a nursing home due to some health issues.

This is my little tote. I had so much fun making it!

I created my own dimensions as I wanted the A2 cards to fit well inside the base of my tote and not stick up too far at the top. I started with a piece of cardstock that was 2 1/2" X 7" and scored it at 1/2" on all sides. I created a little box-like base with this piece.

Then I cut two pieces of patterned cardstock that were 4" X 8". Using a strong double-sided tape, I adhered these pieces to my base, making sure they were flush at the bottom and that the overlap would be at the center of each narrow end. The trim piece at the bottom was punched with a Martha Stewart Doily Lace punch.

The handles were made with 1" X 12" pieces of cardstock, folded in half and adhered together except for 1" at both ends. I rounded the corners on the ends and attached them to my tote with brads.

The pale pink trim piece around the top edge of my tote is just a couple of 1" X 8" pieces of cardstock folded in half and adhered to the tote around the edge to finish it.


In this picture you can see how my top trim piece fits over the top edge and finishes both the inside and the outside.

After I attached the handle with brads, I covered the prongs of the brads with little circles of cardstock. If you click on the photo and look closely, you'll see them.

I actually made my envelopes, too, with my envelope punch board and stamped each one with a couple of butterflies.


My flowers were made using the Spellbinders Die D-lites Blooms 3 dies and a tiny star punch for the centers. The foliage beneath is a combination of dies and punches and the butterflies were made with a Martha Stewart punch.


All of my cards (and my tote) were made with papers from the Essentials paper pad by Martha Stewart. I decided to use "thinking of you" as my sentiment on all the cards. Then they could be used for any occasion and personalized with a note inside.


I used the same flower on all my cards and adhered it to a couple of circle die-cuts (Sizzix).


The strips of cardstock that hold my sentiment were embossed with the Swiss Dots folder after they had been stamped.


I hope you enjoyed my project today.

Why not join our challenge with your own Butterflies or Birds project?  You can link your project here to join in on the fun.

Need a little more FANTASTIC inspiration? Check out the Design Team's projects by clicking on the links below. YOU'LL BE GLAD YOU DID!
Thanks so much for stopping by, and remember to laugh--a little or a lot--every day.
Cheryl

Wednesday, July 1, 2015

Corner fold Christmas cards...

I am really taken with the corner fold card! I couldn't help but try it out on a couple of Christmas cards.

The first card I made has a stamped image as the focal point.


I have had this image for quite a while and never used it, so I was glad to see it down on cardstock!


I colored it with my ProMarkers and added some Wink of Stella (clear) to the flames and centers of the poinsettias. It doesn't show in this photo, but it adds a nice glimmer IRL.

I also dotted the background of my image with a pale aqua ProMarker to add a little texture and to tie in with the accent color on my red card.


The fancy frame was cut with a Spellbinders Marvelous Squares die and the sentiment label was cut with a Spellbinders Fancy Tags die. My "ribbon" is actually just a piece of embossed cardstock.


The inside of my card was decorated with a couple of holly leaves and some berries, made with my red Viva Décor pen.

I'm entering this card into Merry Monday's challenge #165 - Candles and Flowers.


Once again, I used the corner fold technique on my next card.

For this card I used an old Sizzix die for the dove and a Cheery Lynn Holly Flourish die for the holly sprigs.


I heat-embossed a few tiny snowflakes on my background and dry-embossed a snowflake onto my dove's wing. I also inked around my image and added a tiny gem for the eye.

Can you see the teeny weeny berries on the sprig of holly? Those were made (very carefully) with my Viva Décor pen.


The sentiment was cut with another old Sizzix die that I have had for ages and ages. In fact, I think it's getting a little dull, because it was hard to get a good cut. I finally folded up several layers of tin foil and put it between the cardstock and my cutting plate, and only then was I able to get a successful cut.


I think I'll be making a few more cards with this special fold for Christmas. It's easy to adapt to different sized cards and is so easy to execute.

For a great video on making this type of card, visit Dawn's Stamping Thoughts.


For the inside of this card, I used a left over sprig of holly and added a few more tiny berries.

I'm entering this card into Winter Wonderland's More Than One Fold challenge.


I hope you enjoyed my two "Christmas in July" cards. I actually have about 60 Christmas cards completed now. Only 25 or so to go!!

Thanks so much for stopping by, and remember to laugh--a little or a lot--every day.
Cheryl