Wish List

Thursday, January 31, 2013

Happy Birthday, Cupcake...

I have a beautiful granddaughter who just turned 5 years old on January 30. She is smart, polite and a caring friend to her classmates. I only wish we could spend time with her a lot more often. She lives on the West Coast and we are in (freezing cold) Minneapolis.

Here she is having fun with one of her birthday presents - a Play-Doh cake-making set:

 
I wanted to make her a special birthday card that was a reflection of her sweet nature. I decided to use cupcakes - specifically, the cupcake image on the CTMH Art Philosophy cartridge.
 
Isn't this a sweet-looking cupcake?  I had some red-on-red raised-dot paper that I used for the strawberry. I thought it was the perfect paper because it added some realistic texture to the berry.  I embossed the frosting with the Divine Swirls embossing folder and used my scoreboard to add lines to the cupcake wrapper.  I inked the edges of all the various pieces on each panel to give it all a little more realistic dimension.
The interesting aspect (I think) of this card is that it is a tri-fold card. I used my Gypsy to weld together three cupcake images to form the card base. One of the images had to be flipped horizontally before it was welded so that it would match the other two when folded.

Here are a couple of views that show you the different panels of the card and how it was folded. I decorated each cupcake a little differently, including different "frostings" and cake and wrapper colors.
 The details were fun to add, but definitely made this a very thick card. It most certainly would have taken extra postage, but I ws able to include it in a package of other items.
.
Instead of leaving room on the card for our signature, I simply added a little tag, as you can see in the photo above.
 
Thanks so much for stopping by, and remember to laugh--a little or a lot--every day!
Cheryl


Monday, January 28, 2013

You're the best...

I purchased another set of Penny Black clear stamps awhile ago but hadn't gotten around to using them until now. The set is called "Critter Party" and this little guy is one of the stars of the set.


He was quick and easy to color with my ProMarkers. I added a little shadow beneath his feet to ground him.
 
Here's the card that I made with this fun image:

It's definitely a simple design--in retrospect, I could have added some more embellishment or even some light blue shading on all that white space around the image. I still like the simple design, however, and this card will come in handy as a thank you card or even a congratulations card for someone who has achieved something significant. It's so satisfying to put together simple cards like this one.

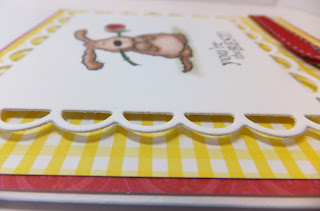
I popped the scalloped square up on foam tape. You can see the dimension a little foam tape adds in the photo at left.
For beginners in coloring with alcohol markers (like me), I think Penny Black images are ideal. They're fun, smaller images on which you can practice shading and detail. Give them a try, if you haven't already. I ordered my two sets (Betsy Bluebell and Critter Party) online from Joann.com when they were 50% off and I had a coupon for free shipping. Now I only  wish I had gotten more.
 
Thanks for stopping by, and remember to laugh--a little or a lot--every day.
Cheryl

Friday, January 25, 2013

Sweet Betsy Bluebell says "feel better soon"...

I love Betsy Bluebell images by Penny Black, and I finally purchased one of these fun sets to play with. Here's one of my first cards:

I colored Betsy with ProMarkers and paper pieced her dress. The pockets and collar on her dress were colored red to match the dots in her dress.

I stamped the image a second time and fussy cut the flowers so I could fill out her bouquet a bit.
I think the extra flowers added lots of dimension and just made a prettier bouquet.  The butterflies' wings were colored in with a glitter pen to give them a bit of sparkle.  I also added some gold liquid pearls to the flower centers.


The image was cut out with a circle die and matted with another red circle. Both of these were centered on a doily that was cut from the same paper as Betsy's dress with a Lifestyle Crafts die.


I'm hoping you can see some of the dimension the extra flowers add to the image in the strangely angled photo on the left. I heat embossed the simple sentiment with some detail white embossing powder. The deep turquoise face of the card was embossed with a Sizzix embossing folder, but only down as far as the narrow red ribbon.
I kept the inside simple so that I would have room to write a personal get well message. Once again I used the same paper as I had used for Betsy's dress, decorating the corners with a Martha Stewart corner punch.
Thanks for stopping by today, and remember to laugh--a little or a lot--every day!
Cheryl
 

Monday, January 21, 2013

At last, a valentine card to share...

It's about time! I finally finished my first valentine and can share it with you today.
This sweet little koala bear was cut at 2 1/2" from the Create a Critter 2 cartridge. I inked all the layers to give her a little better definition.  I even added some rosy cheeks!  I also stamped XO onto the heart and heat embossed it with some red embossing powder. Diamond Glaze was added to the nose, an adhesive-backed gem to the bow, and some black dimensional paint to the eyes.

The pink-stripe doily in the background was cut with a Lifestyle Crafts doily die, and I added some red Liquid Pearls to each scallop of the card base.  Speaking of card base, it was cut from the CTMH - Art Philosophy cartridge at 4".

The koala is popped up on foam tape, as you can see in the picture at left.


The inside was simply decorated with another doily cut and a "Happy Valentine's Day" stamp.
I plan to work on a few more valentines today, so I hope to have more to share with you soon.

Thanks for stopping by, and remember to laugh--a little or a lot--everyday!
Cheryl

Thursday, January 17, 2013

Valentine cards...

My sister has been busy making Valentine's cards--which makes her way ahead of me! I haven't made a single one..

I'm so glad she sent me a couple of photos so I can share her super cute cards with you.
She made this one with a cute little monkey from the Create a Critter 2 cartridge. I told her I may have to steal some of her ideas. I really love how she heat embossed the word "wild," using some pretty pink embossing powder.


She also cut this owl and sentiment from the Create a Critter 2 cartridge. One of my favorite things about this card is that hexagon-patterned paper on the bottom. Love it!

Have you started making your Valentine cards yet? I've got a couple of birthday cards to finish up and then I'll definitely be into red, pink and hearts galore!

Thanks for stopping by today, and remember to laugh--a little or a lot--every day.
Cheryl

Saturday, January 12, 2013

Here comes the judge...

My daughter's father-in-law was elected to serve as a District Judge in North Dakota last November. We are all so pleased, as we are certain he is going to be a tremendous judge and will serve with distinction. We need more public servants like him!

My husband and I were invited to attend his investiture, and we were so very sad that we couldn't go. At that time, we still had a Christmas guest staying with us and we also live 500 miles away.

I certainly wanted to make him a special card, however, to let him know how pleased we were for him.  Here's what I came up with:
I cut the scroll image from some papyrus-like paper (hard to see in this photo) using the Heritage cartridge and inked the edges to give it an aged appearance.  "Judge Greenwood presiding..." was computer-generated.

The ink bottle was also cut from the Heritage cartridge. The cut included a feather quill sitting in the ink bottle. I cut the quill off, punched a tiny hole and then added a real black feather. The tip of the feather was sandwiched between two cuts of the ink bottle, which were adhered together. To make the bottle look a little more realistic, I used a metallic silver pen around the rim and then added some glossy accents.
Both the scroll and the ink bottle were popped up on foam tape. The terra cotta cardstock that I used as the background was embossed with a Sizzix  embossing folder for some added dimension and adhered to a black mat. A black self-adhesive pearl was added to each corner on the front of the card.
 
The inside was kept very simple. The sentiment was added with my computer on the same papyrus-style paper that I used for the scroll. I inked the edges lightly, adhered it to a black mat, and that was it!
 Thanks for stopping by, and remember to laugh--a little or a lot--every day!
Cheryl


Wednesday, January 9, 2013

"Owly" nurse card...

During the last week of December, my brother-in-law had surgery on his shoulder. He's a very lucky man because his wife (my sister) is a practicing registered nurse and an excellent caretaker. I was thinking about what kind of get well card to make for him and decided on this one:
 
Now, my sister is not at all an "owly" person.  She's actually a cheerful, kind and caring person, and that's what made this card kind of funny. I'm sure she has her moments, as we all do, but I haven't seen her in a bad mood in years, maybe decades.
 
I cut the owl and branch from the Hoot 'n' Holler cartridge. The only addition to the cutout is a pair of googly eyes - girly ones with blue eye shadow!  The nurse's cap was cut from the Everyday Paper Dolls cartridge.

The sentiment on the front of the card was computer-generated, cut out with a Sizzix die and popped up on a layer of foam tape..
 
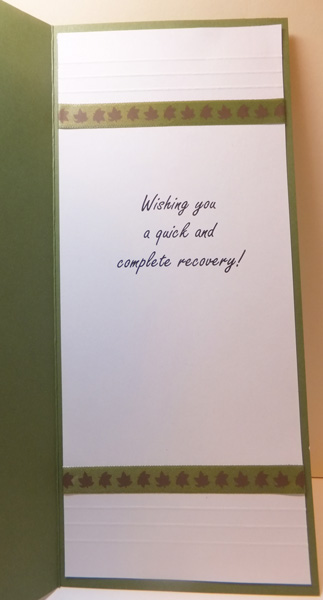
The inside of the card was simply decorated with some scored lines at the top and bottom and two bands of ribbon identical to the ribbon used on the front of the card.
I hope you enjoyed my card today. I had a lot of fun making it.
 
Thanks for stopping by, and remember to laugh--a little or a lot--every day.
Cheryl


Saturday, January 5, 2013

Sympathy in purple..

My stash of  sympathy cards is down to just one card, so I thought I ought to make some more to have on hand. It's doubly hard to make these cards if you have to do it in a hurry, so I always like to have a few done ahead of time.
For this card I used a deep purple cardstock for the base card and the matte behind the scalloped oval. On the matte piece of CS, I stamped a delicate lace border with Versamark ink and then heat embossed it with white detail embossing powder. Doesn't it look like real lace? I just love lacy stamps like these!

The poppy image was stamped with purple Versafine ink onto a lightly speckled white cardstock. I shaded the oval a bit with some of the ink.  Then, I used only a pearl in the center of the poppy and three below the sentiment for embellishments.

I always think that a deep purple, like this one, elicits a feeling of peace and strength. Those are exactly the kinds of feelings I wish to convey to the receiver of a sympathy card, so I think the color works well for this purpose.

The stamped sentiment on the inside of the card also expresses my wishes for strength.


While it's always sad to think we will need these cards, I feel that it is so important to have them on hand.


Thanks for stopping by, and remember to laugh--a little or a lot--every day.
Cheryl


Tuesday, January 1, 2013

A couple more thank you cards...

This card was quick to make, given that the gold/yellow patterned paper came with the narrow pink stripe next to the sparkly green scalloped edge. This was actually a circular piece of DSP, but since I don't do much scrapbooking, I decided to cut it up and use it on a few cards.  I embossed "Thank You" with clear embossing powder and then highlighted it with a little white chalk. It actually shows up much better in real life.

 The flower was from a selection of Martha Stewart flower embellishments I received in one of my Christmas gifts. I added the liquid pearl dots in the center. It matched the pink paper so perfectly!


This next card used some of the same materials. I added a clear self-stick flower border (also from Martha Stewart, also part of a Christmas gift) and stamped "Thank You" on a Spellbinders label shape. I lightly chalked the label with pink chalk and added a bow made from narrow green ribbon.


I decorated the inside of this card with a couple small pieces of the DSP in the corners. I always try to use an entire piece of paper, if at all possible
Thanks so much for stopping by today, and remember to laugh--a little or a lot--every day.
Cheryl